
Critical boot failures on Windows 11 devices often force systems into the Windows Recovery Environment (WinRE), disrupting workflows and requiring time-consuming manual troubleshooting. Quick Machine Recovery (QMR) addresses this challenge by providing an automated, cloud-connected remediation process that detects, diagnoses, and resolves widespread boot issues with minimal user or IT admin intervention.
Overview of Quick Machine Recovery
Quick Machine Recovery streamlines the process of restoring Windows 11 devices that cannot boot due to severe system errors, such as blue screens or infinite reboot loops. When a device repeatedly fails to start, QMR automatically boots into WinRE, connects to the network (Ethernet or WPA/WPA2 Wi-Fi), and communicates diagnostic data to Microsoft. If a known, widespread issue is detected, targeted fixes are delivered directly via Windows Update. This reduces downtime and eliminates the need for physical device access, especially useful in large-scale or remote environments.
Currently, QMR is available to Windows Insiders running Windows 11 version 24H2 in the Beta Channel. On Windows 11 Home, cloud remediation is enabled by default, while Pro and Enterprise editions require manual configuration by IT admins or advanced users.
How Quick Machine Recovery Works
The QMR process consists of several automated phases:
- Boot Failure Detection. The system identifies repeated boot failures and transitions into WinRE.
- Network Connection. WinRE uses preconfigured network credentials to establish connectivity, enabling communication with Microsoft’s cloud services.
- Cloud Diagnostics. Diagnostic crash data is sent to Microsoft, where engineers analyze patterns and prepare remediation packages if a widespread problem is confirmed.
- Automated Remediation. If a suitable fix is found, it is downloaded and applied in WinRE. The system can retry remediation at set intervals if no solution is found initially.
- Automatic Reboot. Once remediation is applied, the device reboots. If the fix is successful, Windows starts normally; otherwise, the device returns to WinRE and repeats the process.
This approach optimizes system resilience and productivity by automating what was previously a manual, error-prone recovery process.
Configuring Quick Machine Recovery Using XML and Command Line
For Windows 11 Pro and Enterprise, QMR is not enabled by default. IT admins or users must configure it by creating an XML settings file and applying it with command-line tools. The following steps outline the process:
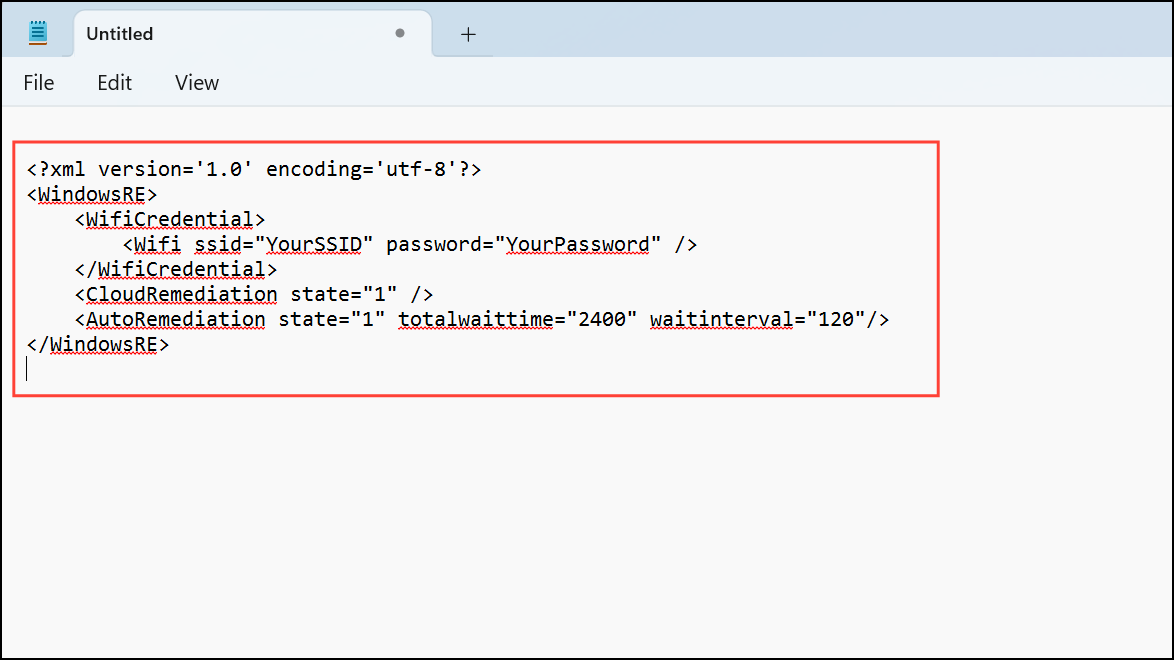
Step 1: Open Notepad or any text editor and create an XML configuration file. Include your Wi-Fi SSID and password if the device uses wireless networking. Set CloudRemediation and AutoRemediation states to 1 to enable both features. Adjust totalwaittime (in minutes) for how long the device waits before rebooting, and waitinterval for how frequently it checks for fixes. For example:
<?xml version='1.0' encoding='utf-8'?>
<WindowsRE>
    <WifiCredential>
        <Wifi ssid="YourSSID" password="YourPassword" />
    </WifiCredential>
    <CloudRemediation state="1" />
    <AutoRemediation state="1" totalwaittime="2400" waitinterval="120"/>
</WindowsRE>
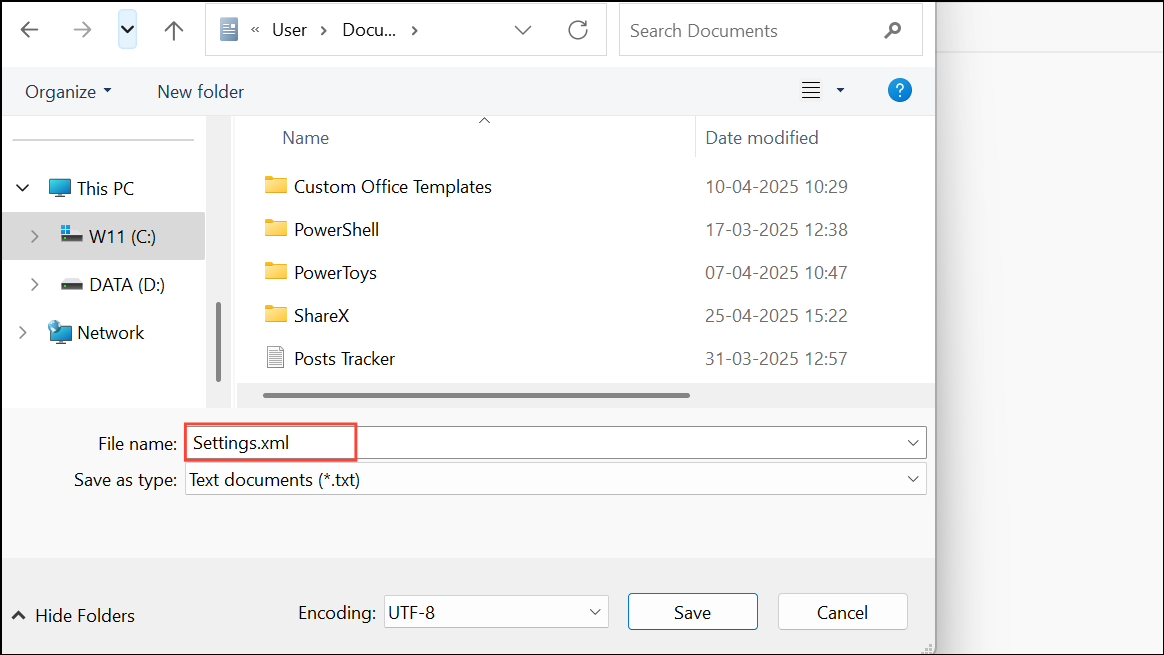
Step 2: Save this file as settings.xml in an accessible directory (e.g., C:\QMR\settings.xml).
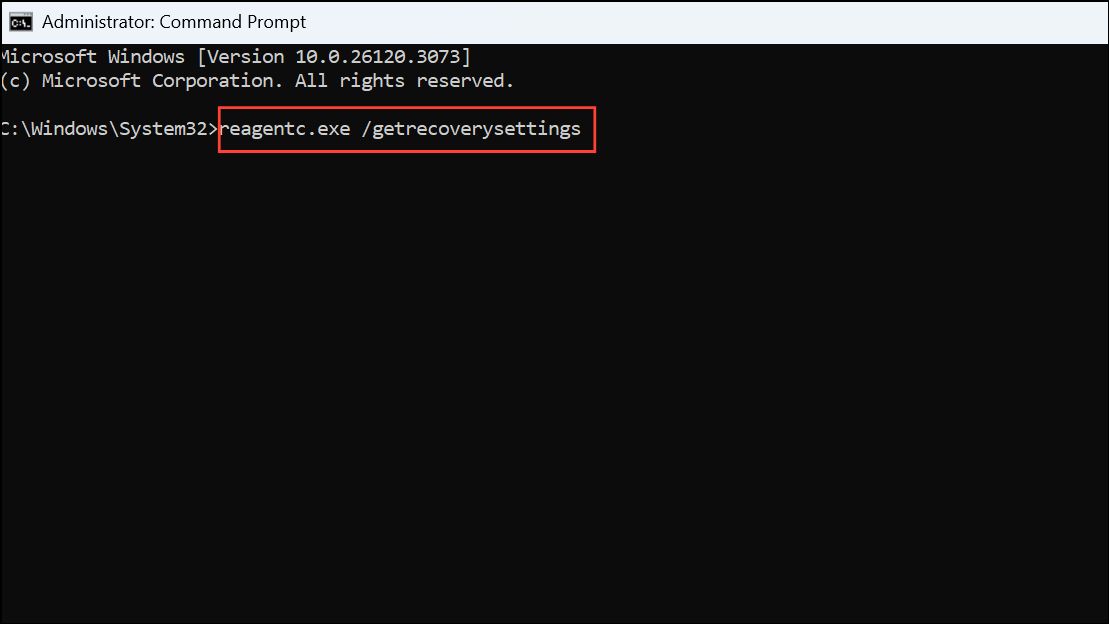
Step 3: Open Command Prompt as administrator. First, verify the current recovery configuration with:
reagentc.exe /getrecoverysettingsThis displays existing network credentials, remediation states, and timing intervals.
Step 4: Apply your new QMR configuration using:
reagentc.exe /setrecoverysettings /path C:\QMR\settings.xmlReplace C:\QMR\settings.xml with your actual file path. Confirm the settings took effect by running reagentc.exe /getrecoverysettings again.

Step 5: To test your configuration without causing an actual system failure, enable QMR’s test mode with:
reagentc.exe /SetRecoveryTestmode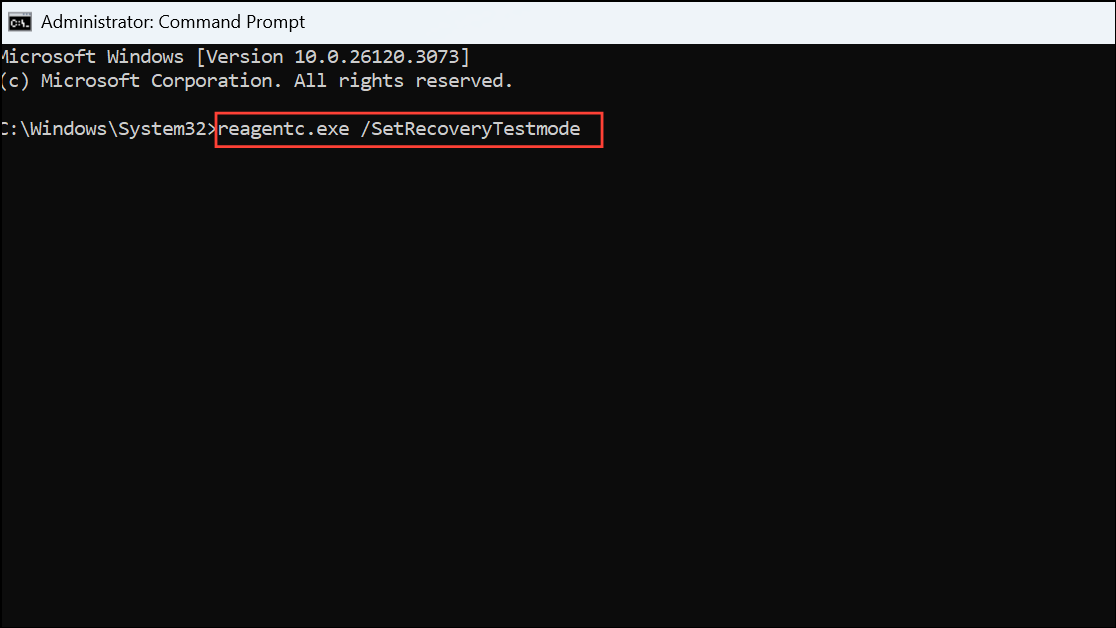
Then, instruct Windows to boot into WinRE on the next restart:
reagentc.exe /BootToRe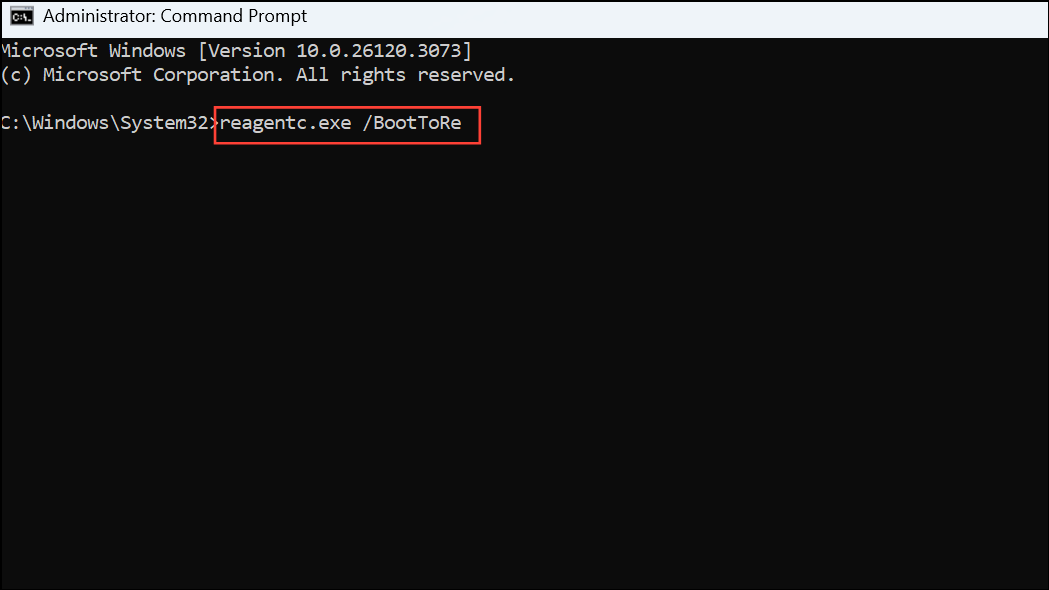
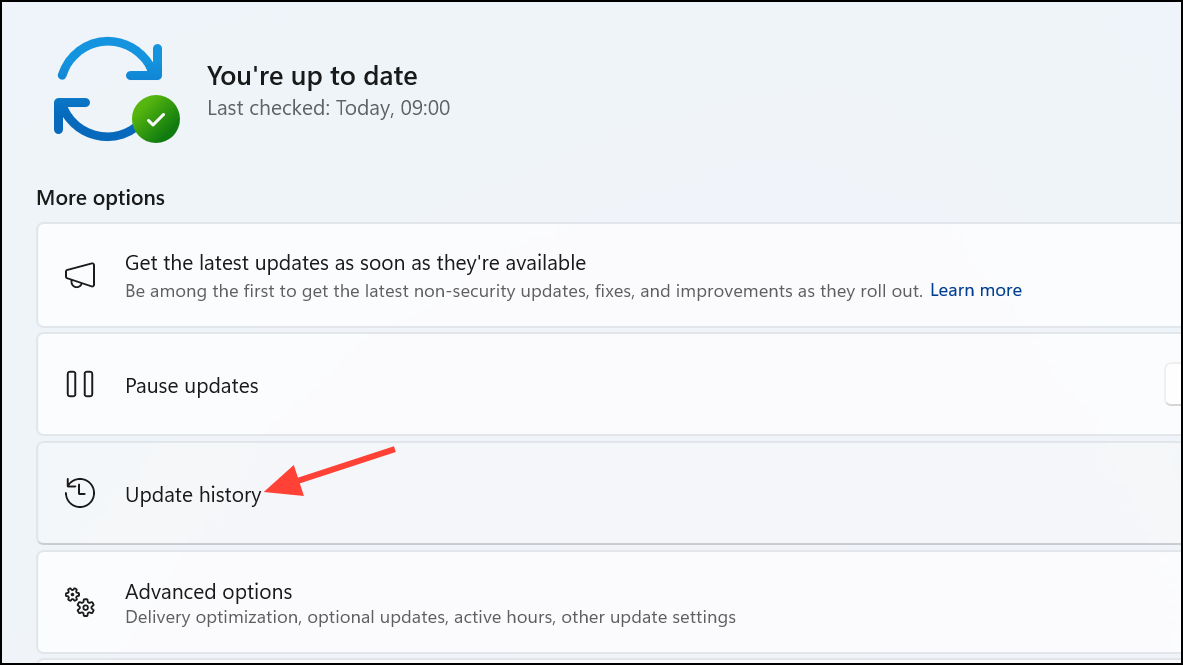
Reboot the device. The system will simulate a crash, run through the QMR process, and reboot normally if successful. You can verify remediation in Settings > Windows Update > Update history.
Step 6: To remove QMR settings, use:
reagentc.exe /clearrecoverysettings
To disable QMR entirely, run:
reagentc.exe /disable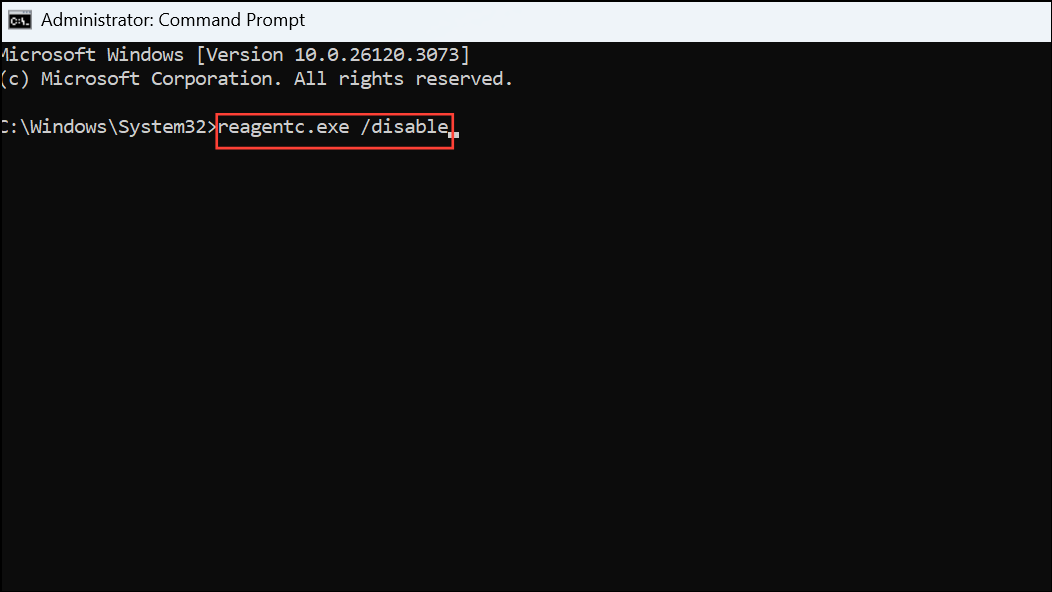
Configuring Quick Machine Recovery with Microsoft Intune
For organizations managing devices at scale, Microsoft Intune offers a streamlined way to deploy QMR settings remotely using custom configuration profiles and OMA-URI policies.
Step 1: Ensure devices are running Windows 11 24H2 Insider Preview and enrolled in Intune with network connectivity.
Step 2: In the Microsoft Endpoint Manager Admin Center, create a new configuration profile for Windows 10 and later, selecting the "Custom" profile type.
Step 3: Add the following OMA-URI settings for QMR:
- Enable Cloud Remediation:
./Device/Vendor/MSFT/RemoteRemediation/CloudRemediationSettings/EnableCloudRemediation(Boolean,True). - Enable Auto Remediation:
./Device/Vendor/MSFT/RemoteRemediation/CloudRemediationSettings/AutoRemediationSettings/EnableAutoRemediation(Boolean,True). - Set Retry Interval:
./Device/Vendor/MSFT/RemoteRemediation/CloudRemediationSettings/AutoRemediationSettings/SetRetryInterval(Integer, e.g.,30for 30 minutes). - Set Time to Reboot:
./Device/Vendor/MSFT/RemoteRemediation/CloudRemediationSettings/AutoRemediationSettings/SetTimeToReboot(Integer, e.g.,4320for 72 hours).
Step 4: For laptops or Wi-Fi-dependent devices, preconfigure Wi-Fi credentials:
- Wi-Fi SSID:
./Device/Vendor/MSFT/RemoteRemediation/CloudRemediationSettings/NetworkSettings/NetworkCredentials/NetworkSSID(String). - Wi-Fi Password:
./Device/Vendor/MSFT/RemoteRemediation/CloudRemediationSettings/NetworkSettings/NetworkCredentials/NetworkPassword(String or Secret).
Step 5: Assign the configuration profile to target device groups in Intune.
Step 6: On managed devices, confirm QMR settings by running reagentc.exe /getrecoverysettings in an elevated Command Prompt.
Step 7: Test the configuration as described in the previous method, using QMR’s test mode and WinRE boot commands.
Key Considerations and Limitations
QMR requires reliable network connectivity during WinRE operations. Only WPA/WPA2 Personal Wi-Fi and Ethernet are supported in the current preview. The system is best suited for addressing issues that Microsoft can identify and remediate at scale. QMR does not replace comprehensive backup or imaging strategies, and is a best-effort feature—some failures may require manual intervention.
IT admins can fine-tune retry intervals and reboot timeouts to balance remediation attempts with operational needs. Test mode allows validation of configurations before deploying to production environments, reducing the risk of misconfigured recovery workflows.
Quick Machine Recovery offers a powerful solution for minimizing downtime and simplifying boot issue resolution on Windows 11. By automating diagnosis and remediation, it streamlines recovery for both end users and IT teams, especially in large or distributed environments.