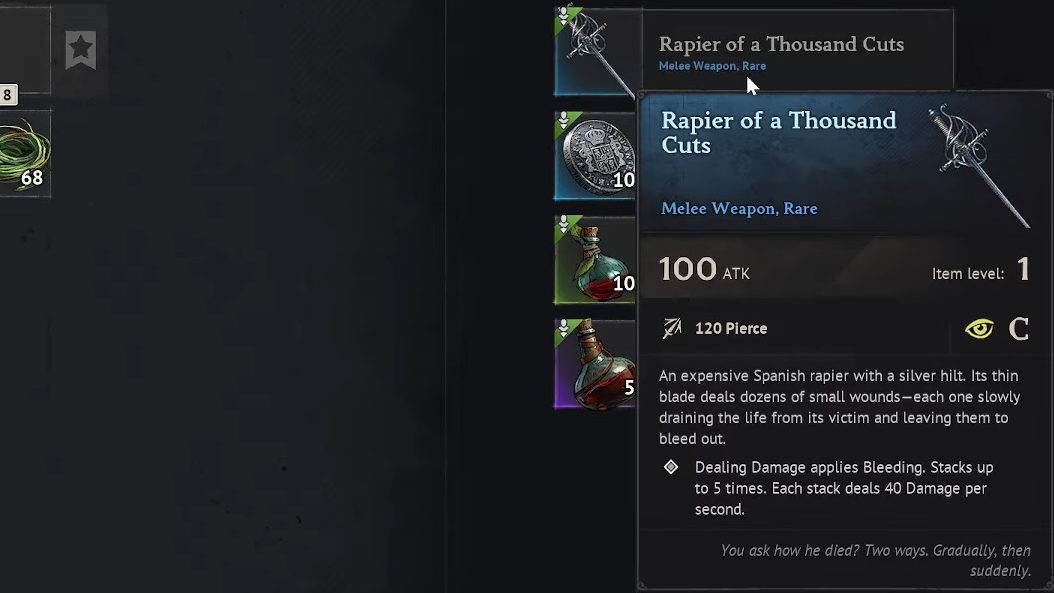
The Rapier of a Thousand Cuts is the signature bleed weapon in Windrose, a one-handed Pierce rapier that scales with Precision and applies stacking Bleeding damage on every hit. It sits at Item Level 15, pushes 380 ATK at cap, and is the default melee pick for any Precision-focused build pairing a rapier with a pistol.
Quick answer: Loot it from Blackbeard Crew Chests, Old Skeleton piles, Smugglers’ Chests, Buccaneers’ Chests, Decrepit Chests, and Thomas Richards’ Chest at pirate camps, shipwrecks, and ancient ruins in the starting region (roughly 20% drop chance per chest), or pick it up during the Underground Network questline. Once it enters your inventory, the blueprint unlocks for crafting at a Weaponsmith Workshop.
Core stats and scaling
The weapon’s raw numbers are modest for its class, but the bleed payload is what carries it. Rapiers in Windrose are one-handed Pierce weapons tied to Precision, the same stat that scales Pistols and Muskets, which is why the rapier plus pistol combo is the canonical Precision loadout.
| Field | Value |
|---|---|
| Weapon class | Rapier (1H melee) |
| Damage type | Pierce |
| Scaling stat | Precision (C at Rare, B at Epic) |
| Base damage | 125 Pierce |
| ATK at Level 1 | 100 |
| ATK at Item Level 15 | 380 |
| Available rarities | Rare, Epic |
The scaling letter on a weapon (C through S) reflects how aggressively it converts the tied stat into damage. Community testing suggests offensive stats soft-cap hard at 20 points, after which extra investment gives diminishing returns, so stacking Precision past 20 through food and gear buffs is the practical way to push this rapier’s output.
Bleed effect and Epic ascension
Every hit applies a Bleeding stack to the target. Stacks cap at 5, and each stack deals 25 damage per second. Reaching the cap is more important than any other priority on a target, because both the damage and the Epic-tier healing scale directly with active stack count.
| Tier | Effect |
|---|---|
| Rare | Dealing damage applies Bleeding. Stacks up to 5 times. Each stack deals 25 damage per second. |
| Epic (adds) | Bleed damage dealt while holding this weapon restores Temporal Health. |
The Epic line only fires while the rapier is held in the main hand. Swap to another weapon, and the bleed ticks still damage the target, but the Temporal Health return stops. That single rule decides whether the rapier is a sustain anchor or a setup tool in your build.
Where to find it
The rapier is a random chest drop, not a fixed quest reward, which is why some players pull it on the first island, and others only see it after the second boss. The loot table covers multiple chest types across the starting region, each with a 20% roll chance per chest opened.
| Chest source | Location examples | Chance |
|---|---|---|
| Blackbeard Crew Chest | Blackbeard Pirate Camp, Cliffside Pirate Camp, Large Pirate Camp, Small Pirate Camp, Blackbeard Camp Near Shipwreck | 20% |
| Thomas Richards’ Chest | Blackbeard Pirate Camp | 20% |
| Buccaneers’ Chest | Abandoned Buccaneer Camp | 20% |
| Smugglers’ Chest | Smuggler’s Cache | 20% |
| Decrepit Chest | Pirate Remains, Shipwreck | 20% |
| Old Skeleton | Ancient Farm, Ancient Fire Sanctuary, Destroyed Buccaneer Fort, Jungle Cave | 20% |
There are two semi-reliable shortcuts. A buried chest at the first Traveller’s Camp on the Exquemelin trail — the camp with the red cloth tied to a tree — can hold the rapier, and the Underground Network questline has dropped it as part of progression. Neither is a guaranteed source on every world because archipelagos are procedurally generated, so POI placement shifts between saves.
Because the item is tradeable, many players also touch-trade in co-op: once the rapier enters your inventory even briefly, the crafting blueprint unlocks permanently, and you can drop it back to the original owner.

Crafting and upgrade costs
The base recipe is cheap, which makes the rapier easy to keep at level as you move between regions. What changes is the metal tier required as the weapon levels up, mirroring the station tier you need.
| Weapon level | Station | Materials |
|---|---|---|
| 1–5 | Weaponsmith Workshop Lv 1 | Copper Ingot ×7, Rough Hide ×2 |
| 6 | Weaponsmith Workshop Lv 2 | Foothills Iron Ingot ×4, Rough Hide ×1, Smithing Flux ×3 |
| 7–10 | Weaponsmith Workshop Lv 2 | Foothills Iron Ingot ×7, Rough Hide ×2, Smithing Flux ×3 |
| 11 | Weaponsmith Workshop Lv 3 | Mire Metal Ingot ×4, Crocodile Hide Piece ×1, Smithing Flux ×3 |
| 12–15 | Weaponsmith Workshop Lv 3 | Mire Metal Ingot ×7, Crocodile Hide Piece ×2, Smithing Flux ×3 |
| Ascend to Epic | Weaponsmith Workshop Lv 1+ | Rapier of a Thousand Cuts ×1, Tumbaga Ingot ×7 |
How to play it
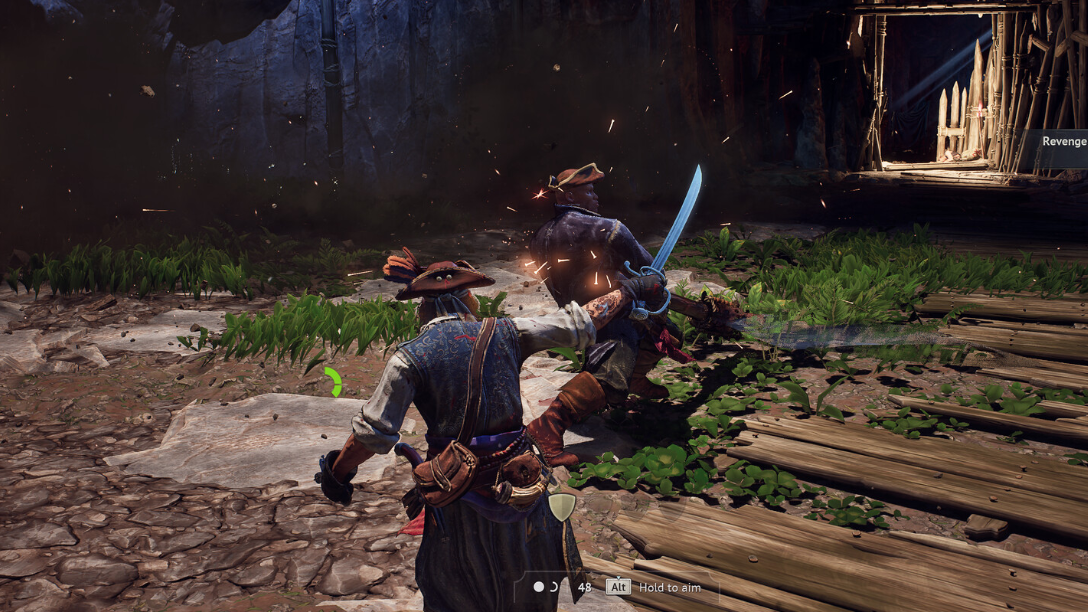
Rapier combat in Windrose rewards thrust-first patterns over wide swings. Stay close enough for light attacks to connect, but not so close that enemy telegraphs clip you mid-combo. The goal on any new target is the same: land hits fast until all five bleed stacks are applied, then let the damage-over-time do the work while you create space.
The strongest pairing is a Pistol in the off-hand. Both weapons scale with Precision, so every attribute point goes to one stat. Pistols reload passively while you swing the rapier, so the loop becomes: stack bleed with the rapier, dodge back, fire a headshot for a guaranteed critical, return to melee while the pistol reloads itself. Reliable Pistol (three shots before reload) and Drake’s Double-Barreled Pistol (two quick shots, plus a Vulnerability debuff at Epic) are the two obvious partners.
Rare-tier weapon swap alternative
If you don’t have the Tumbaga Ingots to ascend yet, the Rare-tier rapier is still useful as a setup weapon rather than a main. The pattern: apply five bleed stacks with the Rapier of a Thousand Cuts, then swap to a higher-base-damage rapier like the Sturdy Rapier (215 Pierce base at Rare) for the rest of the fight. Bleed stacks continue ticking regardless of what is held, so you keep the damage-over-time while gaining raw per-swing damage.
This swap trick only works at Rare tier. Once you ascend to Epic, switching weapons breaks the Temporal Health return, which is usually the main reason to run this rapier at all. Commit to one mode or the other based on whether you need sustain or raw damage.
How it compares to other rapiers
| Rapier | Rarity | Base damage | Scaling | Effect |
|---|---|---|---|---|
| Rapier | Uncommon | 205 Pierce | Precision (B) | No passive |
| Rapier of a Thousand Cuts | Rare / Epic | 125 Pierce | Precision (C/B) | 5-stack Bleed; Temporal Health return at Epic |
| Rapier of Devastation | Rare / Epic | 210 Pierce | Precision (-/B) | Plague marks; heavy attack detonation and heal at Epic |
| Sturdy Rapier | Rare / Epic | 215 Pierce | Precision (A/S) | Wider Perfect Block window; +20% crit damage at Epic |
The Thousand Cuts trades base damage for damage-over-time and sustain. The Sturdy Rapier hits harder per swing and has the best scaling letter in the class, but has no self-heal. For Precision builds that want to tank through long boss fights, the Epic Thousand Cuts is the pick. For burst-oriented rapier play with Perfect Block mechanics, Sturdy Rapier wins.
The rapier works. It’s not the highest per-hit damage in its class, and early reports that it “feels weak” usually come from players comparing Rare-tier Thousand Cuts to Rare-tier weapons that have higher base numbers. The weapon is balanced around its Epic line and its ability to keep bleeding multiple enemies at once, so judge it at cap with five stacks running, not on the first swing.