
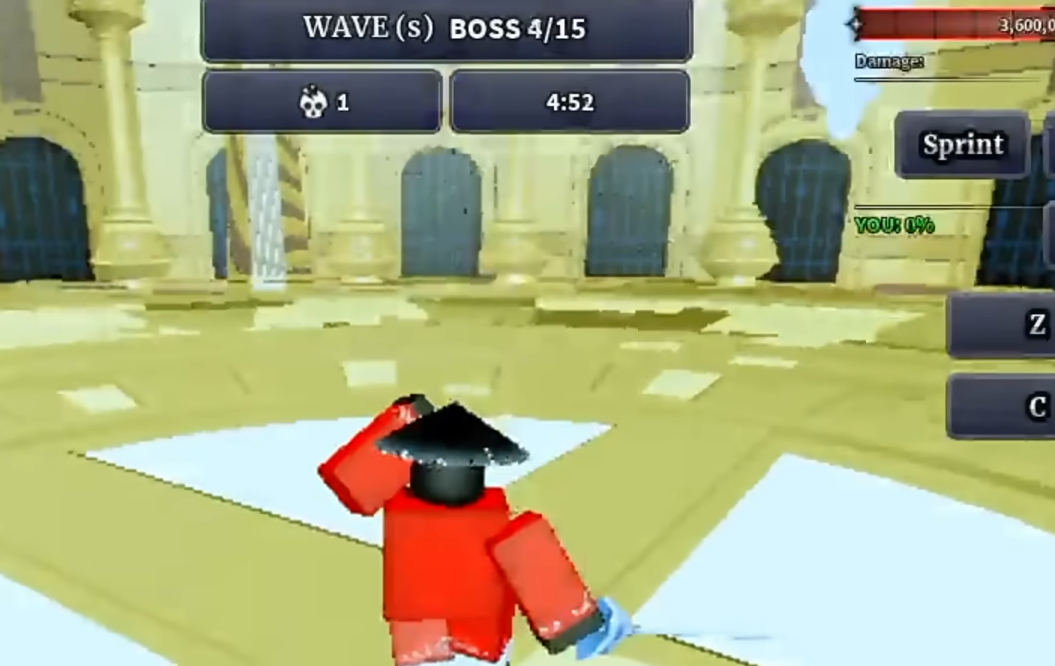
Boss Rush is the endgame gauntlet on Sailor Island in Roblox’s Sailor Piece. Players burn a Rush Key, pick a difficulty, and fight through 15 waves of world bosses inside a five-minute timer. Clearing runs pays out Rush Coins, which feed both a dedicated shop and a set of permanent stat upgrades.
Entering Boss Rush on Sailor Island
The mode runs out of a single NPC on Sailor Island, recognizable by the white kitten perched on its shoulder. The NPC sits next to the leaderboards on the right flank of the boss building. Interacting opens a portal behind them that stays active for 30 seconds once someone enters, and despawns after three minutes if left alone. Up to three players can join a single run.

Run rules and the 10% damage gate
Each run is a 15-wave gauntlet with a global 300-second timer. Bosses that spawn include Manipulator, Madoka, and Escanor, with Escanor reserved for wave 15 on every difficulty. In multiplayer, wave HP scales up roughly 55% per additional player inside the dungeon, so duos and trios fight a much larger pool.
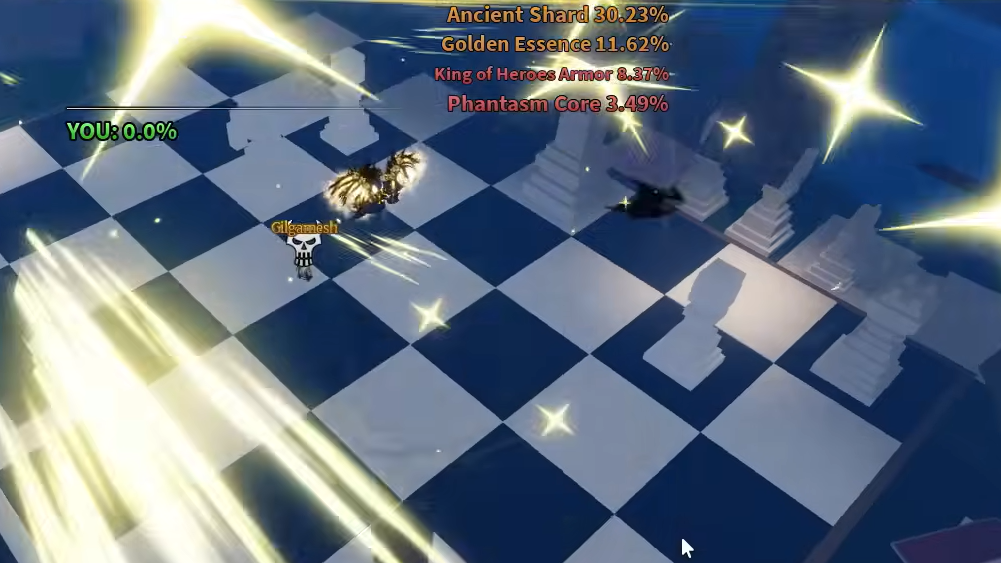
The reward gate is strict. Any player who fails to deal at least 10% of the total run HP will not receive end-of-run rewards, even if the team clears. This matters most on Extreme, where burst damage can easily be hoarded by one player with a strong build.
Boss HP by wave and difficulty
| Wave | Easy | Medium | Hard | Extreme |
|---|---|---|---|---|
| 1 | 90M | 270M | 675M | 1.08B |
| 2 | 112M | 338M | 844M | 2.25B |
| 3 | 135M | 405M | 1.01B | 2.7B |
| 4 | 180M | 540M | 1.35B | 3.6B |
| 5 | 225M | 675M | 1.69B | 4.5B |
| 6 | 270M | 810M | 2.02B | 5.4B |
| 7 | 315M | 945M | 2.36B | 6.3B |
| 8 | 360M | 1.08B | 2.7B | 7.2B |
| 9 | 450M | 1.35B | 3.38B | 9B |
| 10 | 585M | 1.75B | 4.39B | 11.7B |
| 11 | 720M | 2.16B | 5.4B | 14.4B |
| 12 | 900M | 2.7B | 6.75B | 18B |
| 13 | 1.08B | 3.24B | 8.1B | 21.6B |
| 14 | 1.35B | 4.05B | 10.12B | 27B |
| 15 | 1.8B | 5.4B | 13.5B | 36B |
Clear grades and Rush Coin payouts
Payouts scale on two axes: the difficulty chosen before entry and the clear grade earned by finishing the run before the timer runs out. Faster clears pay more coins per run.
| Grade | Clear time |
|---|---|
| SSS | ≤ 30 seconds |
| SS | ≤ 60 seconds |
| S | ≤ 120 seconds |
| A | ≤ 180 seconds |
| B | ≤ 240 seconds |
| C | ≤ 300 seconds |
| Difficulty | SSS | SS | S | A | B | C |
|---|---|---|---|---|---|---|
| Easy | 2–6 | 2–5 | 2–4 | 2–4 | 2–3 | 1–3 |
| Medium | 3–8 | 3–7 | 3–6 | 2–5 | 2–4 | 2–4 |
| Hard | 5–10 | 4–8 | 5–9 | 3–7 | 3–6 | 3–5 |
| Extreme | 8–14 | 7–12 | 6–11 | 5–9 | 4–8 | 4–7 |
Escanor and exclusive drops
Escanor spawns as the wave 15 encounter on every difficulty and hits hard in exchange for the run’s best drop table. The Escanor Sin of Pride weapon is the headline reward, with a drop chance that tracks the difficulty picked at entry. The One title, worth +65% Damage, and Sun Armor are also pulled from the Boss Rush drop pool.
| Drop | Rate range | Notes |
|---|---|---|
| Escanor Sin of Pride | 0.6% (Easy) – 1.85% (Extreme) | Wave 15 Escanor kill |
| The One (title) | 0.85% – 1.75% | +65% Damage |
| Sun Armor | 0.5% – 1.5% | Also sold in the shop for 250 Rush Coins |
Escanor can appear up to three times in a single run, though extra spawns beyond wave 15 are not guaranteed.

Boss Rush shop prices
Rush Coins spend in the Boss Rush Merchant’s shop, which carries rerolls, keys, chests, and Sun Armor. Buying one of every listed non-upgrade item costs 1,927 Rush Coins in total. Sun Armor is the anchor purchase, granting 75% Defense, 55% Damage, and 20% Damage Reduction.
| Item | Cost (Rush Coins) |
|---|---|
| Aura Crate | 1,200 |
| Secret Chest | 400 |
| Sun Armor | 250 |
| Mythic Chest | 40 |
| Legendary Chest | 15 |
| Epic Chest | 6 |
| Clan Reroll | 5 |
| Rare Chest | 3 |
| Trait Reroll | 2 |
| Race Reroll | 2 |
| Dungeon Key | 2 |
| Common Chest | 1 |
| Boss Key | 1 |
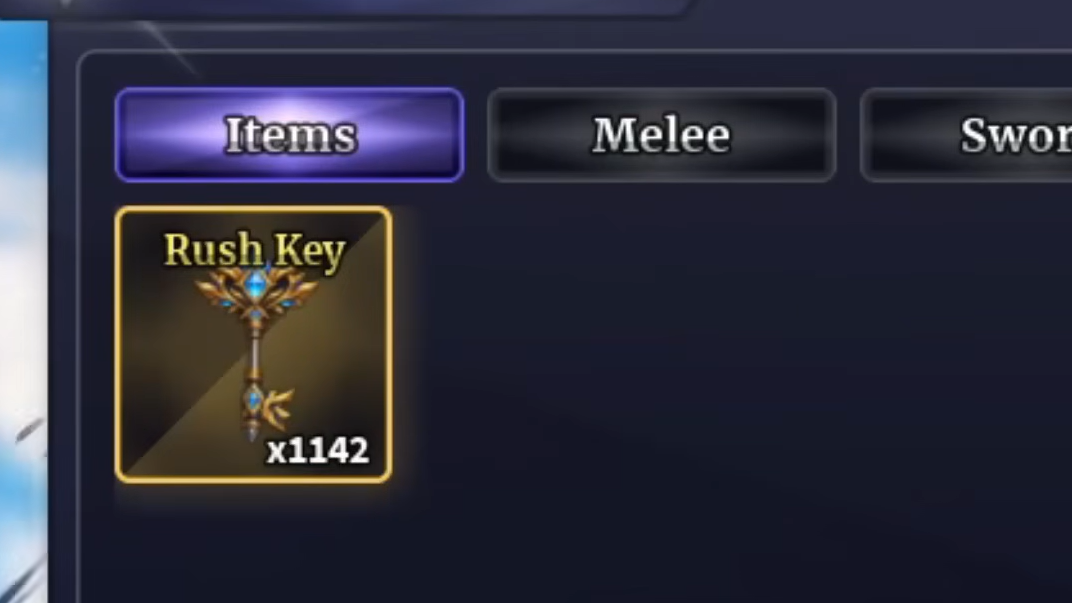
| Rush Key (buyback) | 1 |
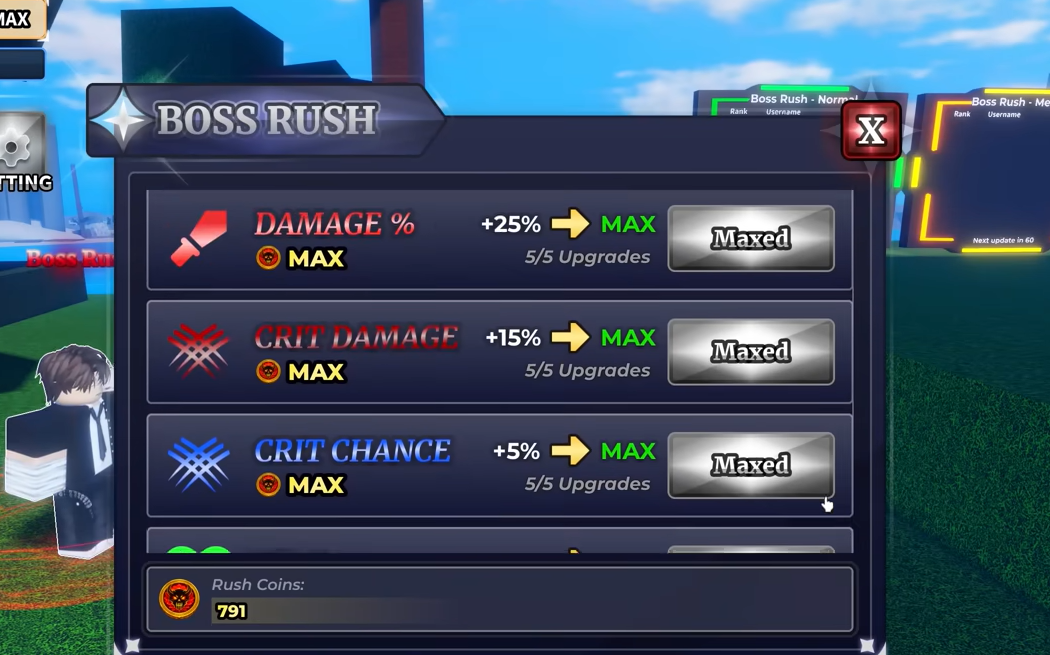
Permanent Rush upgrades
The Boss Rush Upgrades shop converts Rush Coins into permanent stat bonuses across Damage, Health, Crit Damage, Crit Chance, and Luck. Each stat caps at five levels, and fully maxing every track costs 6,625 Rush Coins.
| Upgrade | Level costs | Max bonus | Total cost |
|---|---|---|---|
| Damage | 100 / 150 / 250 / 350 / 500 | +25% (+5% per level) | 1,350 |
| Health | 75 / 100 / 150 / 200 / 300 | +37.5% (+7.5% per level) | 850 |
| Crit Damage | 100 / 150 / 250 / 350 / 500 | +15% (+3% per level) | 1,350 |
| Luck | 125 / 200 / 300 / 450 / 650 | +15% (+3% per level) | 1,725 |
| Crit Chance | 100 / 150 / 250 / 350 / 500 | +5% (+1% per level) | 1,350 |
Health is the cheapest track to max, and often the most useful priority for surviving Hard and Extreme pulls. Damage and Crit Damage pay off fastest for players already clearing Hard cleanly and chasing SSS timers.

Rush Key farming notes
Rush Keys drop from any NPC, but the rates climb steeply with enemy tier. Arena Fighter sits at the top of the normal-enemy table at roughly 0.1775%, followed by Ninja, Quincy, Swordsman, and Academy Teacher. Shinjuku Island and the later enemy lines tend to be the cleanest farms once a build can clear them quickly. Lawless Island is a common alternative because it overlaps with Power Shard farming for the Power spec.
Team play and difficulty selection
Three-player parties are the safest setup for fast Hard and Extreme clears, provided every player can push through the 10% damage threshold against the inflated HP pool. Solo runs dodge the per-player HP scaling, but put all wave pressure on one build. Extreme is smooth with coordinated burst compositions and punishing otherwise, while Hard is the practical sweet spot for farming Rush Coins and Escanor attempts once a build can handle the wave 15 HP spike.
A run qualifies for rewards the moment the wave 15 boss dies before the timer expires and every rewarded player has cleared the 10% damage gate. The end-of-run screen displays the clear grade and coin payout, which is how you confirm the run counted.