
Slow boot times, laggy apps, and delayed system responses often result from unnecessary background processes, outdated drivers, and storage issues on Windows 11 PCs. Making targeted system tweaks can improve speed and stability—especially on older hardware or systems with limited resources.
Upgrade to a Solid State Drive (SSD)
Replacing a traditional hard drive (HDD) with a solid state drive (SSD) is the single most effective way to speed up a Windows 11 PC. SSDs read and write data much faster than HDDs, resulting in quicker boot times, faster file access, and smoother multitasking. Users with older laptops or desktops will notice a dramatic difference after this upgrade. While this step involves hardware changes, it is routinely recommended by experienced users and technicians as the first step for sluggish systems.
Disable Startup Programs
Many applications launch automatically when Windows 11 starts, consuming valuable system resources and slowing down boot times. Disabling unnecessary startup programs streamlines system boot and reduces background load.
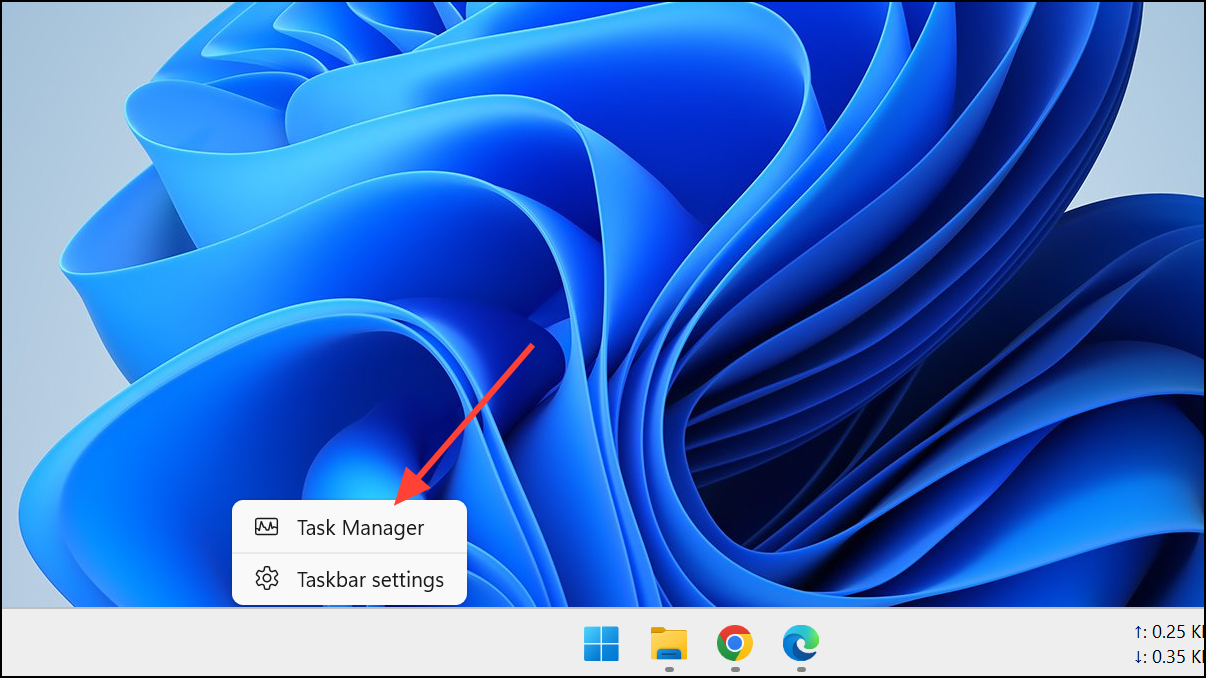
Step 1: Open Task Manager by pressing Ctrl+Shift+Esc or right-clicking the taskbar and selecting Task Manager.
Step 2: Click the Startup apps tab to view all programs set to run at startup. Review the list, right-click any app you do not need to launch automatically, and select Disable. Disabling programs here does not uninstall them—it simply prevents them from running on boot. You can re-enable them later if needed.
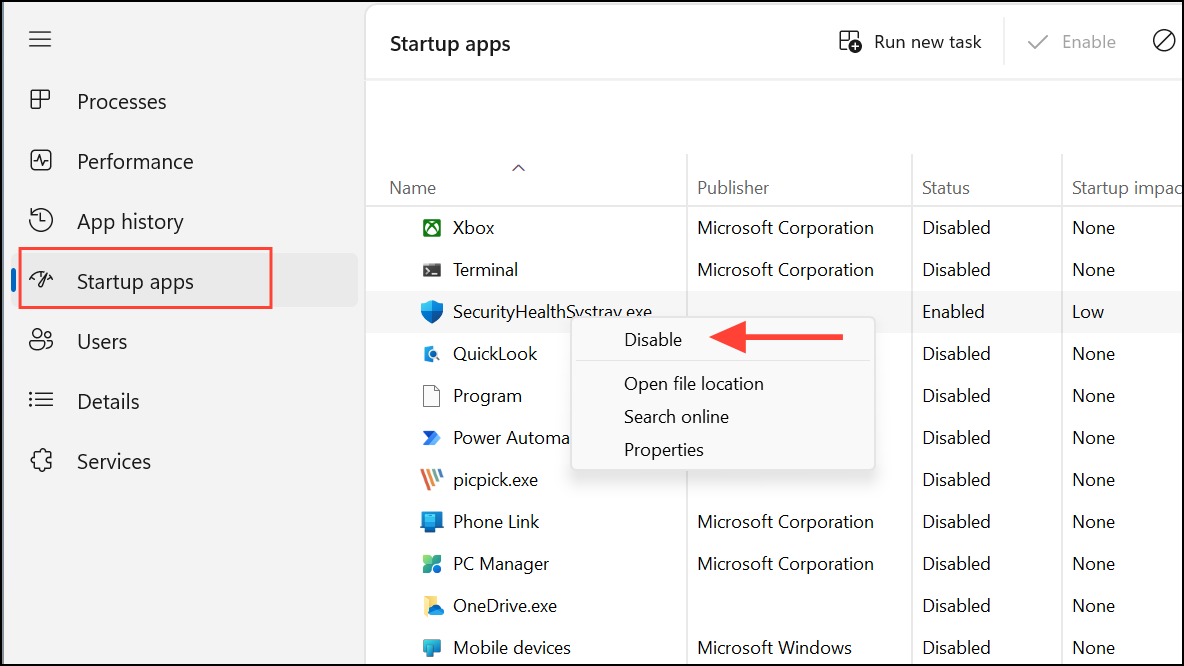
Disabling high-impact apps like cloud storage clients, music players, or unnecessary vendor utilities can significantly speed up startup times and free up system memory for other tasks.
Switch Power Settings to Best Performance
Windows 11 uses power plans to balance energy use and system speed. By default, many PCs use the Balanced or Power Saver plan, which reduces performance to save energy. Switching to a higher performance power plan allows your CPU and other hardware to operate at full speed, improving responsiveness and reducing lag.
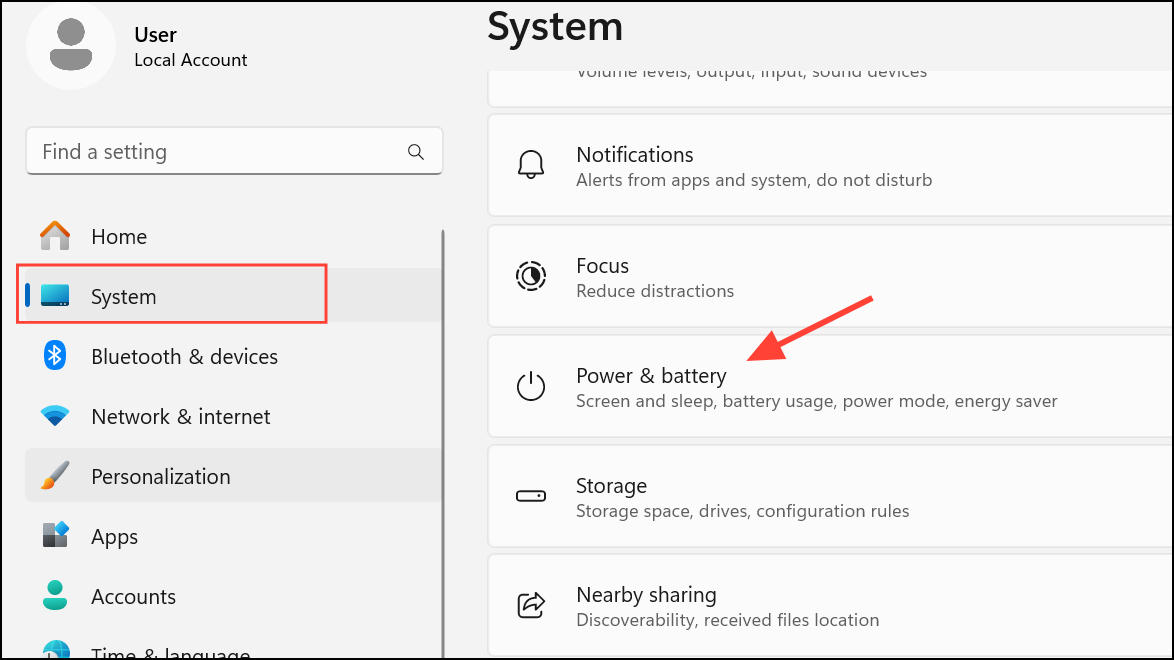
Step 1: Open the Settings app and go to System > Power (or Power & Battery on laptops).
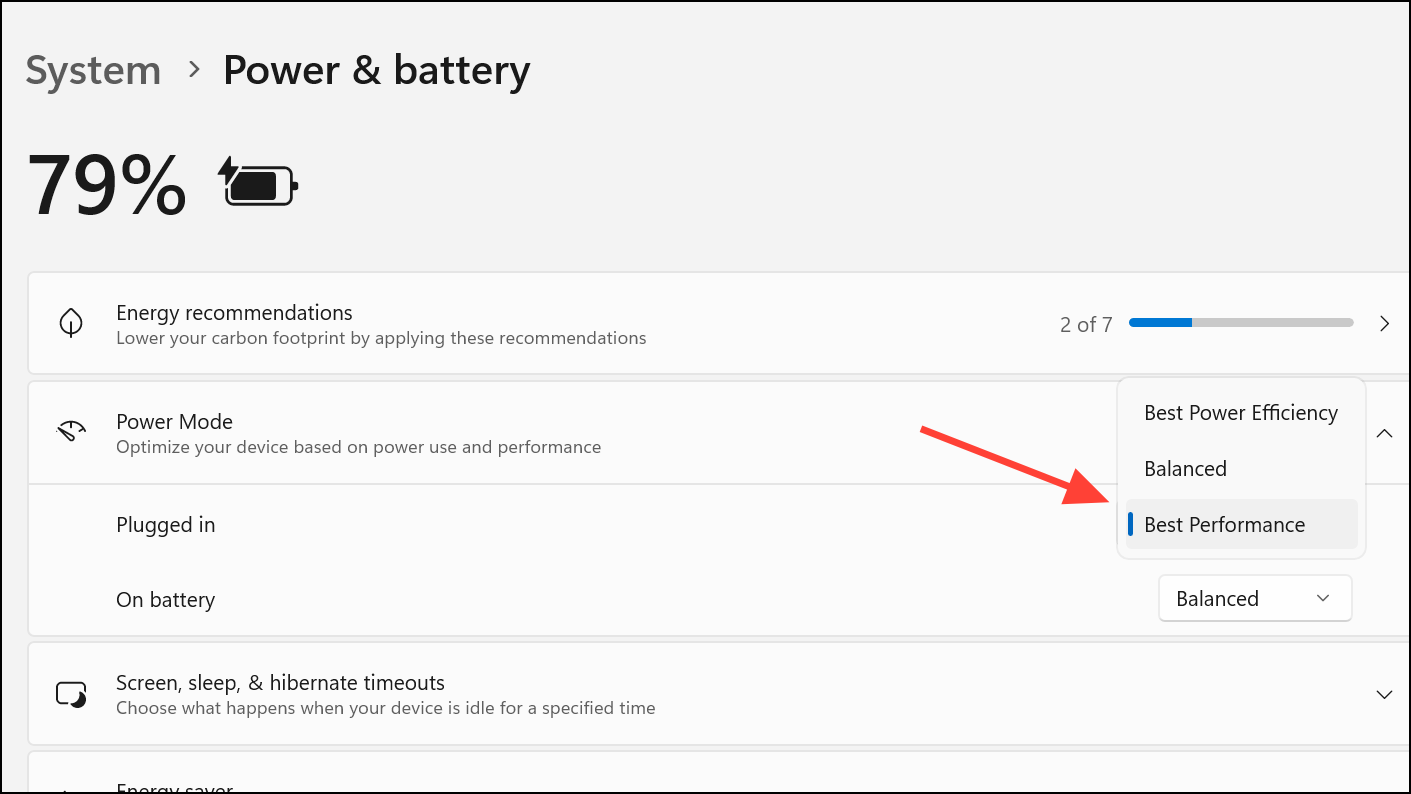
Step 2: Under Power Mode, select Best Performance from the dropdown menu.
Step 3: On desktops, also check the Control Panel’s Power Options for an available Ultimate Performance plan. If it’s not visible, you can enable it by opening PowerShell as Administrator and running:
powercfg -duplicatescheme e9a42b02-d5df-448d-aa00-03f14749eb61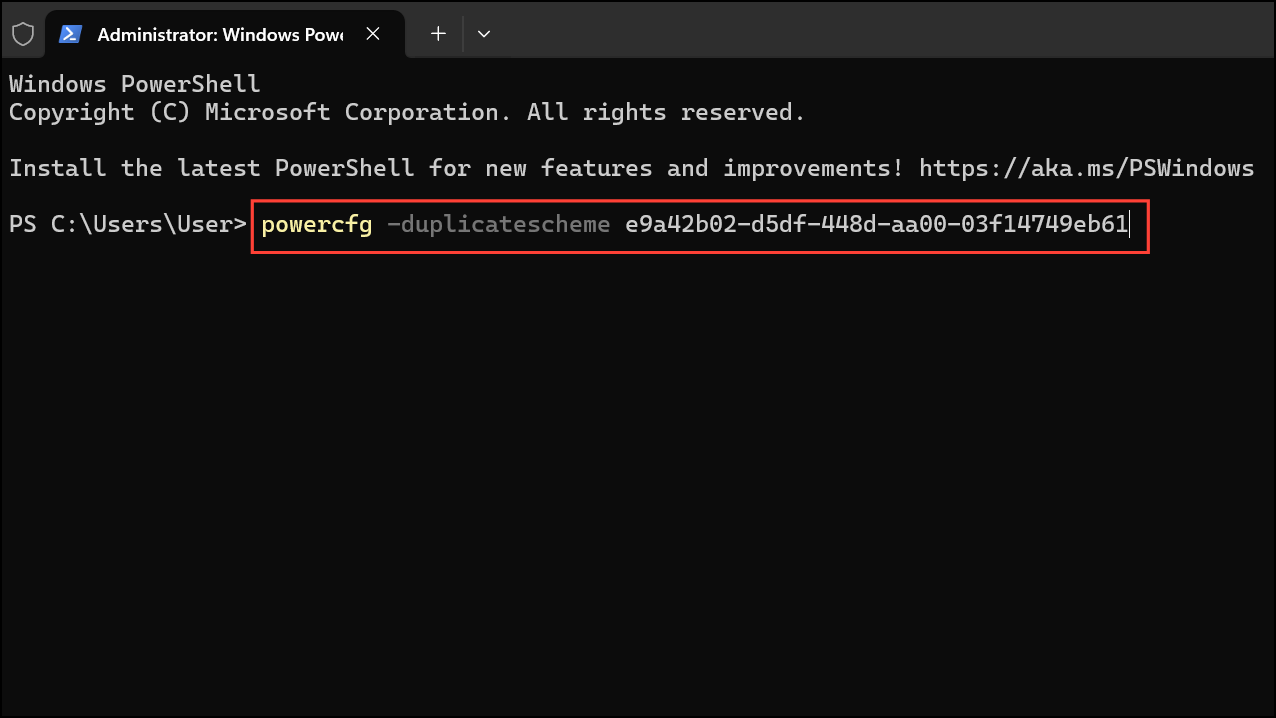
This change allows your PC to prioritize speed over energy savings, which is especially useful for gaming, video editing, or other demanding tasks.
Clean Up Disk Space with Storage Sense
Temporary files, old downloads, and other clutter can fill up your drive, slowing down Windows 11. Storage Sense is a built-in tool that automatically deletes unnecessary files and keeps your system running smoothly.
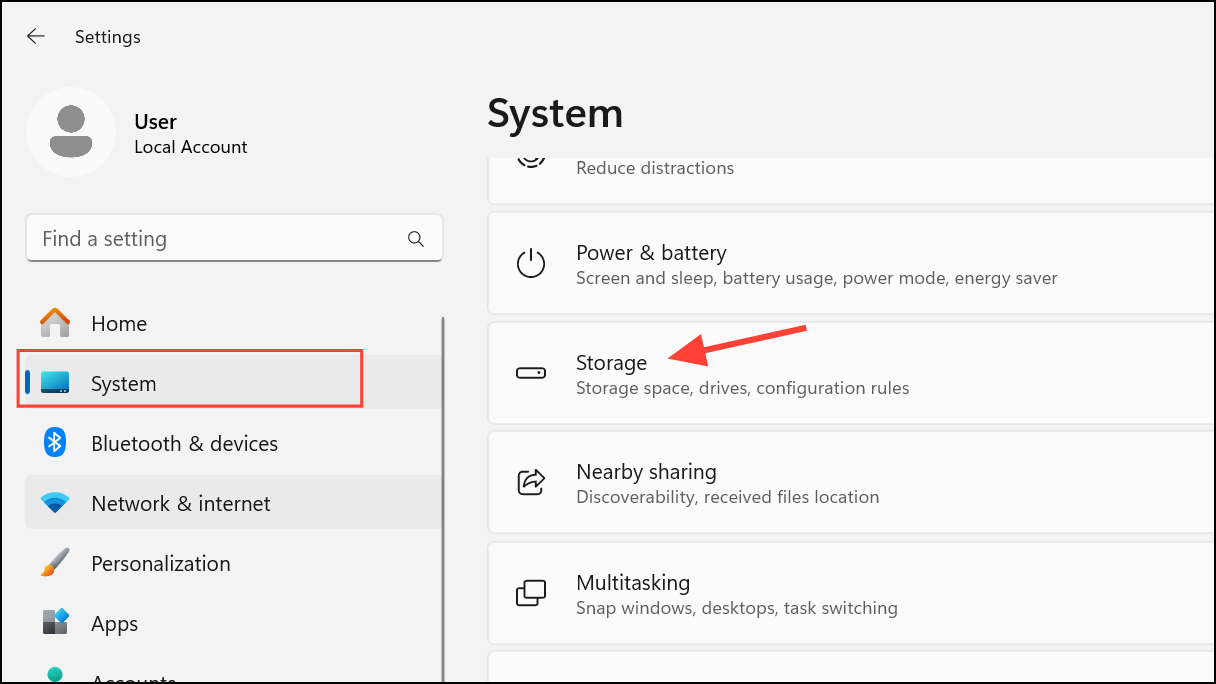
Step 1: Open Settings > System > Storage.
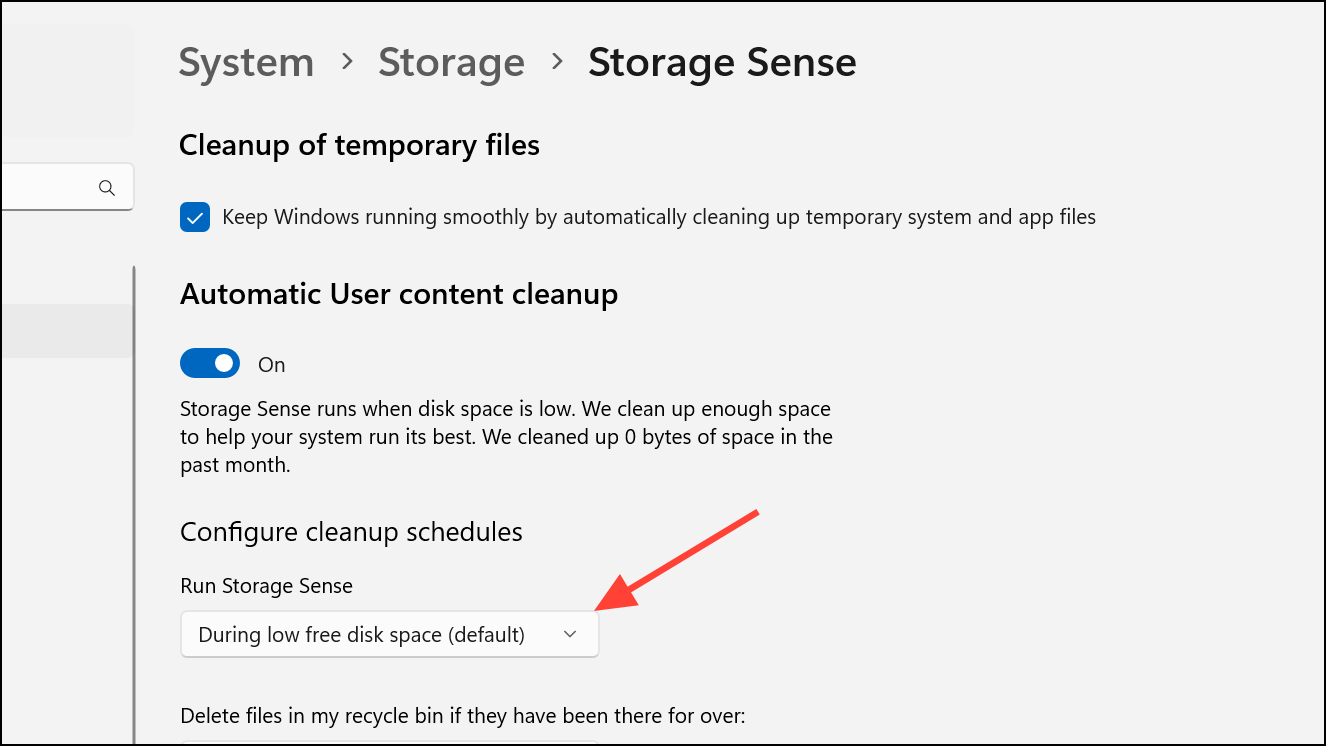
Step 2: Turn on Storage Sense under Storage Management. Click the arrow next to Storage Sense to configure when and how it runs—for example, set it to clean up temporary files, empty the Recycle Bin, or remove files from Downloads after a set period.
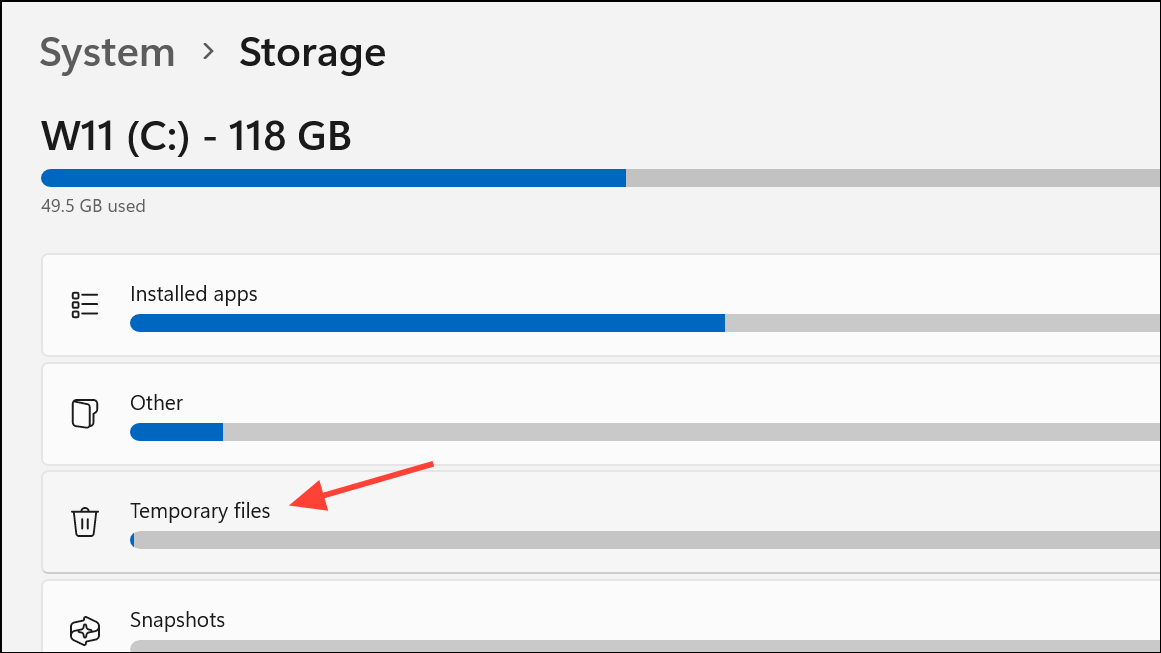
Step 3: To run a manual cleanup, select Temporary files in the Storage section, review the list, and remove files you no longer need. For a deeper clean, use Disk Cleanup or the Microsoft PC Manager utility to remove old Windows installation files and free up additional space.
Update Device Drivers and Windows
Outdated drivers—especially graphics drivers—can cause performance issues, crashes, and compatibility problems. Keeping both Windows and your device drivers current ensures your system benefits from the latest speed improvements and bug fixes.
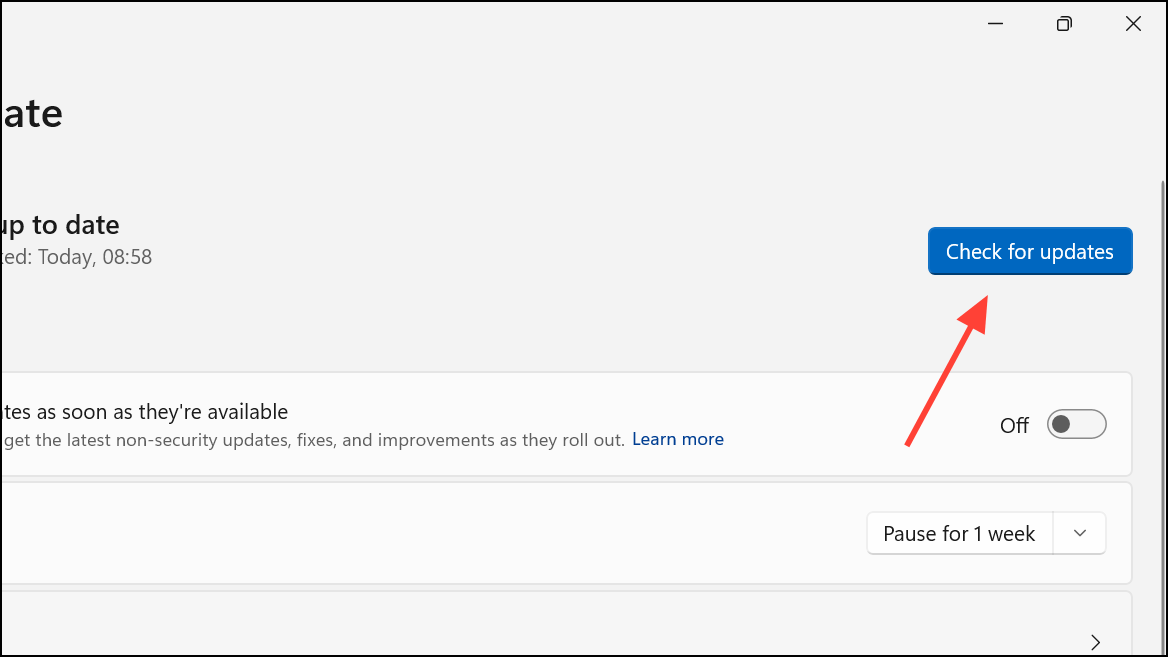
Step 1: Open Settings > Windows Update and select Check for updates. Install any available updates and restart your PC.
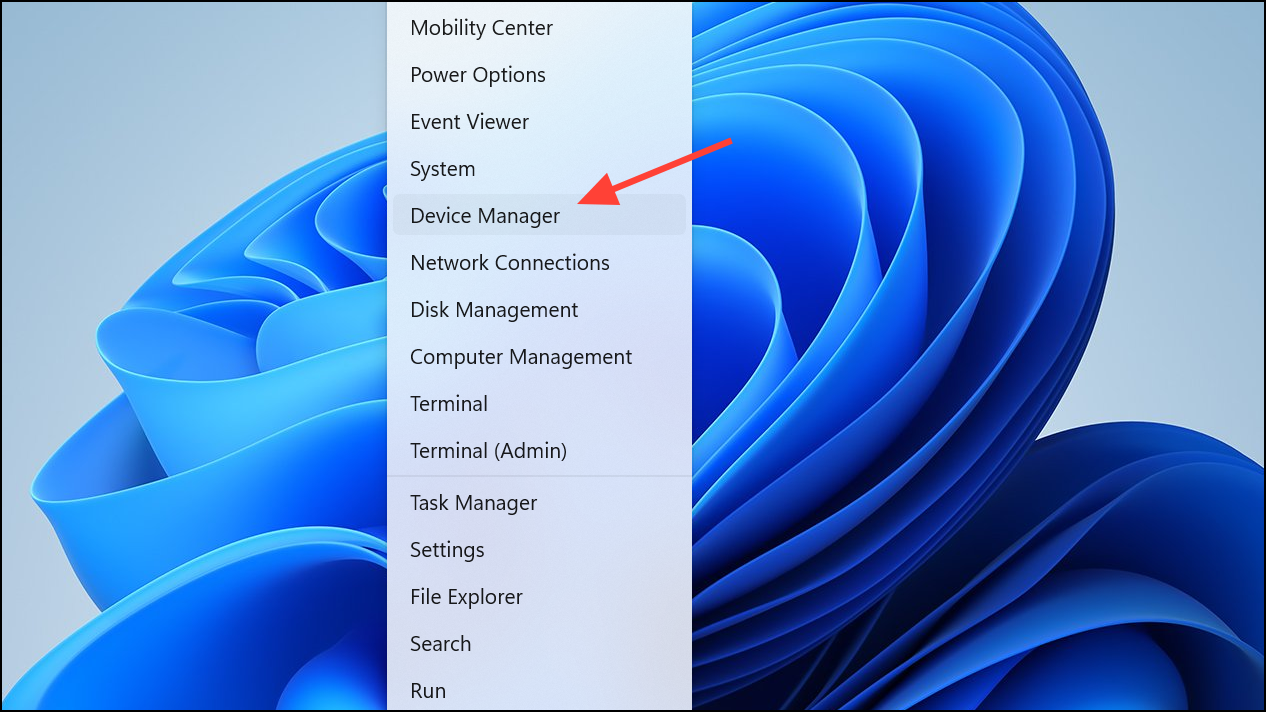
Step 2: For driver updates, open Device Manager by right-clicking the Start button and selecting it from the menu.
Step 3: Expand Display adapters, right-click your graphics card, and select Update driver. Allow Windows to search for new drivers. For the latest GPU drivers, you can also visit your hardware manufacturer’s website (e.g., NVIDIA, AMD, Intel).

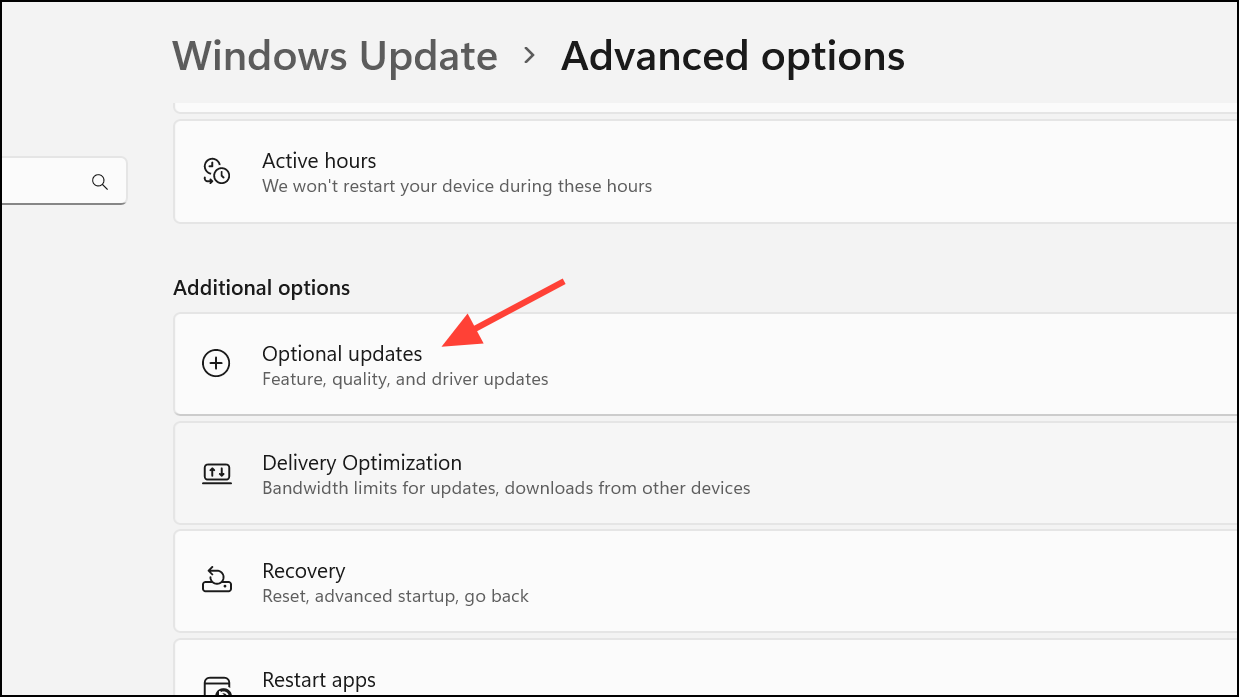
Step 4: Check Settings > Windows Update > Advanced options > Optional updates for additional driver updates that may not be installed automatically.
Turn Off Visual Effects and Animations
Windows 11 includes visual flourishes like animations, transparency, and shadows that can slow down older or lower-end PCs. Disabling these effects improves responsiveness and reduces unnecessary GPU load.
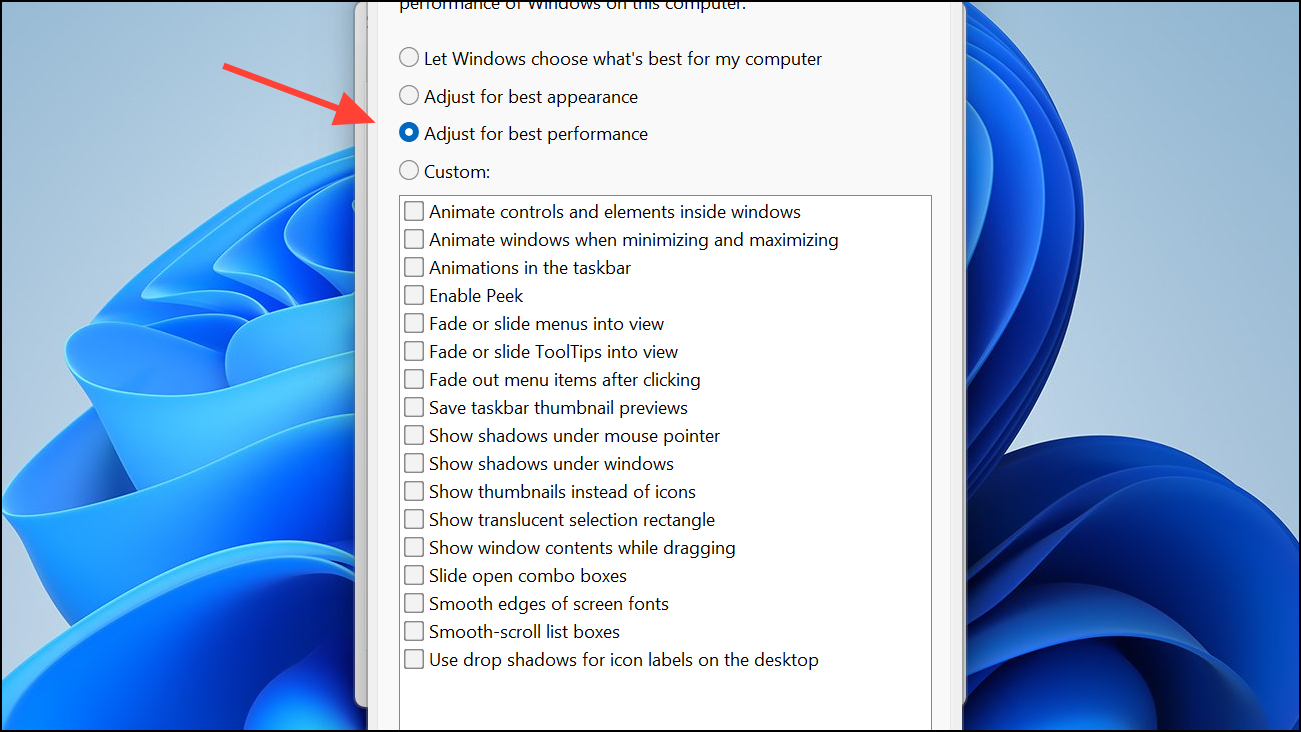
Step 1: Open the Start menu, type sysdm.cpl, and press Enter to open System Properties.

Step 2: Go to the Advanced tab and click Settings under Performance.
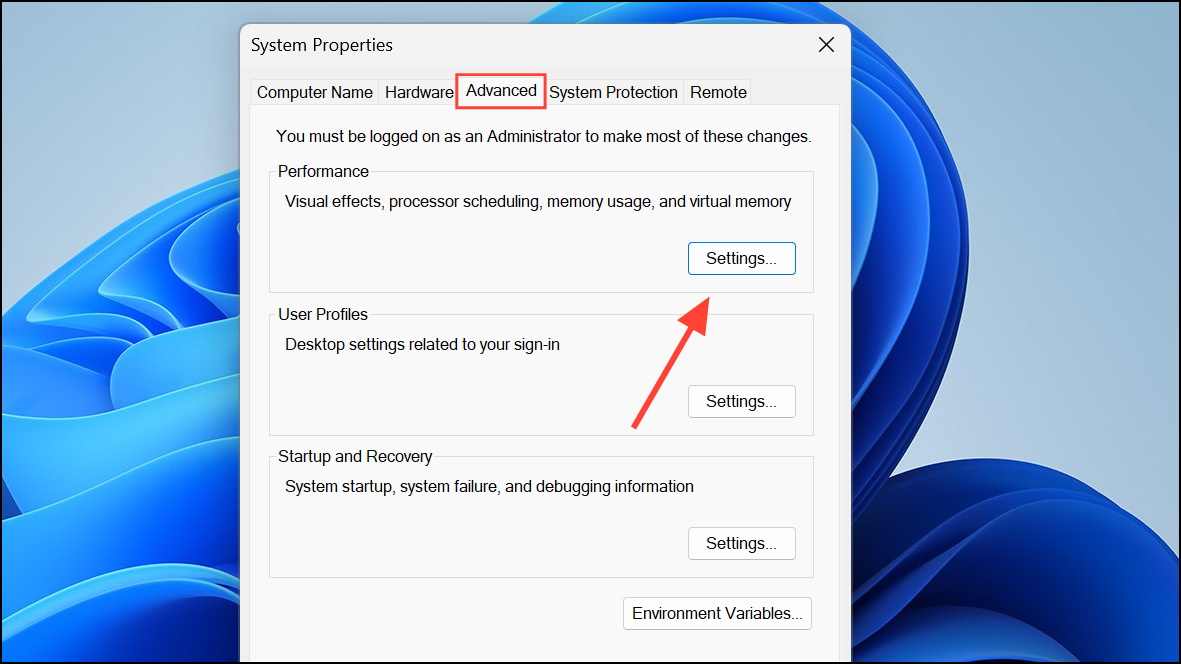
Step 3: In the Performance Options dialog, select Adjust for best performance to turn off all visual effects. Alternatively, you can manually disable specific options like “Animate windows when minimizing and maximizing,” “Show shadows under windows,” and “Fade or slide menus into view.”
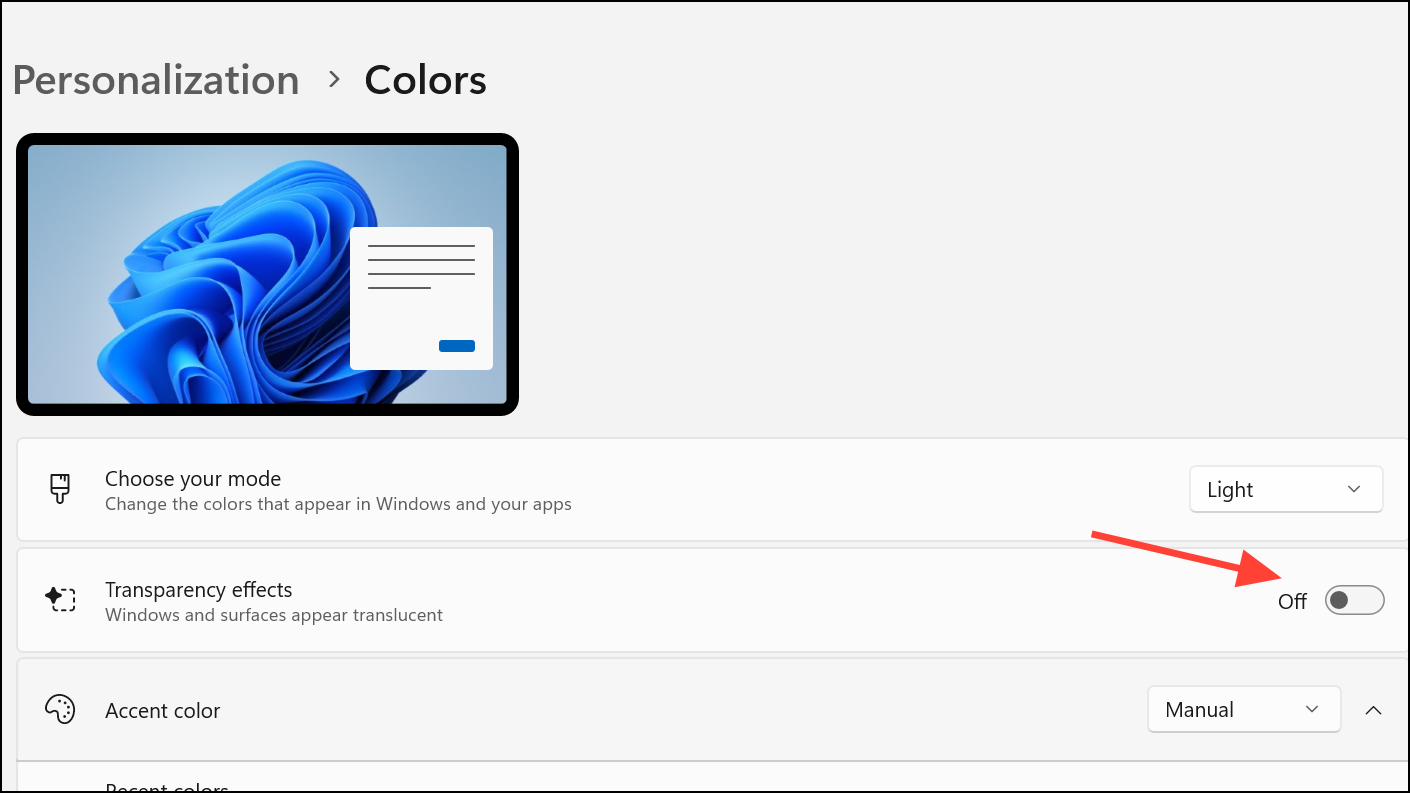
Step 4: For transparency effects, go to Settings > Personalization > Colors and turn off Transparency effects.
Remove Bloatware and Unnecessary Apps
Pre-installed manufacturer software, trialware, and unused programs can consume resources and slow down your PC. Uninstalling these apps frees up memory and storage, reducing background activity.
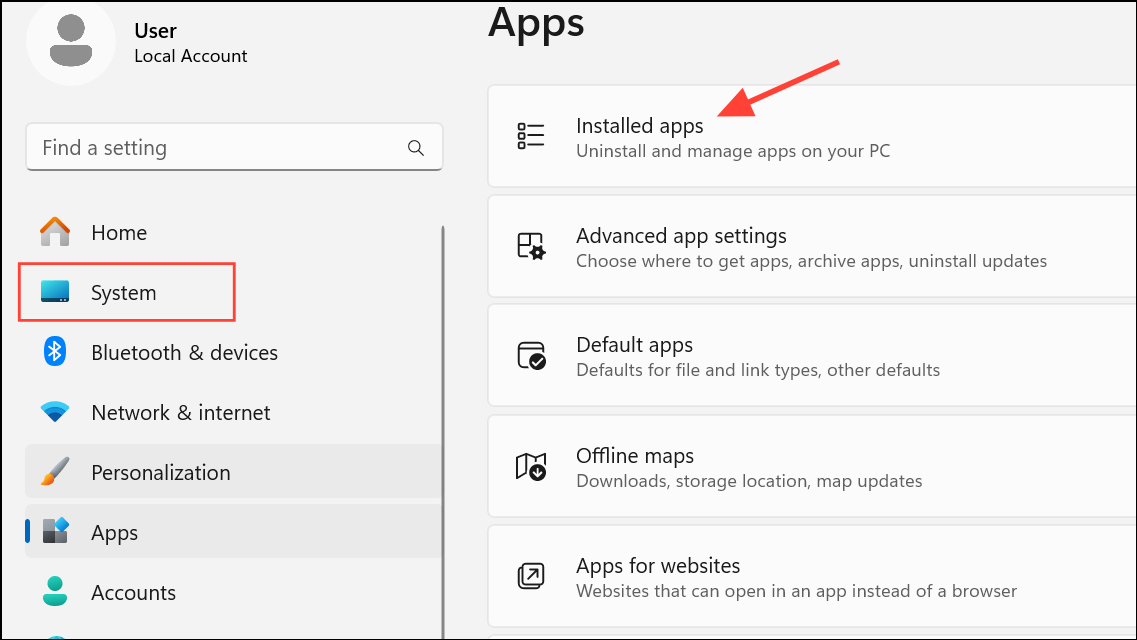
Step 1: Open Settings > Apps > Installed apps (or Apps & features).
Step 2: Review the list of installed programs and uninstall anything you do not use or recognize. For persistent bloatware, consider using tools like Bulk Crap Uninstaller or consulting the “Should I Remove It?” website for guidance on which apps are safe to remove.
Step 3: For deeper cleaning, you can use reputable third-party utilities, but always back up your data and create a restore point before making major changes.
Scan for Malware and Adware
Malware and adware can silently drain resources and cause slowdowns. Running regular security scans helps keep your PC running efficiently.
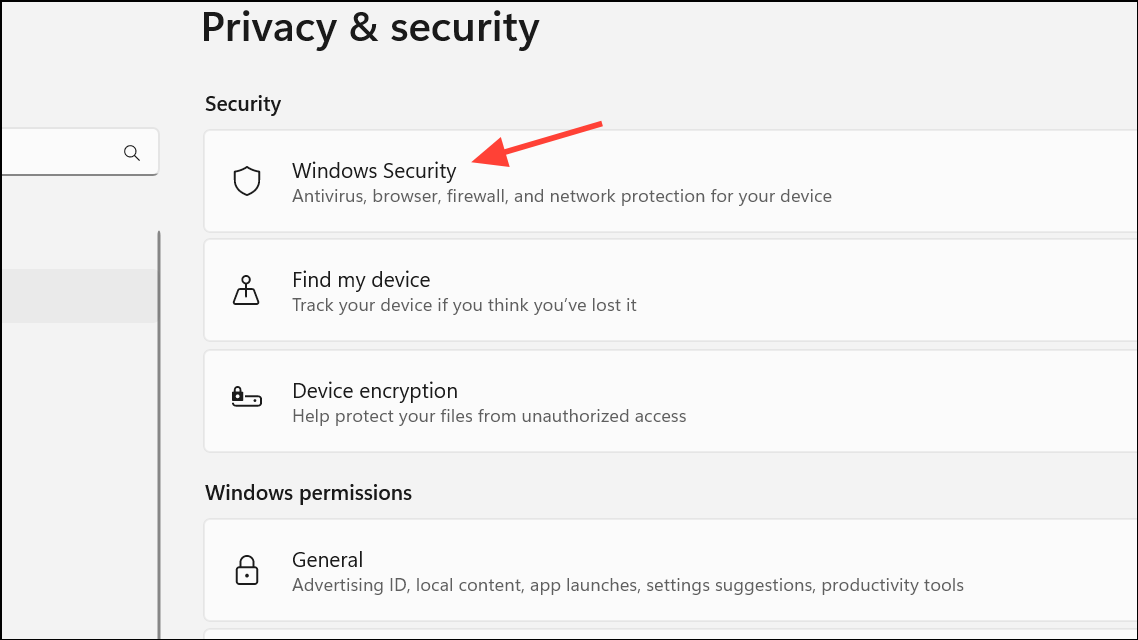
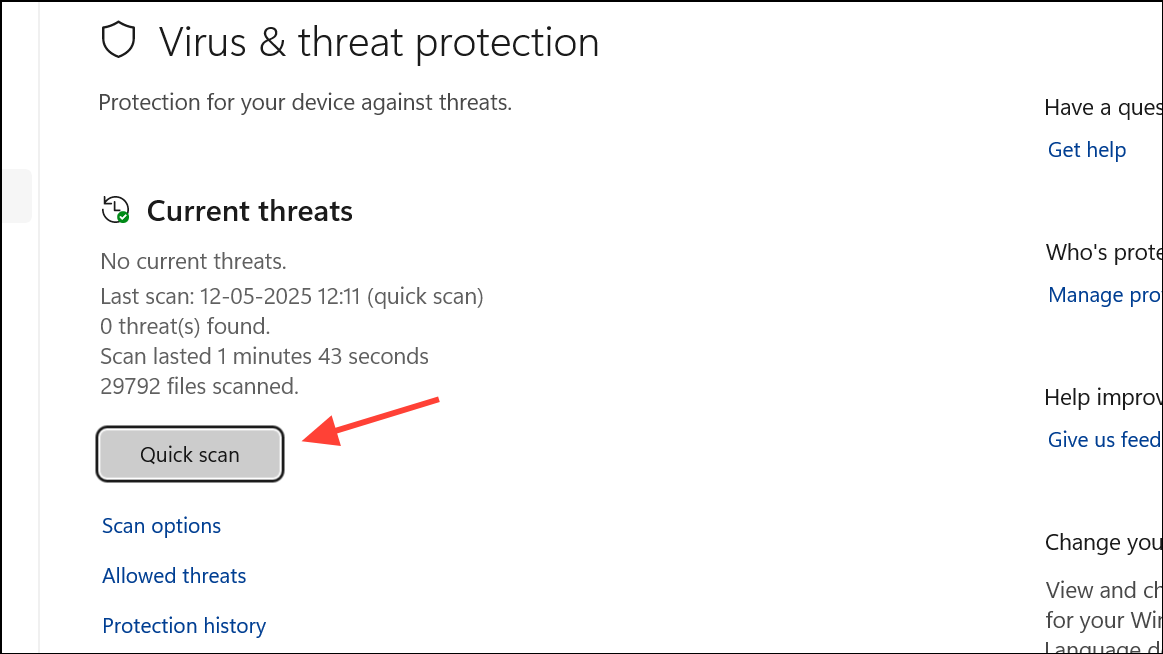
Step 1: Open Windows Security from the Start menu or Settings > Privacy & security > Windows Security.
Step 2: Select Virus & threat protection and run a Quick scan. For a more thorough check, choose Full scan or use reputable third-party tools like Malwarebytes for a second opinion.
Disable Search Indexing on Slow PCs
Windows Search indexes files in the background to speed up searches, but on slower PCs or older hard drives, this process can cause performance drops. Disabling or limiting indexing can free up resources.
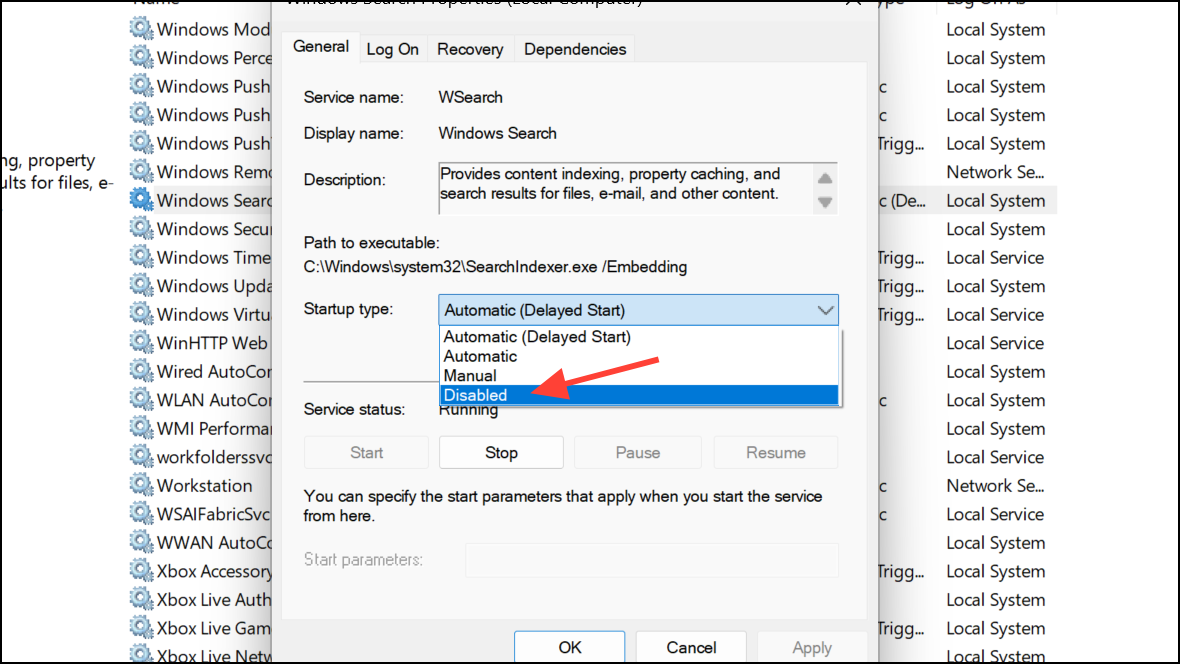
Step 1: Type services.msc in the Start menu and press Enter to open the Services app.
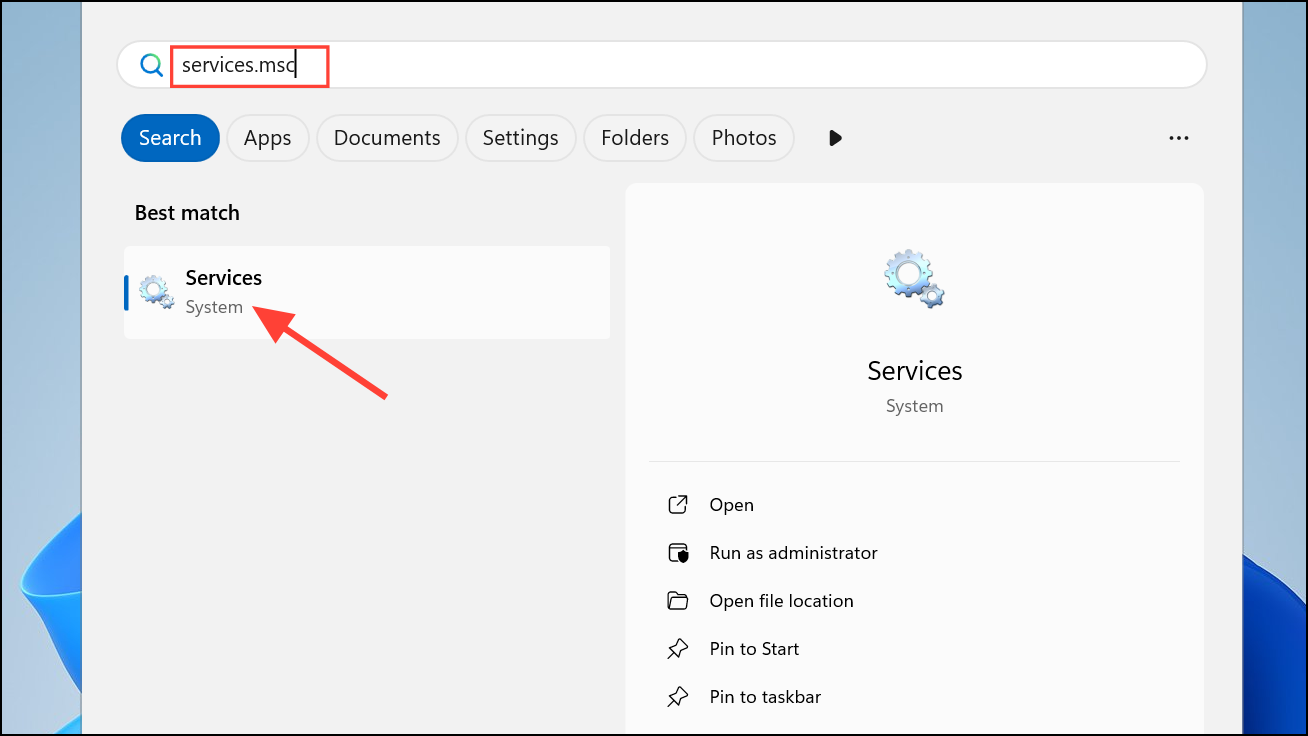
Step 2: Scroll to Windows Search, double-click it, and set the Startup type to Disabled. Click Stop to end the service immediately, then reboot your PC.
If you still want fast search in certain folders, adjust indexing options by searching for Indexing Options in the Start menu and modifying the included locations.
Use ReadyBoost for Extra RAM (on HDD Systems)
ReadyBoost uses a USB flash drive to supplement system memory, which can help if your PC has limited RAM and no SSD. This method is less effective than upgrading to an SSD or adding physical RAM, but it can provide a small speed boost on older systems.
Step 1: Insert a USB flash drive with at least 500MB free space.
Step 2: In File Explorer, right-click the drive and select Properties. Go to the ReadyBoost tab and select Use this device. Click OK to reserve space for ReadyBoost.
Restart Windows Regularly
Restarting your PC clears temporary files, releases memory, and stops lingering background processes that can slow down performance. If your system feels sluggish after long periods of use, a quick reboot often restores responsiveness.
Applying these tweaks will help your Windows 11 PC start faster, run smoother, and deliver a more responsive experience—whether you’re working, gaming, or just browsing the web.