Java is a fundamental programming language and platform that many applications rely on. If you’re using Ubuntu 20.04 and need to run or develop Java applications, you’ll need to install the appropriate Java packages. This guide will walk you through installing Java using the OpenJDK implementation.
Installing Java on Ubuntu 20.04
OpenJDK 11 is the version available in the Ubuntu 20.04 repositories. It provides the Java Runtime Environment (JRE) for running Java applications and the Java Development Kit (JDK) for developing them.
sudo apt install openjdk-11-jreThis command installs the openjdk-11-jre package, enabling your system to run Java applications.
sudo apt install openjdk-11-jdkThe openjdk-11-jdk package includes the JRE and adds the necessary development tools.
apt search openjdk-11This will display a list of all related packages available in the repositories.
Verifying the Installation
After installing Java, it’s important to verify that it was installed successfully.
java --version
You should see output indicating the version of Java installed on your system.
javac --versionThe javac command represents the Java compiler, which is essential for Java development.
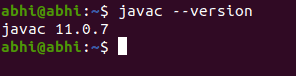
The output will display the version of the Java compiler, confirming the JDK installation.
With Java installed and verified, you’re now ready to run Java applications and develop your own on your Ubuntu 20.04 system.