Sword X Staff lives or dies on its loadout. Picking a strong class is only half the work, because the skills you slot, the Fantomon you deploy, and the relic you equip decide how fast stages fall and whether boss fights drag. A well-matched budget setup will clear faster than a meta class running the wrong tools.
Quick answer: Prioritize Lion Combo (single-target) or Water Assault (AoE) for your core skill, run Zeioletus as your all-around Fantomon, and equip Everburn Throne for a flat +58 ATK that works on every class. Replace any C-tier relic the moment you find a better one.
How classes shape which skills matter
The game runs on a dual-class system. You start as a Mage (staff) or Warrior (sword), then branch into an advanced specialization once your Total Level and Class Level hit the thresholds. Mage splits into Sorcerer and Sage, while Warrior splits into Duelist and Knight. Class switching unlocks later, so an early mistake is not permanent.
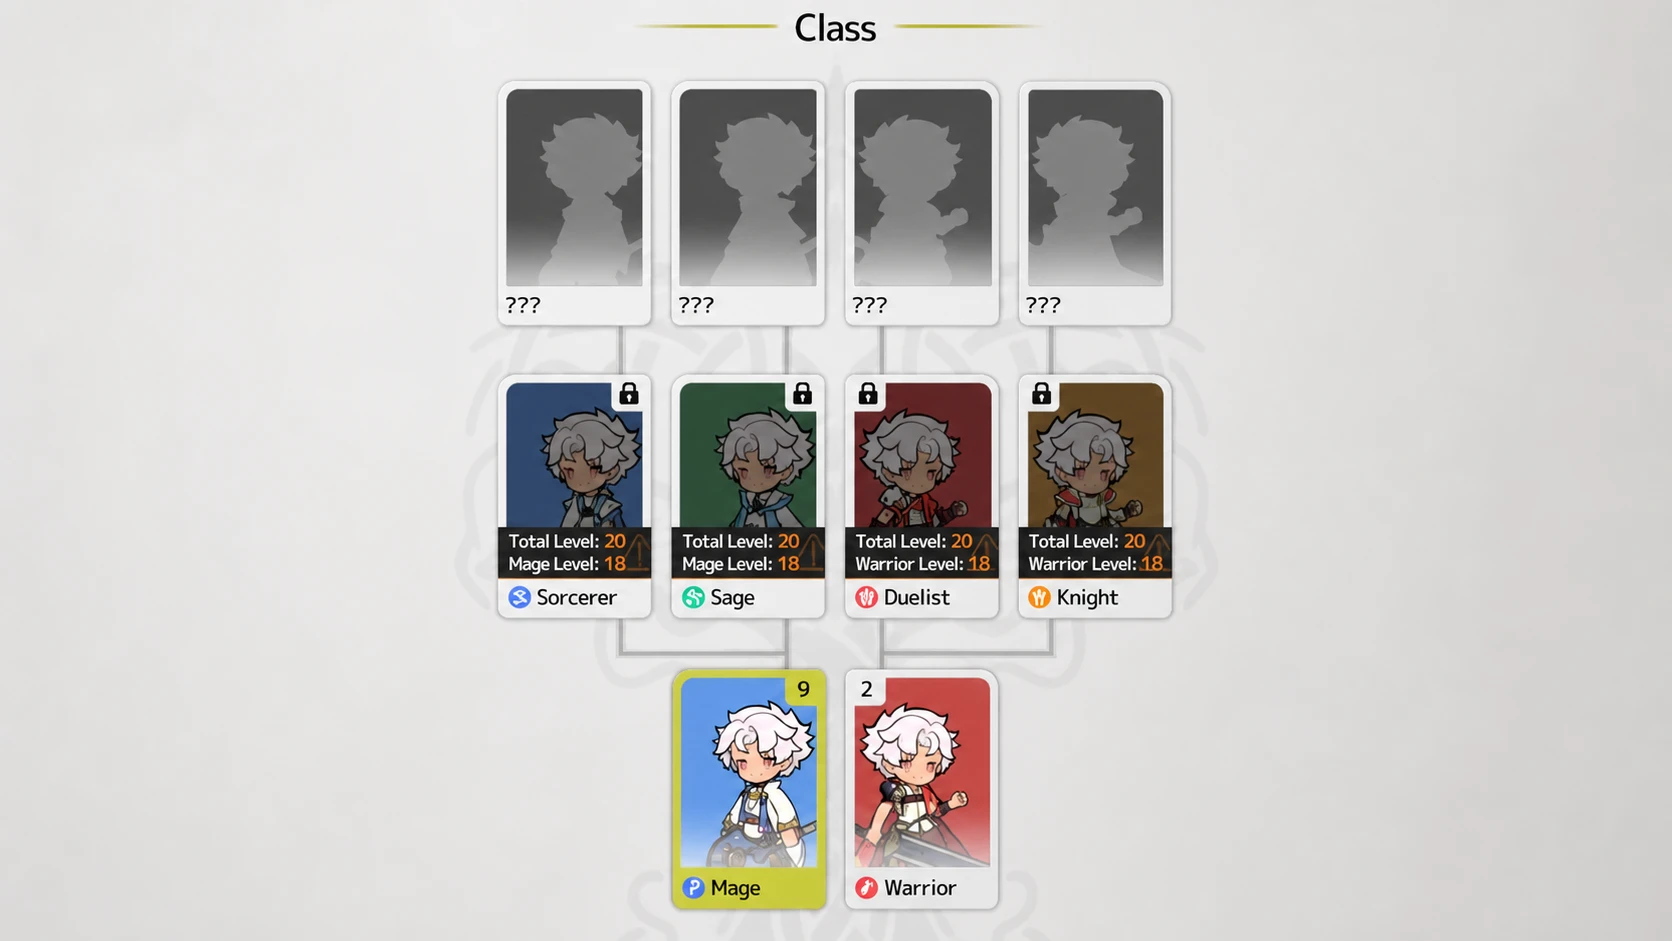
Your class decides which skills shine. A Duelist without Lion Combo loses its best burst, and a Sorcerer without Water Assault misses its top scaling tool. The split between free-to-play and paid value matters too, because investment shifts the ranking.
| Class | F2P value | Paid value |
|---|---|---|
| Duelist (Warrior) | S — top single-target burst with crit scaling, no rare drops needed | A — still excellent, but Sage pulls ahead |
| Knight (Warrior) | A — reliable tank that carries solo PvE | B — raw defense flattens as DPS classes scale |
| Sorcerer (Mage) | B — strong farming, but ceiling depends on rare relics | A — elemental multipliers scale hard with rare gear |
| Sage (Mage) | C — weak solo without scaling | S — Erosion stacks and premium prayers give the highest ceiling |
Best skills in Sword X Staff (S tier)
S-tier skills are the Legendary picks that stay strong from early game into endgame. Water Assault is the standout because its multiplier stacks on consecutive hits and scales against multiple targets at once, making it effective in both boss and crowd fights. Lion Combo owns single-target damage outright.
| Skill | What it does | Best for |
|---|---|---|
 Water Assault Water Assault | AoE in front; stacking multiplier on repeat hits; scales vs single and multiple targets | Boss fights, AoE, all modes |
 Lion Combo Lion Combo | Highest single-target damage; three hits scaling higher each strike | Boss fights, single-target DPS |
 Whirlwind Slash Whirlwind Slash | 1-grid AoE physical, up to 4 targets; scales with upgrades | AoE DPS, late game |
 Heavy Impact Heavy Impact | High front damage, launches airborne, priority targeting on large enemies | Boss openers, combo setups |
 Blazing Fire Ring Blazing Fire Ring | Massive fire damage to nearby enemies; strong upgrade scaling | AoE, fire core, late game |
 Wind’s Delight Wind’s Delight | Wind blades across a 6-grid radius, widest AoE in the game; sustained DPS | AoE, wind core |
 Leap Attack Leap Attack | Mobility, AoE, and Armor Break in one; repositions to reach back-line targets | AoE, self buff, debuff |
A-tier skills worth slotting
A-tier skills are situational but still strong, often filling combo or crowd-control roles around an S-tier core. Most reward positioning and lose value when enemies kite or spread out.
| Skill | Strength and limit | Best for |
|---|---|---|
 Wind Blade Slash Wind Blade Slash | Heavy wind line damage with airborne knock; weak when foes are not lined up | Combo setup, wind core |
 Quadrant Slash Quadrant Slash | Heavy melee AoE, multi-hit when grouped; struggles vs ranged kiters | AoE DPS, melee |
 Tempest Sphere Tempest Sphere | Continuous wind pressure; damage falls off in very high difficulty | Burst AoE, mid game, wind |
 Cyclone Cyclone | Long-range AoE that pulls enemies airborne; needs timing | Ranged AoE, wind |
 Fireball Fireball | Heavy fire AoE with random repositioning; reposition can backfire | Early to mid fire, AoE |
 Ice Spike Ice Spike | Long-range damage with a chance-based Frozen disable | Ranged DPS, CC, water |
 Gravity Pull Gravity Pull | Gathers enemies for AoE follow-up; needs team AoE to pay off | AoE, CC, melee |
 Mountain Collapse Mountain Collapse | Area damage with airborne and knockback; knockback not guaranteed | AoE, CC |
B and C tier skills
B-tier skills are useful in narrow situations like dungeons or boss-only crit windows. C-tier skills give little progression value in a mostly solo game and should be swapped out as soon as a stronger option appears.
| Skill | Tier | Best for |
|---|---|---|
 Stonechief Summon Stonechief Summon | B | Early to mid, dungeons |
 Healing Touch Healing Touch | B | Dungeons only |
 Boiling Bloodlust Boiling Bloodlust | B | Boss fights, dungeons |
 Flame Jet Flame Jet | B | Fire build, burst DPS |
 Iron Thorn Iron Thorn | B | CC, AoE, wind |
 Diving Gale Diving Gale | B | Melee, DPS |
 Phantom Assault Phantom Assault | B | Melee, DPS, mobility |
 Luminous Shield Luminous Shield | C | Mid-game only |
 Void Blessing Void Blessing | C | Team dungeons only |
 Water Shot Water Shot | C | Early game, DPS |
 Edge Strike Edge Strike | C | Early game only |
Best Fantomons (pets) to deploy
Fantomons are pet companions that add passive stats and can materialize in combat. The system unlocks at account level 50 through the home-base tree. You can run four at once, with your main slot giving 100% of its stats and the three secondary slots giving 50% each. Every Fantomon you own also contributes 20% through resonance, so collecting more is always a gain.
Note: your main stat slot and your combat slot are separate decisions. Put your highest-rarity Fantomon in the main stat slot regardless of role.
| Pet | Tier | Best for |
|---|---|---|
 Zeioletus Zeioletus | S | All content, combo setups, Mage |
 Armopi Armopi | S | All content, late game, Warrior |
 Nyxarchon Nyxarchon | S | All content, DPS, boss fights |
 Pandarial Pandarial | S | Offensive builds, debuffing, DPS |
 Chomusuke Chomusuke | S | AoE builds, farming |
 Kels Kels | A | Support builds, Mages |
 Terragon Terragon | A | Support builds, Warriors |
 Sylvaerie Sylvaerie | A | Boss fights, burst builds |
 Aegiswing Aegiswing | A | Boss fights, low HP builds |
 Falko Falko | A | AoE builds, boss fights, DPS |
 Mandragora Mandragora | A | Team fights, support |
 Herbote Herbote | B | Support builds, Warriors |
 Boaro Boaro | B | Boss fights, low HP builds |
Mythic Fantomons sit a tier above because of higher base stats and full Materialization after evolution. Evolution requires a duplicate copy of the same Mythic, which unlocks the Materialization form at level 108, so plan for two copies before spending all your Summon Crystals. Aegiswing and Nyxarchon are the two Mythics in the shop at 60 Summon Crystals each, while Sylvaerie costs 18.
Best relics for damage and survival
Relics give passive stat boosts. The S tier is built around direct, no-condition offense, while most A-tier picks require gear investment or skill levels to reach their cap. DPS players should ignore pure defensive relics unless they are struggling to survive.
| Relic | Effect | Tier and best for |
|---|---|---|
 Everburn Throne Everburn Throne | ATK +58 | S — all DPS builds, all classes |
 Pinnacle Radiance Pinnacle Radiance | Crit DMG +7.5% | S — crit builds, boss fights |
 Prime Dynamo Prime Dynamo | ATK +10 per 2 boots dismantled (max +60) | S — farmers, late game |
 Doomsday Chronometer Doomsday Chronometer | SPD +8 per weapon enhancement (max +48) | A — low-cooldown rotations |
 Scales of Order Scales of Order | HP +106 per skill level (max +318) | A — tank builds, Warriors |
 Ignis Oculus Ignis Oculus | DEF +12.5% | A — tank builds, Warriors |
 Sandfall Sarcophagus Sandfall Sarcophagus | DEF +10 per helmet enhancement (max +60) | A — tank builds, Warriors |
 Clockwork Arcanum Clockwork Arcanum | HP +12.5% | B — early to mid, all classes |
 Eternal Gale Wheel Eternal Gale Wheel | DEF +10.5% | B — early to mid tanks |
 Genesis Dew Genesis Dew | Block Rate +5% | C — early game only |
Tip: Everburn Throne is the safest first pick because the +58 ATK applies instantly with no farming. Prime Dynamo edges past it for players who regularly dismantle boots, but reaching the +60 cap takes 12 boots, so skip it if you rarely scrap gear.
Build templates that work right now
These setups pair a top skill core with the matching Fantomon and relic. Each lists an alternate relic for cases where the primary pick needs investment you do not have yet.
| Build | Core skills | Pet | Relic (alt) |
|---|---|---|---|
| Warrior burst (Duelist) | Lion Combo, Heavy Impact, Boiling Bloodlust | Sylvaerie | Pinnacle Radiance (Prime Dynamo) |
| Mage wind core (Sorcerer) | Wind’s Delight, Wind Blade Slash, Cyclone | Zeioletus | Everburn Throne (Prime Dynamo) |
| Mage fire core (Sorcerer) | Blazing Fire Ring, Water Assault, Fireball | Kels | Pinnacle Radiance (Everburn Throne) |
| Warrior tank (Knight) | Whirlwind Slash, Quadrant Slash, Stonechief Summon | Armopi | Scales of Order (Ignis Oculus) |
Knight players have a deeper wrinkle worth knowing. The class is built around Block Rate, which reduces blocked damage by 50% and prevents crits, then reflects damage back through the Rebound charm based on your Defense. That makes Defense an offensive stat for Knight, and a block-focused setup can clear deficits of roughly 100,000 to 130,000 combat power in PvP and story push. Prioritize block rate on purple and legendary gear even if the raw combat power drops slightly.
To confirm a loadout is working, watch your clear speed and the damage numbers on your core skill. A correctly slotted Water Assault or Lion Combo should noticeably shorten boss fights, and a block-stacked Knight should survive hits that would normally kill a DPS class. If damage still feels flat, check that your skills are actually leveled, since several A-tier relics scale off skill level rather than equip alone. Secure a top skill first, pair it with Everburn Throne for immediate damage, and replace C-tier relics the moment something better drops.