Haze Seas throws a stack of overlapping systems at you the moment you pick Pirate or Marine, and most of the early confusion comes from not knowing which one to touch first. The short version is that leveling drives everything else, since almost every island sits behind a level requirement. Get that flowing, then layer on a race, a Devil Fruit, a sword, and a few Haki unlocks in that order.
Quick answer: Complete the quest NPC loop on your current island to level up, roll a race as early as possible and aim for D. Clan or Dragonborne, buy Devil Fruits from Fruit Dealer Cynthia for 125K cash or 50 Gems per roll (or grab ones that spawn under trees every 60 minutes), and pour every stat point into one primary damage type with Defense as your backup.
Level up fast by following the quest chain
Experience Points are the backbone of progression, because nearly every new island is locked until you hit its required level. The fastest way to earn them is to keep taking quests from the NPCs on whatever island you are currently standing on. These quests ask you to defeat a set number of enemies or a boss, and they hand back both EXP and cash at once.
The game removes most of the guesswork here. When you reach the level needed for the next area, it automatically points you toward your next destination, so you rarely have to wonder where to sail. Stick to that quest line on each fresh island instead of grinding random mobs in place.
Island bosses are the other big EXP source. They hit harder than normal enemies, but they pay out far more experience and frequently drop swords or accessories. If a boss shows up while you are questing, it is almost always worth taking it down before you move on.
Tip: Equip a strong Devil Fruit or fighting style before you grind. Clearing enemies faster directly raises your EXP per hour, so damage output matters as much as picking the right quest.
Here is a rough early-game route to keep you fighting enemies near your own level.
| Level range | Where to grind |
|---|---|
| 1 – 40 | Starter Island quest loops, thieves and bandits |
| 40 – 90 | Clown Island, clustered mobs |
| 90 – 160 | Shark Park, minor bosses |
| 160 – 250 | Desert Ruins groups |
| 250+ | Sea Restaurant and beyond, prep for Second Sea |
Earning cash while you level
Cash pays for weapons, Fruit rolls, and upgrades, so you never really stop needing it. The good news is that the activities feeding your EXP bar usually fill your wallet too. Completing quests remains the single most efficient move for beginners because it rewards money and experience at the same time.
Boss farming stacks on top of that. Bosses pay out much more cash than regular enemies and carry a chance at rare drops. Two other income streams are easy to forget: claim your daily login rewards whenever they are available, since they often include cash, Gems, Devil Fruits, and boosts, and crack open the chests scattered across every island for a payout that scales with their rarity.
Roll a race for permanent passive buffs
Every race grants passive bonuses such as extra HP, more movement speed, or faster stamina recovery, and you roll for one from the Race section on the left side of the screen. Rolling costs Race Reroll items, which you mostly earn by redeeming active game codes. If you would rather not wait for new codes, you can also buy extra rerolls with Robux.
Because each race suits a different playstyle, it is worth rerolling until you land one you like. The most sought-after option is D. Clan, a Mythical race that grants the widest set of buffs and unlocks Conqueror’s Haki. Dragonborne is the other standout early target thanks to its health and regen bonuses.
| Race | Rarity / roll chance | Buff highlights |
|---|---|---|
| Human | Common (55%) | +25% walkspeed under 70% HP |
| Skyborne / Beastborne / Fishborne | Uncommon (35%) | Skywalk boost, walkspeed and stamina, or swim speed |
| Demon | Rare (8.9%) | 2.5% life steal |
| Dragonborne | Legendary (1%) | +10% health, +10% health regen, Skywalk boost |
| D. Clan | Mythical (0.1%) | Health and stamina bonuses, plus Conqueror’s |
How to get Devil Fruits in Haze Seas
Devil Fruits are the strongest single upgrade you can grab, giving you a combat ability that reshapes how you fight. The trade-off is permanent: any Fruit user loses the ability to swim and takes steady damage while standing in water, so plan your travel around boats. Fruits are also fully tradable, which means duplicates are worth keeping for exchanges.
There are three Fruit types, and each one changes your approach to combat.
| Type | What it does |
|---|---|
| Zoan | Transform into powerful animals to boost physical combat |
| Paramecia | Grants unique physical powers and environmental manipulation |
| Logia | Turn into natural elements; most enemies cannot hurt you without Buso Haki or a Devil Fruit attack |
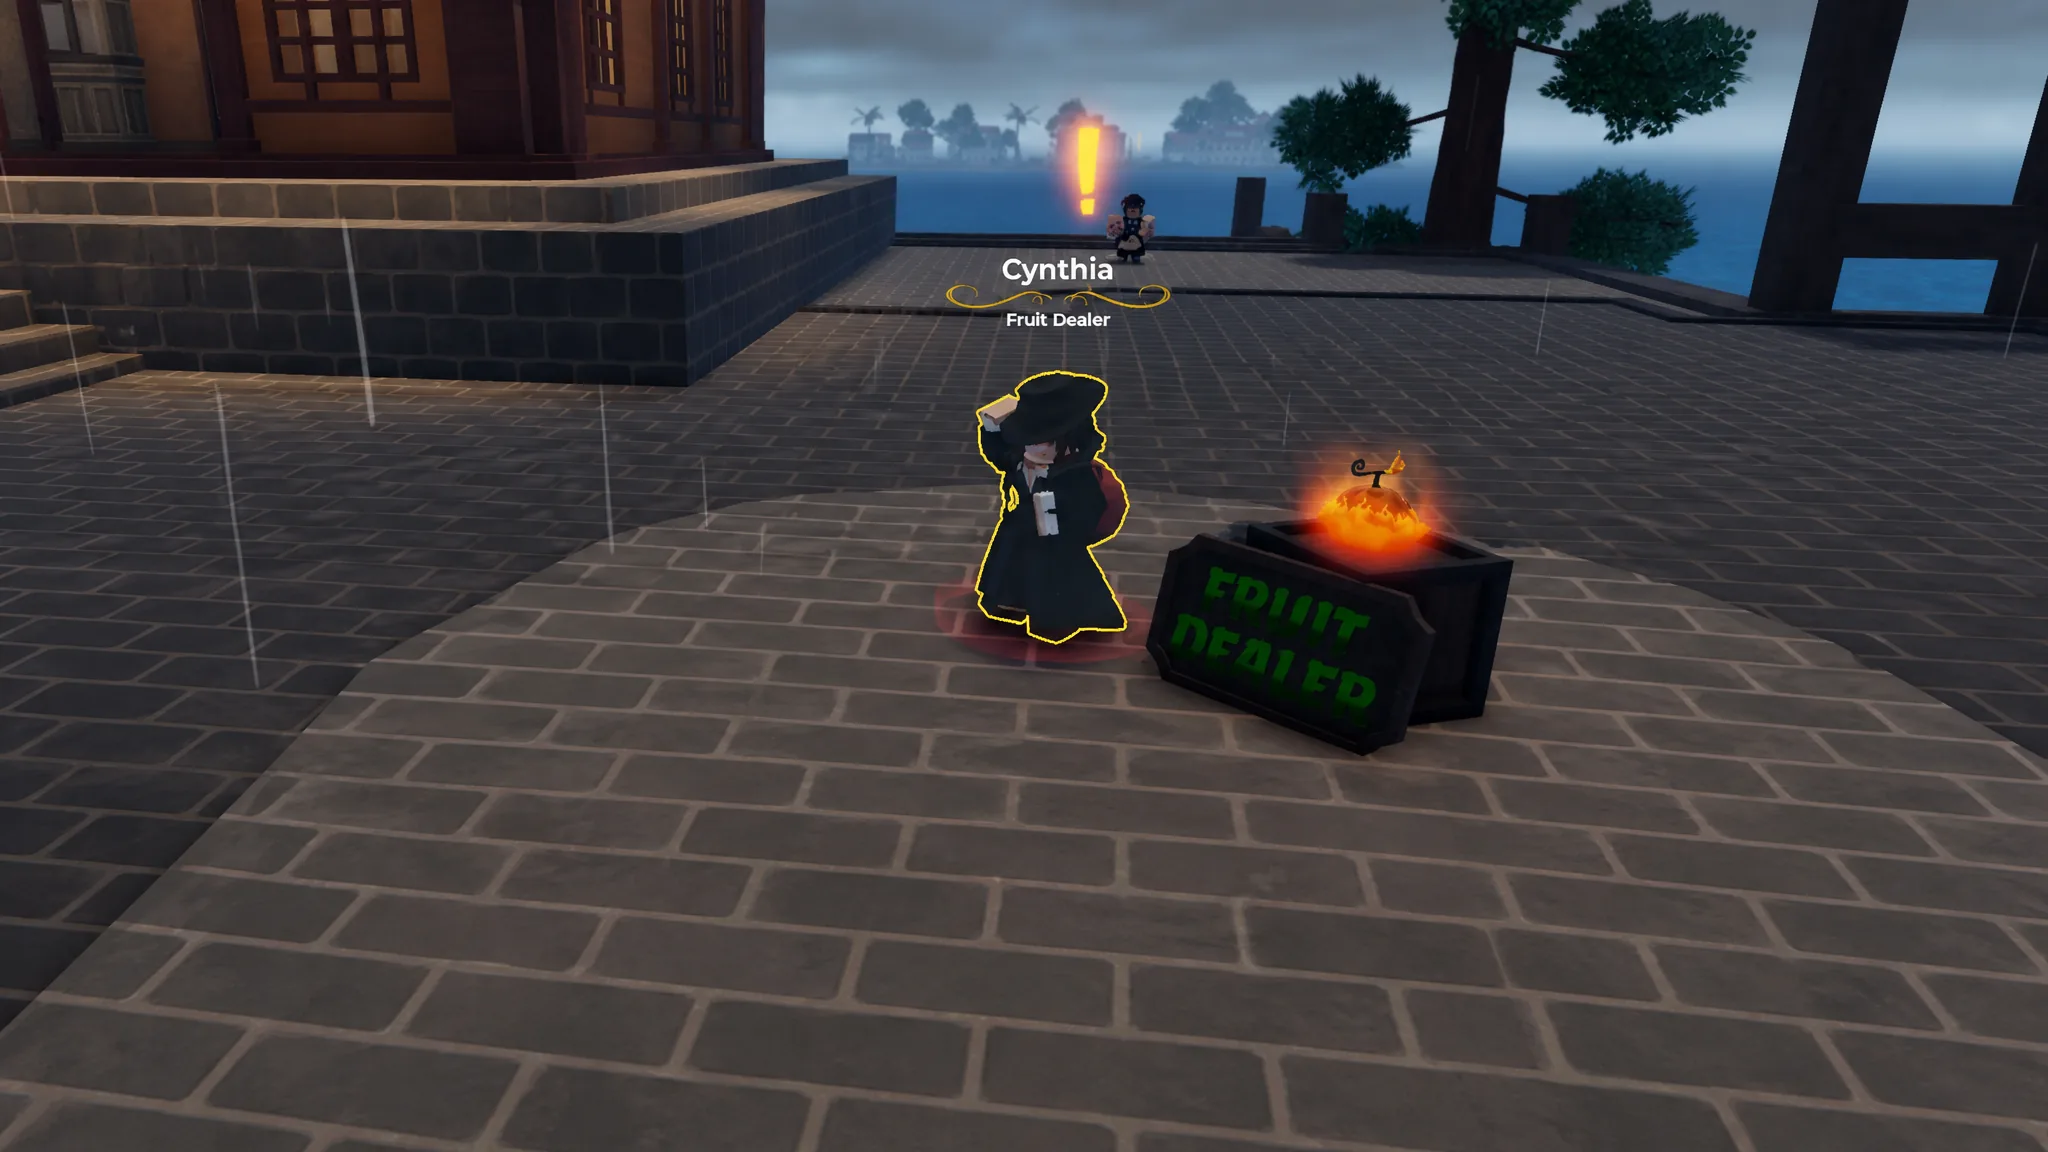
You have several routes to a Fruit. The main one is Fruit Dealer Cynthia on the starter island, who lets you roll a random Fruit for 125K cash or 50 Gems, or buy a specific Fruit outright if it is in her current stock.
- Tree spawns: Fruits appear under trees every 60 minutes and despawn 20 minutes after spawning.
- Daily login rewards: Regularly include free Devil Fruits, with Legendary Fruits reachable through longer AFK sessions.
- Starter reward: Claim a free random Fruit by liking the game, favoriting it, and joining the official Roblox group.
For beginners, an Elemental (Logia) Fruit is the highest priority pick since it makes you immune to physical damage from ordinary enemies. Light and Flame are strong, accessible choices, with Light’s Teleport and Light Fly speeding up island travel and Flame’s area attacks clearing groups fast. If you ever pull a Legendary or Mythical Fruit like Dragon, Dough, or Gum, hold onto it regardless of how early you are. Note that a consumed Fruit is saved to your character permanently, but an unused Fruit sitting in your inventory disappears if you leave the server without eating it.
How to get swords in Haze Seas
Swords are one of the three main damage systems, and each blade carries its own moveset that expands as you raise Sword Mastery by killing enemies and bosses with it equipped. Early swords are bought from weapon shops on the islands using cash, and the Katana on Starter Island is the first one you can grab.

Shop swords are fine to start with, but the strongest blades in the game are boss drops that cannot be bought anywhere. As you climb into higher-level islands, boss farming becomes central to sword progression. Some swords also have V2 upgrades, unlocked either through more boss drops or by crafting at Doran the Forge in Sea 3, so a few early weapons are worth grinding Mastery on well before their upgrades are within reach.
Unlocking fighting styles and Haki
Fighting Styles are melee options taught by trainers on specific islands, and a couple of them double as key mobility unlocks that make exploring far quicker. Buso Haki is the one you cannot skip, because without it you deal zero damage to Logia-type Fruit users, which becomes a serious problem in PvP and several boss fights.
| Skill | Where to unlock | Effect |
|---|---|---|
| Flash Step | Trainer on Clown Island (Level 40) | Press T for a rapid teleport dash |
| Skywalk | Black Leg trainer in the hidden cave at Rocky Pillars Island | Lets you travel through the air |
| Buso Haki | Old Man Silver in Luke Town (Level 350) | Press J to add damage and hit Logia users |
| Observation Haki | Trainer on Marine Base Town Island (Level 600) | Press R to reveal enemy health and dodge attacks |
Prioritize Buso and Observation Haki as soon as you meet their level requirements. Conqueror’s Haki is the rare third type that can stun weaker enemies, and it is tied to the D. Clan race or specific unlocks rather than a standard trainer visit.
Best stats to invest in
The most common beginner mistake is spreading stat points evenly across every category. Splitting them equally lowers your total damage and slows you down at every stage. Instead, commit to one primary damage stat that matches your build and keep Defense as your secondary.
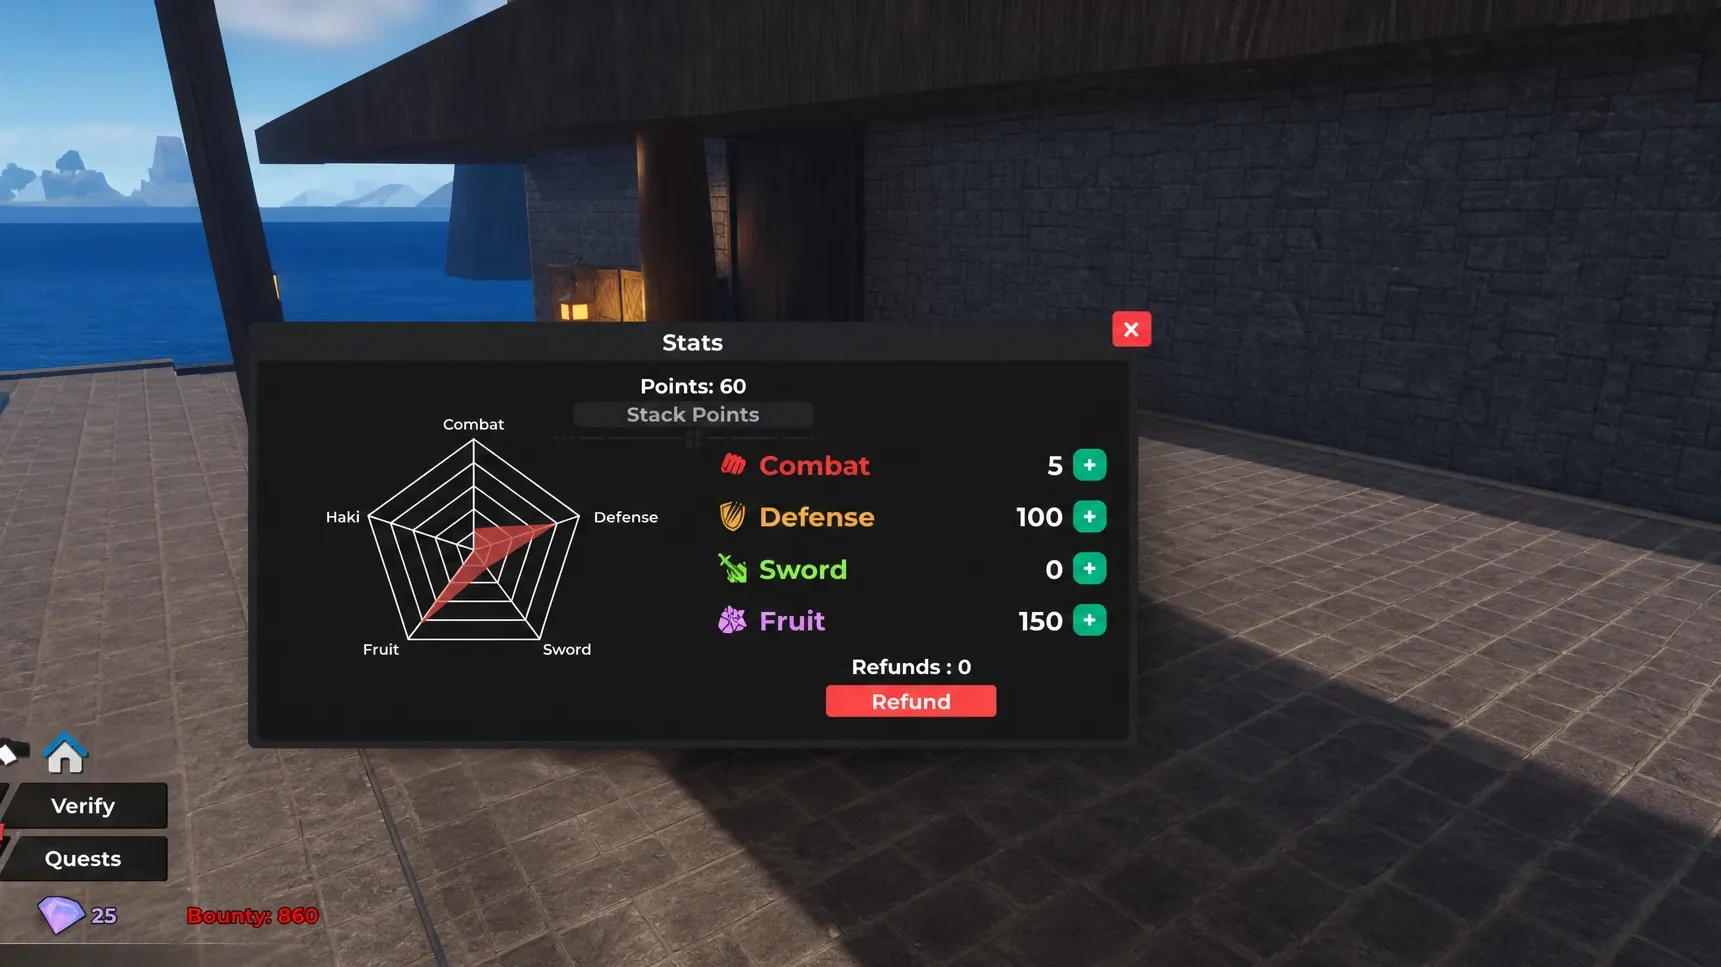
| Build | Stat priority |
|---|---|
| Devil Fruit | Fruit → Defense → Sword |
| Sword | Sword → Defense → Fruit |
| Fighting Style | Combat → Defense → Fruit |
Defense stays your second priority across all three builds because survivability matters more than a few extra points of damage when you are grinding bosses with huge health pools. If you want to change direction later, a Stat Refund returns your allocated points so you can rebuild from scratch, though it costs some Robux, so save it for when you have a clear new plan.
Lock in the quest loop first, roll toward a strong race, and pick one damage system to invest in, and the rest of Haze Seas opens up without the early overwhelm. From there, farming chests and Sea 1 bosses steadily builds the cash and gear you need to push into the Second Sea.