
Microsoft Store app installations can fail on Windows 11 due to a range of system, account, or configuration issues. Symptoms include missing install buttons, error codes (such as 0x80070005), or the inability to find certain apps. Addressing these problems involves a combination of cache clearing, app repair, service management, and account verification. Each method below targets a specific cause and is designed to restore your ability to download and install apps from the Microsoft Store.
Repair or Reset Microsoft Store App
Repairing or resetting the Microsoft Store app often resolves most installation and update failures. This process restores the app’s default state, removes corrupted settings, and can resolve persistent errors without deleting your installed apps.
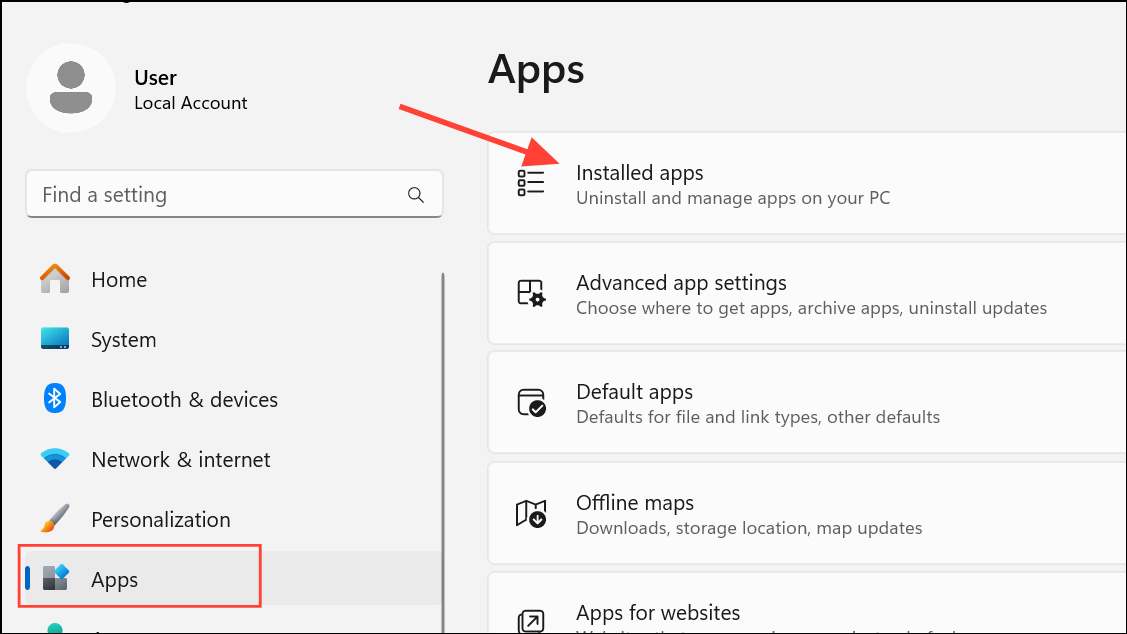
Step 1: Open the Settings application by pressing Windows + I. In the left pane, select Apps, then click on Installed apps or Apps & features depending on your Windows 11 version.
Step 2: Scroll through the list to find Microsoft Store. Click the three-dot menu next to it and choose Advanced options.
Step 3: On the Advanced options page, click Repair. This attempts to fix issues without affecting app data. Wait for the process to complete, then check if you can install apps.
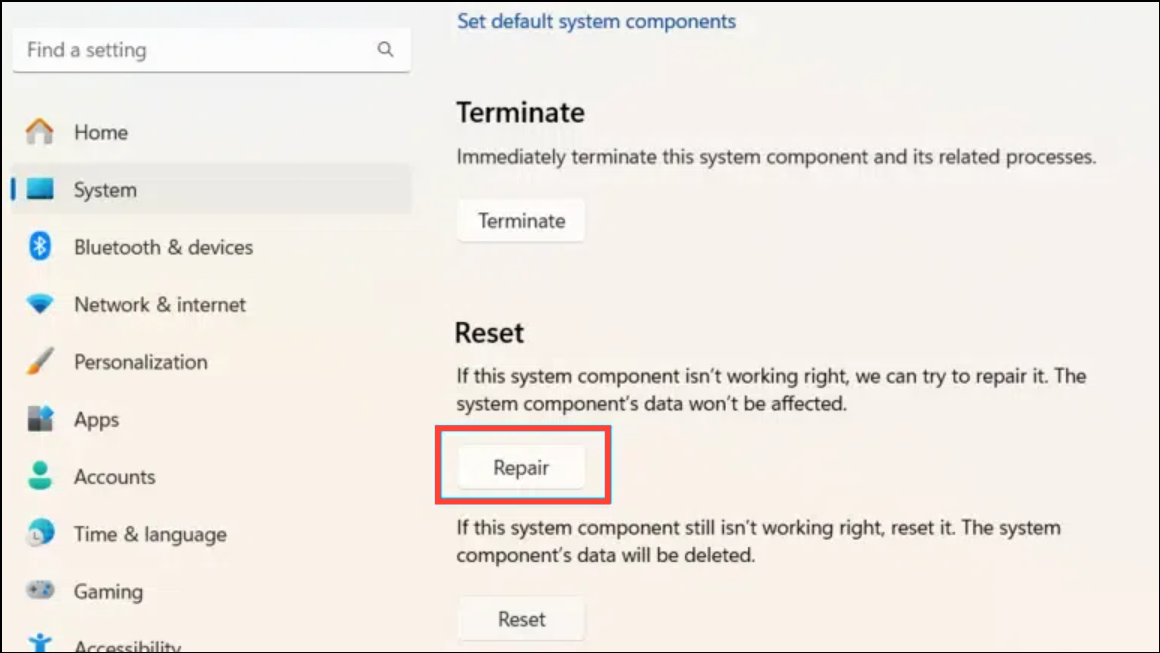
Step 4: If problems persist, return to the same page and click Reset. Confirm your choice. This will remove all Microsoft Store data, including sign-in details and preferences, but your installed apps will remain unaffected. Open Microsoft Store and try downloading an app again.
Clear Microsoft Store Cache
Corrupted cache files can block downloads or cause the Store to display outdated content. Clearing the cache forces Microsoft Store to fetch fresh data, often resolving glitches and installation errors.
Step 1: Press Windows + R to open the Run dialog. Type wsreset.exe and press Enter.
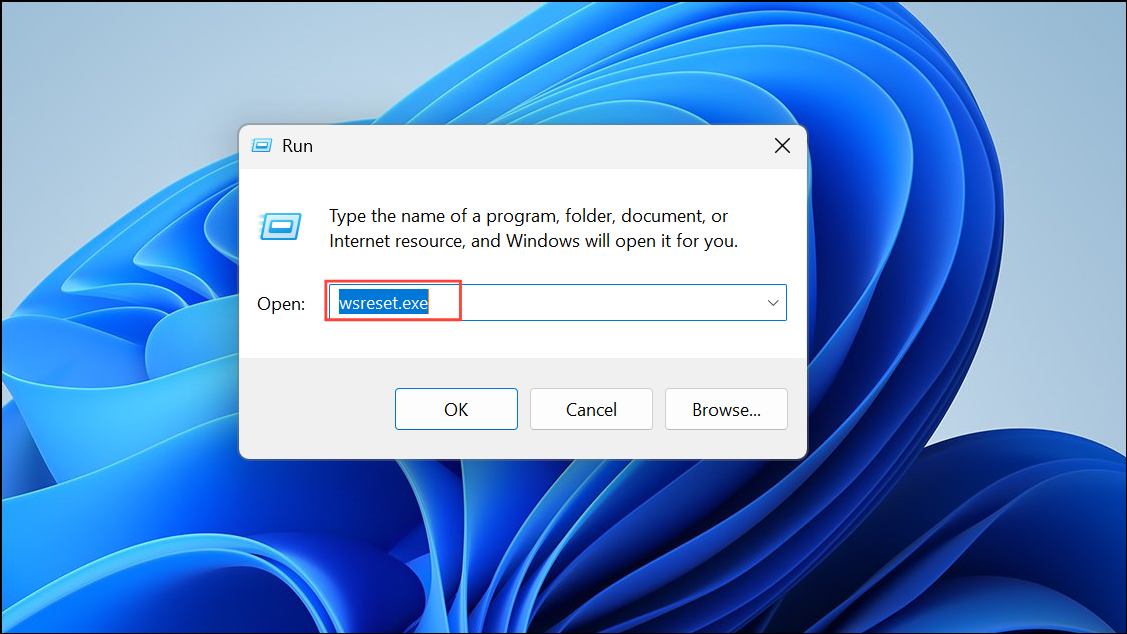
Step 2: A blank Command Prompt window will appear for several seconds. Once the cache is cleared, Microsoft Store will open automatically. Attempt to install or update the desired app.
Uninstall and Reinstall Microsoft Store Using PowerShell
If the Store app is missing or severely corrupted, uninstalling and reinstalling it can restore full functionality. This method requires administrative privileges and should be used if standard repairs fail.
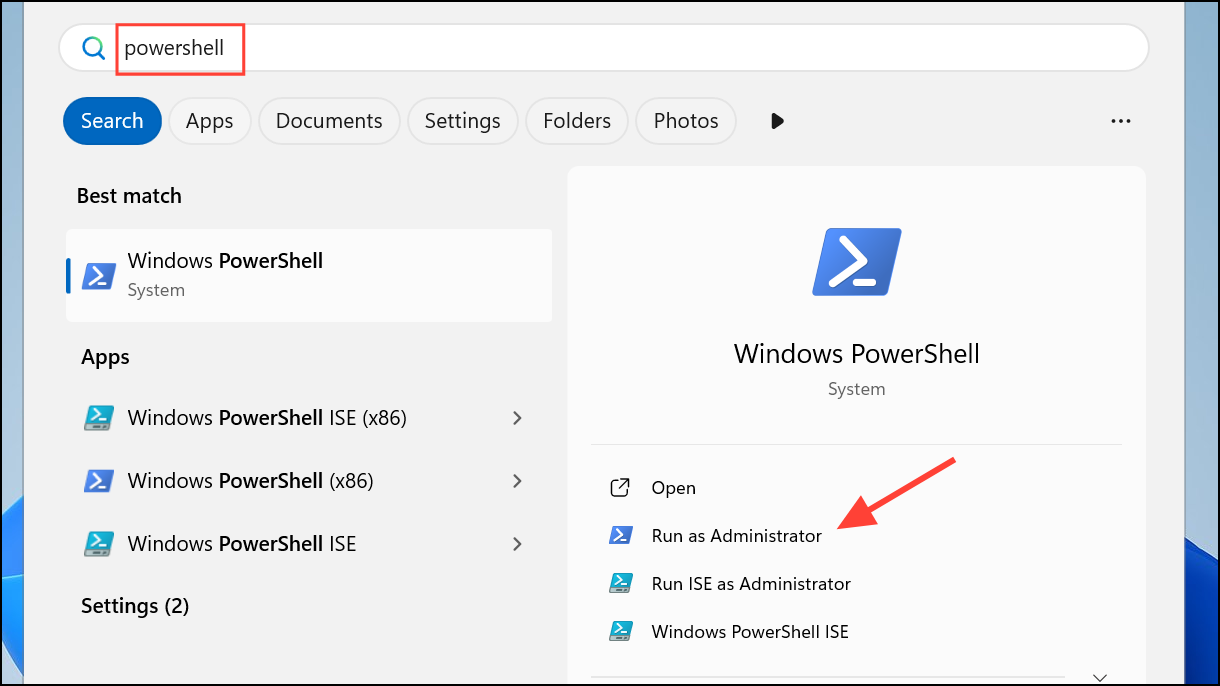
Step 1: Open PowerShell as an administrator by searching for “PowerShell” in Start, right-clicking the result, and choosing Run as administrator.
Step 2: To uninstall Microsoft Store, enter:
Get-AppxPackage Microsoft.WindowsStore | Remove-AppxPackage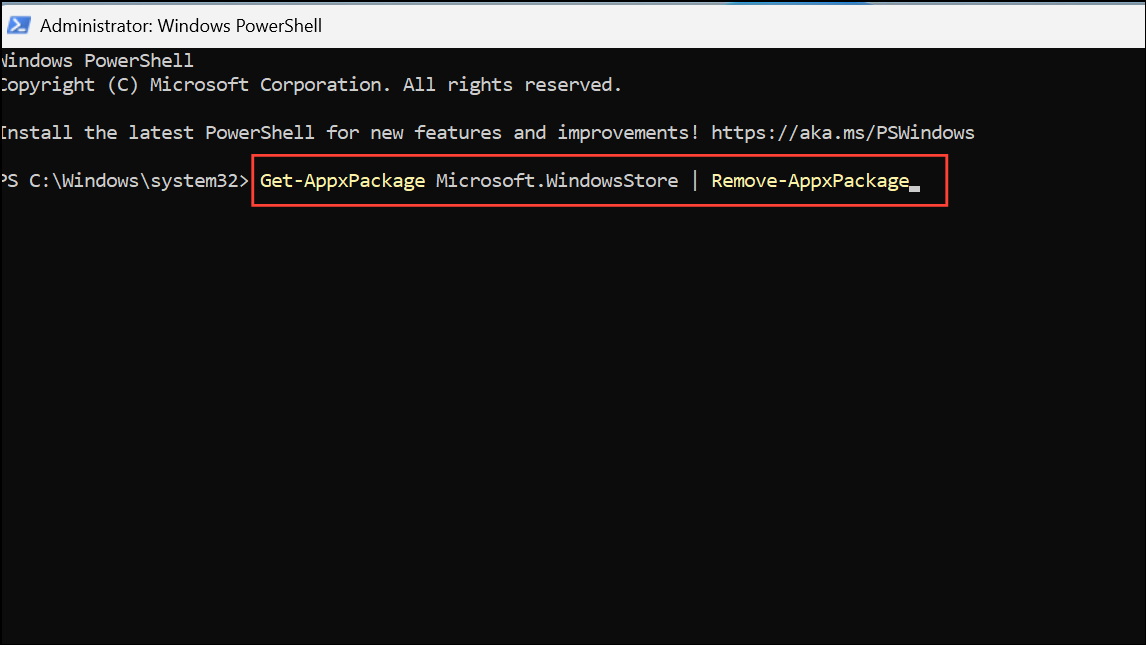
Step 3: After uninstalling, reinstall the app with:
Get-AppXPackage *WindowsStore* -AllUsers | Foreach {Add-AppxPackage -DisableDevelopmentMode -Register "$($_.InstallLocation)\AppXManifest.xml"}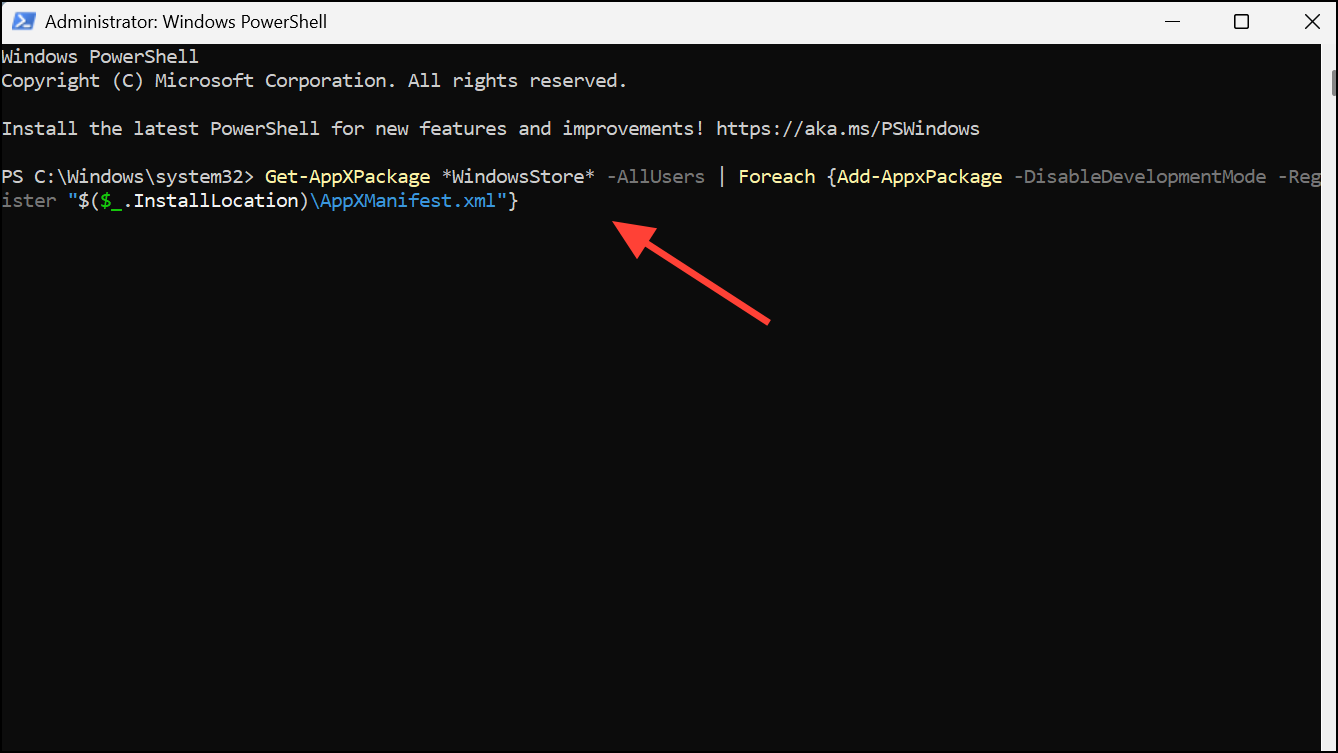
Step 4: Restart your computer. Open Microsoft Store and verify if installation issues are resolved.
Restart Essential Microsoft Store Services
Several background services support Microsoft Store operations. If these are stopped or misconfigured, app installations may fail. Restarting and setting them to automatic can restore proper operation.
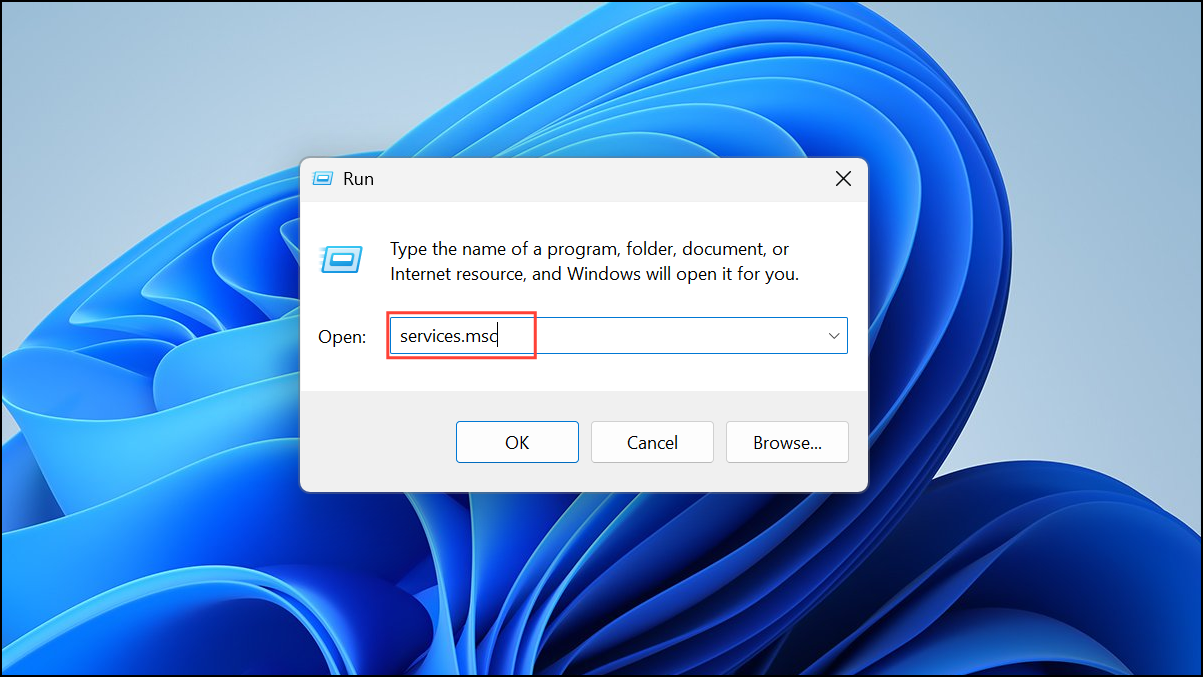
Step 1: Press Windows + R, type services.msc, and press Enter to open the Services window.
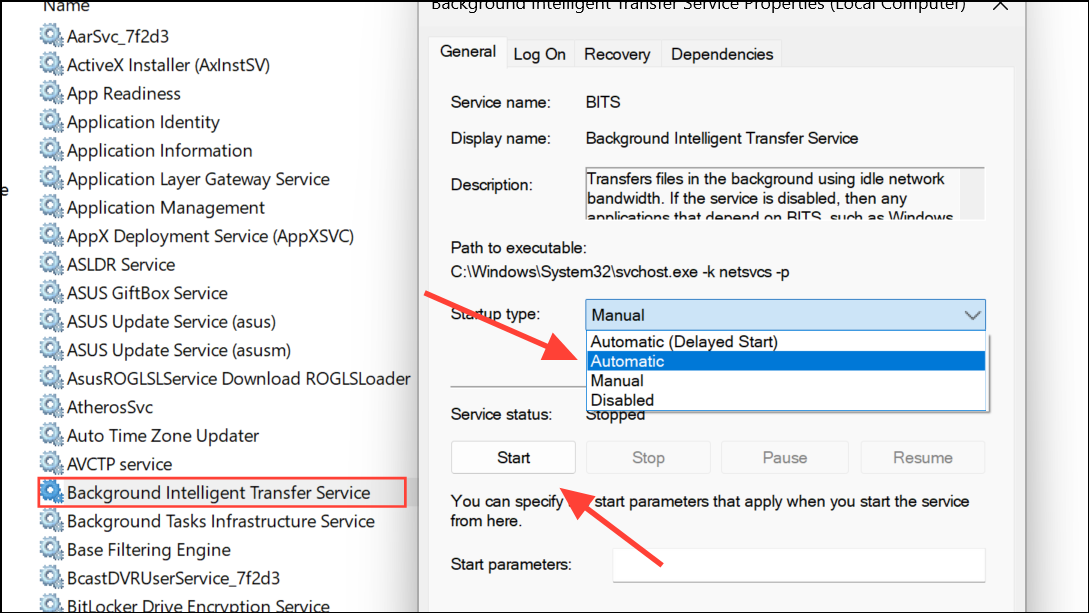
Step 2: Locate the following services one by one: Background Intelligent Transfer Service (BITS), Microsoft Store Install Service, and Windows Update.
Step 3: For each service, right-click and select Properties. Set Startup type to Automatic. If the service is not running, click Start. Click Apply and OK to save changes.
Step 4: Close the Services window and test Microsoft Store app installation again.
Run Windows Store Apps Troubleshooter
Windows 11 includes a dedicated troubleshooter for Store apps. This tool identifies and automatically corrects common Store-related issues.
Step 1: Open Settings and select System. Scroll down and click Troubleshoot, then select Other troubleshooters.
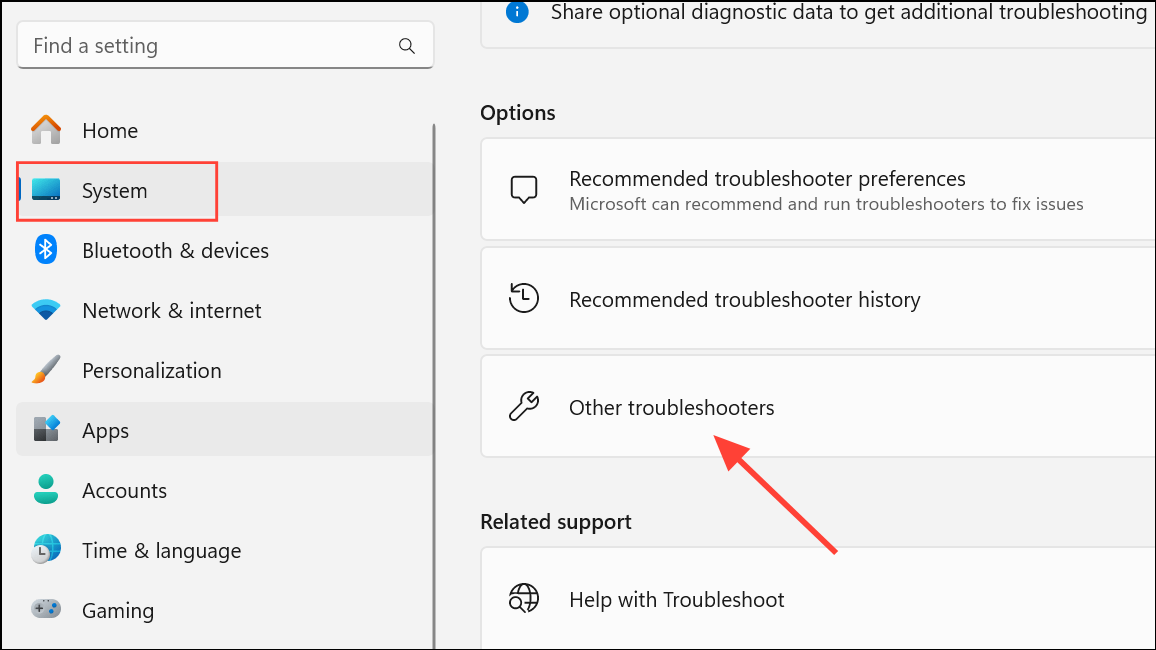
Step 2: Find Windows Store Apps in the list and click Run. Follow on-screen instructions. If any issues are detected, the troubleshooter will attempt to fix them automatically.
Check Account and Device Restrictions
Account controls, device limits, and system settings can prevent app installations or hide apps in the Store. Reviewing these configurations can resolve invisible or blocked app issues.
- Verify you are signed in with a Microsoft account in the Store. Some apps require an account to download or install.
- If you receive messages about device limits, remove unused devices from your Microsoft account device list or uninstall apps on other devices.
- Review Microsoft Family Safety or parental controls, as these may restrict app installations based on age or content ratings.
- Check your device’s region and language settings under Settings > Time & Language, as some apps are region-locked.
- Restart your device after major system updates to complete pending changes that may block Store functionality.
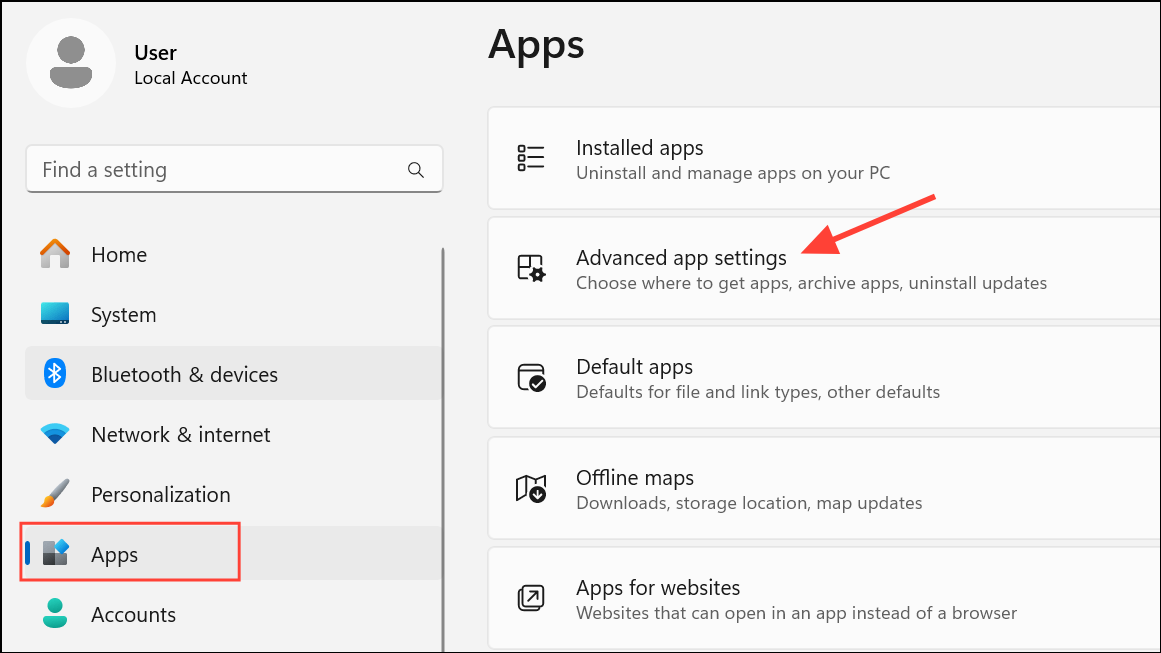
Switch Off S Mode or Adjust App Installation Settings
Windows 11 in S Mode only allows the installation of apps from the Microsoft Store. If you need to install apps from outside the Store or encounter messages about “Microsoft-verified apps,” you may need to switch out of S Mode or adjust app installation settings.
Step 1: Open Settings, go to Apps > Advanced app settings.
Step 2: Choose where to get apps, and select Anywhere.
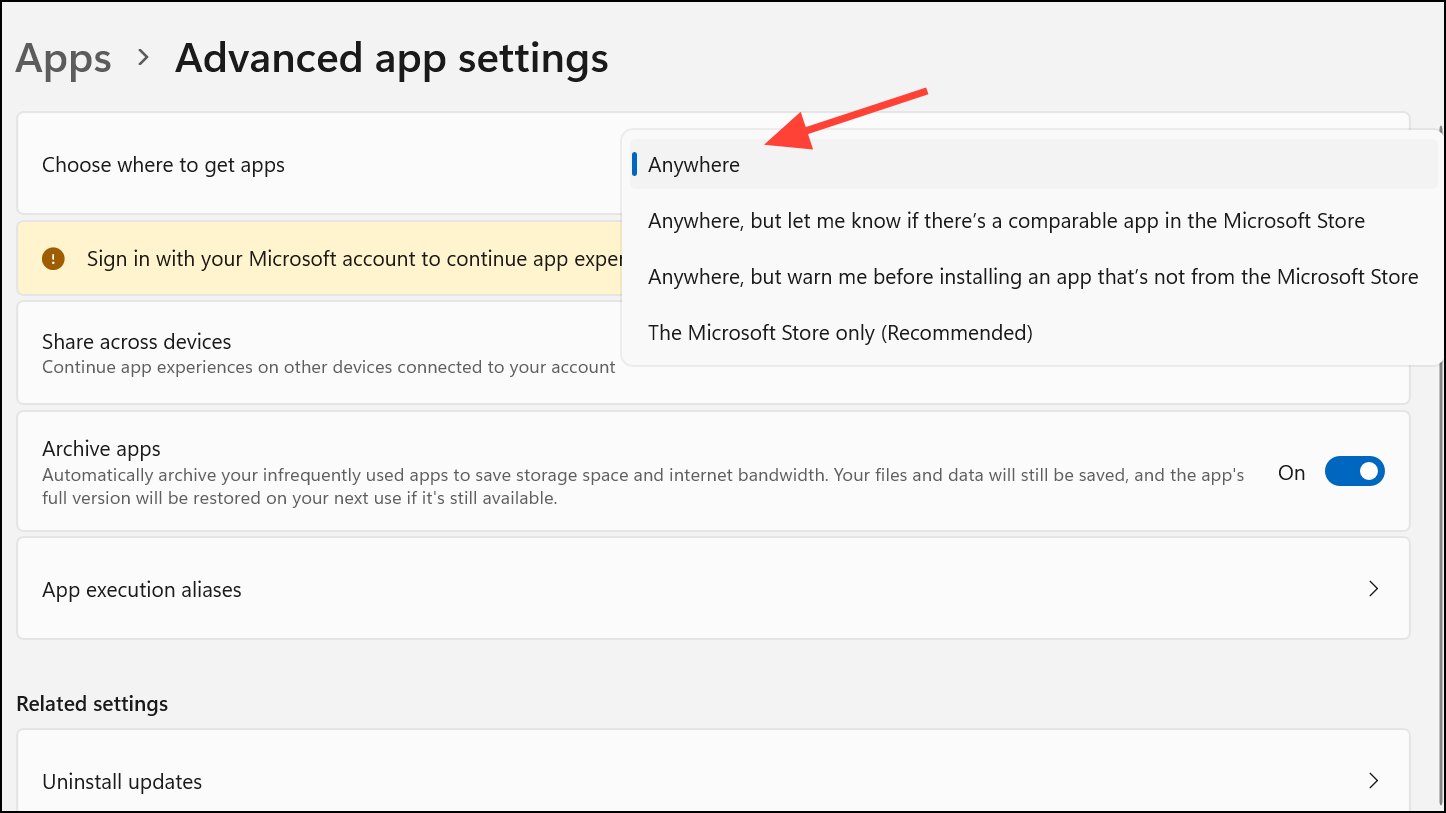
Step 3: If you cannot change this setting and see references to S Mode, search About your PC in Settings and look for S Mode status. To switch out of S Mode, follow the “Switch out of S Mode” option in the Microsoft Store. Note: This is a one-way process and cannot be undone.
Repair System Files with SFC and DISM
Corrupted Windows system files can disrupt Store operations. Running built-in repair tools can restore system integrity and resolve stubborn installation problems.
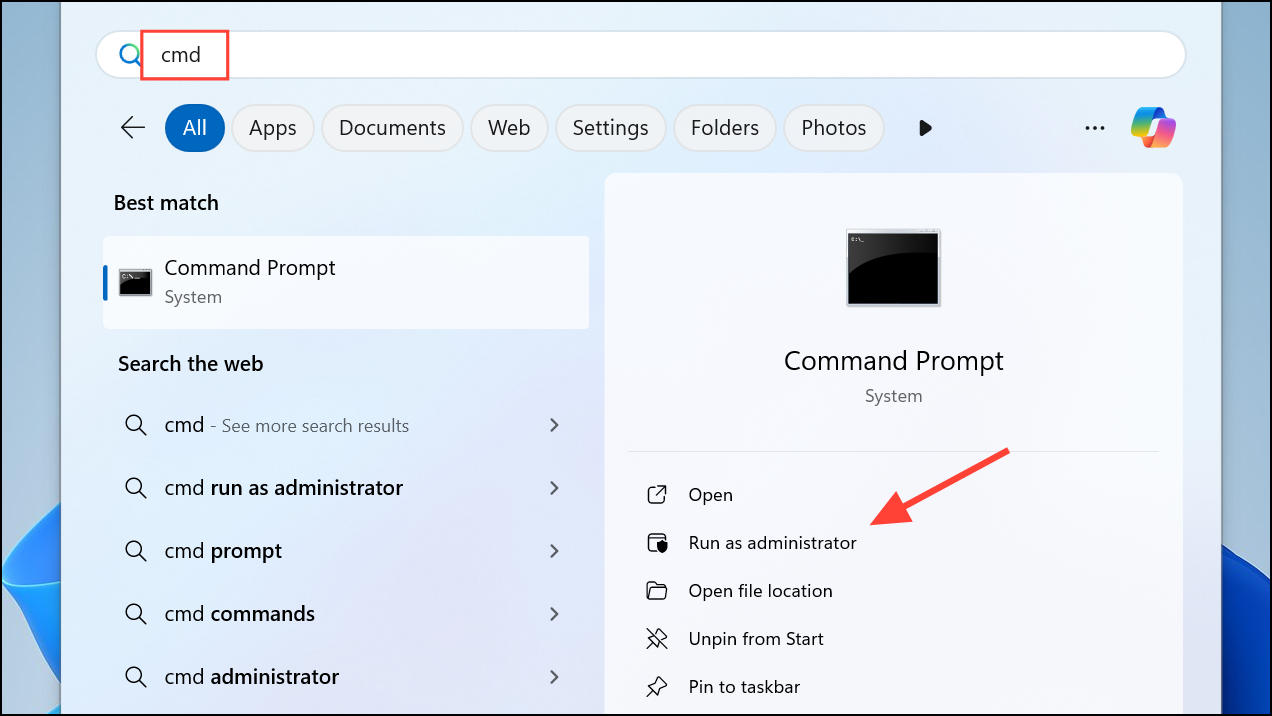
Step 1: Open Command Prompt as administrator (search “cmd”, right-click, and select Run as administrator).
Step 2: Enter the following command to repair system image components:
Dism.exe /Online /Cleanup-Image /Restorehealth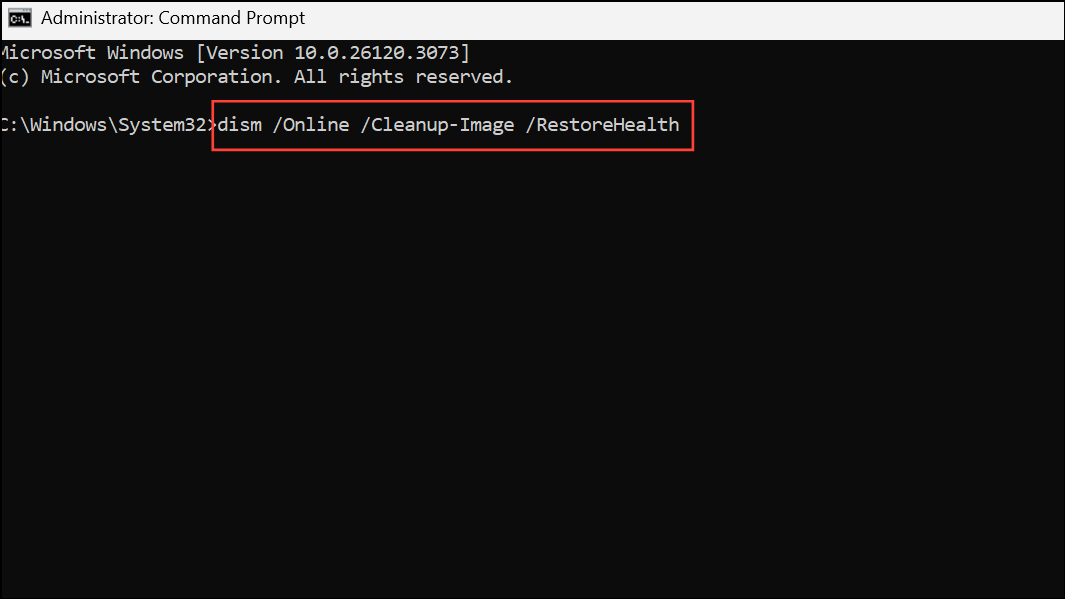
Step 3: Once DISM completes, run the System File Checker:
sfc /scannow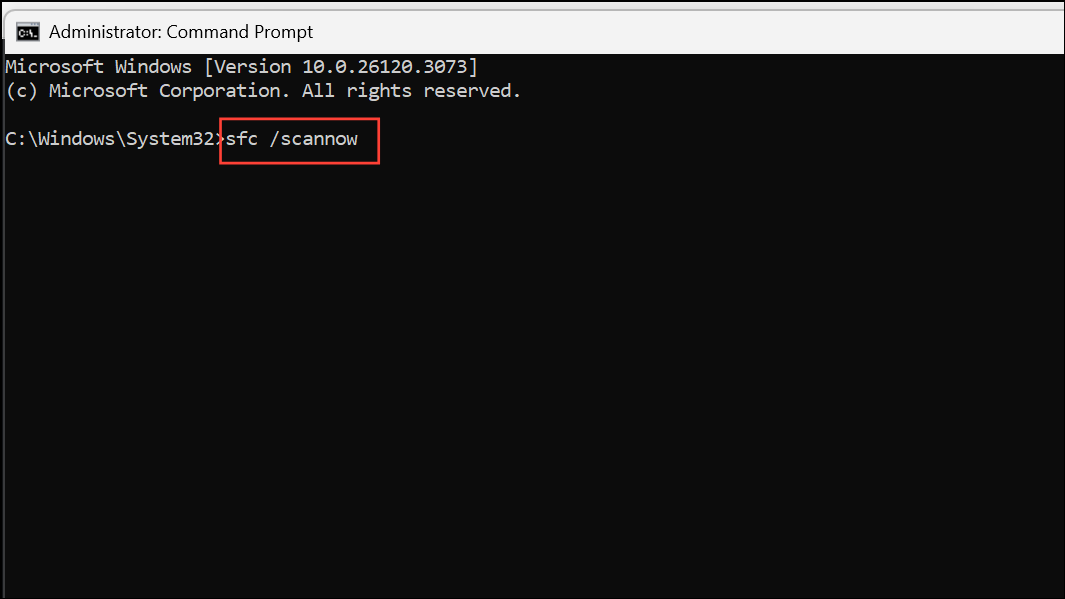
Step 4: After repairs finish, restart your computer and test Microsoft Store functionality.
Create a New User Account
Corrupted user profiles can block Store access or app installations. Creating a new user account with administrative privileges can help determine if the issue is profile-specific.
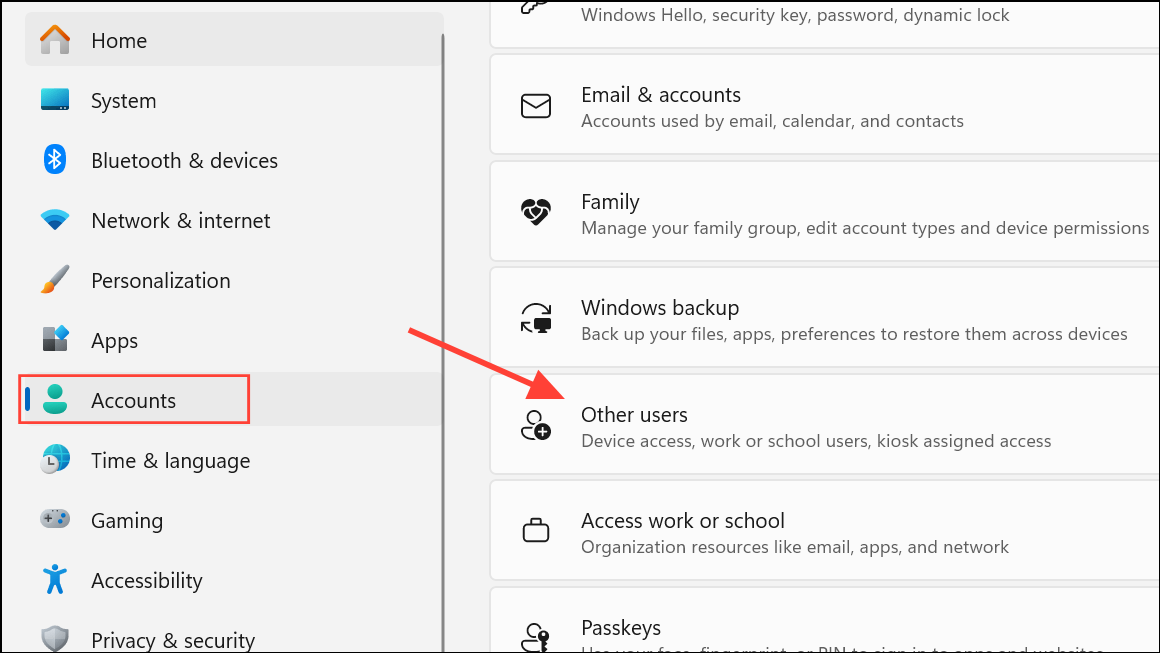
Step 1: Open Settings, select Accounts, then Other users.
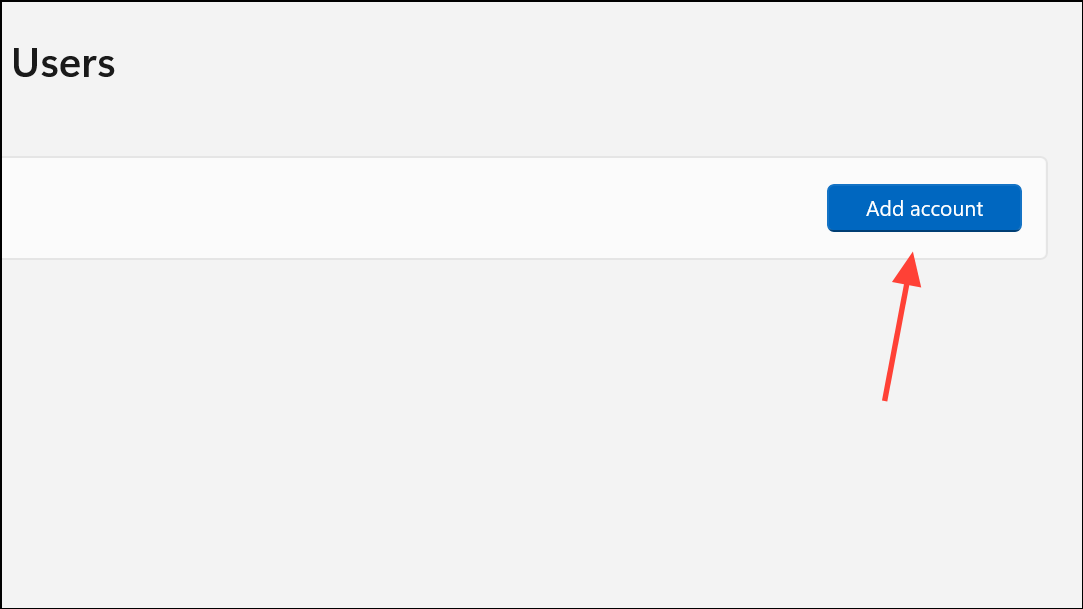
Step 2: Under Other users, click Add account. Choose I don’t have this person’s sign-in information, then select Add a user without a Microsoft account.
Step 3: Enter a username and set the account type to Administrator.
Step 4: Sign out and log in with the new account. Open Microsoft Store, sign in with your Microsoft account, and test app installation. If successful, consider migrating your data to the new profile.
Resolving Microsoft Store app installation issues on Windows 11 typically involves a combination of cache clearing, app repair, service checks, and account verification. If none of these methods restore normal operation, consider contacting Microsoft Support or performing a system recovery as a last resort.