
When the primary administrator account on a Windows 11 system is disabled, you lose the ability to approve User Account Control (UAC) prompts, install software, or modify crucial system settings. This situation can occur after using tools like netplwiz to adjust login settings or due to an accidental configuration change. The most effective way to resolve this is by using the Command Prompt from the Windows Recovery Environment to reactivate the account.
Enable the Administrator Account Using Command Prompt
This method is the most direct approach to re-enable your administrator account when you are locked out of your regular user session. It involves booting into the Windows Recovery Environment (WinRE), which provides access to troubleshooting tools without needing to log in to Windows.
Step 1: On the Windows sign-in screen, locate the power icon in the bottom-right corner. Press and hold the Shift key on your keyboard, and while holding it, click the power icon and select Restart. Continue holding the Shift key until the "Choose an option" screen appears.
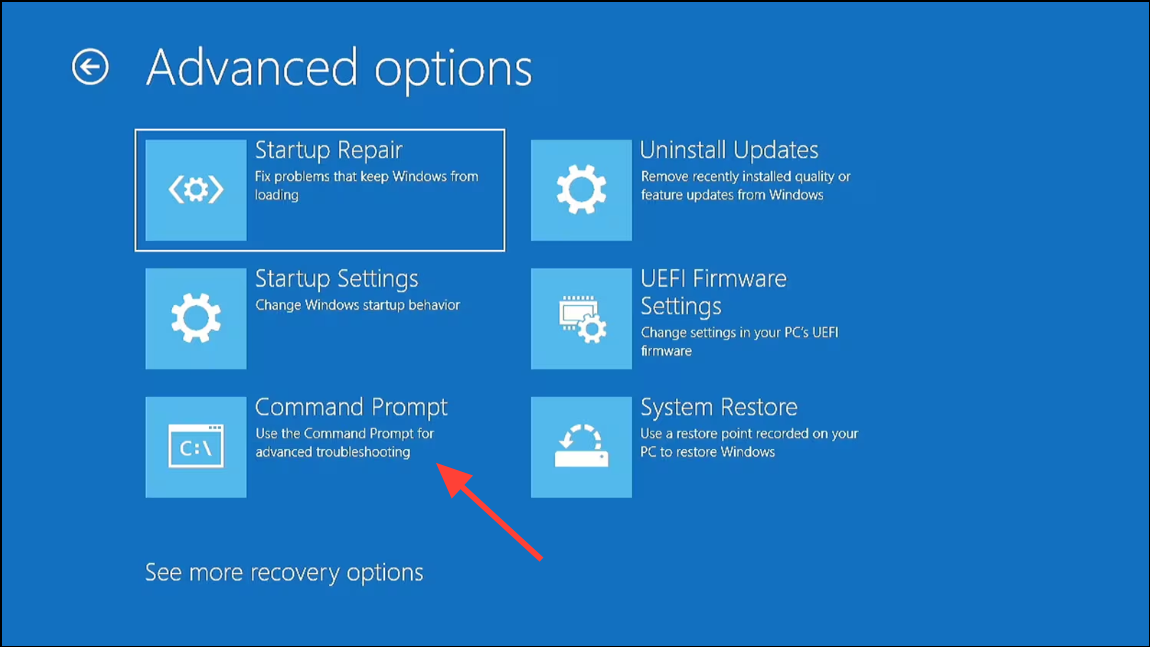
Step 2: On the "Choose an option" screen, select Troubleshoot. From there, click Advanced options.
Step 3: In the Advanced options menu, select Command Prompt. Your computer will restart and open a Command Prompt window before the main operating system loads.
Step 4: In the Command Prompt window, type the following command and press Enter. This command targets the built-in administrator account and sets its status to active.
net user administrator /active:yes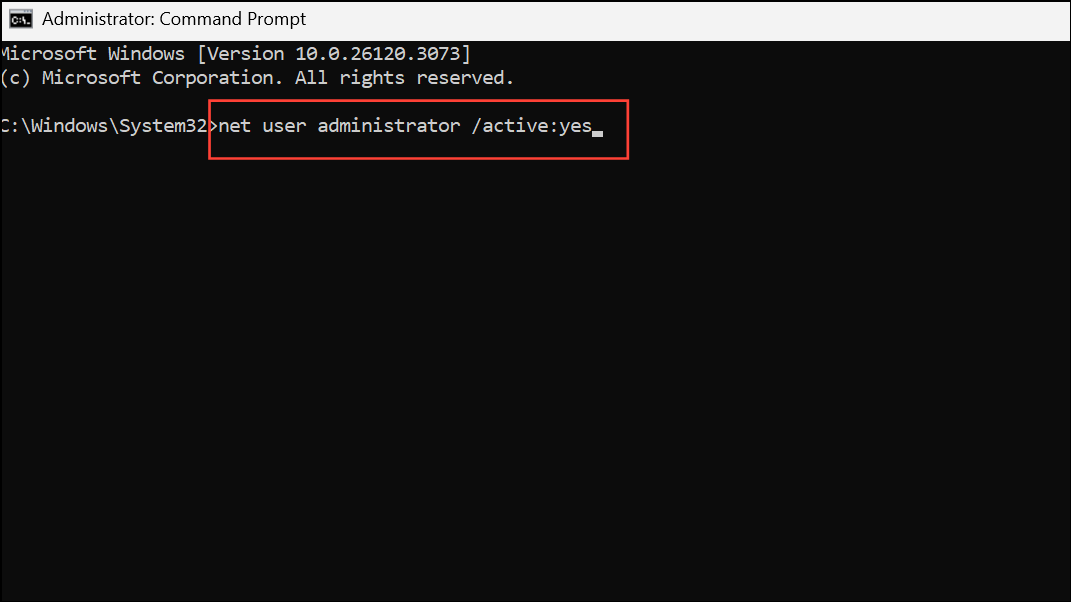
Step 5: After the command executes, you will see a confirmation message that says, "The command completed successfully." Close the Command Prompt window by clicking the "X" in the top-right corner.
Step 6: You will be taken back to the "Choose an option" screen. Select Continue to exit the recovery environment and restart your computer to boot into Windows 11 normally.
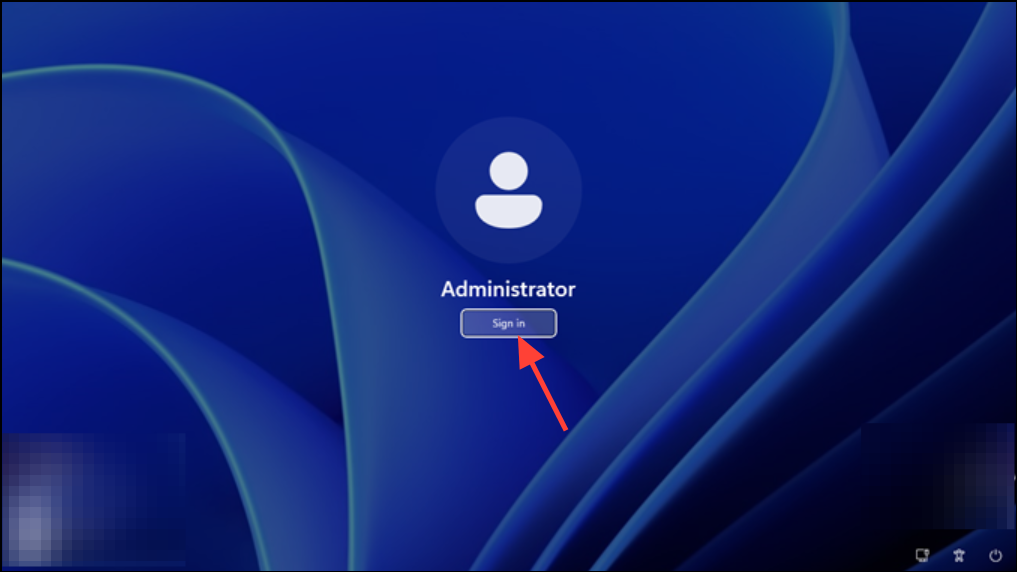
Step 7: On the sign-in screen, you should now see the "Administrator" account as an option. Click it to log in. By default, this account has no password. Once logged in, you can restore administrative privileges to your original user account through the Control Panel or Computer Management settings.
Re-enable the Administrator Account via Safe Mode
If you prefer a graphical interface, you can use Safe Mode to log in and re-enable the account. When Windows starts in Safe Mode, it allows the built-in Administrator account to be used for login, even if it has been disabled.
Step 1: Access the Windows Recovery Environment by holding the Shift key while clicking Restart from the sign-in screen's power menu.
Step 2: On the "Choose an option" screen, navigate to Troubleshoot > Advanced options > Startup Settings.

Step 3: Click the Restart button. Your computer will reboot and present a list of startup options.
Step 4: Press the 4 or F4 key on your keyboard to boot into Safe Mode.
Step 5: On the Safe Mode login screen, select the Administrator account. You will be logged into a basic Windows desktop environment.
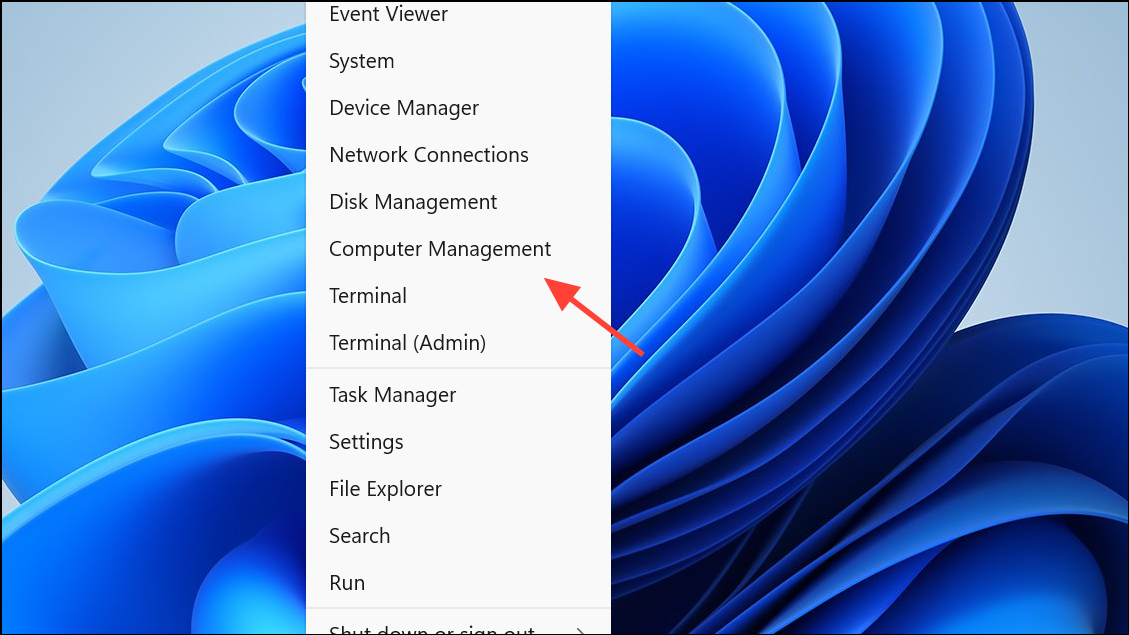
Step 6: Right-click the Start button and select Computer Management from the menu.
Step 7: In the Computer Management window, expand the Local Users and Groups section in the left pane, and then click on the Users folder.
Step 8: In the central pane, right-click the Administrator account and select Properties.
Step 9: In the Administrator Properties window, uncheck the box next to Account is disabled. Click Apply and then OK to save the change.
Step 10: Close Computer Management and restart your computer. It will boot into normal mode, and the administrator account will be permanently enabled and accessible from the standard sign-in screen.
Manually Enable the Administrator Account by Editing the Registry
This method is for advanced users and should only be attempted if the other methods fail. It involves booting from a Windows installation media and directly modifying the Security Account Manager (SAM) file in the Windows Registry. Incorrectly modifying the registry can cause system instability.
Step 1: On a separate, working computer, use the official Microsoft Media Creation Tool to create a bootable Windows 11 installation USB drive.
Step 2: Insert the bootable USB drive into the locked computer and start it. You may need to press a specific key (e.g., F2, F12, Del) during startup to enter the BIOS/UEFI settings and change the boot order to prioritize the USB drive.
Step 3: Once the computer boots from the USB drive, the Windows Setup screen will appear. Press Shift + F10 simultaneously to open a Command Prompt window.
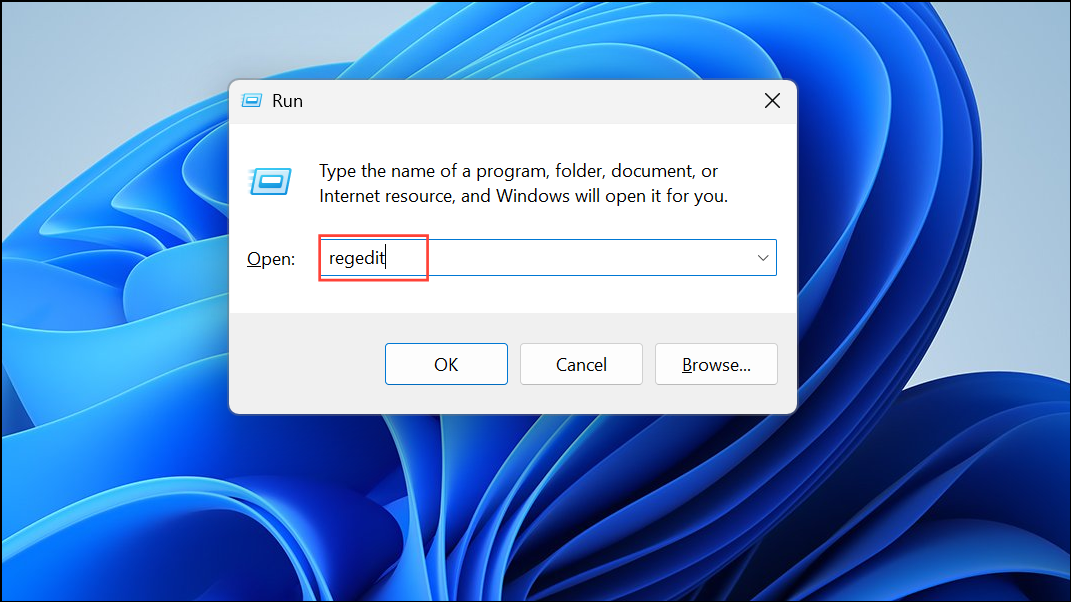
Step 4: In the Command Prompt, type regedit and press Enter to launch the Registry Editor.
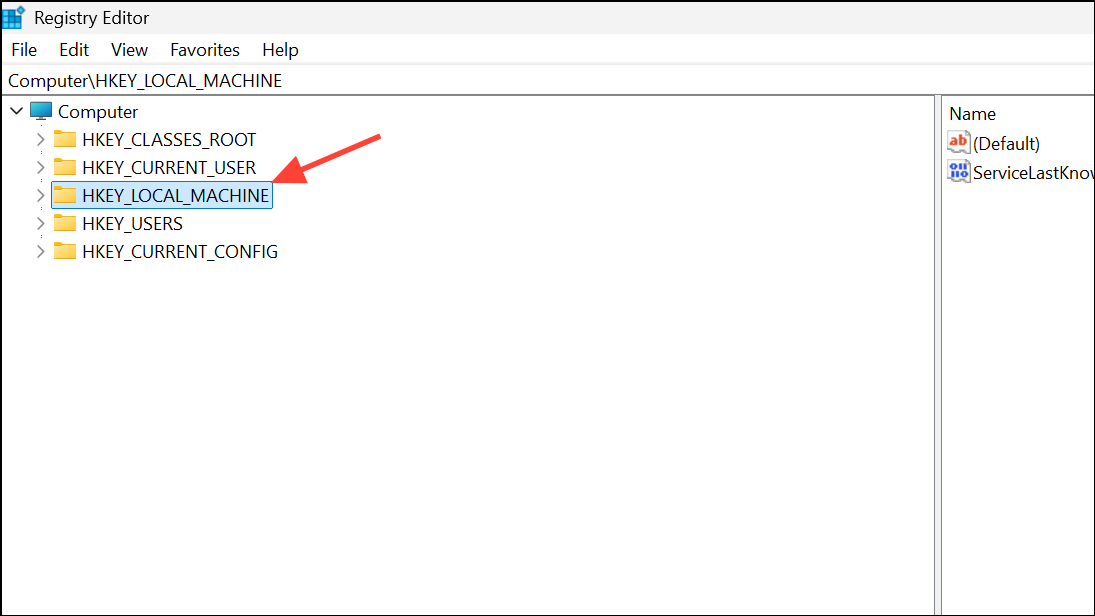
Step 5: In the Registry Editor, click to highlight the HKEY_LOCAL_MACHINE key in the left-hand navigation pane.
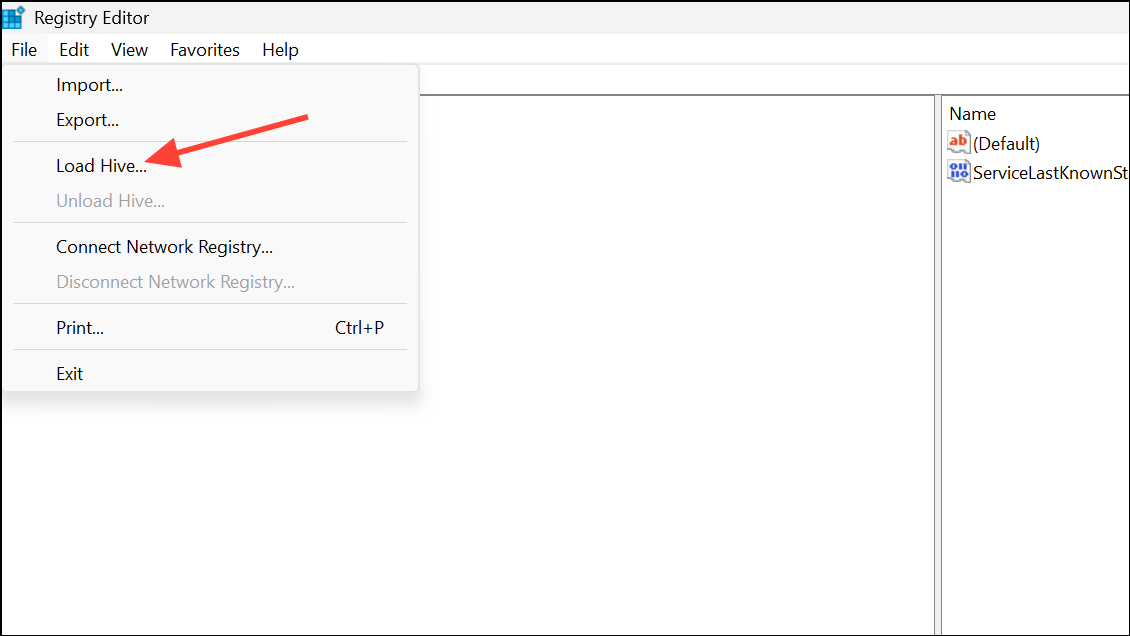
Step 6: Go to the File menu at the top and select Load Hive....
Step 7: In the "Load Hive" file browser, navigate to the drive where Windows is installed. In the recovery environment, this might be the D: or E: drive. The correct path is [Windows Drive]:\Windows\System32\config.
Step 8: Select the file named SAM (with no file extension) and click Open.
Step 9: A dialog box will prompt you for a key name. Type a temporary name for the hive, such as TEMP_SAM, and click OK.
Step 10: In the left pane, navigate down the following path: HKEY_LOCAL_MACHINE\TEMP_SAM\SAM\Domains\Account\Users\000001F4.
Step 11: Click on the 000001F4 key. In the right pane, double-click the binary value named F to open it in the hex editor.
Step 12: In the editor window, scroll down to the line with the offset 0038. In the first column of that row, you will see the value 11. Place your cursor just to the right of it, press Backspace once to delete it, and then type 10. This change toggles the account from disabled to enabled.
Step 13: Click OK to save the change and close the hex editor.
Step 14: In the left pane, click on the TEMP_SAM key you created earlier. Go to the File menu and select Unload Hive.... Confirm when prompted.
Step 15: Close the Registry Editor and the Command Prompt. Remove the bootable USB drive and restart your computer. The built-in administrator account will now be active.
With your administrator account back in action, you can manage your system settings again. It's a good practice to create a password for the built-in administrator account to keep your computer secure.