
The error message “The Boot Configuration Data for your PC is missing or contains errors” stops Windows from starting, displaying codes like 0xc000000f or 0xc0000034. This issue means the system’s boot information is damaged or inaccessible, often due to sudden power loss, disk errors, failed updates, or hardware problems. Addressing this error restores your ability to load Windows and access your files.
Rebuild the Boot Configuration Data (BCD) Using Command Prompt
Rebuilding the BCD is the most direct solution for repairing boot failures related to missing or corrupted boot records. This process uses Windows installation media to access repair tools and rewrite the boot configuration, restoring the information Windows needs to start properly.
Step 1: Insert a Windows installation USB or DVD into the affected computer. Power on the system and boot from the installation media. If necessary, enter the BIOS or UEFI settings to change the boot order so the USB or DVD loads first.
Step 2: When the Windows Setup screen appears, select your language and region preferences, then click Next.
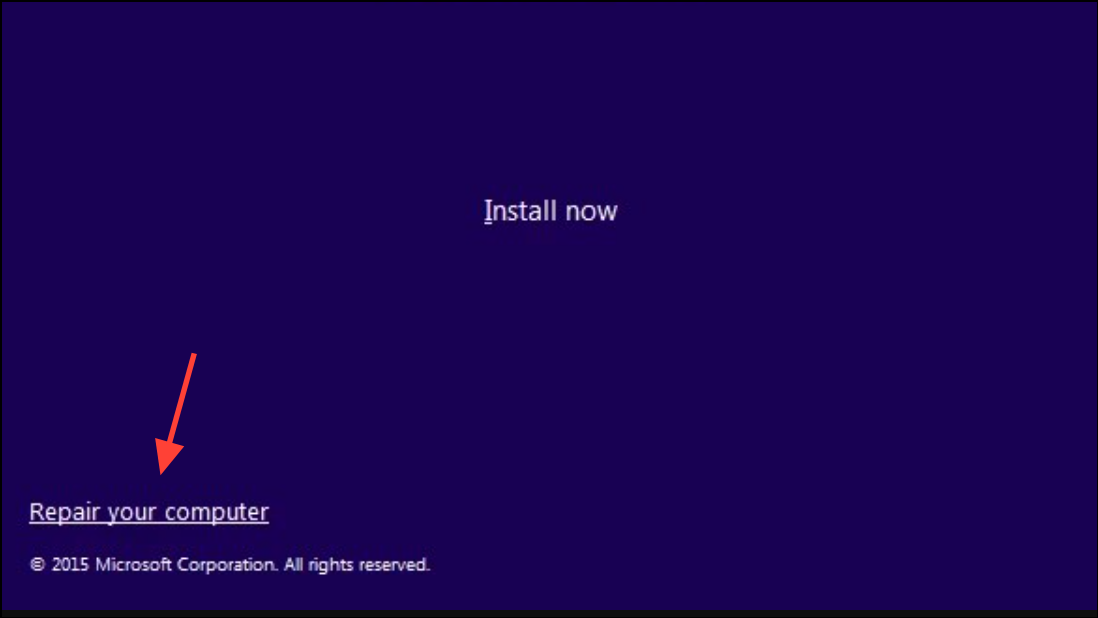
Step 3: Click Repair your computer in the lower left corner instead of Install now.
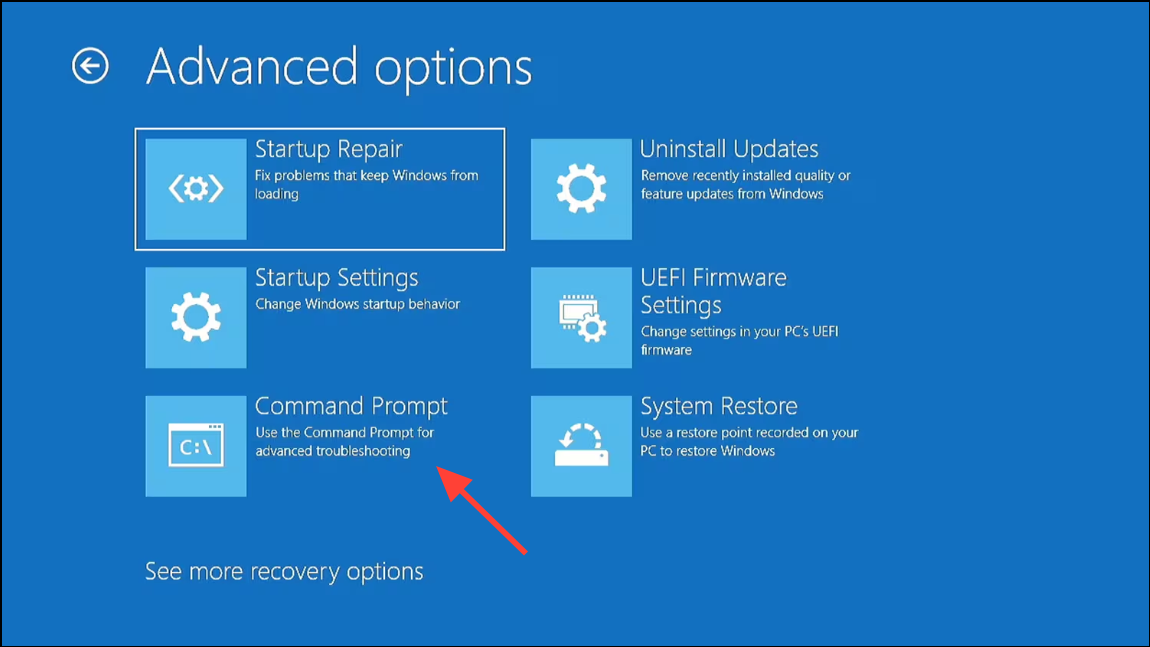
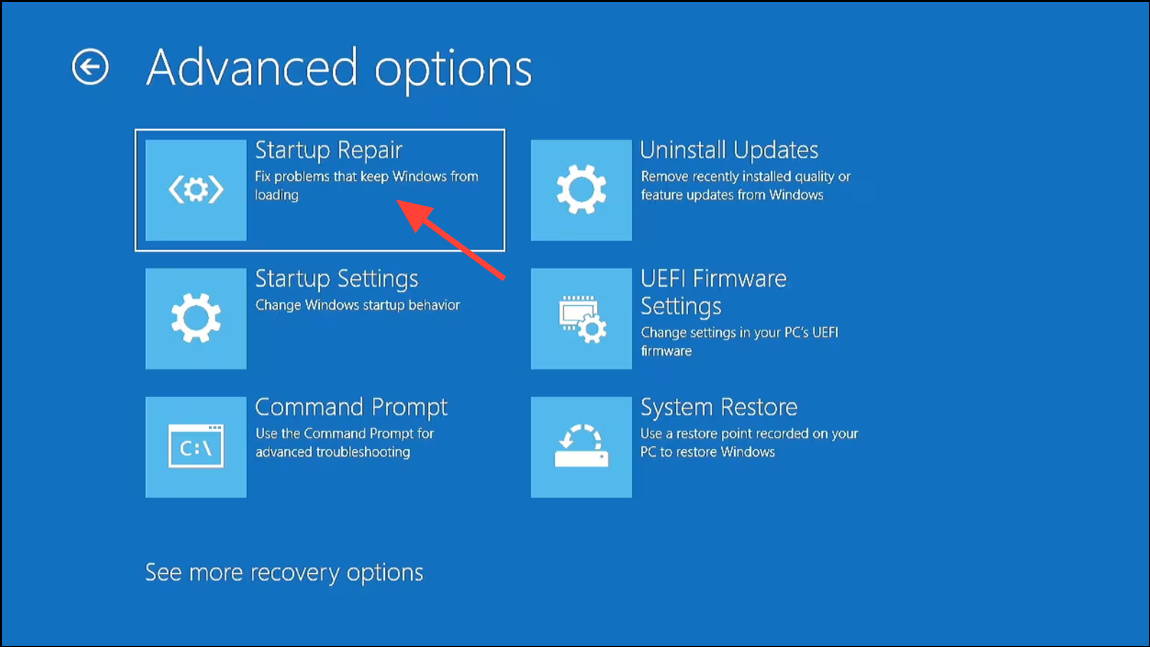
Step 4: Choose Troubleshoot, then select Advanced options, and click Command Prompt. This opens a text-based interface to run repair commands.
Step 5: In the Command Prompt window, enter the following commands one at a time, pressing Enter after each:
bootrec /fixmbr
bootrec /fixboot
bootrec /scanos
bootrec /rebuildbcd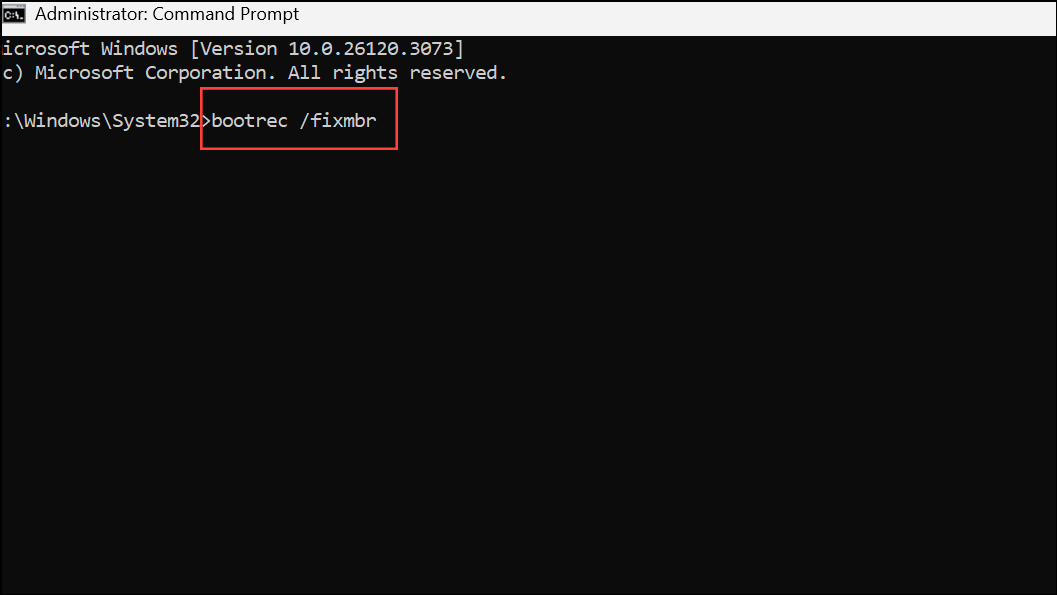
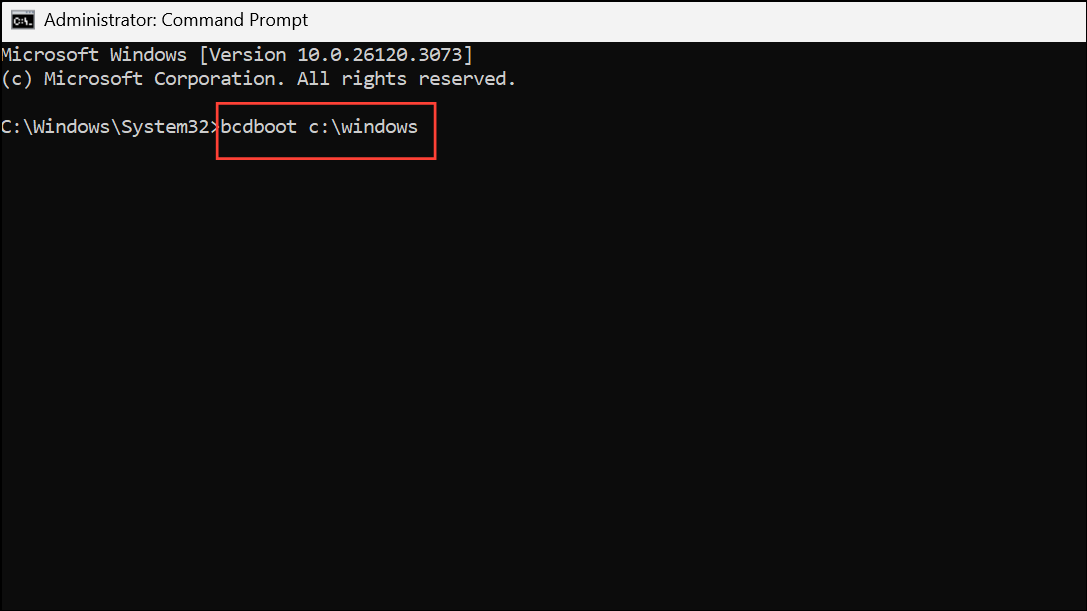
These commands repair the Master Boot Record, fix boot sectors, scan for Windows installations, and rebuild the BCD store. If you receive an “Access is denied” error on bootrec /fixboot, additional troubleshooting is needed, such as running bcdboot c:\windows or using third-party boot repair tools.
Step 6: Once the commands complete, type exit and press Enter. Remove the installation media and restart the computer to check if Windows boots successfully.
Run Windows Startup Repair
Startup Repair automatically detects and fixes many common boot issues, including missing or damaged BCD files. This method is useful if you prefer a guided repair process without manual command entry.
Step 1: Boot from your Windows installation USB or DVD as before.
Step 2: On the Windows Setup screen, select language and region, then click Next.
Step 3: Click Repair your computer, choose Troubleshoot, then Advanced options, and select Startup Repair.
Step 4: Follow the prompts. Windows will scan your system and attempt to repair any startup problems. This process may take several minutes.
Step 5: After repair completes, remove the installation media and restart your PC. If Startup Repair cannot resolve the error, try rebuilding the BCD using Command Prompt as described above.
Set the Correct Windows Partition as Active
Windows may fail to boot if the partition containing system files is not marked as “active.” Setting the correct partition as active directs the system to load Windows from the right location.
Step 1: Access Command Prompt from the Windows installation media as outlined earlier.
Step 2: Enter the following commands, pressing Enter after each:
diskpart
list disk
select disk X   (replace X with the number of your system disk)
list partition
select partition Y   (replace Y with the Windows system partition)
active
exit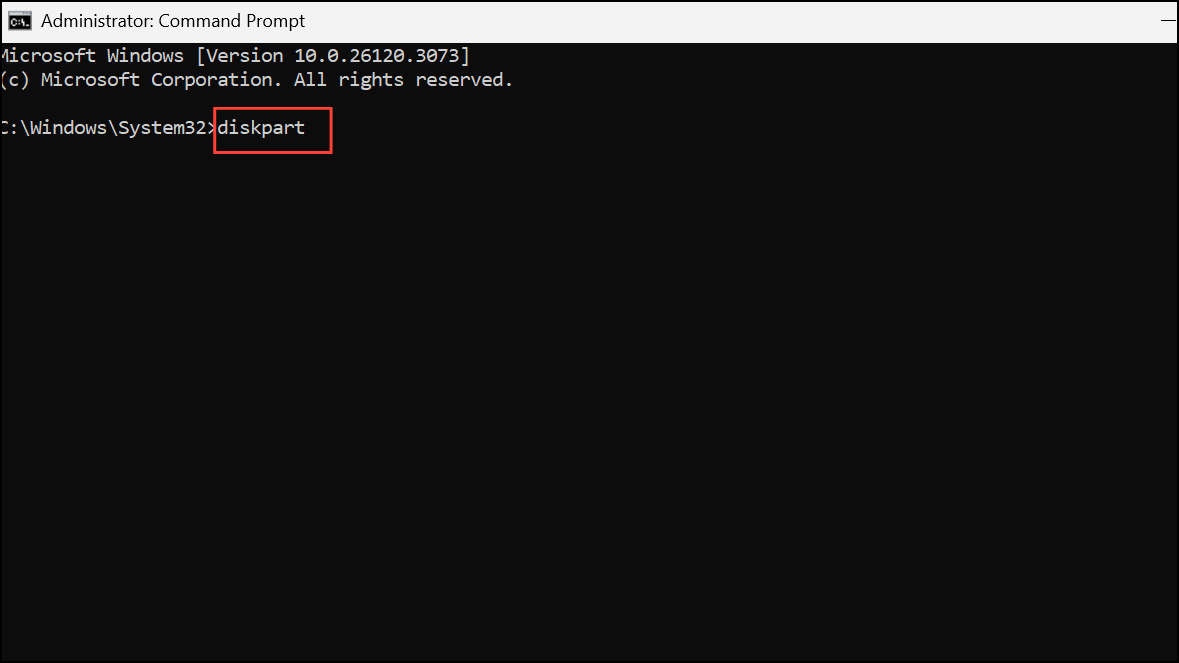
This sequence opens the disk partition tool, lists available disks and partitions, and marks the correct partition as active. Restart your computer when finished.
Create a New BCD Store with BCDBoot
If previous methods fail to restore the BCD, creating a new BCD store can resolve persistent boot configuration errors. This approach is especially effective if the BCD file is missing or irreparably corrupted.
Step 1: Use Command Prompt from the installation media.
Step 2: Enter the following command and press Enter:
bcdboot c:\windows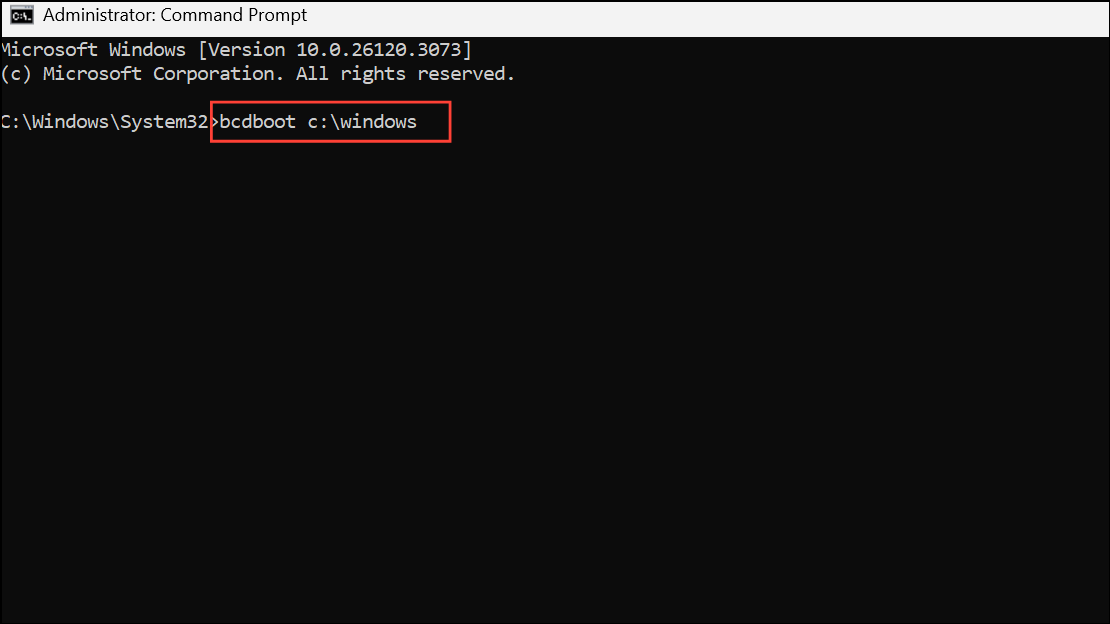
This command copies boot files from the Windows directory and configures them for the current system drive. Replace c:\windows with the correct Windows installation path if necessary.
Step 3: Restart the system and check for successful boot.
Recover Data When Windows Won’t Boot
When boot errors persist or repairs fail, recovering important files becomes a priority. Several data recovery tools offer bootable media that can access your files even if Windows cannot start.
Step 1: On a working computer, download and install a data recovery tool that supports bootable media creation.
Step 2: Use the tool to create a bootable USB drive or CD/DVD. Insert this media into the affected PC and boot from it.
Step 3: Once the recovery environment loads, scan the drive for recoverable files. Select the files you need and save them to a healthy external drive or USB stick.
This approach preserves your data before attempting riskier repairs or a full Windows reinstallation.
Restoring the Boot Configuration Data file restores Windows startup and prevents data loss. If standard repairs fail, data recovery tools help you retrieve files for backup before further troubleshooting or reinstalling Windows.