Zoom has made it awfully convenient for everyone to hold video conferences and connect. Whether you are catching up with friends and family, holding lectures for school, or hosting large office meetings, everyone’s Zooming.
And there’s truly nothing more annoying than getting on the app for a video conference but getting slapped with the camera not working error instead. Thankfully, it is not that uncommon of a problem and you can try to resolve it with some simple fixes and a trial-and-error approach. Whether your camera is not showing up in Zoom Settings or it is selected but the video isn’t working, these fixes can be of help to you.
Check whether the Correct Camera is Selected in Zoom
Let’s start with the easiest fix for your problem. There is a chance that the root of all your problems can be fixed by simply testing your video in Zoom Settings and making sure that Zoom has access to the correct camera device. After all, no device, no video.
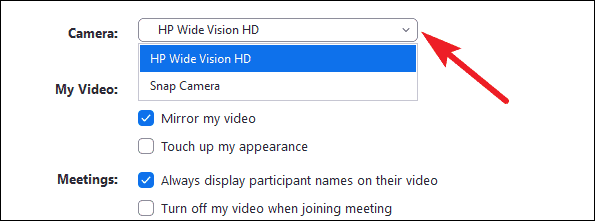
Click on the setting icon to open Zoom settings and then go to ‘Video’ from the navigation menu on the left.
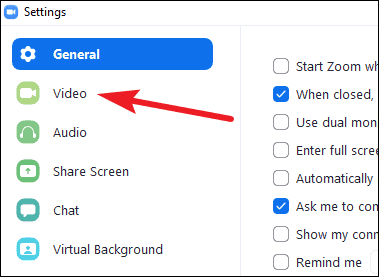
If your video is working properly, you’ll see a preview of your video. But if it was working properly, you wouldn’t be here. So, go on ahead and check that the correct camera is selected. Click on the drop-down menu next to the ‘Camera’ to select the correct device. If this doesn’t help, try the next fixes on the list until you find one that sticks.
Make Sure No Other App is Accessing the Camera
There’s a high possibility that the culprit could be something as simple as another app hogging your camera. So, make sure no other app that uses the camera is running or that it is not using the camera currently when you find yourself at the sticky end of this situation. Most webcams also have a light that turns on when it is in use, so you’ll know if your camera is in use by another app if your webcam supports it.
Confirm that Windows isn’t Blocking Your Camera
There’s no scope of any of the above fixes working if the Windows could be blocking access to the camera. Zoom, or any other app for that matter, will find itself quite helpless if this is the case. Go the Windows settings from the start menu or by using the Windows + i keyboard shortcut and open ‘Privacy’ settings.
Then, go to ‘Camera’ from the navigation menu on the left to open camera settings.
Now make sure that the toggle for ‘Allow apps to access your camera’ is on.
Scroll down a little to also ensure that the toggle for the setting ‘Allow Desktop apps to access your camera’ is also on.
Some instances of Windows might also require you to turn on the permissions for individual apps. Scroll down and under ‘Choose which apps can access your camera’, look for Zoom on the list. If it’s there, enable the toggle for it. If not, that means it doesn’t require special permission. But if everything was already spick-spack here, there’s not much for you to do but proceed to the other tips on the list.
Check Your Anti-Virus Software
This one could sneak up on you like you can’t even imagine. A lot of anti-virus software provide webcam protection these days, and rightly so. Webcam spying is a real thing and something to be completely wary of. It’s important to protect yourself against it.
And it’s just as important to remember in time that the anti-virus software could also be the one causing all the ruckus. Go to your anti-virus and check that it is not blocking Zoom’s access to the camera. And if it is, turn it off. As every anti-virus software has a different interface, it is not possible to include steps on how you can achieve this feat.

Restart your PC
It might seem like such a simple thing to say but often it can fix a lot of problems, present trouble included. Restart your PC and see if it resolved the issue.
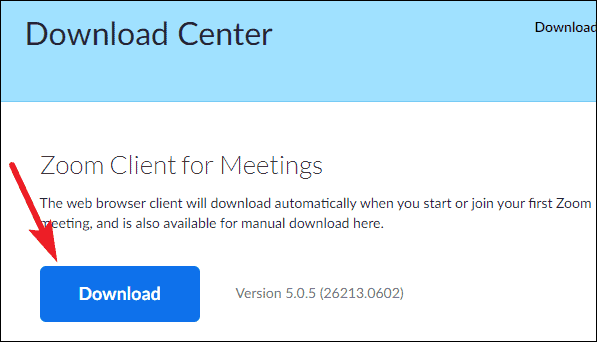
Re-install the Zoom Client
Try this one last Hail Mary before pulling out the big guns. Uninstall your Zoom client and re-install the latest version from the Zoom Download Center. Now check whether the problem was solved. If not, proceed to the next fix.
Run the ‘Hardware and Devices’ Troubleshooter
So you’ve tried the fixes above and nothing worked. That’s no reason to fret. It only means that you’re going to have to grind harder. You’ve checked and double-checked all the permissions, but the problem could be with the camera itself. Running the Hardware and Devices troubleshooter will help you determine if that’s the case and further pinpoint the exact problem too.
Open the Command Prompt on your PC and run the following command without any changes to open the Hardware and Devices troubleshooter. Type ‘cmd’ in the search bar to open the Command Prompt or access it from the Start menu. To run the command, copy/ paste it and press enter.
msdt.exe -id DeviceDiagnosticThe troubleshooter dialog box will open. Follow the steps to run the diagnostics. It will find if there are any problems with your camera and also guide you on how to fix it.
Re-register the Camera on your Computer
We’ve all heard of the good old restart approach. Well, that can apply to your camera too. Re-registering the camera will do basically what restarting does for your computer, mobile, or any other electronic device. To get started, right-click on the Start button, and open ‘Windows PowerShell (Admin)’.
A User Account Control prompt will appear on your screen, asking whether ‘you want to allow this app [Windows PowerShell] to make changes to your device?’ Click on ‘Yes’.
The Windows PowerShell console will open. Copy/ Paste the following command and press enter to re-register your camera. Now check whether this resolved the issue.
Get-AppxPackage -allusers Microsoft.WindowsCamera | Foreach {Add-AppxPackage -DisableDevelopmentMode -Register "$($_.InstallLocation)\AppXManifest.xml"}Update Your Camera Drivers
You’ve tried a bunch of fixes and none of them have worked. It’s time to dig deeper. The problem could be your camera drivers that need to be updated. Drivers are an essential part of the machinery and although most of the drivers are auto-updated by Windows to ensure everything works like clockwork, there’s always a chance that an important update might have gotten skipped. It’s a good thing you can verify that easily.
Go to the system’s ‘Device Manager’ by right-clicking the start button and selecting the option from the menu.
The Device Manager will list all your available devices. Find ‘Camera’ and click on the arrow on its left to expand the list of camera devices. If you have more than one camera installed on your system, choose the one you use and right-click on it. Then, select ‘Update Driver’ from the context menu if the option is available.
Select the ‘Search automatically for updated driver software’ option on the next screen. If a newer update for the driver is available that Windows update missed, the Device Manager would download and install it. If not, outdated drivers were not your problem.
Reset the Camera Hardware
There’s one last thing you can try if nothing else worked for you. Open the Device Manager and go to your Camera device. Then right-click on it and select ‘Uninstall device’ from the context menu.
Now go to the ‘Action’ option on the Menu Bar in the Device Manager window and select ‘Scan for Hardware Changes’ from the menu that appears.
Wait for the scan to complete, restart your PC, and check whether your camera started working.
Getting the video up and running is of crucial importance when you are trying to video conference someone. Hopefully, the problem was something simple and you could solve it by using a fix on this list. Otherwise, you need to consider the possibility that might be beyond your scope.


