Aim on a controller in Fortnite lives and dies on a handful of numbers. Get the sensitivity, dead zones, and input curve right, and your crosshair stops fighting you. Get them wrong, and every close-range shotgun peek or long-range spray feels shaky no matter how much you practice. The values below are the tested baseline that most competitive controller players build from.
Quick answer: Set Look Sensitivity 4, Aim Sensitivity (ADS) 4, turn on Advanced Options, then use Look Horizontal/Vertical 40%, ADS Horizontal/Vertical 15–17%, all Turning Boosts 0%, Boost Ramp Time 0.00s, and Aim Assist Strength 100%. Keep both stick deadzones at 5% and raise only if you have stick drift.
Core sensitivity values for aim
Start with the simple sliders before touching anything advanced. A Look Sensitivity of 4 is a clean middle ground. It is fast enough to track players moving above and around you, but slow enough that a small stick nudge does not throw your crosshair off target. Aim Sensitivity (ADS) at 4 keeps your aim-down-sights response predictable.
Building and editing want more speed than aiming does. Keeping the build and edit multipliers higher than your look sensitivity lets you throw down walls and ramps quickly without making your gunfights twitchy. If 4 feels too slow once you settle in, bump the base look value to 5 before you start editing advanced percentages.
| Setting | Value |
|---|---|
| Look Sensitivity | 4 |
| Aim Sensitivity (ADS) | 4 |
| Build Mode Sensitivity Multiplier | 2.0 – 2.2x |
| Edit Mode Sensitivity Multiplier | 2.0 – 2.3x |
| Use Advanced Options | On |
Note: The moment you enable Advanced Options, your basic Look Sensitivity slider stops driving your aim. The Look Horizontal and Vertical Speed percentages take over instead, so the numbers in the next section are what actually control your camera.
Advanced look and ADS speeds
Advanced Options split your camera into hipfire look speed and aim-down-sights speed, and this is where aim precision is won. The rule that gives the fastest improvement is simple. Keep ADS slower than your normal look speed so your tracking steadies the moment you aim in.
| Advanced setting | Value |
|---|---|
| Look Horizontal Speed | 40 – 60% |
| Look Vertical Speed | 40 – 60% |
| Turning Horizontal Boost | 0% |
| Turning Vertical Boost | 0% |
| Turning Boost Ramp Time | 0.00s |
| ADS Look Horizontal Speed | 15 – 17% |
| ADS Look Vertical Speed | 15 – 17% |
| ADS Turning Horizontal Boost | 0% |
| ADS Turning Vertical Boost | 0% |
| ADS Turning Boost Ramp Time | 0.00s |
| Look Dampening Time | 0.00 – 0.20s |
Match your horizontal and vertical speeds so vertical fights, box fights, and retakes feel the same in every direction. Newer players should drop the look speeds to around 35% and creep them up until turning feels natural, which avoids overshooting targets while you build muscle memory.
Leave every turning boost at 0% to begin with. Boost speeds up your camera when the stick is pushed all the way to an edge, which can help you spin around fast, but it also makes your aim less consistent. Only add boost later if you know exactly why you want it, and reset it to 0% the moment aiming starts feeling spiky.
Linear vs Exponential input curve
The Look Input Curve changes how your stick movement translates into camera movement, and it is the setting players argue about most. Both options are widely used, so the right pick depends on how you fight.
| Curve | How it behaves | Best for |
|---|---|---|
| Linear | Constant response — the crosshair moves at the same rate no matter how far you push the stick, like a mouse with acceleration off. | Quick shotgun flicks, close-range fights, faster reaction time, snappier building. |
| Exponential | Speed ramps up the further you push the stick, so tiny inputs are gentle and full tilts are fast. | Long-range tracking, steadier aim, aim assist feeling stronger, less shakiness at distance. |
Pick Linear if close-range shotgun peeks and swaps feel best and your aim is already accurate. Switch to Exponential if you keep missing consistent long-range shots or your crosshair feels shaky on small movements. If you build a lot, keep in mind that Exponential can make small building and editing motions feel sluggish, so expect an adjustment period whichever way you go.
Tip: After changing the curve, load a Creative aim map and shoot for a while before judging it. The difference feels dramatic at first, and your muscle memory needs a few sessions to catch up.
Deadzones: keep them low, fix drift only
The deadzone is the small area around the center of each stick that Fortnite ignores. A larger deadzone means you have to move the stick further before anything registers, which adds a tiny delay to every micro-adjustment. Lower deadzones feel more responsive and let your inputs land sooner.
Aim assist and controller configuration
Set Aim Assist Strength to 100% and leave it there. Lowering it makes controller aiming harder with no real upside unless a specific tournament ruleset forces a different value. One thing to check if your aim suddenly feels weaker: aim assist is disabled while Gyro Aiming is active, so confirm gyro has not been switched on.
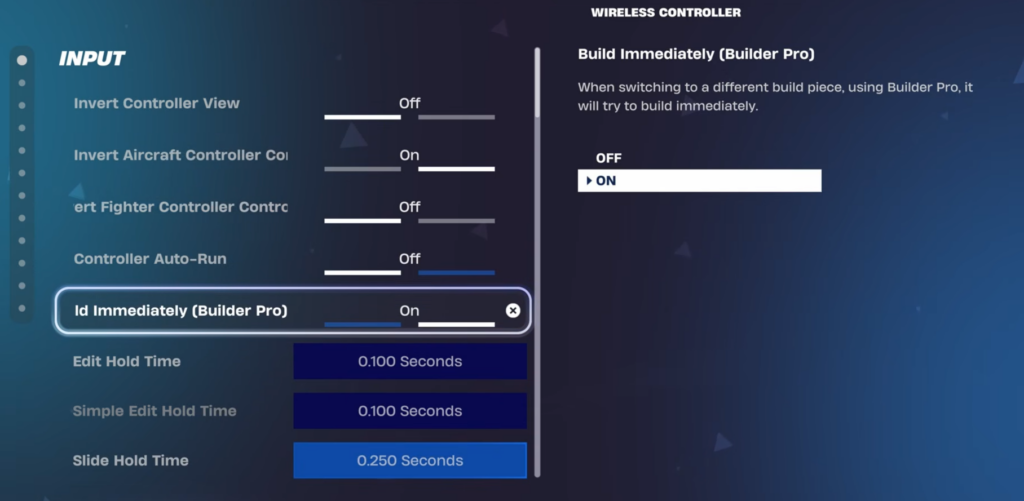
For your button layout, use Builder Pro as the template. It puts build pieces on the shoulder and trigger inputs instead of forcing you to cycle through them slowly, which keeps your right thumb on the aim stick more often. It can feel awkward for the first few sessions, so practice walls, ramps, boxes, and edits in Creative before judging it. Every other preset puts you at a serious disadvantage.
| Input setting | Value |
|---|---|
| Controller Auto-Run | On |
| Build Immediately (Builder Pro) | On |
| Edit Hold Time | 0.100s |
| Slide Hold Time | 0.100 – 0.150s |
| Vibration | Off |
| Aim Assist Strength | 100% |
Keep vibration off for gunfights. It feels more immersive on, but the rumble adds noise to your hands right when you are trying to hold a steady line on a target. If you are not a claw player, moving the edit button to L3/LS is a strong tweak, since Controller Auto-Run frees up the stick click and lets you edit without lifting your thumb off the aim stick.
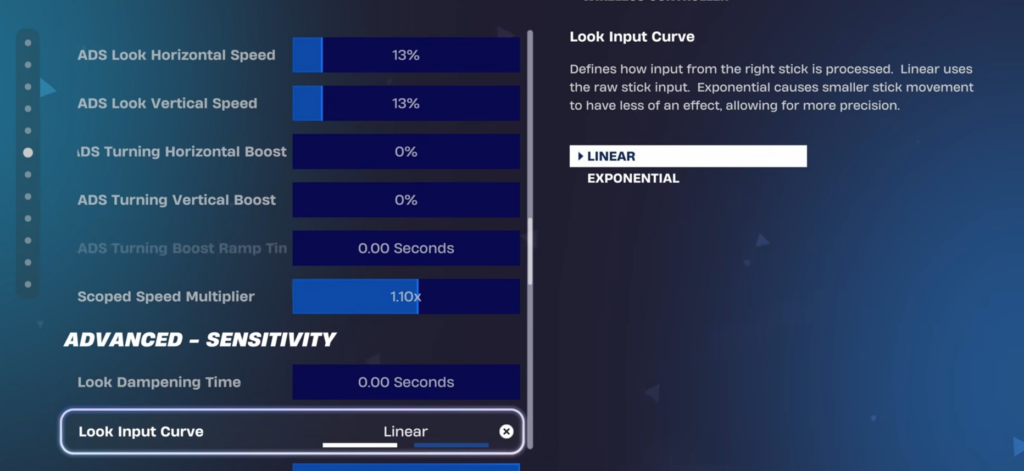
Image credit: Epic Games / dropz
Platform notes for PS5, Xbox, and PC
The in-game baseline is identical across PS5, Xbox, and PC controller play. The differences come from the hardware and how each platform handles input.
| Platform | What to adjust |
|---|---|
| Xbox | Simplest, plug-and-play feel. Use the baseline as-is. |
| PS5 | Turn off DualSense adaptive trigger resistance so inputs stay consistent during fights. |
| PC (controller) | Highest responsiveness, but feel depends on frame rate, USB or Bluetooth connection, and drivers, so input lag can come from the system rather than your settings. |
If a delay feels like sluggish stick response, lowering deadzones and keeping boost ramp time at 0.00s helps inputs register sooner. If it feels more like lag, that is a connection or display issue. Enabling Game Mode on your TV or monitor cuts processing delay and makes controls feel more immediate.
How to test and confirm your settings
You know the settings are right when your crosshair holds still while you stand idle, your ADS tracking stays glued to a moving target without overshooting, and your close-range flicks land where you expect. Test all of this in a Creative map with bots before ranked or tournaments.
Change one thing at a time. Adjusting ten values after a single bad fight destroys the muscle memory these settings depend on. Make one change, play a few fights, then decide. Treat these numbers as a starting point and drift toward whatever feels most controllable in your own hands, since even a strong baseline still needs small tuning to match your grip and eye-hand coordination.