


Sandrone is a 5-star Cryo claymore DPS who rewrites Superconduct into a new reaction called Stellar-Conduct, and almost everything about her build follows from that one fact. She is not a normal Cryo carry, so the usual instinct — slap on a Cryo DMG goblet and stack elemental damage bonus — actively makes her worse. Her damage lives in reaction numbers that ignore elemental DMG%, which changes her artifacts, her weapon shortlist, and even which teammates are worth a slot.
Quick answer: Equip 4-piece Disenchantment in Deep Shadow with an ATK% Sands, an ATK% Goblet, and a CRIT DMG Circlet, use A Teaspoon of Transcendence (or the craftable Tidal Shadow if you are free-to-play), level Normal Attack first, and field at least one Electro and one Cryo teammate so Stellar-Conduct keeps firing.
Why Sandrone wants ATK instead of Cryo DMG
Two passives decide her entire stat sheet. Light of Rationalisme converts your party’s Superconduct into Stellar-Conduct and raises everyone’s Base Stellar-Conduct DMG by 0.7% per 100 ATK Sandrone has, up to +14%. A Lady’s Code of Conduct then converts her ATK into Elemental Mastery, giving 8 EM per 100 ATK for a maximum of 160.
Both cap at 2,000 ATK, which is why that number keeps coming up as the first real checkpoint. It also means you rarely need to force an EM main stat, since she manufactures a chunk of EM herself. Reaction damage does not scale off elemental DMG bonus, so a Cryo goblet is a wasted slot and passives that only grant DMG% — Serpent Spine being the obvious trap — do nothing for her main damage source.
Best Sandrone artifacts and stat targets
Disenchantment in Deep Shadow released alongside her and is built for exactly what she does. The 2-piece gives 18% ATK. The 4-piece raises Superconduct damage by 80% and Stellar-Conduct damage by 40%, then adds 16% CRIT Rate when you hit enemies affected by either reaction. Nothing else is close.
If you have not farmed it yet, 4-piece Gilded Dreams works as a stopgap, or you can double up on two-piece ATK sets while you wait for usable pieces. Sets built purely around Elemental Mastery are a distant fallback given her self-generated EM.
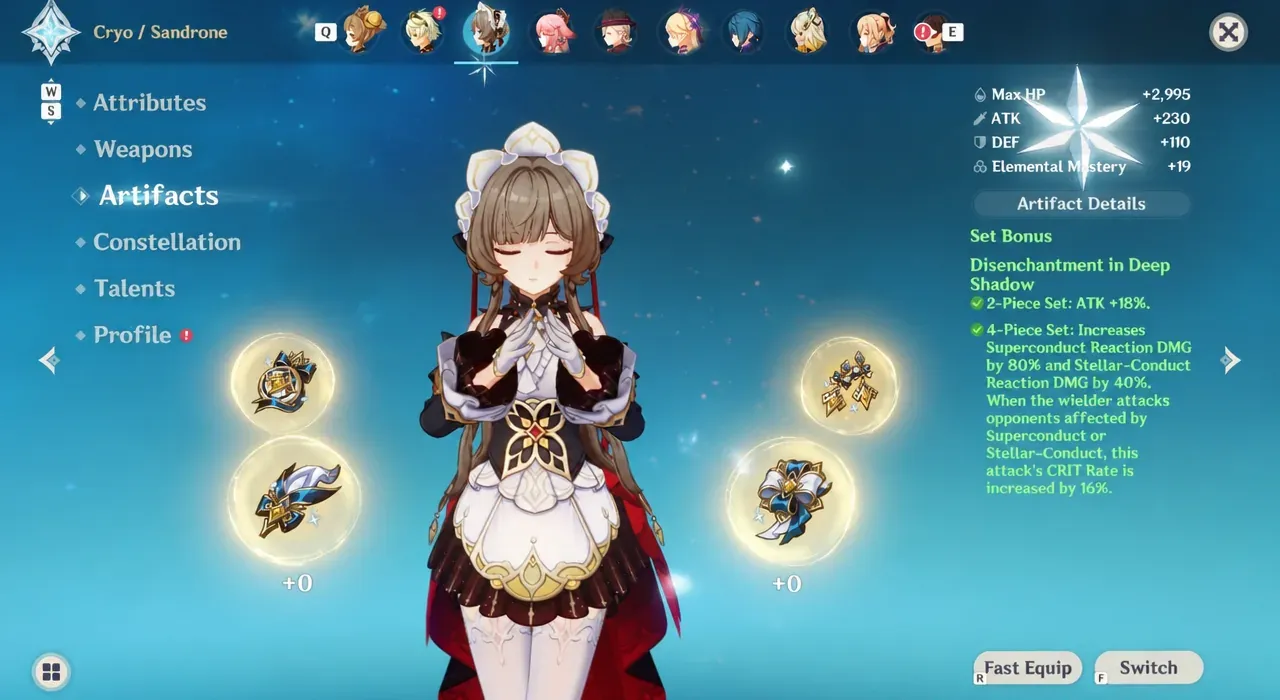
| Slot | Main stat |
|---|---|
| Sands | ATK% |
| Goblet | ATK% (not Cryo DMG) |
| Circlet | CRIT DMG, or CRIT Rate if you are short |
For substats, build enough Energy Recharge to fire her 60-cost Burst every rotation first, then pile into CRIT DMG, CRIT Rate, and ATK%. Elemental Mastery is welcome when it rolls but is the lowest priority of the five.
| Stat | Target |
|---|---|
| ATK | 2,000+ |
| Energy Recharge | 125–145%, lower with a Cryo battery |
| CRIT Rate | 30–40% before the set bonus and her ascension stat |
| CRIT DMG | 180% or higher |
| Elemental Mastery | 150–200 |
Note: her ascension stat is CRIT Rate, and the 4-piece adds another 16% on qualifying hits. Between those, Cryo Resonance, and any CRIT Rate weapon, it is easy to overshoot — which is why CRIT DMG usually wins the Circlet.
Best claymores for Sandrone, ranked by what they actually give her
Her signature is the clean winner, but the gap is smaller than usual because she is happy with plain offensive stat sticks. Anything that hands her ATK, CRIT DMG, or Stellar-Conduct damage is fair game.
| Weapon | Why it works |
|---|---|
| A Teaspoon of Transcendence | Signature and best-in-slot. 674 base ATK, 44.1% CRIT DMG, +28% ATK, and Charged Attack hits stack +16% Stellar-Conduct DMG up to three times. |
| A Thousand Blazing Suns | Strongest non-signature option. High base ATK, CRIT Rate substat, and an ATK/CRIT DMG buff she keeps refreshing with Charged Attacks. |
| Wolf’s Gravestone | ATK% main stat plus an ATK passive, freeing your substats to chase CRIT. |
| Redhorn Stonethresher | Pure CRIT DMG stat stick; the DEF-scaling passive is dead weight here. |
| Verdict | Big ATK and CRIT Rate numbers even though the extra effects do nothing in Stellar-Conduct teams. |
| The Unforged | ATK% main stat with an easy-to-stack ATK passive, best when you run a shielder. |
| Beacon of the Reed Sea | CRIT main stat with two ATK% triggers; punches above its tier if both stay active. |
| Forged by the Golden Melody | Battle pass claymore with CRIT Rate that ramps her ATK, EM, and Stellar-Conduct damage. Wants R5 to compete. |
| Tidal Shadow | Best free-to-play pick. Craftable, ATK main stat, and its ATK buff stays up as long as someone heals her. |
| Mailed Flower | Event claymore with EM main stat plus ATK and EM buffs. Only relevant if you already own it. |

Talent priority: Normal Attack first, and crown all three eventually
Her Charged Attack sits inside the Normal Attack talent, and that is where the bulk of her damage comes from, so it goes first. Her Burst is second because the Convective Inhibition Ray dumps a huge single instance every rotation, boosted by the Refined Tactics stacks it consumes.
The Elemental Skill is last, mostly because you press it to drain Fagio’s Decoding Power rather than to deal damage. It still hits hard enough that all three are worth a Crown of Insight once your materials allow it.
Best Sandrone teams in Genshin Impact
The only hard requirement is one Electro applicator, because Stellar-Conduct is a Cryo-Electro reaction. From there you want a second Cryo unit for Cryo Resonance, sustain to keep her alive through long Charged Attack windows, and a flex slot for ATK buffs or resistance shred.
| Team | Notes |
|---|---|
| Sandrone / Odette / Yae Miko / Nicole | Her strongest lineup. Odette is the standout Stellar-Conduct enabler and nothing replaces her cleanly. |
| Sandrone / Odette / Yae Miko / Qiqi or Alyosha or Diona | Sustain version, trading the buffer for healing or a shield. |
| Sandrone / Odette / Yae Miko / Escoffier | Cryo-heavy variant with off-field damage, healing, and resistance shred. |
| Sandrone / Yae Miko / Escoffier / Qiqi | Reliable double-Cryo setup with plenty of healing and particles. |
| Sandrone / Beidou or Fischl / Qiqi / Sucrose | Free-to-play option. Sucrose needs 4-piece Viridescent Venerer to be worth the Anemo slot. |
| Sandrone / Yae Miko or Alyosha / Odette / Xilonen or Sucrose | Shred-focused flex slot when enemies have high Cryo resistance. |
Anemo is technically off-theme if you are chasing pure Stellar-Conduct damage, but the fourth slot is usually loose enough that a Viridescent Venerer holder earns its place. Bennett and Nicole are the ATK-buff answers when you have the room.

How to play Sandrone: the Charged Attack and Skill loop
Tip: Fagio’s Decoding Power maxes out at 100 points and flips into Power Overdrive, where it attacks slower and for less damage. It cannot go back to Decoding mode until that value drops below 50, and Sandrone drains it at triple speed while she is off-field.
How to tell the build is working
The check is simple. Her condensed beams should read as Stellar-Conduct damage rather than plain Cryo damage in combat. If they are still landing as ordinary Cryo hits, she is not in the Radiance: Stellar-Conduct state, which means no Polestar Field is active and your Electro application has lapsed.
Three things break the build more often than bad substats. Running a Cryo DMG goblet, since that bonus does not apply to her reaction damage. Missing the Burst on a rotation because Energy Recharge is too low for your team’s particle generation. And letting Fagio hit Power Overdrive without using the Skill, which quietly halves your uptime on her main damage window.
Constellations worth chasing
Sandrone functions at C0 and does not need constellations to hold a team together, but a few are meaningful upgrades if you are already pulling.
| Constellation | Effect |
|---|---|
| C1 | Decoding Power builds 50% slower and the whole party deals 30% more Stellar-Conduct damage. |
| C2 | Large CRIT DMG boost to her Charged Attack condensed beams. |
| C4 | Dealing Stellar-Conduct damage summons an extra Prismatic Resonance Cannon for 125% of her ATK, once every 4 seconds. |
| C6 | The third condensed beam becomes a cluster beam with four extra AoE instances, plus 20% more Stellar-Conduct damage overall. |
C1 is the smoothest quality-of-life gain since slower Decoding Power buildup means fewer forced Skill presses, while C2 is the bigger raw damage jump. Neither is required for her to clear content comfortably.
The short version: is that Sandrone rewards a boring, disciplined build. Hit 2,000 ATK to cap her passives, get Energy Recharge to the point where the Burst never misses a rotation, then dump everything else into CRIT DMG and let the Disenchantment in Deep Shadow set do the heavy lifting. Her rotation is only three inputs deep, so most of the damage difference between accounts comes down to whether the goblet is ATK% and whether Fagio ever stalls out in Power Overdrive.





