Respecting a person’s pronouns is an important part of showing respect for their gender identity. Assuming someone’s pronouns based on how you perceive their appearance is not just hurtful and disrespectful, but also oppressive.
When people are misgendered, they can feel disrespected, invalidated, and it can worsen their social anxiety and depression. Although everyone should play their part and ask others for their pronouns, it should also be easy for people to share their pronouns and better express themselves. Zoom is taking a crucial step in this direction with its latest update to make users feel seen and included on its meeting platform.
You can now add pronouns to your profile on Zoom officially. Many users already did it before there was an official feature by adding it to their display name on Zoom. But this solution was far from perfect. For starters, it gave users no control over which meetings they wanted to display their pronouns in. Also, for some organization accounts and SSO integrations, it is impossible to edit your name in Zoom.
With Pronouns, you won’t have to jump through so many hoops to share this important information about yourself. You can also easily control who sees it.
Prerequisites for Using this Feature
The Pronouns feature is a part of Zoom 5.7.0. So, whether you’re using it on Windows, Mac, Linux, iOS, or Android, you need to update your app to use this feature.
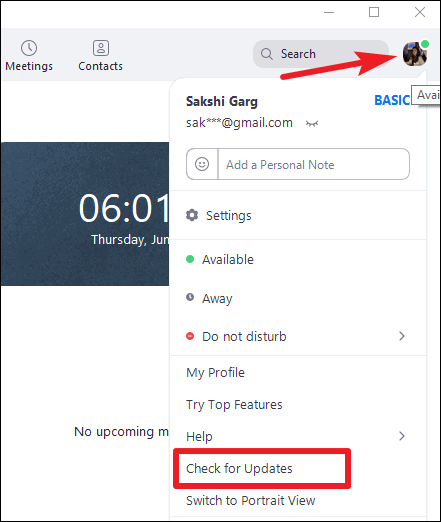
To update your desktop client, open Zoom and click on your ‘Profile icon’ in the upper right corner. Then, click the ‘Check for Updates’ option from the menu that appears.
If your client hasn’t been auto-updated already, the download for the new update will start.
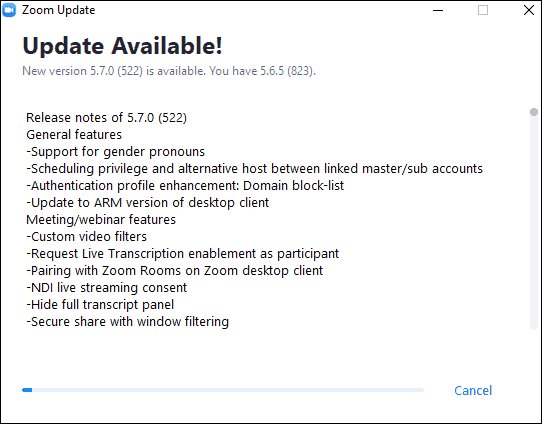
Click the ‘Update’ button once it finishes. Your Zoom client will now have the feature to share your pronouns, but first, you need to add them to your profile.

Adding Pronouns to your Zoom Profile
To add your Pronouns to your Zoom Profile, go to zoom.us and sign in to your account on the web portal.
Pronouns are automatically enabled for basic and single licensed user accounts. But Pronouns is off by default for Zoom accounts with more than one user. So if you’re using an organizational account, your admin has to enable the feature first.
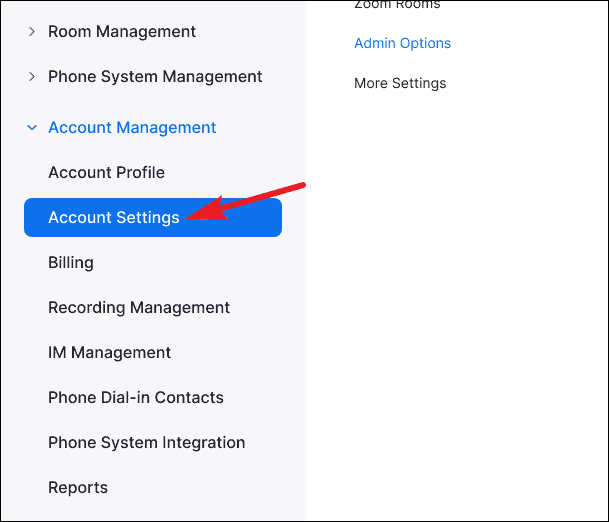
If you’re an admin, login to the Zoom web portal and click ‘Account Settings’ from the navigation panel on the left.
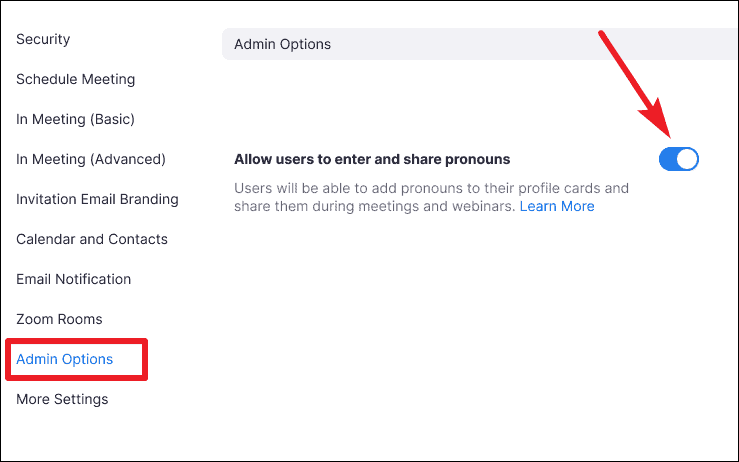
Then, go to ‘Admin Options’. Then, enable the toggle for ‘Allow users to enter and share Pronouns’.
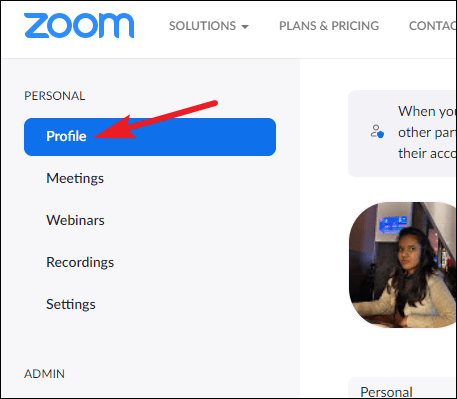
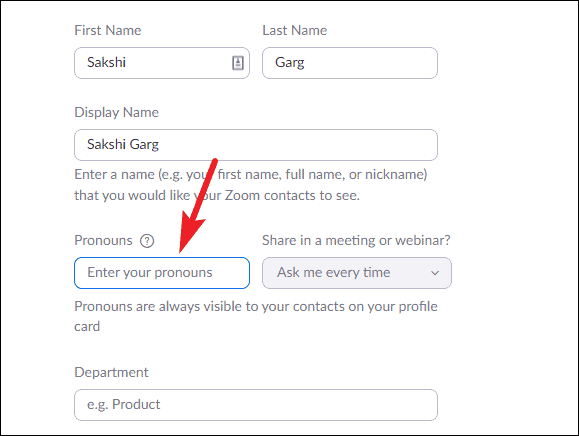
From the navigation panel on the left, click ‘Profile’.
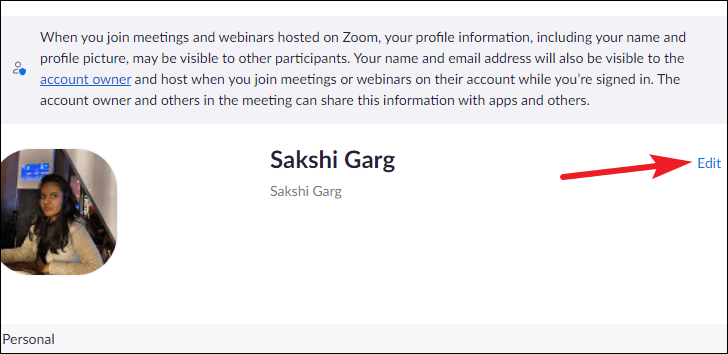
Then, click the ‘Edit’ button on the right corner of your name.
The options for editing your personal information will appear. Go to the Pronouns field and enter your pronouns.
Some examples of pronouns include he/his/him, she/her/hers, and the gender-neutral they/them/theirs, or ze/hir/hirs. But these don’t even begin to cover the pronouns people use. Some people use rollout pronouns like she/they.
As gender is a spectrum and gender identity can be fluid, rightly, Zoom doesn’t have a drop-down menu to select your Pronouns. You have to enter them manually. And this ensures you can enter the pronouns you choose.
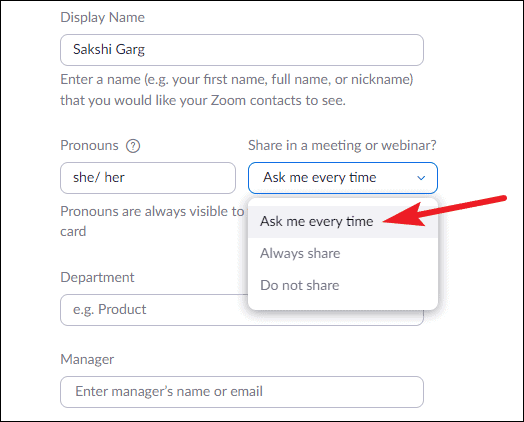
After entering your pronouns, go to the option next to it. Now, you could want to share your pronouns in every meeting or webinar, or neither of them or maybe your choice could vary for every meeting. This option precisely gives you control over this aspect of sharing your pronouns.

Click the drop-down menu and select one of the three options: ‘Ask me every time’, Always share’, or ‘Do not share’.
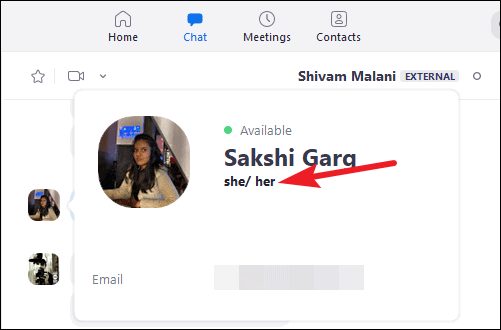
Note: Even though you can choose not to share your pronouns in a meeting or webinar, your pronouns will always be visible on your profile card. Your contacts can see it from their contacts tab or by hovering over your avatar in Zoom chat if you have added them.
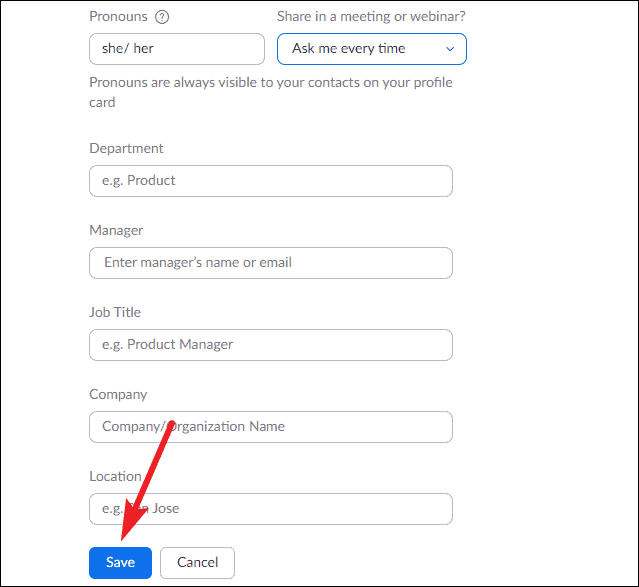
Finally, click the ‘Save’ button to add pronouns to your Zoom profile.
Sharing your Pronouns in Meetings and Webinars
You can share your pronouns in any meeting, regardless of whether you’re the host or a participant. But for webinars, you can only share your pronouns if you are the host or a panelist. Attendees’ pronouns are not visible in a webinar, nor can they be shared.
For meetings and webinars where you can share your pronouns, you can share/ unshare them at any point.
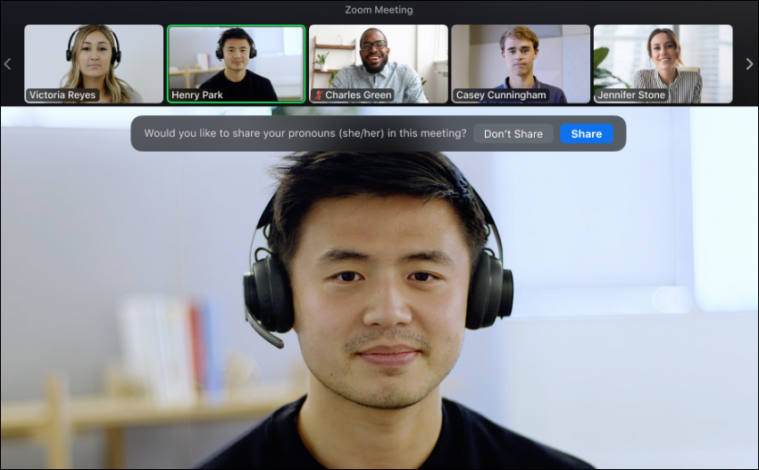
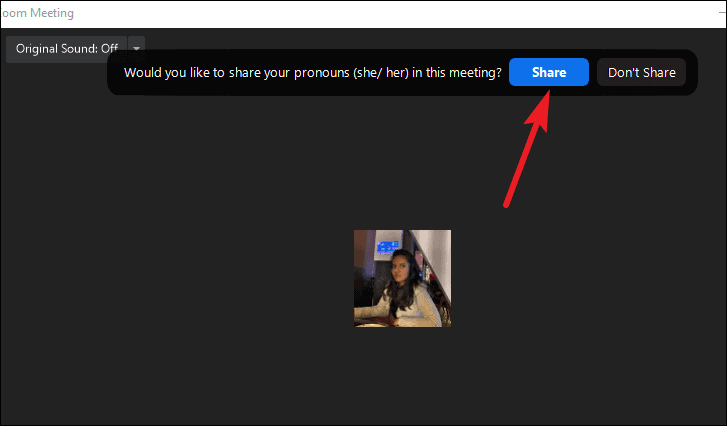
If you selected ‘Ask me every time’ from your zoom web portal, Zoom will prompt you before every meeting or webinar, and you must select an option.
After you start or join a meeting, or start a webinar as a host or join as a panelist, a prompt will appear on your meeting screen. Select ‘Share’ or ‘Don’t Share’ depending on your choice.
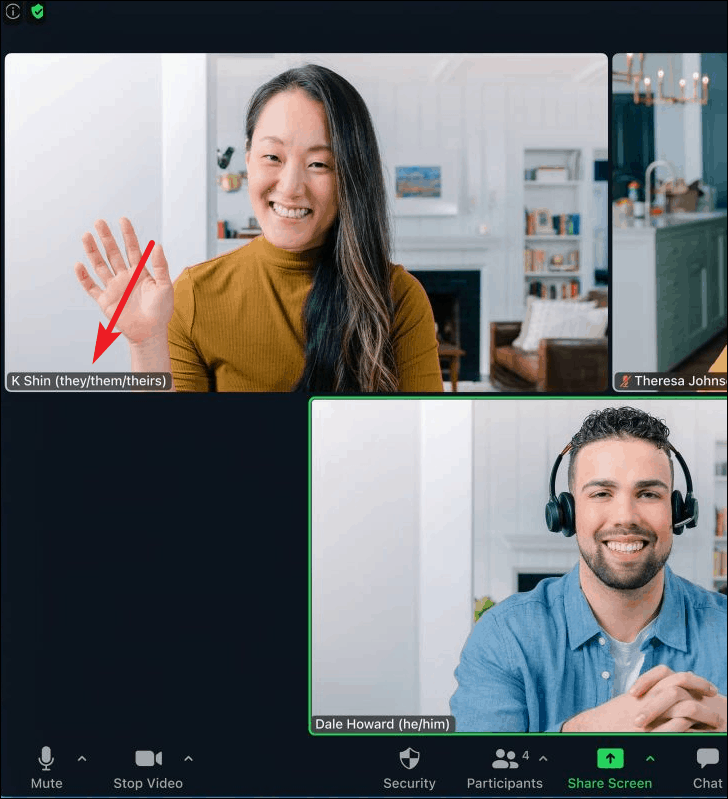
If you share them, your pronouns will be visible next to your name in your participant video or thumbnail.
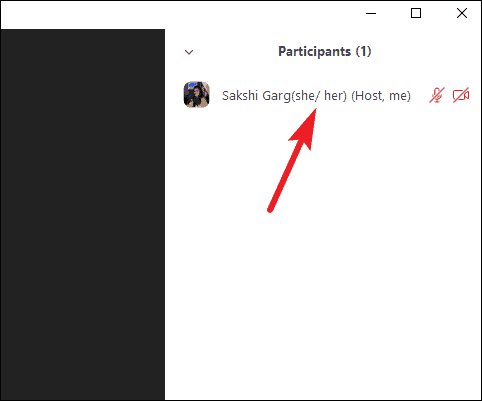
They’ll also appear next to your name in the Participants panel.
Now, whether you chose to share your pronouns at the start of the meeting/ webinar or you had the ‘Always share’ setting on, you can unshare them at any point.
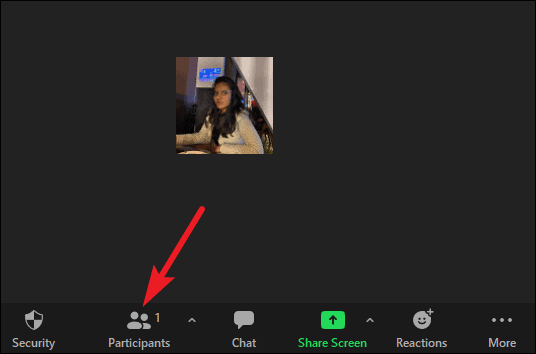
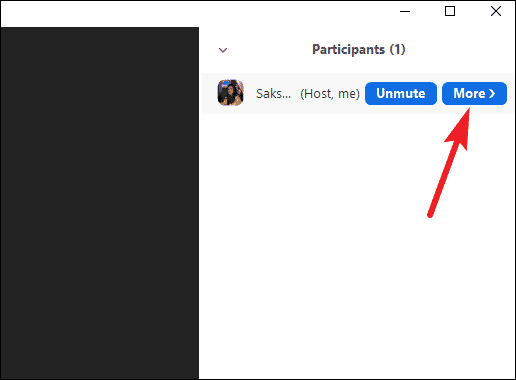
Click the option for ‘Participants’ from the meeting toolbar.
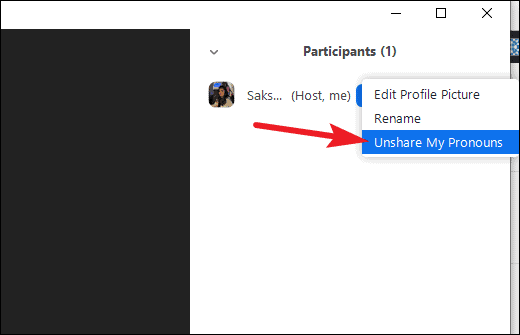
Go to your name on the participants panel and click the ‘More’ option.
Then, select ‘Unshare my Pronouns’ from the menu.
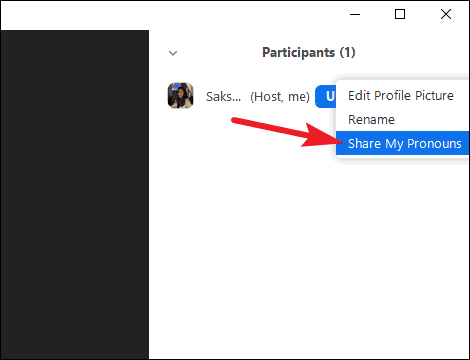
Similarly, if you’re not sharing your pronouns currently, you can share them at any time. Go to the ‘More’ option next to your name from the Participants panel and select ‘Share my Pronouns’ from the menu.
Zoom also supports SAML mapping of pronouns from your identity provider. If you’re using an SSO integration to sign in and your identity provider supports a pronoun field, then Zoom will automatically map your pronouns to your profile on the app.
Pronouns are an important part of representation for the LGBTQ community members. Pronoun sharing on Zoom, no matter what a small feature it might appear to some, is a huge step on Zoom’s part in making everyone feel inclusive while using the platform.


