High-Efficiency Image File Format (HEIC) was released back in 2017 by Apple to optimize storage for its users as it takes way too little space than a standard JPG. If you have been breathing Apple in and out, you probably won’t even notice the HEIC format exists. Apple makes sure to convert HEIC to JPG before you send them out to Instagram, Facebook, Twitter, or take a cloud backup of your pictures.
However, when it comes to reading a HEIC file on a windows computer or editing the picture using a 3rd party app. It’s going to give you a hard time, as it is still not as widely accepted.
Though you don’t need to worry, as always Apple has got your back by giving you native support to convert a HEIC file to any other desirable extension. It is pretty much plain sailing once you know what you are doing. So, let’s get going!
Convert HEIC to JPG using Preview app
Preview is the precursor of its kind to the Mac. In present times, with Apple’s own Photos and many 3rd party apps coming in, the main use-case for Preview has been reduced to just a photo or document viewer. However, it is still a rock-solid application with great versatility. Down here is a showcase, just how efficient Preview is despite being the ancient one!
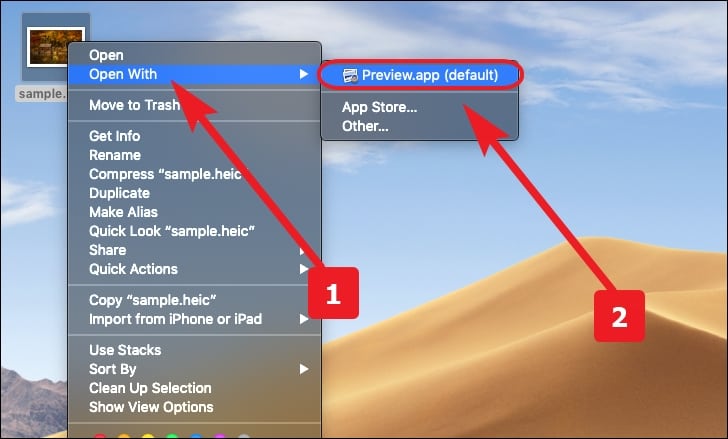
Open the image you want to convert with the ‘Preview’ app. If ‘Preview is not your default picture viewer. You can secondary click on the image and locate the ‘Open with’ option and click on ‘Preview. app’ from the list.
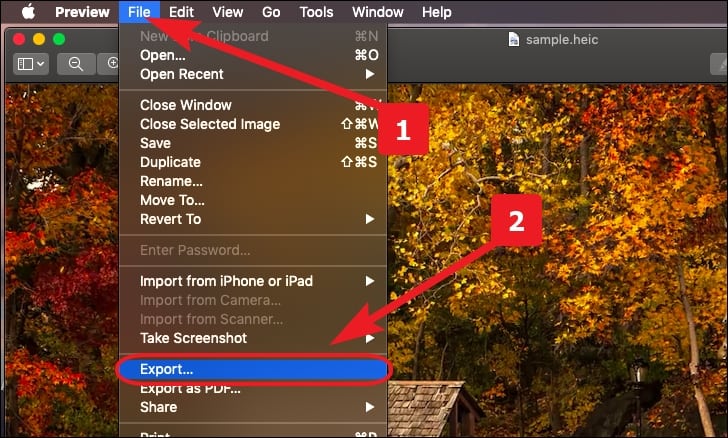
Now, select the ‘File’ tab from the menu bar situated on the top right section of your screen. Next, navigate to the ‘Export…’ option from the list.
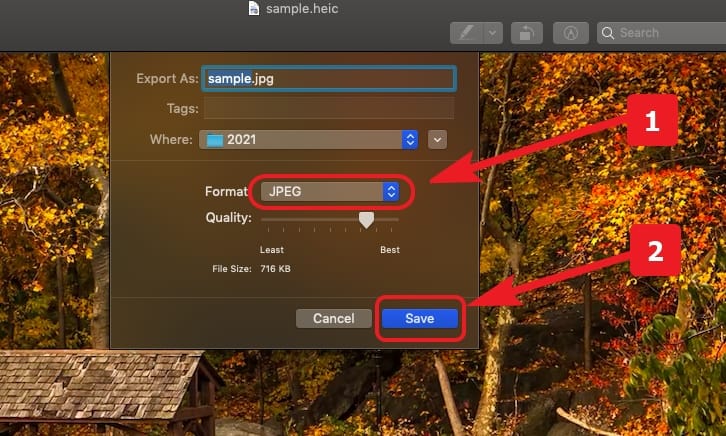
Go to the ‘Format’ option and choose the ‘JPEG’ option from the drop-down list. Next, hit ‘Save’ to convert the file to JPEG.
Note: You can also choose the quality of the export by dragging the slider. Quality increases as you move more rightward. Do note as you increase the quality, the size of the file will also increase.
Convert HEIC to JPG using the Photos app
Photos being the go-to app for most Mac users is the easiest option out of the lot. Especially when you do not want to dive enough to get technical, but do need to convert HEIC to JPG in bulk frequently enough.
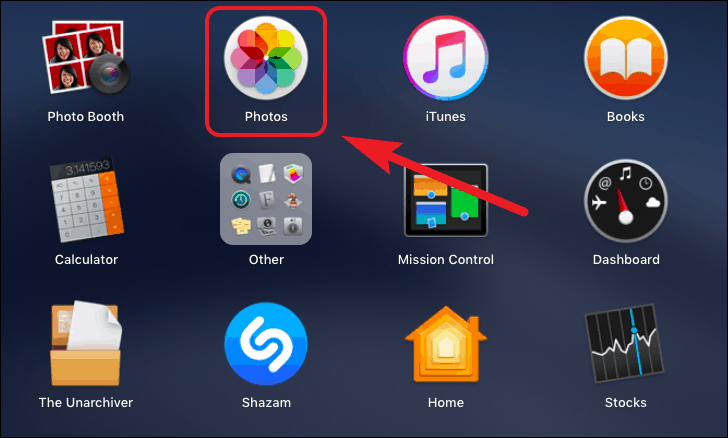
Launch ‘Photos’ app from Launchpad.
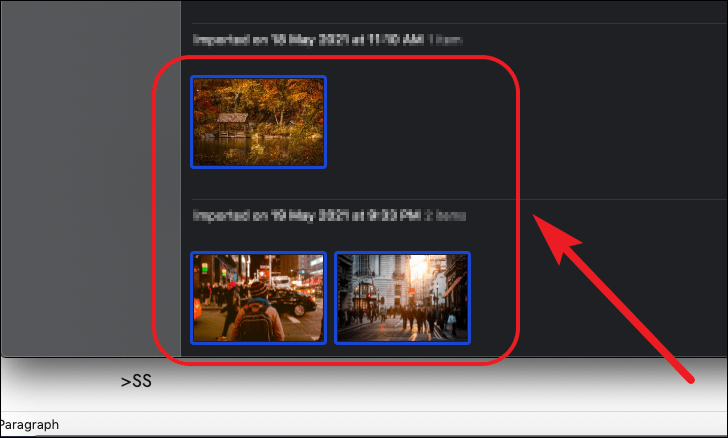
Select all the pictures you want to convert to JPG file format.
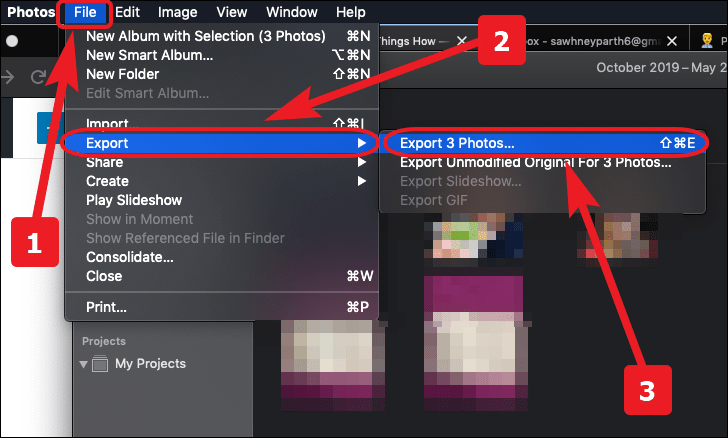
Now, go to the ‘File’ tab from the menu bar and navigate to the ‘Export’ option. After that, click on the ‘Export 3 Photos’ option from the list. Alternatively, you can also press and hold Shift+Command+E to export.
After that, you can select the desired extension for the files from the drop down menu.
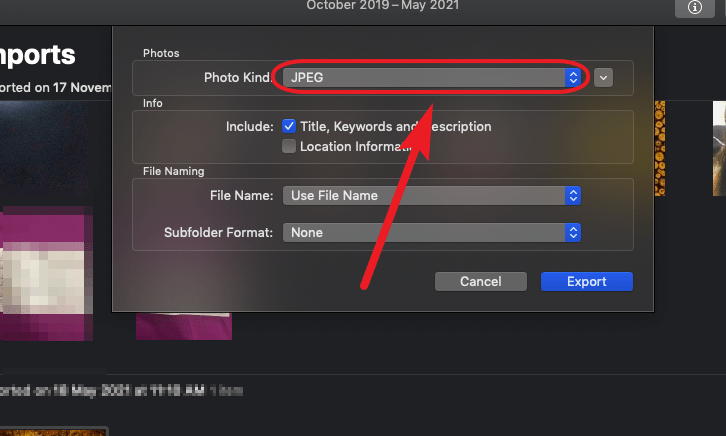
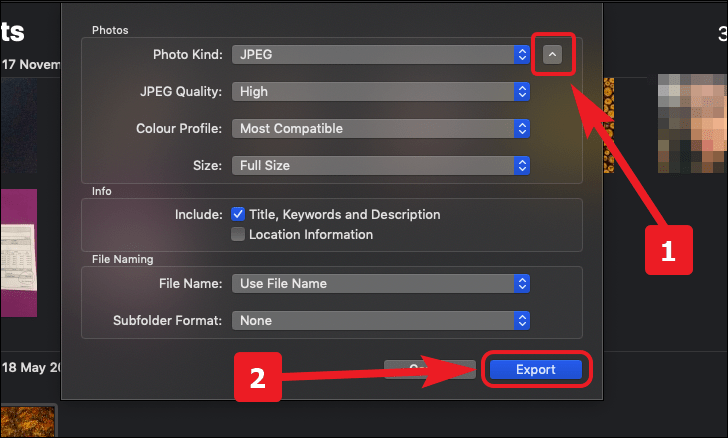
You can also have control over the JPG quality, color profile, and size by clicking on the inverted carat (downward arrow) icon, situated right next to the ‘Photo Kind’ option. Next, click on the ‘Export’ button from the bottom right corner of the pane.
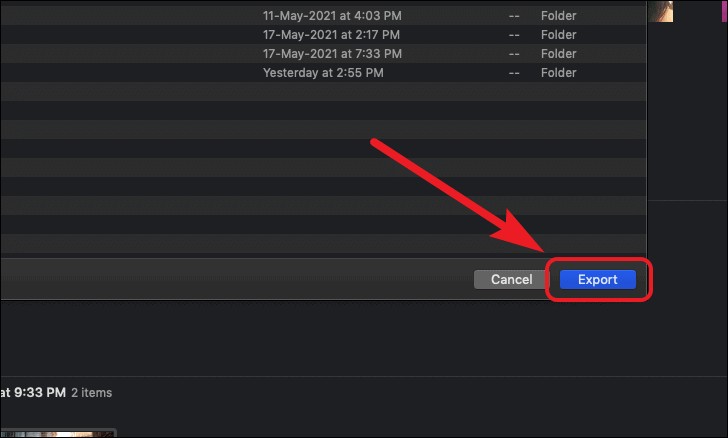
Finally, choose your desired output folder for the files and click on the ‘Export’ button from the bottom right corner of the window.
Convert HEIC to JPG using Automator
Automator is one of the most underused tools present in macOS. It lets you create various kinds of workflows for repetitive and tedious tasks. Thus, it helps to eliminate the need to do tasks manually. So, let’s create a quick action to convert HEIC to JPG.
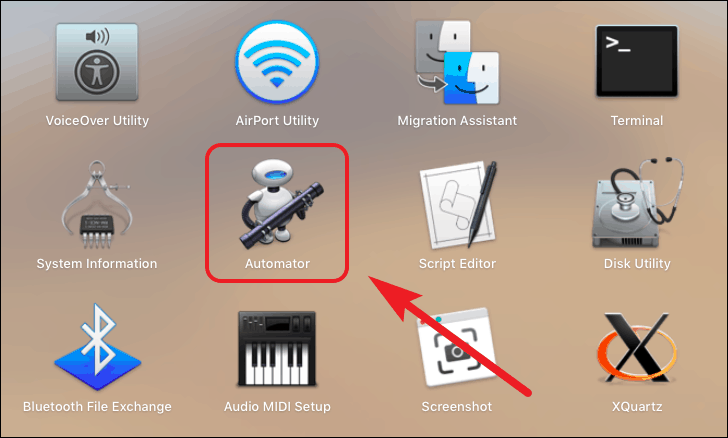
First, launch Automator from Launchpad. If you do not know the location of it, try looking in the ‘Other’ folder. Otherwise, you can also search for ‘Automator’ using spotlight by pressing command+space.
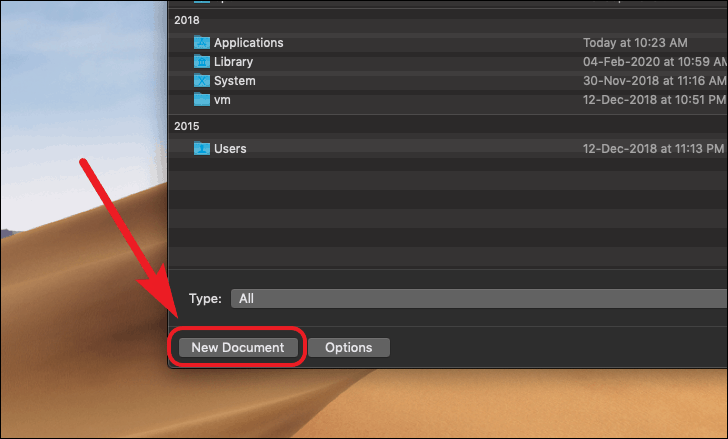
Next, click on the ‘New Document’ button from the bottom left corner of the window.
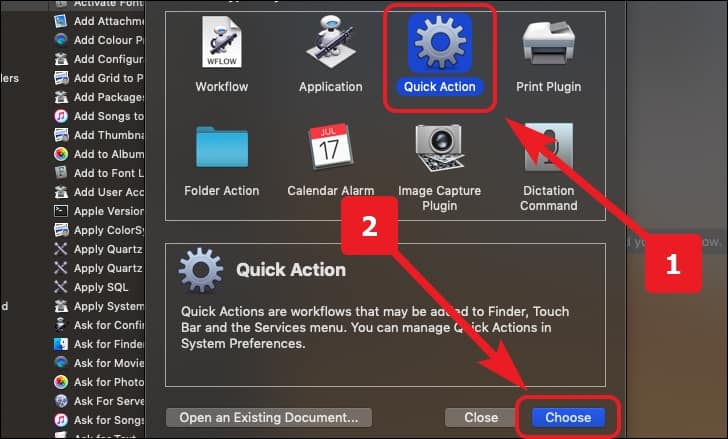
After that select the ‘Quick Action’ option from available types of document. Next, click on the ‘Choose’ button to confirm.
Note: If you do not wish to create a separate JPG copy of your original HEIC images. Kindly skip the next step. Do remember, skipping the next step will replace your original HEIC images.
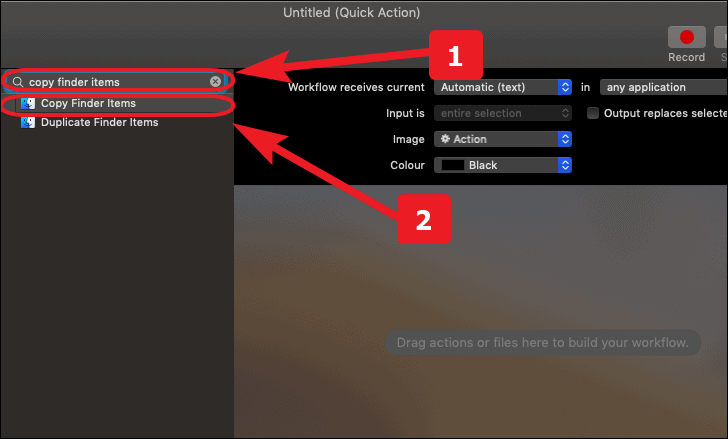
Next, type ‘Copy finder items’ in the search bar located on the left section of the window. Then, drag or double click the ‘Copy finder Item’ to add it to the current workflow.
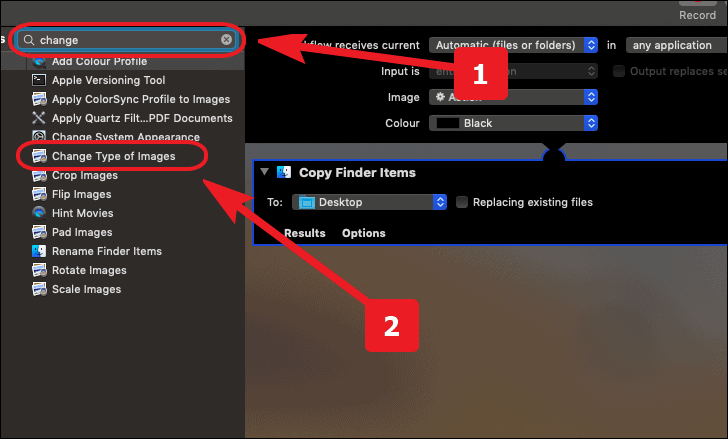
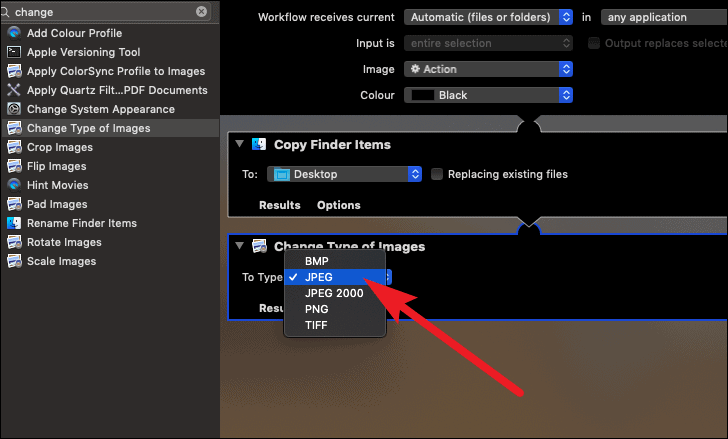
Now, type the ‘Change’ keyword in the search bar and double click on the ‘Change Type of Images’ option from the list.
After that, select the ‘JPEG’ option from the drop-down under the ‘Change Type of Images’ pane.
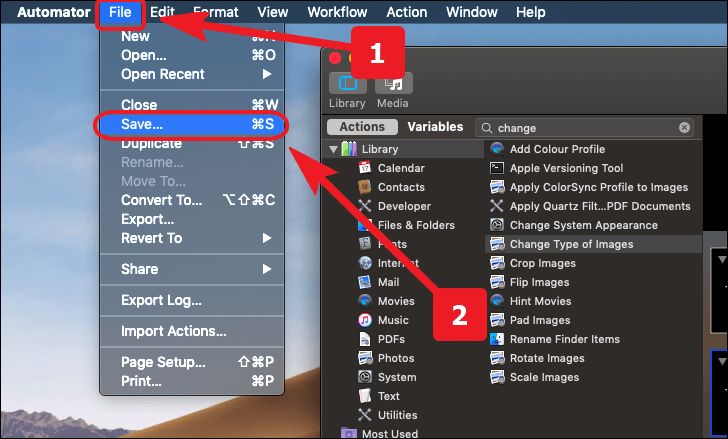
Now, select the ‘File’ tab from the menu bar and navigate to the ‘Save…’ option from the list.
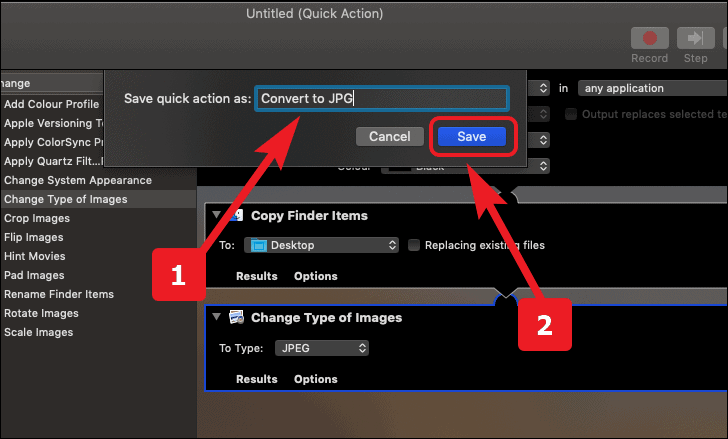
Finally, give a suitable name to the quick action and hit the ‘Save’ button to complete the process.
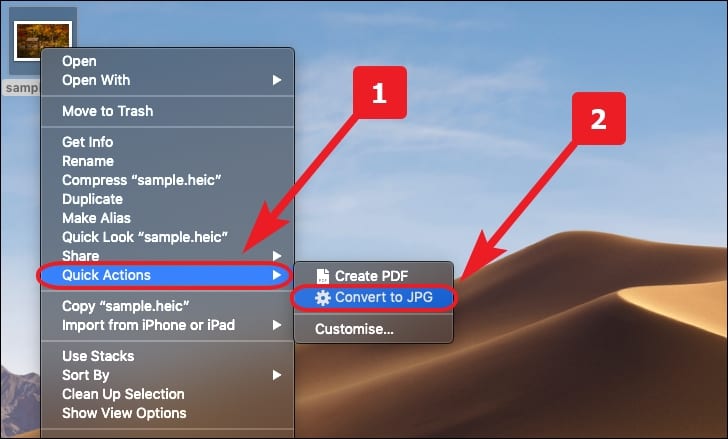
Using the Quick Action to Convert HEIC to JPG
To use your fresh created quick action, secondary click on any HEIC image file. Then select the ‘Convert to JPG’ option from the list and your file will be converted.
Now, with your newly acquired file converting chops. Never face another annoying situation where you cannot upload or edit a picture you took using an iPhone!