Microsoft Teams used to be quite ahead in the horde of Workstream Collaboration apps. But lately, it’s been pushing its boundaries even farther to stay relevant in the changing times. Thanks to the drastic change in the whole equation surrounding the way we work and cutthroat competition, Microsoft Teams has consistently been bringing its A-game.
The latest addition to the arsenal of features Teams offers is Live Meeting Transcriptions. Live transcriptions are available during a meeting, and you don’t need to record a meeting to generate these transcriptions.
Transcriptions can greatly enhance your meeting experience. They don’t just make your meetings more productive by automating meeting notes for you. Although not having to manually take notes is a big plus. They also make meetings more inclusive for participants who are deaf or hard-of-hearing, are in a noisy place, or have a different level of language proficiency.
How is Transcription Different from Live Captions?
Microsoft Teams has had a live captioning feature for quite some time now. So, what’s so special about Meeting Transcriptions? The biggest difference is the availability.
Transcriptions are available after a meeting. And you can download and share them with anyone. That is precisely why we called them “automated meeting notes”. But Teams doesn’t save captions.
Also, when you enable captions, they are visible only to you but transcription is visible to everyone, although users can choose to hide it.
If the main reason you want to enable transcriptions is to make the meeting more inclusive and accessible, you can go with either transcriptions or captions. But to have a record of the entire meeting, transcription is the way to go.
Pre-Requisites for Using Transcription in Misrosoft Teams
There are a few strings attached with using transcriptions in Microsoft Teams. Firstly, it’s only available for scheduled meetings, and not for channel or ‘Meet Now’ meetings. So, if your agenda is inclusivity and better understandability in an impromptu or a channel meeting, you can go for live captions.
Also, the feature is only available when the spoken language is U.S. English. Moreover, it can only be used from the desktop app and is available for certain licenses only. It essentially means that Microsoft Teams free users and the excluded license types don’t have access to the feature.
Organizations with the following licenses have access to Transcriptions in Teams: Office 365 E1, Office 365 A1, Office 365/Microsoft 365 A3, Office 365/Microsoft 365 A5, Microsoft 365 F1, Office 365/Microsoft 365 F3, Microsoft 365 Business Basic, Microsoft 365 Business Standard, Microsoft 365 Business Premium SKUs.
GCC, GCC-High, and DoD users aren’t eligible to use the feature.
Transcription should also be enabled for the organization by the IT admin. If you can’t find the option for the transcription, you’d have to contact the admin.
Enabling Transcription for your Organization
If you are an IT admin for your organization, go to the Teams admin center.
Organization IT admins can enable transcription for everyone by including it in the global policy or selective people by having different policies for different users.
From the navigation panel on the left, click the option for ‘Meetings’.
Few options will expand underneath it. Select ‘Meeting policies’ from these.
To enable the option for the entire organization, click the option or ‘Global (Org-wide default)’.
Scroll down to the ‘Audio & Video’ section. Then, make sure the option for ‘Allow Transcription’ is on.
To enable it selectively, you have two options. You can either have it on for the entire organization, then create a custom policy where the option for Transcription isn’t enabled and assign the policy to the users you don’t want to access the feature. Or you could go in the exact opposite direction, where the option isn’t enabled globally, but only in the custom policy and you can assign it to the users you want to be able to access the feature.
To create a new meeting policy, go to the ‘Meeting policies’ page and click the ‘Add’ button.
Give the name to the policy and configure it the way you want. Click the ‘Save’ button.
To assign the policy to users, select it and click the ‘Manage Users’ button.
A panel will appear on the right. Search for the users you want to assign the policy to and click the ‘Apply’ button.
You can also assign policies to any group of users in your organization.
Using the Transcription Feature in Meetings
Using the feature in meetings is a walk in the park. But remember that you can only transcribe scheduled meetings. Start or join the scheduled meeting from your calendar event.
The meeting organizer and people from the same tenant can start transcriptions. Guests, people from another tenant, and anonymous users (people who don’t want to be identified in transcriptions) cannot start transcription in a meeting.
To start a transcription, go to ‘More actions’ from the meeting toolbar.
Then, select ‘Start Transcription’ from the options.
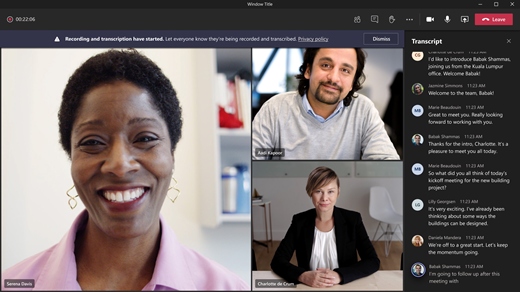
You’ll see a notice that the transcription has started, and you should let everyone know that they are being transcribed. But other participants will also see the notice that the meeting is being transcribed. Nonetheless, you should inform everyone as a courtesy for the participants who have joined from a phone.
The transcription panel will appear on the right. The transcript will also include the username and profile icon of the participant as well as the time stamp.
All participants in the meeting can show or hide the transcript panel at any time. Click the ‘Close’ button on the panel to hide it.
You can also go to the More actions menu and select ‘Hide transcript’ from there.
To show the panel, select ‘Show transcript’ from the More actions menu.
The meeting organizer and presenters can stop the transcription and restart it at any point during the meeting. To stop the transcription, navigate to the More actions menu and select ‘Stop Transcription’.
Everyone will get a notice that you stopped transcribing. The transcription will automatically stop when everyone leaves the meeting.
Downloading and Sharing Transcriptions
The meeting transcripts are available for download automatically after the meeting in the calendar event. Go to ‘Calendar’ from the navigation panel on the left.
Then, open the event for the scheduled meeting.
The meeting page will have an additional tab at the top: ‘Recordings and Transcripts’.
The entire transcript will be available to view there. To download it, click the download button.
You can download the transcript as either a .vtt file (a popular format for transcripts) or a .docx file (Word document).
Transcriptions are available for download from the participant’s accounts until the meeting organizer deletes them.
Mobile participants cannot see the transcription on the mobile app. To make it accessible to mobile participants, download the file and upload it to chat. Go to the meeting chat and click the ‘Attach’ button to upload the file.
Mobile participants can then find the file in their chat.
Hiding Your Identity in Transcriptions
Teams can identify the person speaking and meeting transcriptions automatically include the username and the person’s name. If you wish to remain anonymous in transcriptions, you can hide your identity. But you have to do so before a meeting.
Click the ‘Settings and more’ icon (three-dot menu) next to your profile icon on the title bar. Then, select ‘Settings’ from the menu.
Settings will open. From the navigation menu on the left, go to ‘Captions and transcripts’.
Then, turn off the toggle for ‘Automatically identify me in captions and transcripts’.
Transcriptions are a great feature and Microsoft Teams certainly makes them easy to use. So next time you want to take meeting notes or want to make the meeting content accessible for everyone, you can transcribe the entire meeting.