Cisco Webex is one of the popular video conferencing apps out there. A lot of organizations and schools use it to conduct online meetings and classes to keep a handle on things during these unusual times. One of the great things about video conferencing is that you can have closed captions in real-time, an area where it transcends its alternative – physical meetings.
Whether you have a bad connection that’s affecting your capability to understand the audio from other people or a meeting participant has a hearing disability, closed captions can come handy in all situations. Most software have automated closed captions that use speech intelligence, but the one in Webex is a bit different. It has automated closed captions too, but there are a few strings attached. So, let’s just dive in and see what’s what.
Closed Captions in Webex
The current system of closed captions that Webex has is not an automated one. When you have enabled closed captions in Webex, a user, generally the designated captionist, can manually transcribe the audio in the captions panel.
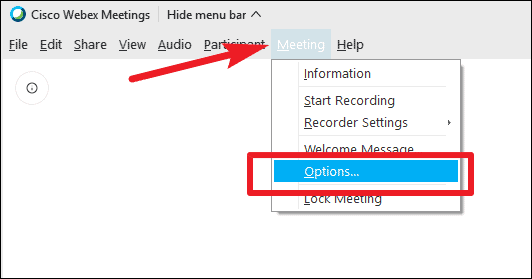
Enabling closed captions in a meeting is a piece of cake. Go to the ‘Meeting’ option on the menu bar in the meeting screen and select ‘Options’ from the menu.
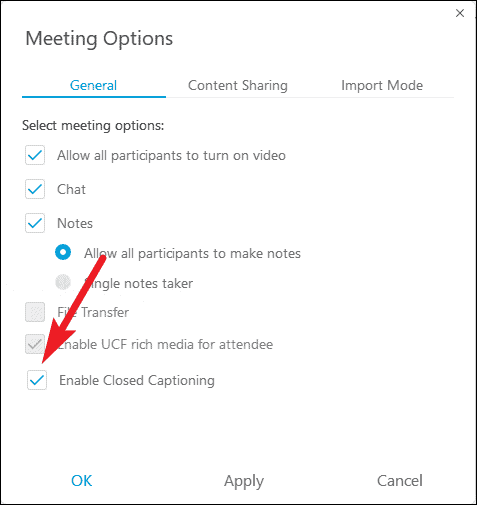
A dialog box will open, and the ‘General’ tab will be open by default. Click on the checkbox next to ‘Enable Closed Captioning’ to select it and click on ‘OK’ to save the changes.
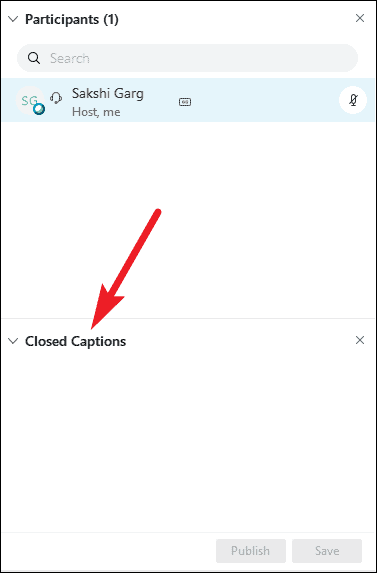
The panel for ‘Closed Captions’ will appear on the right of the meeting window like other panels in the meeting. You can write the captions in this closed captions box.
Now, this system of closed captions only works when someone manually transcribes the meeting contents. So, broadly speaking, you must have a designated captionist in the meeting for the purpose. So, after you have enabled closed captioning, you need to assign that person their role as the captionist.
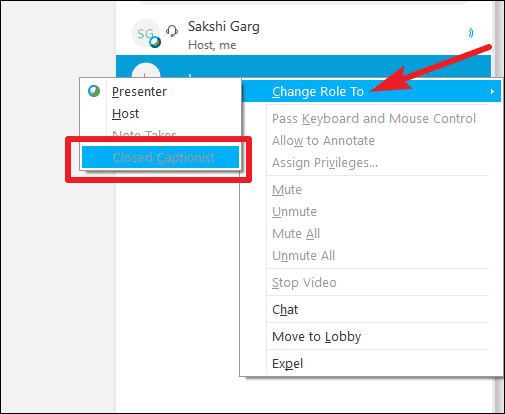
To assign the role to a participant, go to the participant panel, and right-click on the name of the participant to whom you want to assign this role. Then, go to ‘Change Role To’ in the right-click menu and select ‘Closed Captionist’ from the sub-menu.
That participant can now write in the closed captions textbox and fulfill their role as the meeting captionist and caption the meeting for those who need it.
How do Automated Closed Captions Work in Webex?
Cisco Webex is now adding automated closed captions to its arsenal of tools. “Why do I feel like there’s a but coming?” Because there is. Automated closed captioning is coming to Webex but with some strings attached.
Webex is adding a new digital AI meeting assistant to Webex meetings, which will be available to users by the end of this year and is currently in the trial phase. Part of the AI assistant’s capabilities includes captioning the meeting using advanced voice technology to accurately capture speech-to-text in real-time.
The AI meeting assistant will only be available with paid plans and that too as an add-on, so there’s your catch. Cisco says you will be able to add it to your plan by later this year.
To enable closed captions, click on the ‘Closed Caption’ icon next to the meeting assistant icon on the lower-left corner of the screen.

So, there you have it. The complete rundown of closed captions in the Cisco Webex Meetings ecosystem. You can have closed captions in meetings in Webex, but they are only useful if there is a designated captionist present in the meeting to provide real-time captions. You can also include captions if you’re recording the meeting for later.
Automated captions will be great when they finally come to Webex. But as Cisco hasn’t announced the price for the AI meeting assistant yet, we’ll have to wait and see whether it’ll be worth it to have this add-on feature when it comes.


