
Outlook’s AutoArchive feature automatically moves older emails and items to an archive file, reducing mailbox size and helping you access important messages faster. When AutoArchive stops working or goes missing, mailbox clutter builds up and can lead to slow searches, performance drops, or even data corruption. Addressing AutoArchive problems quickly restores efficient email management and prevents mailboxes from exceeding storage limits.
Method 1: Use the Registry to Fix Date-Based Archiving Problems
Outlook sometimes fails to archive emails because it uses the message’s “last modified” date instead of the received or sent date. This can cause older emails to remain in your mailbox if they’ve been edited or flagged recently. Adjusting the registry forces Outlook to use the sent/received date, ensuring emails archive as expected.
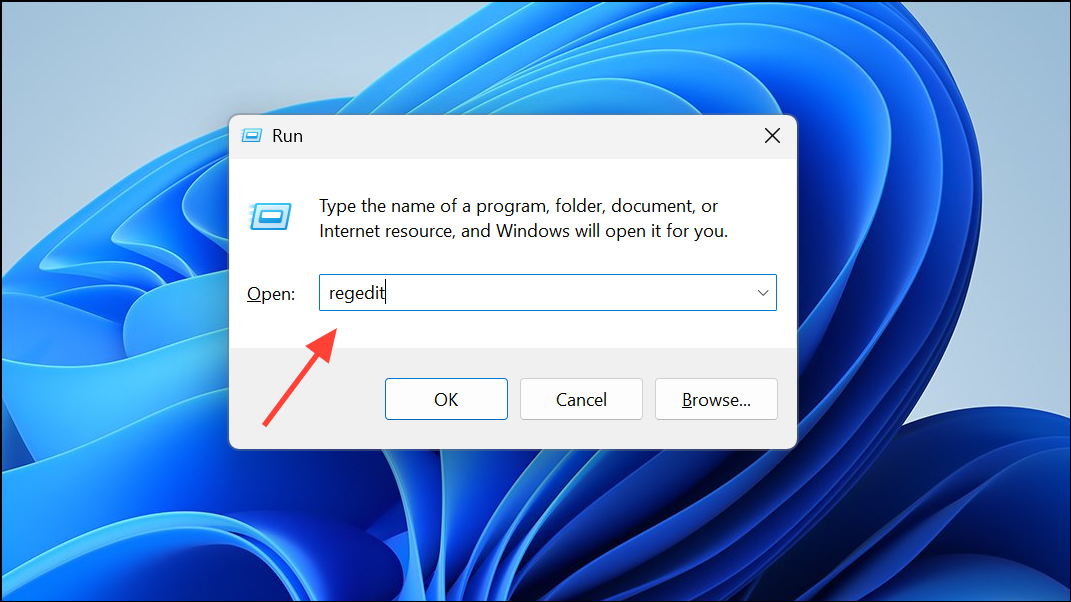
Step 1: Press Windows + R to open the Run dialog. Type regedit and press Enter to open the Registry Editor.
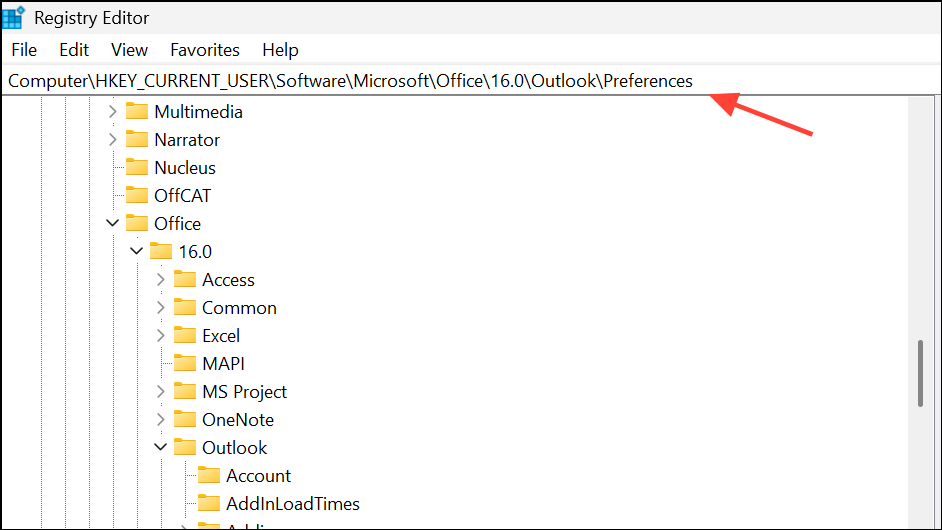
Step 2: Navigate to the path: HKEY_CURRENT_USER\Software\Microsoft\Office\16.0\Outlook\Preferences. (For Outlook 2016/2019/365, use 16.0; for Outlook 2013 use 15.0.)
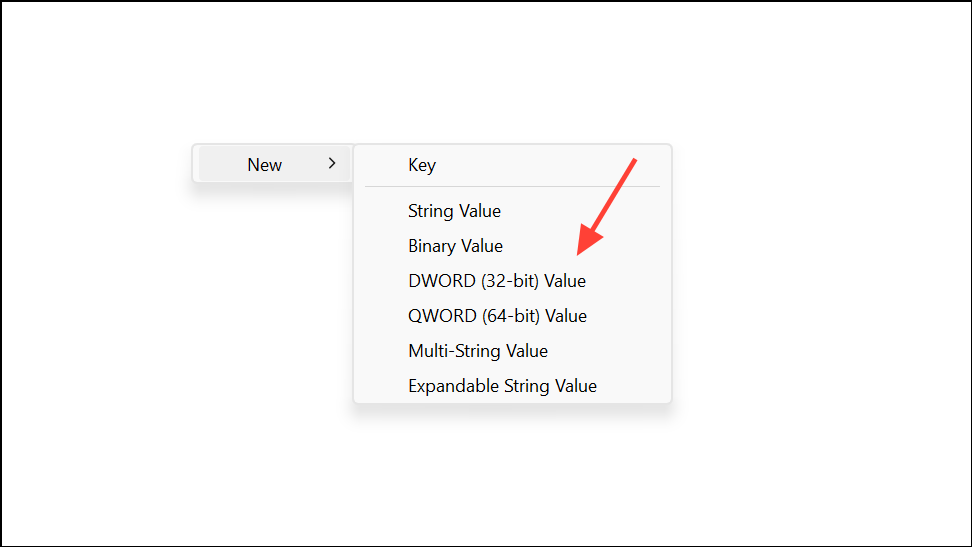
Step 3: Right-click in the right pane, choose New > DWORD (32-bit) Value, and name it ArchiveIgnoreLastModifiedTime.
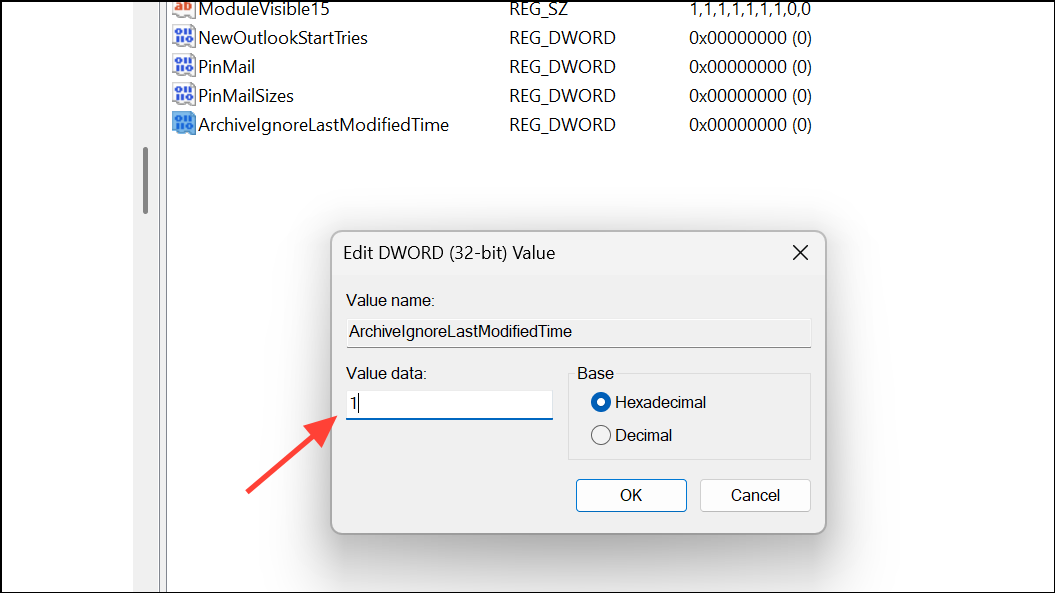
Step 4: Double-click the new value and set its data to 1. Click OK.
Step 5: Close the Registry Editor and restart Outlook.
This change instructs Outlook to archive messages based on their sent or received date, bypassing issues caused by recent modifications.
Method 2: Disable and Re-enable Outlook Add-Ins
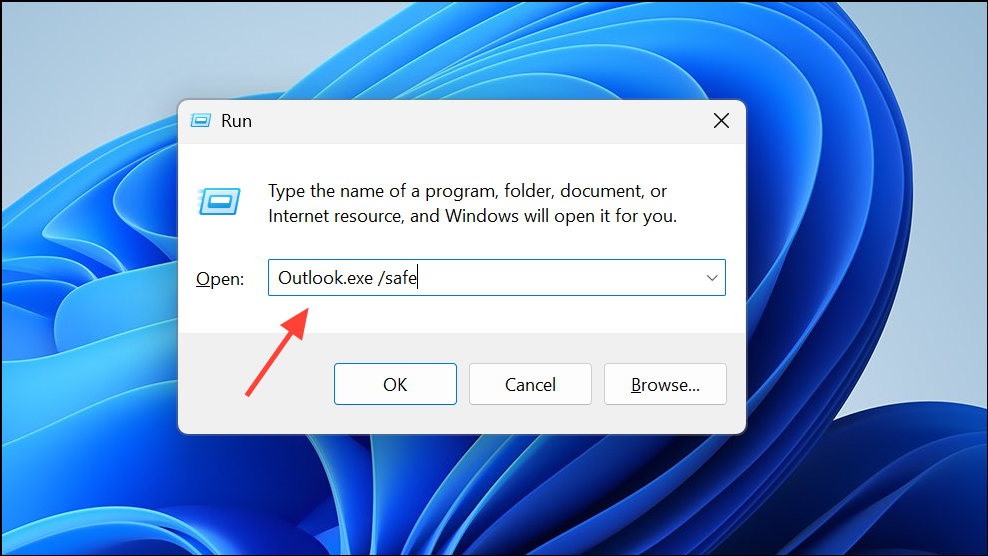
Conflicting or malfunctioning COM add-ins can block AutoArchive from running correctly. Temporarily disabling add-ins can help identify if one is the culprit.
Step 1: Close Outlook. Hold Windows + R, type Outlook.exe /safe, and press Enter to launch Outlook in Safe Mode.
Step 2: Click File > Options > Add-ins. At the bottom, set Manage to COM Add-ins and click Go....
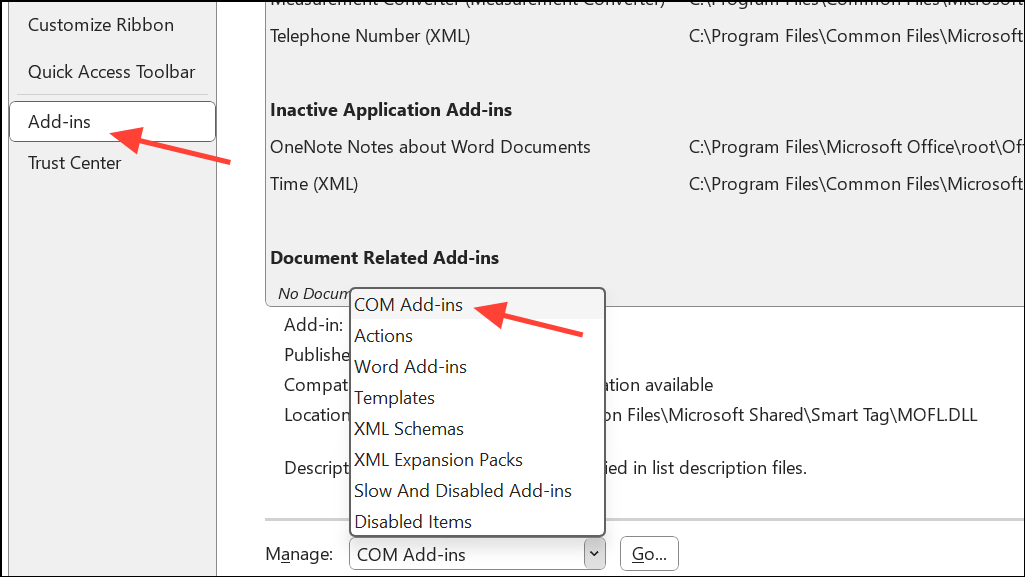
Step 3: Uncheck all add-ins and click OK.
Step 4: Restart Outlook normally (not in Safe Mode). If AutoArchive works, re-enable add-ins one by one, restarting Outlook each time, to identify the problematic add-in.
Disabling problematic add-ins restores AutoArchive functionality and prevents future disruptions.
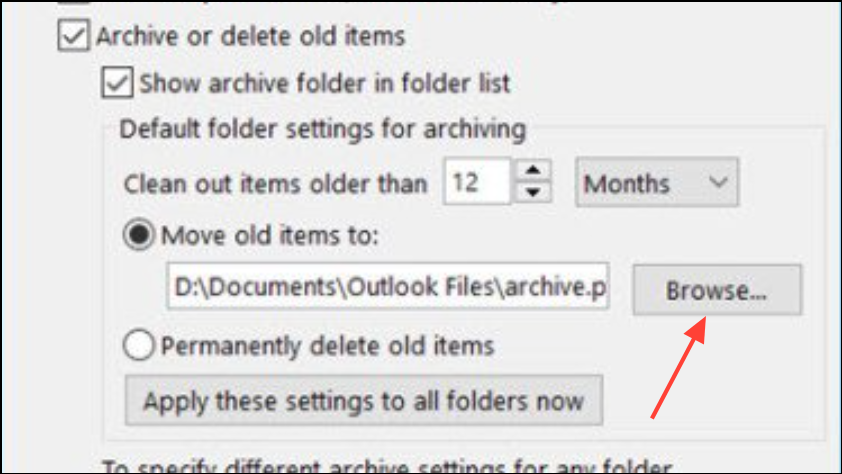
Method 3: Verify and Configure AutoArchive Settings Globally and Per Folder
Incorrect or disabled AutoArchive settings at the global or folder level often prevent archiving from running. Verifying and adjusting these settings ensures Outlook processes items as intended.
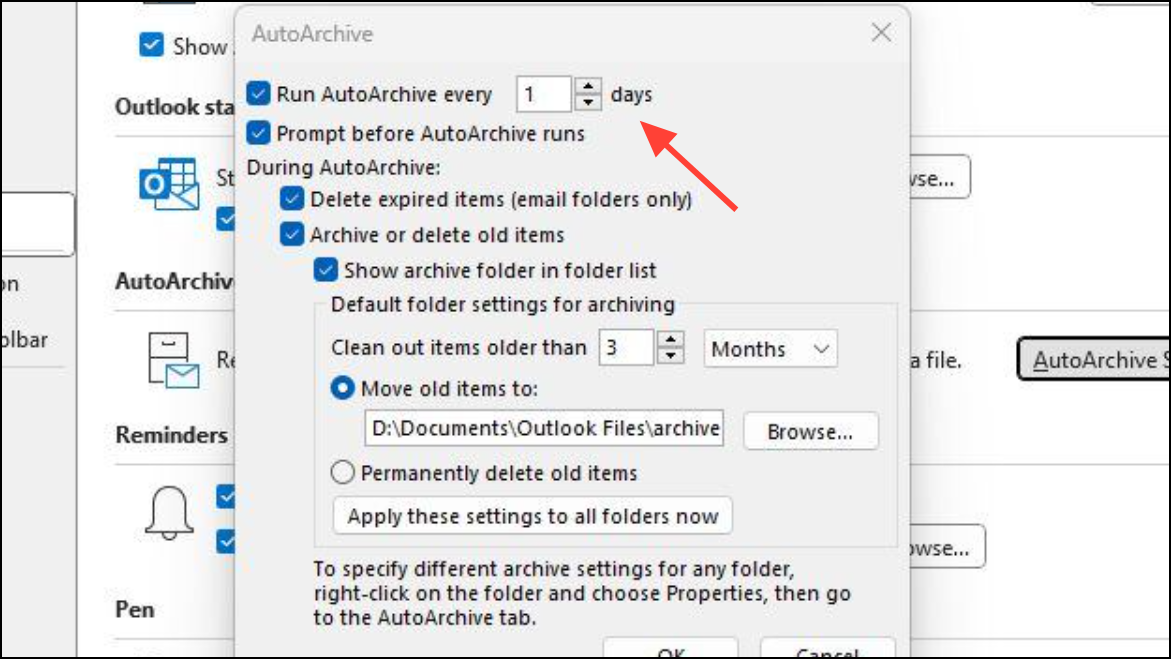
Step 1: Go to File > Options > Advanced in Outlook.

Step 2: Under the AutoArchive section, click AutoArchive Settings.... Make sure Run AutoArchive every [X] days is checked and set to your preferred frequency. Choose whether to move or delete old items, and specify the archive file location.
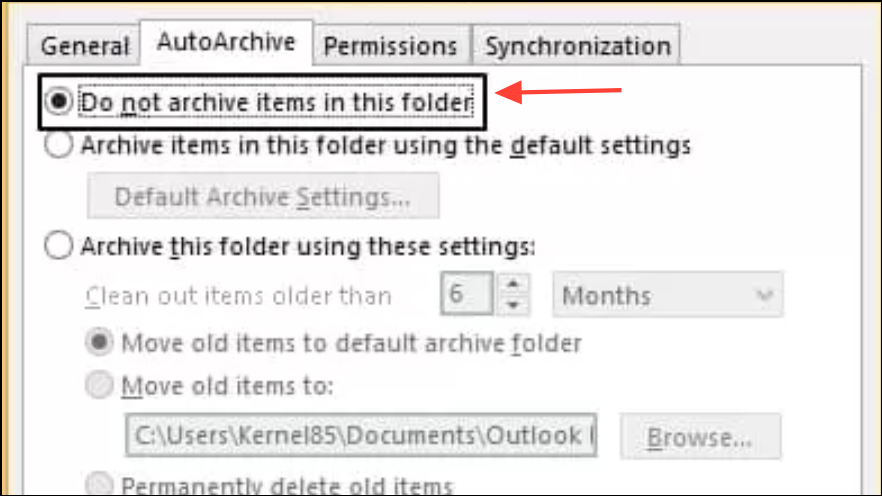
Step 3: For individual folders, right-click the folder, select Properties, and open the AutoArchive tab. Confirm that archiving is enabled for the folder and not set to Do not archive items in this folder.
Proper configuration ensures both global and folder-level AutoArchive schedules operate as expected.
Method 4: Check for Missing AutoArchive Due to Exchange or Retention Policies
In organizations using Exchange or Office 365, AutoArchive may be unavailable or hidden if mailbox retention policies are active. These policies override user-level archiving options and may remove the AutoArchive button from Outlook settings.
Step 1: Contact your IT administrator to check if mailbox retention policies are enabled for your account. Retention policies are typically managed in the Exchange Admin Center under recipients > mailbox > mailbox features > Retention Policy.
Step 2: If your mailbox is connected to Exchange and AutoArchive is missing, ask your administrator if the policy can be adjusted or if you should use the Online Archive feature instead.
Understanding policy restrictions clarifies why AutoArchive options may be missing and helps you find alternative archiving solutions.
Method 5: Move Archive Files to Local Storage
Storing archive files on network drives or external storage often causes archiving to fail or slow down. Microsoft recommends keeping archive PST files on your local hard disk to prevent connectivity and corruption issues.
Step 1: Open the AutoArchive settings in Outlook as described above.
Step 2: In the Move old items to field, select a folder on your local drive (such as C:\Users\YourName\Documents\Outlook Files\archive.pst).
Step 3: Click OK to save changes.
Archiving to local storage reduces errors and speeds up the archiving process.
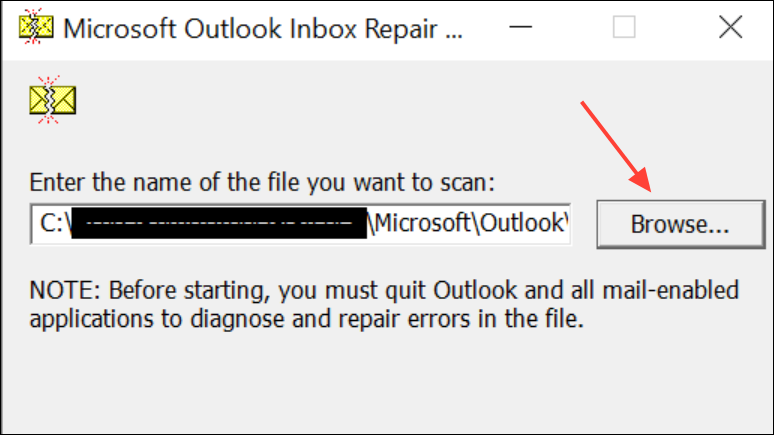
Method 6: Repair Corrupt PST Files with Inbox Repair Tool
Corrupted Outlook data files (PST) can block AutoArchive from processing items or saving new data. Microsoft’s Inbox Repair Tool (ScanPST.exe) scans and repairs minor corruption in PST files.
Step 1: Close Outlook. Open File Explorer and navigate to your Office installation folder, typically C:\Program Files\Microsoft Office\root\OfficeXX (replace XX with your version number).
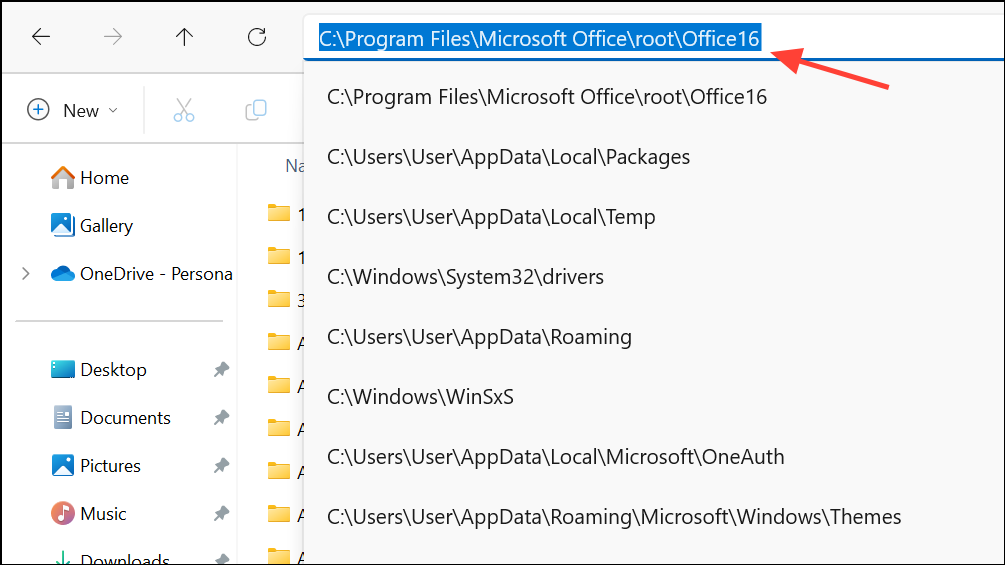
Step 2: Run ScanPST.exe. Click Browse to select your PST file (often found in Documents\Outlook Files).
Step 3: Click Start to scan for errors. If issues are found, click Repair.
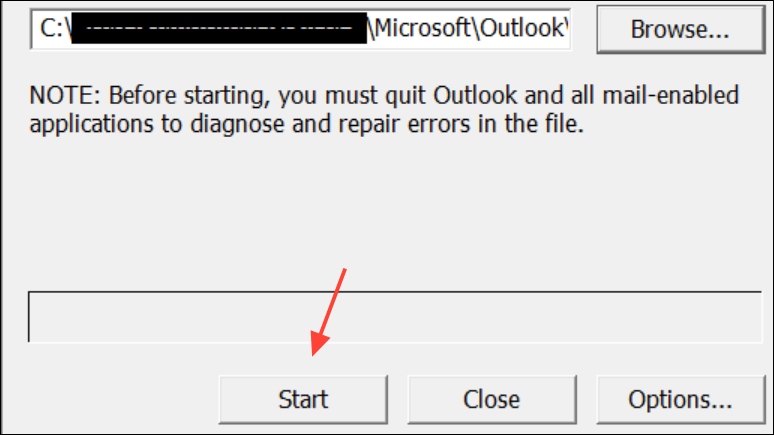
Step 4: Restart Outlook and test AutoArchive again.
Repairing the PST file resolves archiving failures caused by data corruption.
Method 7: Check Group Policy and Organizational Settings
Group Policy can disable AutoArchive in managed environments. If you cannot find AutoArchive settings, your organization may have set a policy to hide or restrict this feature.
Step 1: Ask your IT administrator to review Group Policy settings related to Outlook AutoArchive. These are typically managed through the Group Policy Management Console under Microsoft Outlook policies.
Step 2: If allowed, administrators can enable AutoArchive by changing policy settings or removing restrictions.
Resolving policy conflicts restores access to AutoArchive in Outlook.
Method 8: Verify Storage Space and Exclusions
Low disk space or item-level exclusions can prevent archiving. Outlook needs sufficient free space to create or update archive files, and individual items marked as “Do Not AutoArchive” will be skipped.
- Ensure your hard drive has enough free space for the archive PST file.
- To check item exclusions, open an email, click
File > Properties, and verify that “Do not AutoArchive this item” is not checked.
Clearing storage and removing exclusions allows all eligible items to be archived.
Addressing AutoArchive issues in Outlook restores automatic email management, speeds up mailbox searches, and prevents data loss. Regularly reviewing settings and maintaining your PST files keeps archiving running smoothly.