
The "Can't connect to this network" error in Windows 11 stops devices from accessing Wi-Fi networks that previously worked without issue. This problem often appears suddenly—sometimes after a Windows update, a change in router settings, or even with no clear cause. The error may affect only one device while others connect just fine, making it especially frustrating to diagnose. Here are the most effective, proven methods to restore your connection and prevent future disruptions.
Update or Reinstall Network Drivers
Outdated, corrupted, or incompatible network drivers are a primary cause of connection failures. Updating or reinstalling these drivers can resolve issues where Windows 11 refuses to connect to specific networks.
Step 1: Download the latest Wi-Fi driver for your device from the manufacturer's website using another computer or a mobile device, if possible. Save the installer to a USB drive for transfer.
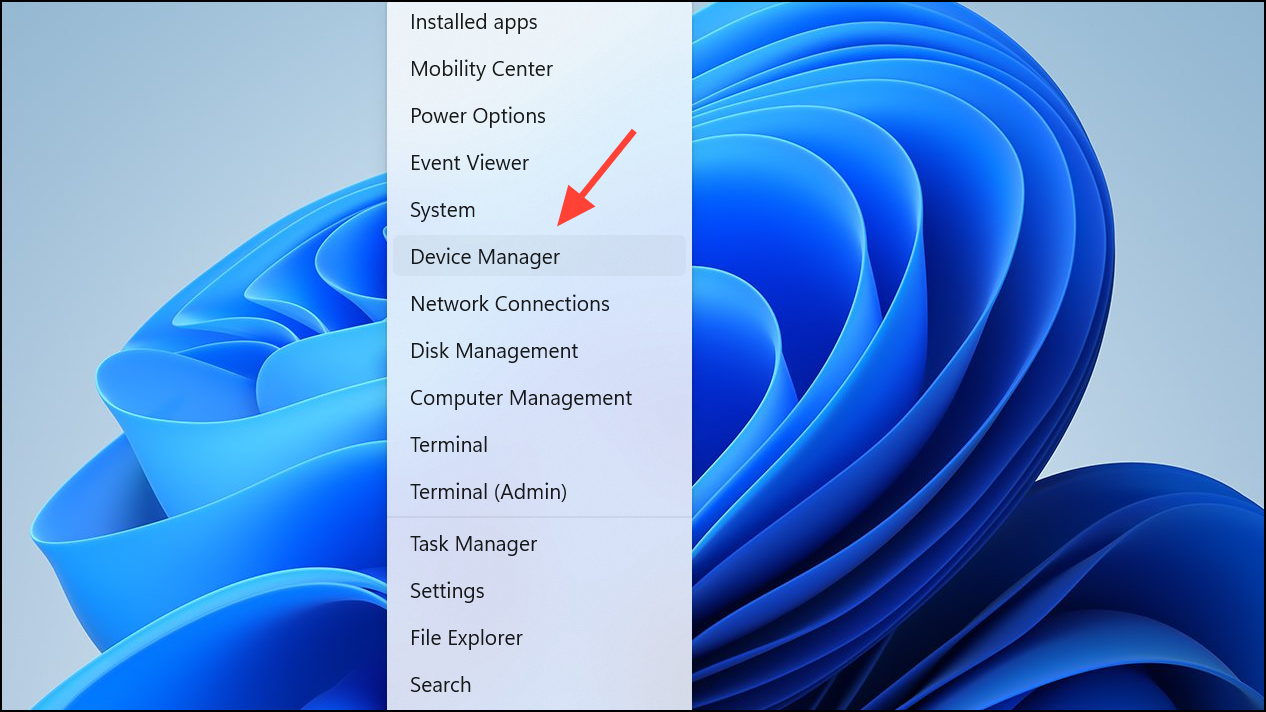
Step 2: On your Windows 11 PC, right-click the Start button and select Device Manager.
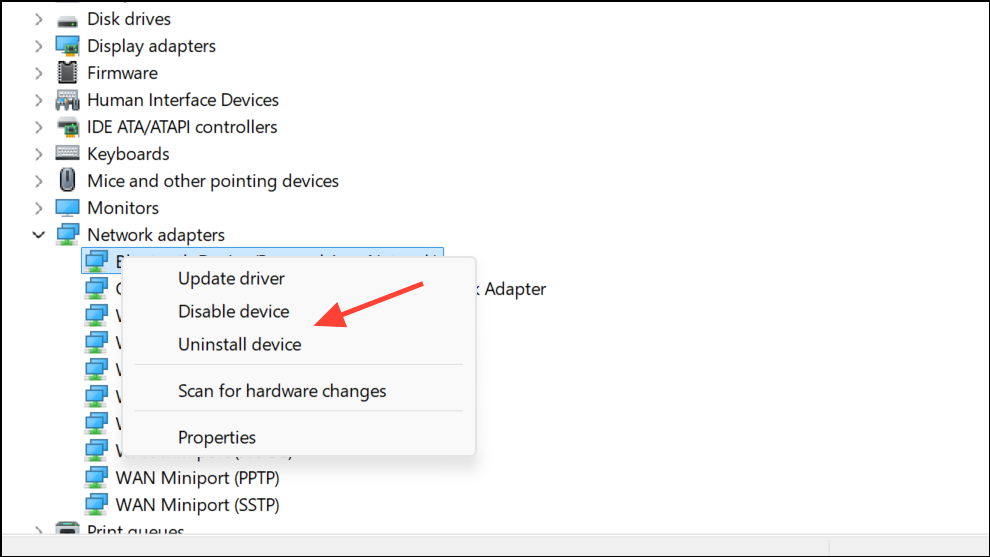
Step 3: Expand the Network adapters section, right-click your Wi-Fi adapter, and choose Uninstall device. If prompted, check the box to remove the driver software.
Step 4: Restart your PC. Windows will attempt to reinstall the default network driver. If it doesn't, run the installer you downloaded in Step 1 to manually install the latest version.
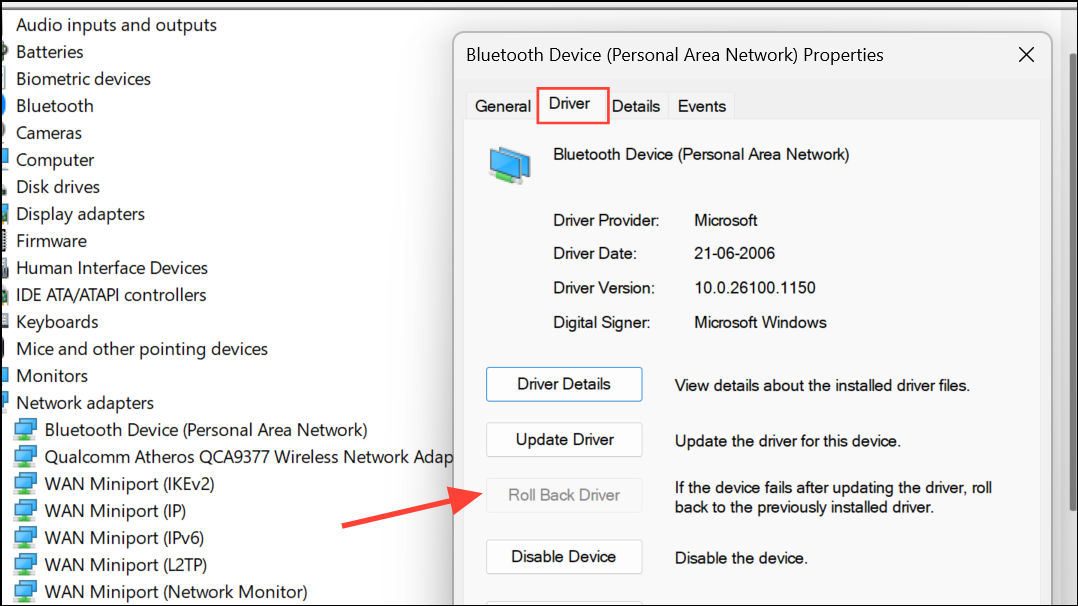
Step 5: Once the driver is installed, check if your Wi-Fi network appears and try connecting again. If the issue started after a recent driver update, consider rolling back to a previous version by opening the adapter's properties in Device Manager and selecting Roll Back Driver under the Driver tab.
Flush DNS Cache and Reset Network Stack
Corrupted DNS cache or network stack settings can prevent Windows from establishing new connections. Clearing these settings often restores normal connectivity.
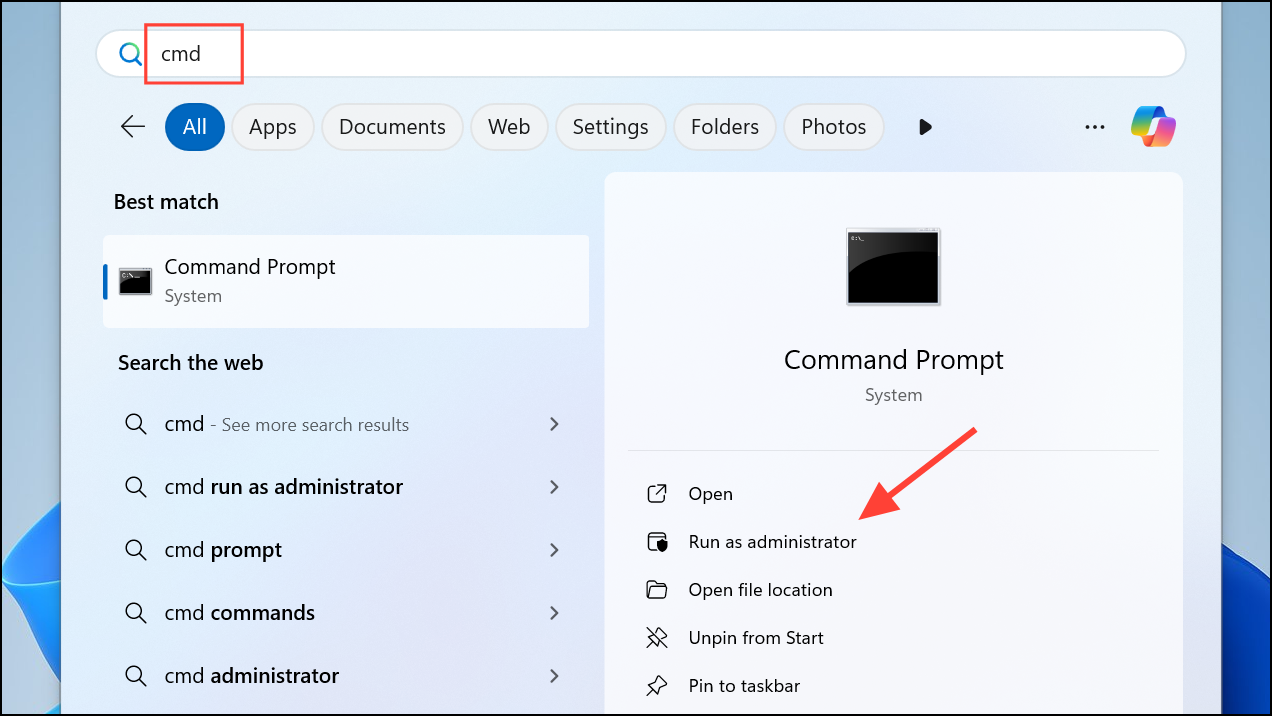
Step 1: Type cmd in Windows Search, right-click Command Prompt, and select Run as administrator.
Step 2: Enter the following commands, pressing Enter after each one:
netsh winsock reset
netsh int ip reset
ipconfig /release
ipconfig /renew
ipconfig /flushdns
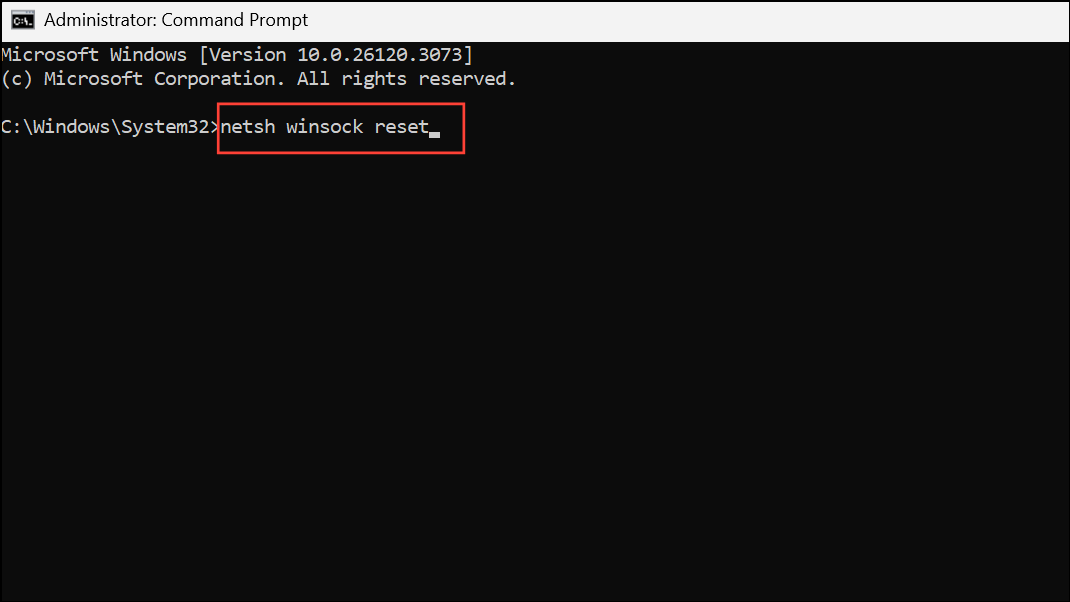
Step 3: Close Command Prompt and restart your computer. Try connecting to your Wi-Fi network again.
Forget and Reconnect to the Wi-Fi Network
Saved Wi-Fi profiles can become corrupted, especially if router settings have changed. Removing and re-adding the network forces Windows to create a fresh connection profile.
Step 1: Go to Settings > Network & Internet > Wi-Fi and select Manage known networks.
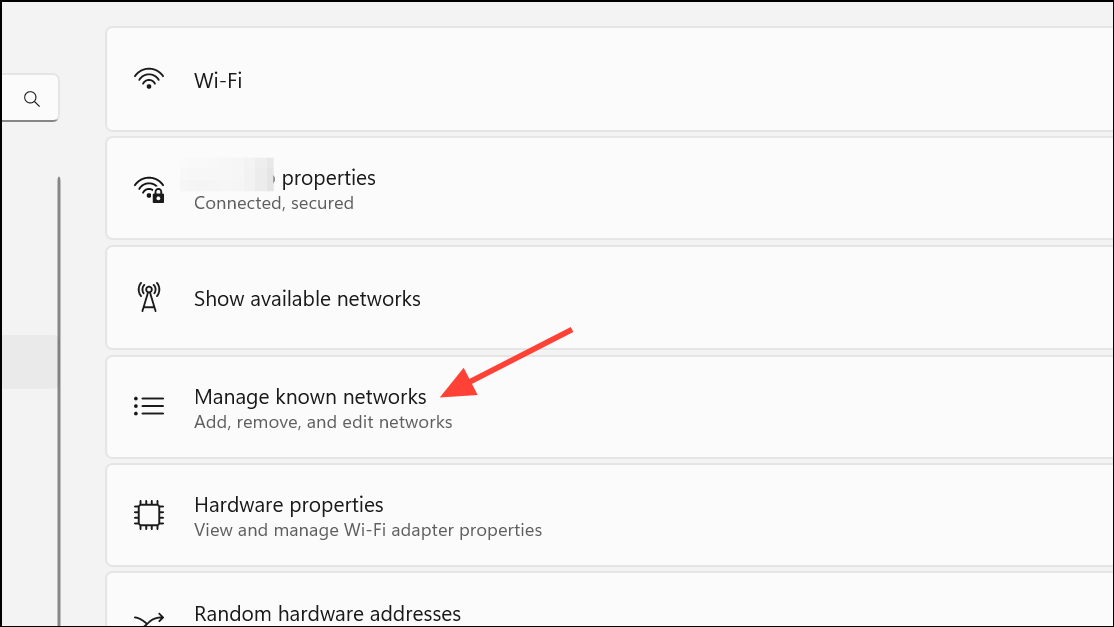
Step 2: Find your problematic network in the list and click Forget.

Step 3: Scan for available networks, select your Wi-Fi, and enter the password to reconnect.
Toggle Random Hardware Addresses
Windows 11 includes a feature called Random Hardware Addresses (MAC randomization), which can interfere with certain routers or network setups. Toggling this setting often resolves unexplained connection failures.
Step 1: Open Settings > Network & Internet > Wi-Fi > Manage known networks.
Step 2: Click the arrow next to your Wi-Fi network, then locate the Random hardware addresses option. Toggle it ON if it was OFF, or OFF if it was ON. Wait a few seconds, then try connecting again.
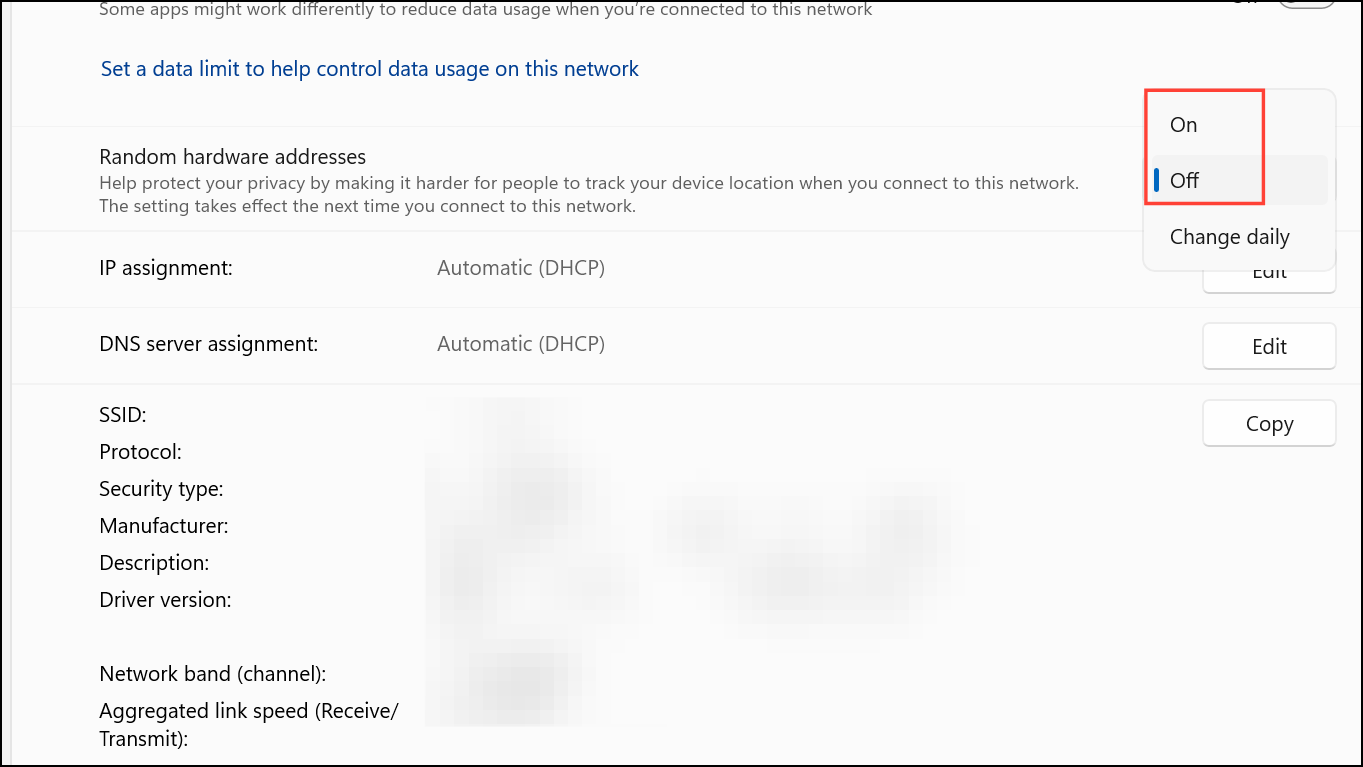
Step 3: If you have already forgotten the network, you can enable or disable Random hardware addresses globally from Wi-Fi settings before reconnecting.
Reset Network Settings in Windows 11
When all other troubleshooting fails, resetting all network settings restores Windows networking to its factory defaults. This step removes all network adapters and reinstalls them, clearing any misconfigurations.
Step 1: Navigate to Settings > Network & Internet > Advanced network settings.
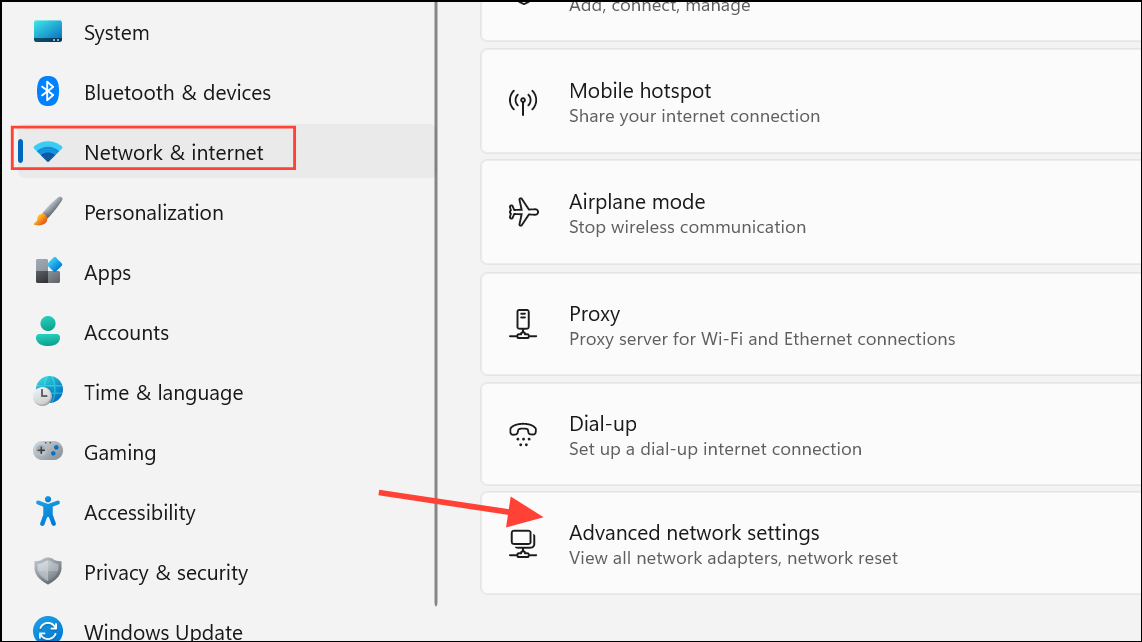
Step 2: Scroll down to Network reset and click Reset now. Confirm your choice. Your PC will restart automatically.
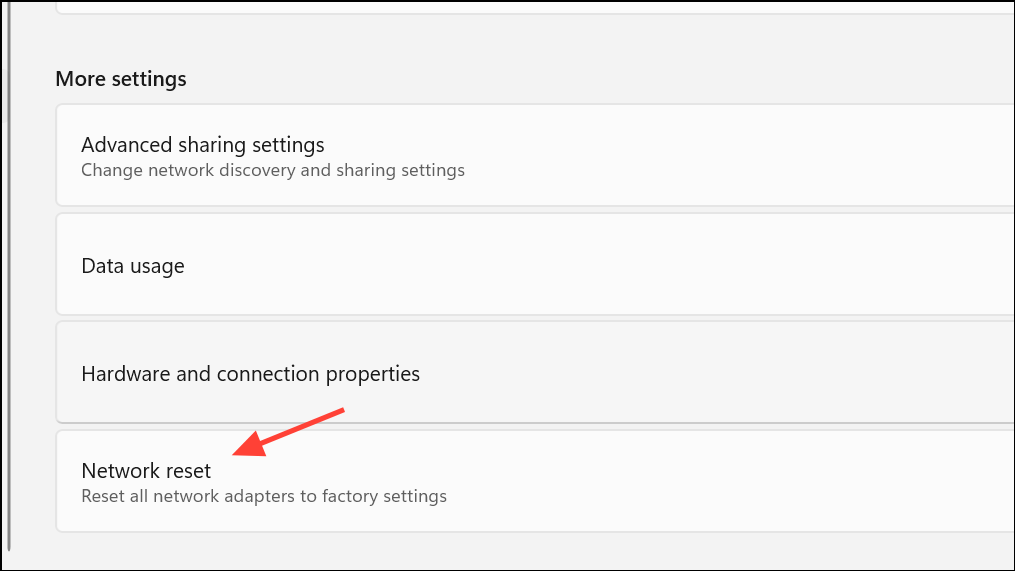
Step 3: After rebooting, reconnect to your Wi-Fi network by entering the password.
Disable IPv6 for the Wireless Adapter
Some routers and adapters have compatibility issues with IPv6, which can disrupt Wi-Fi connections. Disabling IPv6 can improve connection reliability, especially on older networks.
Step 1: Right-click the network icon in the system tray and choose Network and Internet settings. Go to Advanced network settings >Your Connection> More network adapter options.
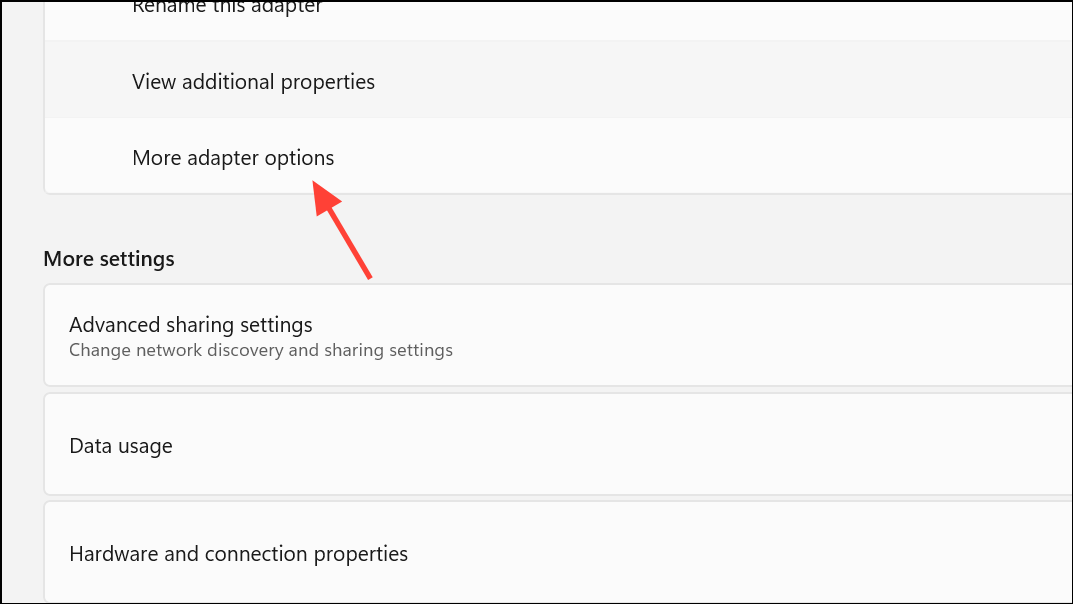
Step 2: Right-click your Wi-Fi adapter and select Properties. Find Internet Protocol Version 6 (TCP/IPv6) in the list and uncheck it.
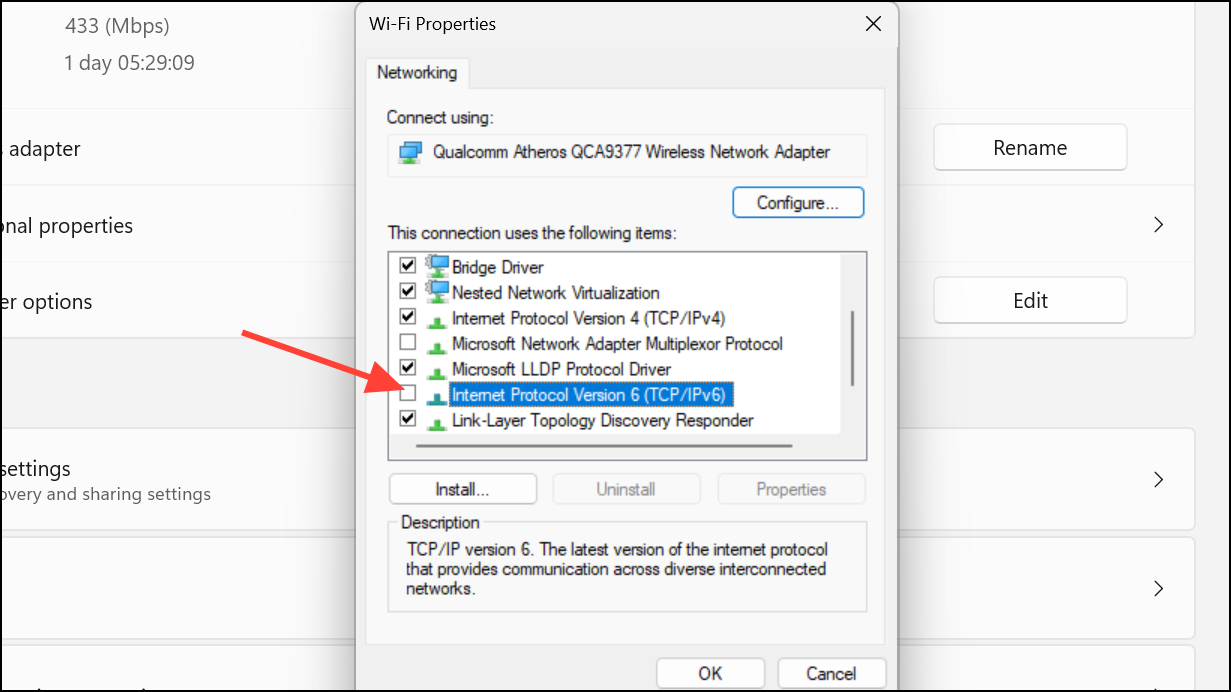
Step 3: Click OK, then reboot your PC and try connecting again.
Check Router Settings and Compatibility
Router configuration changes, such as enabling only WPA3 encryption or changing Wi-Fi bands, can cause devices to lose connectivity. If your Windows 11 device can't connect but others can, review these settings:
- Ensure your router is broadcasting both 2.4GHz and 5GHz bands, and try connecting to each one separately.
- Check for MAC address filtering or access lists that might block your device.
- Temporarily disable advanced security features like WPA3 if your device only supports WPA2.
- If your router supports guest networks, try connecting to the guest network as a test.
- Restart the router by unplugging it for 10 seconds and plugging it back in.
Use Windows Network Troubleshooter
Windows 11 includes a built-in troubleshooter that can automatically detect and fix common network problems.
Step 1: In Windows Search, type network troubleshooter and select Find and fix network problems.
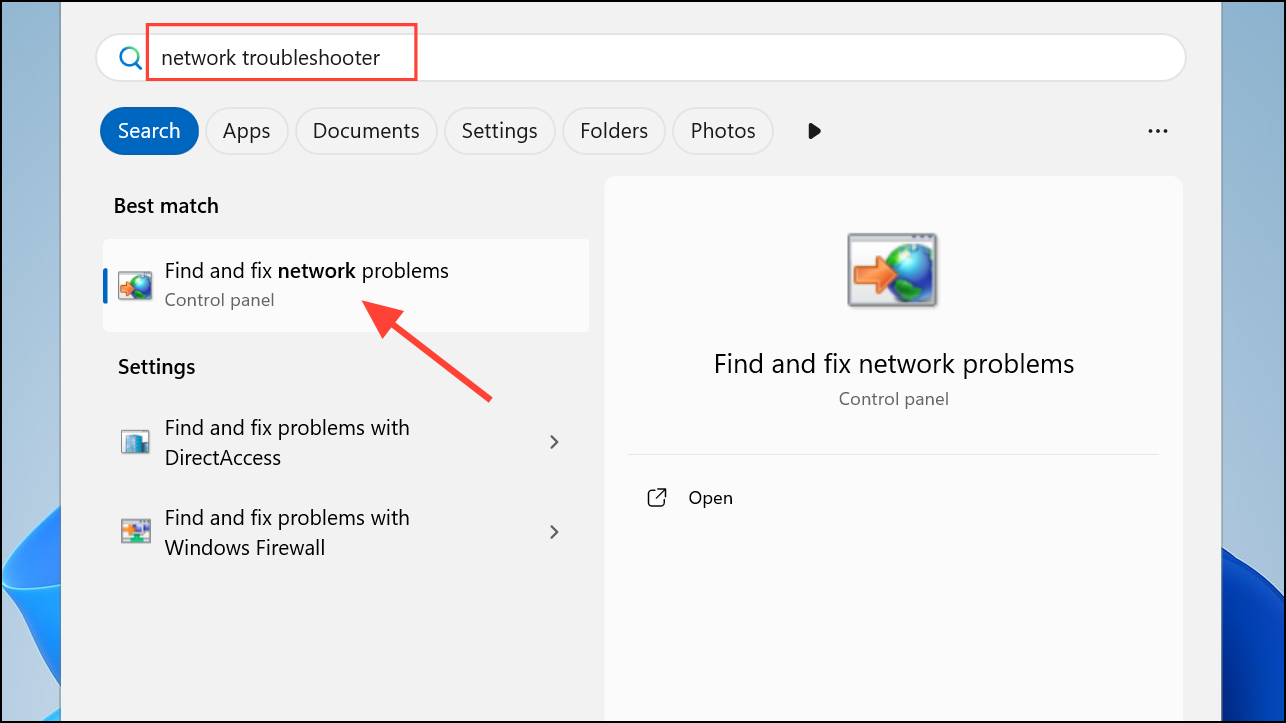
Step 2: Follow the on-screen instructions. If prompted, allow Windows to reset adapters or apply recommended fixes.
Physical and Environmental Checks
Physical issues can also prevent successful connections:
- Move your PC closer to the router to rule out signal interference or weak reception.
- Verify that Wi-Fi is enabled (some laptops have a physical switch or function key).
- Disconnect USB devices (such as wireless mouse dongles) that may interfere with Wi-Fi signals.
- Check the internal Wi-Fi card connections if you recently opened the laptop or desktop.
System Restore or Windows Update
If the error started after a Windows update or system change, restoring your system to a previous restore point can roll back problematic changes.
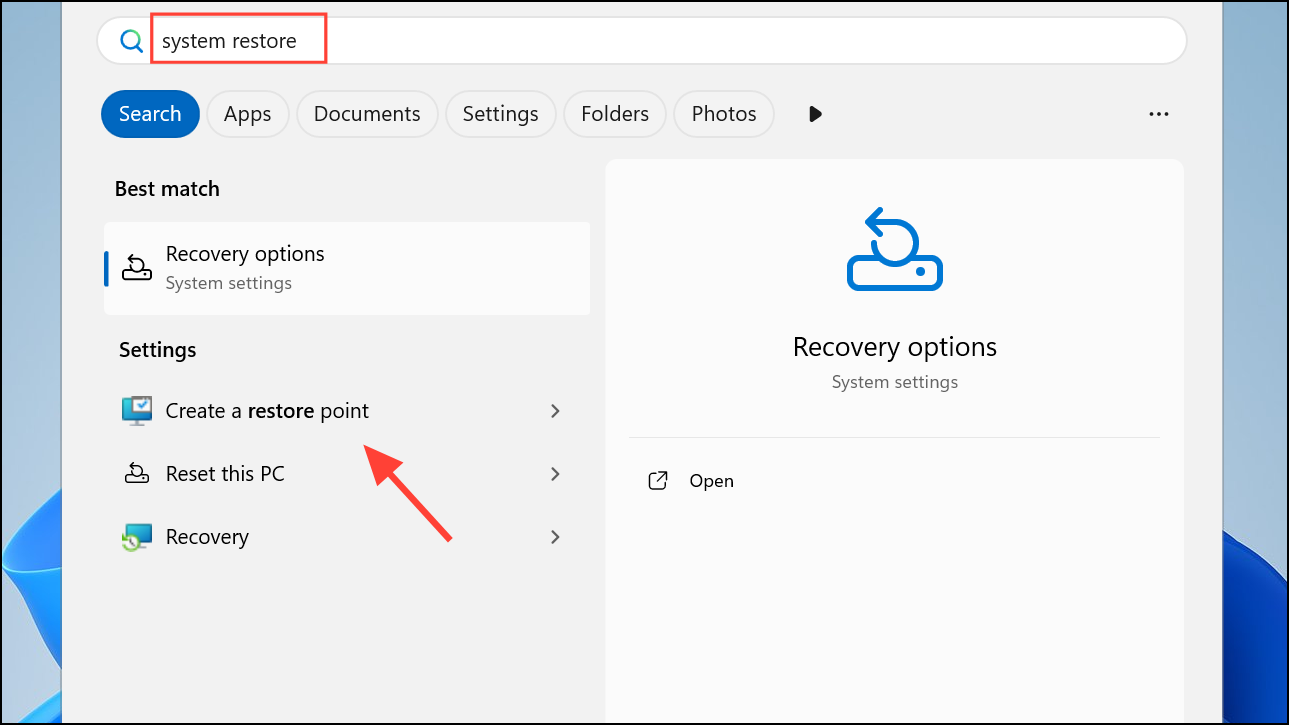
Step 1: Type system restore in the search bar and open Create a restore point.
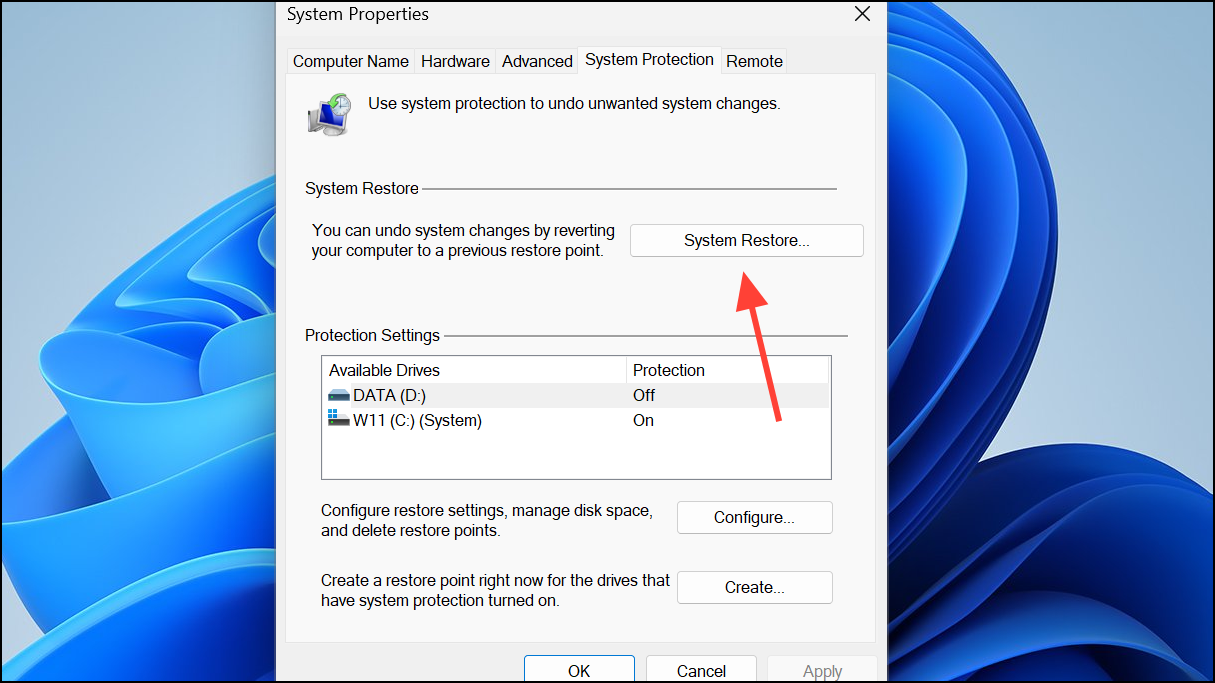
Step 2: Click System Restore and follow the prompts to select a restore point from before the issue began.
Step 3: After the process completes, reboot and test your connection. Also, check for pending Windows updates under Settings > Windows Update and install any available fixes.
Resolving the "Can't connect to this network" error in Windows 11 often requires a combination of these steps. Keeping your drivers and Windows version up to date, and occasionally refreshing your Wi-Fi settings, will help prevent future connection issues.