
CPU bottlenecking occurs when your processor can't keep up with the demands of your graphics card, limiting overall game performance and causing stuttering, low FPS, and frustrating gameplay. Resolving this issue involves several practical steps, ranging from software adjustments to hardware upgrades. Follow these detailed instructions to identify and eliminate CPU bottlenecks on your PC.
How to Identify a CPU Bottleneck
Before you can fix a CPU bottleneck, you need to confirm that the CPU is indeed the limiting factor. The easiest way to do this is by monitoring your CPU and GPU usage during gameplay.
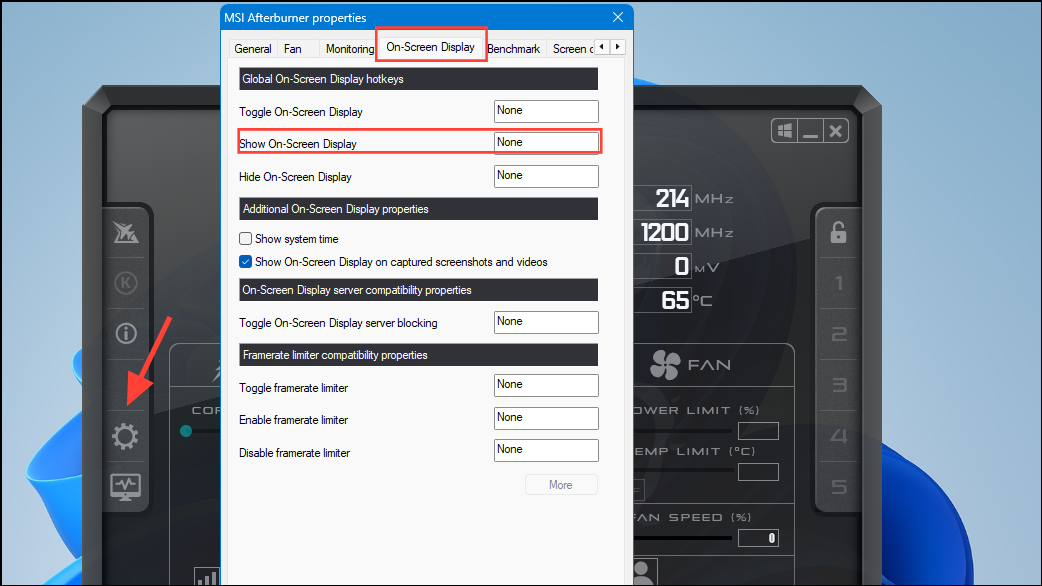
Step 1: Download and install MSI Afterburner, a free tool that displays real-time CPU and GPU usage while gaming.
Step 2: Once the program is installed, open it and click the gear icon on the left. In the pop-up that appears, click the 'On-Screen Display' tab at the top and set a hotkey for enabling it. You can then turn it on in the middle of your game to monitor the CPU and GPU.
Step 3: Launch a demanding game and play for several minutes. Look at the CPU and GPU utilization percentages. If your CPU usage consistently hovers around 100%, while your GPU usage remains significantly lower (below 90%), you have a CPU bottleneck.
It's important to test multiple games to ensure the issue isn't specific to a single game. If the CPU is consistently maxed out across multiple games, proceed to the following solutions.
Method 1: Close Unnecessary Background Processes
Reducing the number of active background tasks frees up CPU resources and allows your processor to focus primarily on the game.
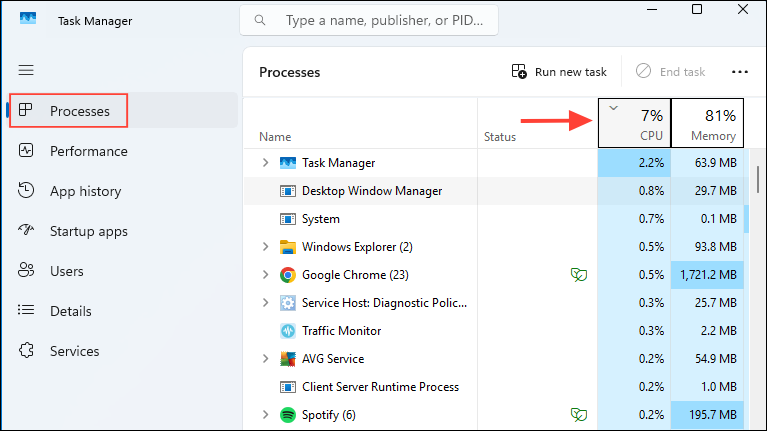
Step 1: Press Ctrl + Shift + Esc to open Task Manager. Go to the "Processes" tab and sort the list by CPU usage by clicking the CPU section.
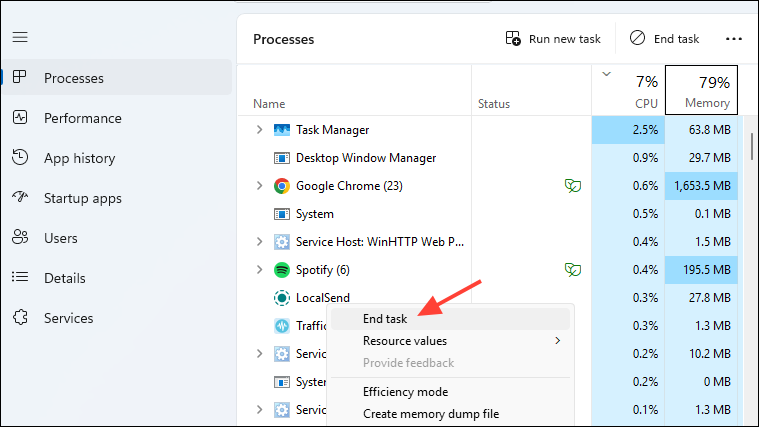
Step 2: Identify any non-essential processes or apps consuming significant CPU resources. Right-click these tasks and select "End Task" to stop them from running. Avoid terminating critical system processes, as this could lead to instability.
This simple step often results in immediate improvements in game smoothness and frame rates.
Method 2: Adjust In-Game Settings and Resolution
Increasing your game's graphical settings and resolution might seem counterintuitive, but it effectively shifts the workload from your CPU to your GPU, balancing out the usage and reducing bottlenecks.
Step 1: Open your game's graphics settings menu. Increase resolution, texture quality, anti-aliasing, and other GPU-intensive settings.
Step 2: Reduce CPU-intensive settings like draw distance, shadow quality, physics calculations, crowd density, and particle effects.
Finding the right balance may take some experimentation, but it will help your CPU keep pace with your GPU.
Method 3: Check and Optimize RAM Settings
Incorrect RAM settings can severely limit CPU performance. Ensuring your RAM is running at the correct speed and in dual-channel mode will optimize CPU throughput.
Step 1: Download CPU-Z and verify your RAM specifications under the "Memory" tab. Ensure your RAM frequency matches the manufacturer's advertised speed.
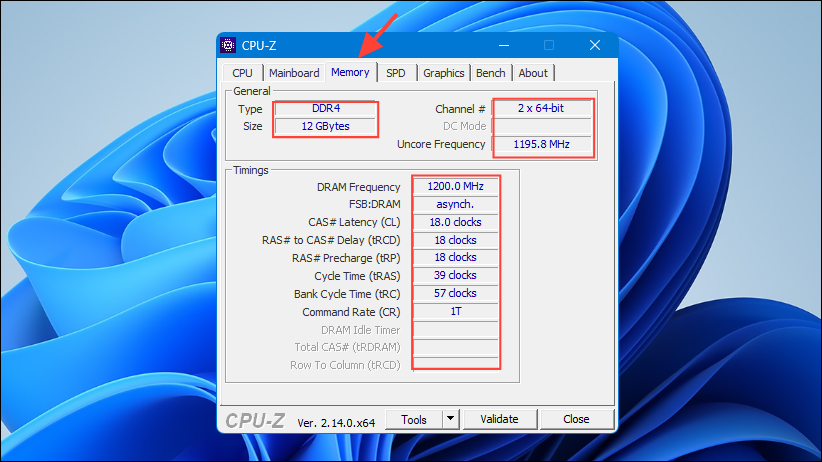
Step 2: If your RAM is running slower than its rated speed, enter your motherboard's BIOS (usually by pressing DEL or F2 during startup) and enable the XMP (Intel) or EXPO (AMD) profile to automatically set the correct RAM speed and timings.
Optimal RAM settings significantly improve CPU efficiency and reduce bottlenecks.
Method 4: Improve CPU Cooling and Prevent Overheating
CPU overheating can trigger thermal throttling, drastically reducing performance. Keeping your CPU cool ensures it runs at optimal speeds consistently.
Step 1: Monitor CPU temperatures using software like HWMonitor or MSI Afterburner. Normal gaming temperatures should ideally remain below 80°C.
Step 2: If temperatures are high, improve airflow in your PC case by adding more fans or upgrading to a better CPU cooler, such as a high-performance air cooler or a liquid cooling solution with at least a 240mm radiator.
Maintaining lower temperatures prevents throttling and allows your CPU to perform at its peak.
Method 5: Overclock Your CPU for Higher Performance
If your CPU and motherboard support overclocking, increasing your CPU's clock speed can significantly boost performance and reduce bottlenecks.
Step 1: Enter your motherboard's BIOS and navigate to the overclocking settings, usually labeled as "Advanced CPU Core Settings" or similar.
Step 2: Gradually increase the CPU multiplier or frequency in small increments, then test stability using software like Prime95. Monitor CPU temperatures closely to ensure they remain within safe limits.
Overclocking can deliver noticeable performance gains, but it requires careful monitoring and adequate cooling solutions to prevent overheating or hardware damage.
Method 6: Upgrade Your CPU
If none of the above methods sufficiently resolve your bottleneck, upgrading your CPU is the definitive solution.
Step 1: Select a CPU that matches or slightly exceeds your GPU's performance level. For instance, pairing an RTX 4070 GPU with a recent-generation Intel i7 or AMD Ryzen 7 CPU is ideal.
Step 2: Ensure your motherboard is compatible with the new CPU. You may also need to update the BIOS before installing the new processor.
Upgrading your CPU provides long-term performance improvements, eliminating bottlenecks and ensuring smoother gaming experiences.
CPU bottlenecks can significantly limit your gaming experience, but these practical steps will help you identify and address the problem effectively. Whether through software tweaks or hardware upgrades, eliminating CPU bottlenecks ensures your system runs at optimal performance.