
If you’ve noticed that your computer is slowing down due to high disk usage by the Windows Modules Installer Worker, also known as TiWorker.exe, you’re not alone. This system service is responsible for installing and managing Windows updates, but sometimes it can consume excessive system resources. In this guide, we’ll explore effective methods to fix the high disk usage issue caused by TiWorker.exe on Windows 11.
1. Restart Windows Update Services
Restarting the Windows Update services can resolve issues with the update process that may be causing high disk usage.
- Press
Windows + Rto open the Run dialog box. - Type
services.mscand pressEnterto open the Services window. - In the Services window, scroll down and locate Windows Update.
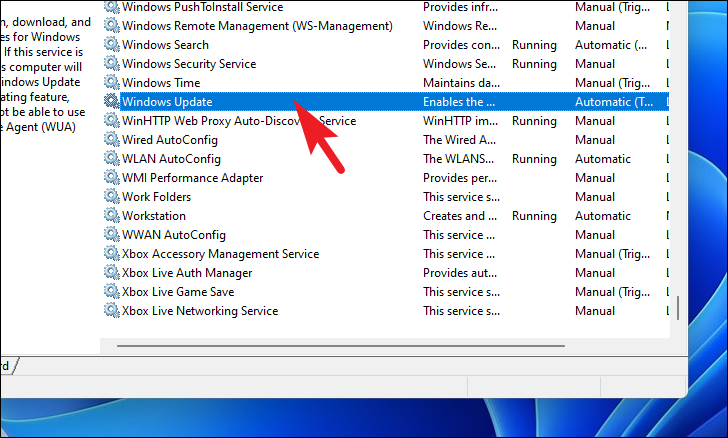
- Double-click on Windows Update to open its properties.
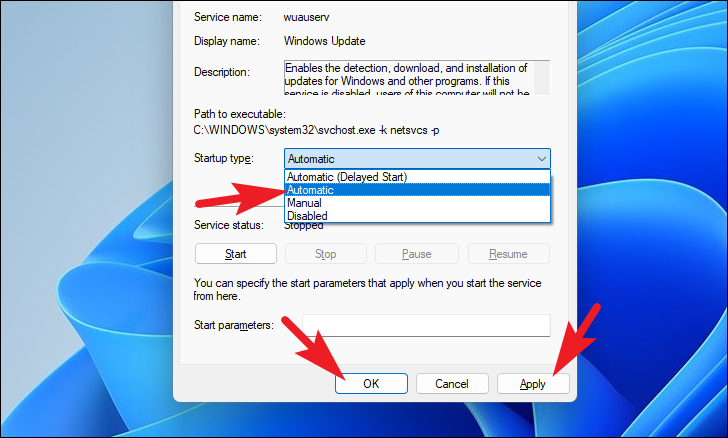
- Set the Startup type to Automatic from the dropdown menu.
- If the service is running, click on Stop, then click on Start to restart it.
- Click Apply and then OK.
After restarting the Windows Update service, monitor your system to see if the disk usage has decreased.
2. Empty the Software Distribution Folder
Corrupted or incomplete updates in the Software Distribution folder can cause high disk usage. Deleting the contents of this folder can force Windows to download fresh updates.
- Press
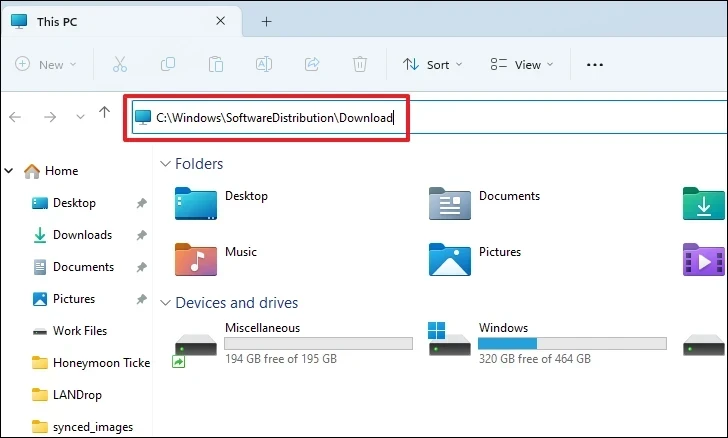
Windows + Eto open File Explorer. - Navigate to the following path by copying and pasting it into the address bar and pressing
Enter:C:\Windows\SoftwareDistribution\Download
- Select all files and folders by pressing
Ctrl + A. - Delete all the selected items permanently by pressing
Shift + Deleteand confirm the action.
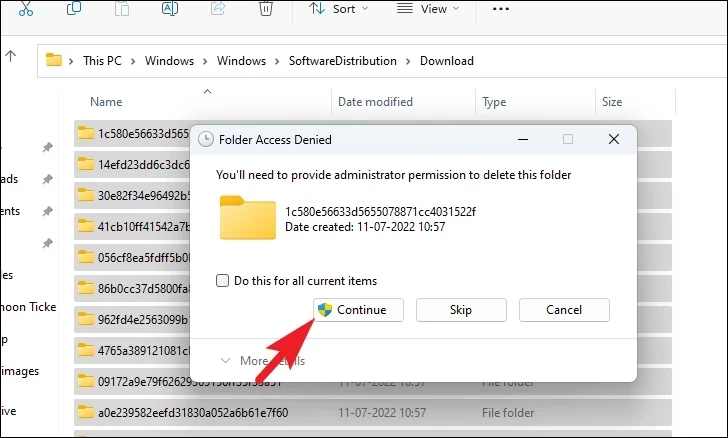
Note that you might need administrative privileges to delete these files. After emptying the folder, restart your computer and check if the problem persists.
3. Run Windows Update Troubleshooter
The Windows Update Troubleshooter can automatically detect and fix issues related to Windows Update, which might be causing high disk usage.
- Open the Settings app by pressing
Windows + I. - Click on System in the left sidebar.
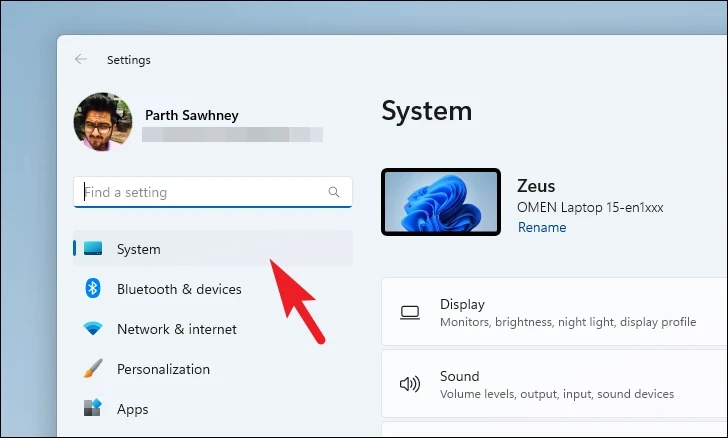
- Select Troubleshoot from the right pane.
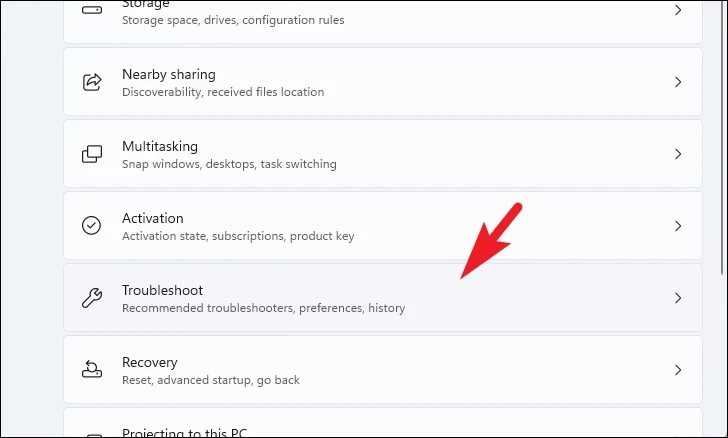
- Click on Other troubleshooters.
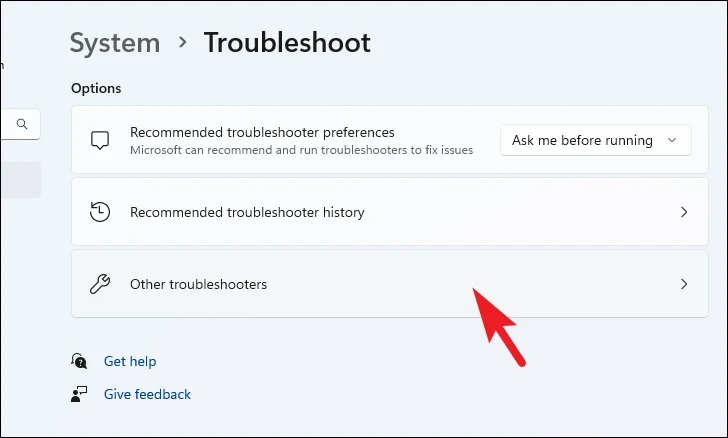
- Find Windows Update and click on Run.
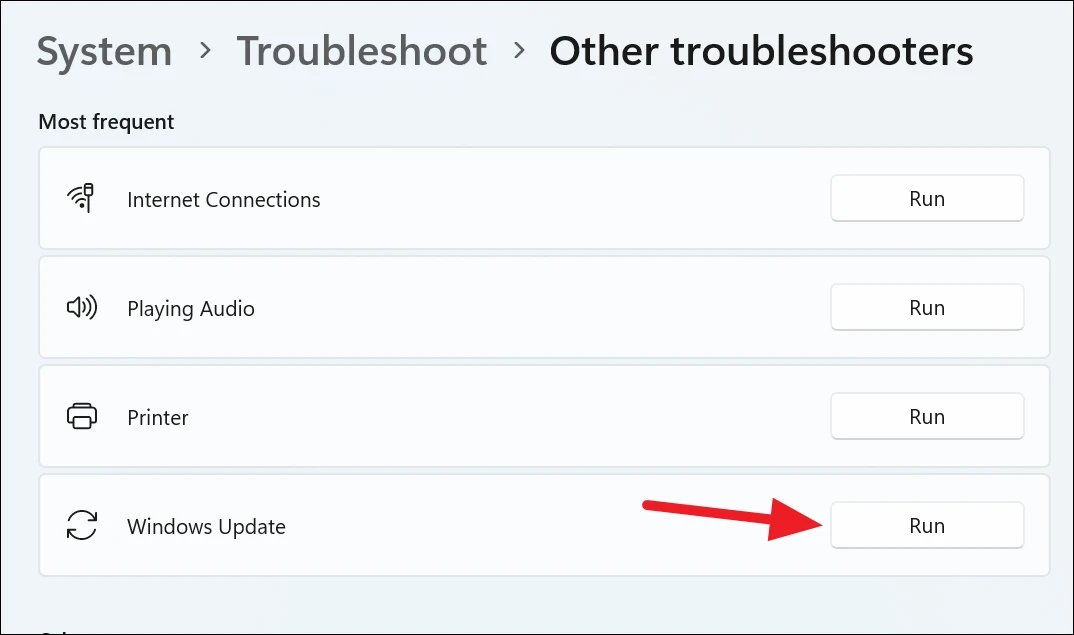
The troubleshooter will run and attempt to fix any detected issues. Once it’s done, check if the disk usage has returned to normal.
4. Run SFC and DISM Scans
Corrupted system files can cause the Windows Modules Installer Worker to use excessive disk resources. Running the System File Checker (SFC) and Deployment Image Servicing and Management (DISM) scans can repair these files.
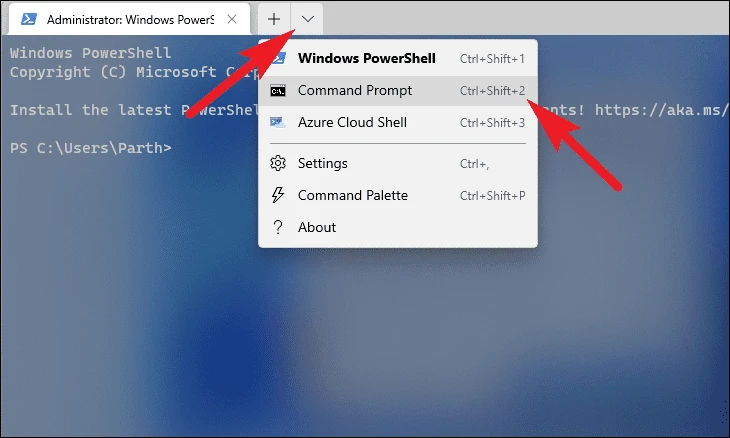
- Right-click on the Start button and select Terminal (Admin). If prompted by User Account Control, click Yes.

- In the Terminal window, click the downward arrow and choose Command Prompt to open it in a new tab.
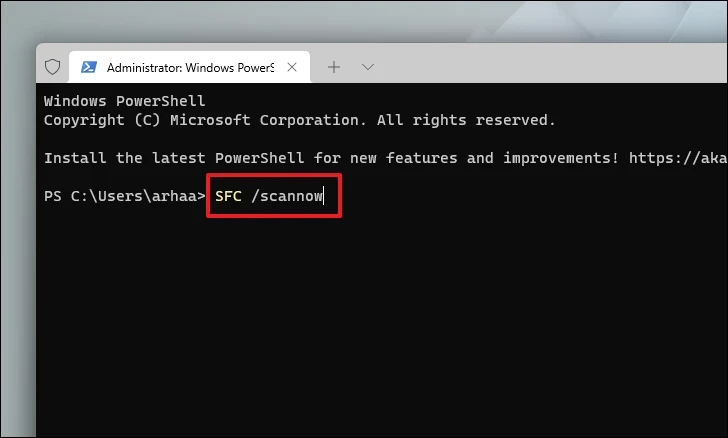
- Type the following command and press
Enterto run the DISM scan:DISM /Online /Cleanup-Image /RestoreHealth
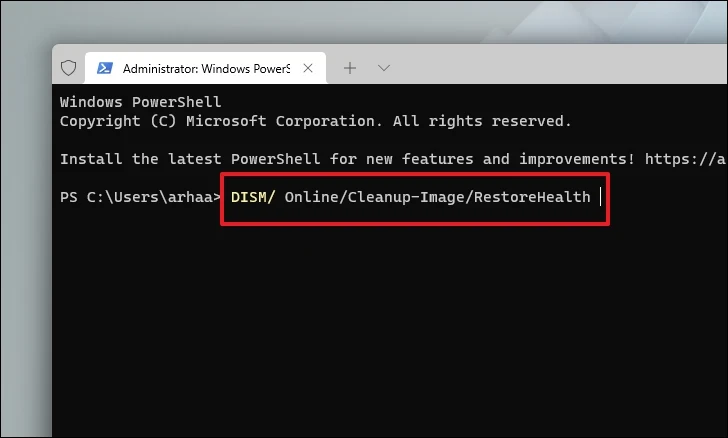
- Once the DISM scan is complete, type the following command and press
Enterto run the SFC scan:sfc /scannow
After the scans finish, restart your computer and check if the high disk usage issue is resolved.
5. Verify Windows Update Services are Running
Ensure that the necessary Windows Update services are enabled and running properly.
- Press
Windows + Rto open the Run dialog box. - Type
services.mscand pressEnter. - In the Services window, locate the following services:
- Windows Update
- Background Intelligent Transfer Service (BITS)
- Cryptographic Services

- For each service, double-click to open its properties.
- Set the Startup type to Automatic.
- If the service is not running, click on Start.
- Click Apply and then OK.
After ensuring these services are running, restart your computer and see if the problem persists.
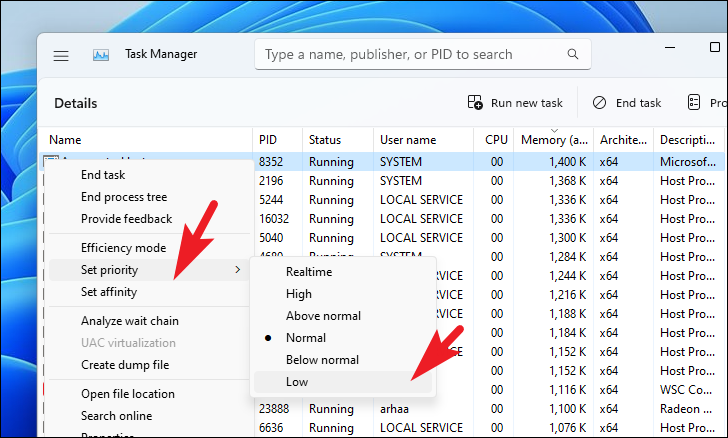
6. Adjust TiWorker.exe Task Priority
Lowering the priority of the TiWorker.exe process can reduce its impact on your system’s disk usage.
- Press
Ctrl + Shift + Escto open the Task Manager. - Click on Details to view all processes.
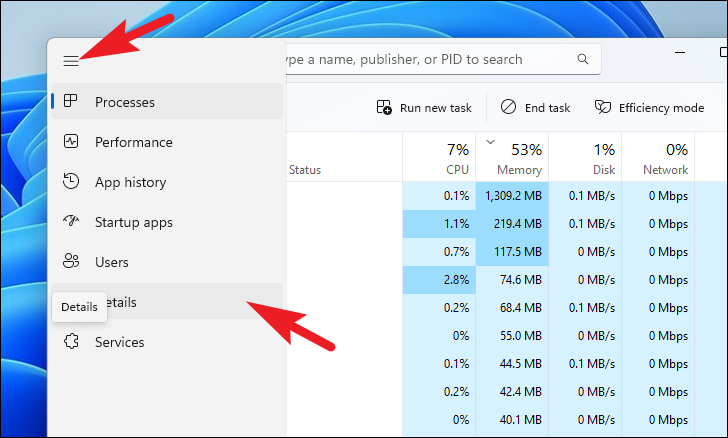
- Find
TiWorker.exein the list. - Right-click on it and hover over Set priority.
- Select Low from the options.
If lowering the priority doesn’t help, you can end the process:
- Right-click on
TiWorker.exeand select End task.
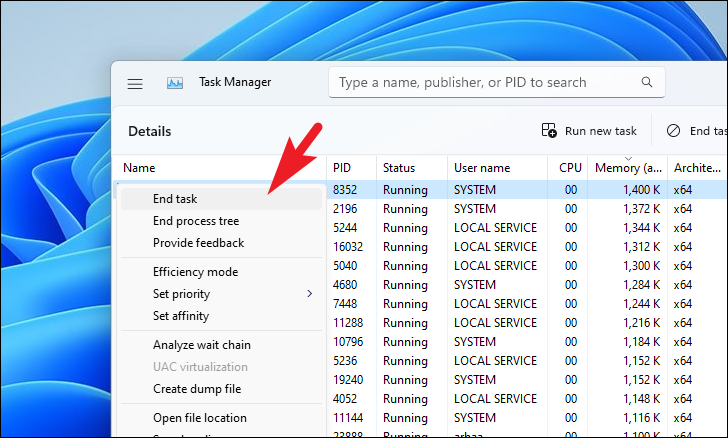
Be aware that ending the process might interfere with Windows updates.
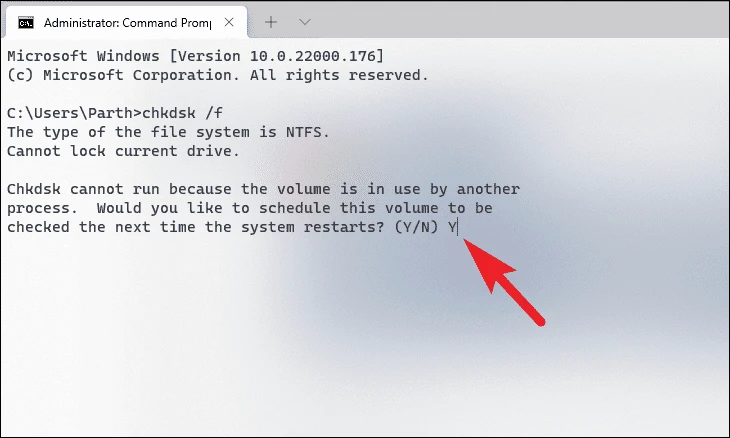
7. Run CHKDSK Command
Running the CHKDSK command checks your hard drive for errors that might be causing high disk usage.
- Right-click on the Start button and select Terminal (Admin).
- If prompted, click Yes to allow administrative access.
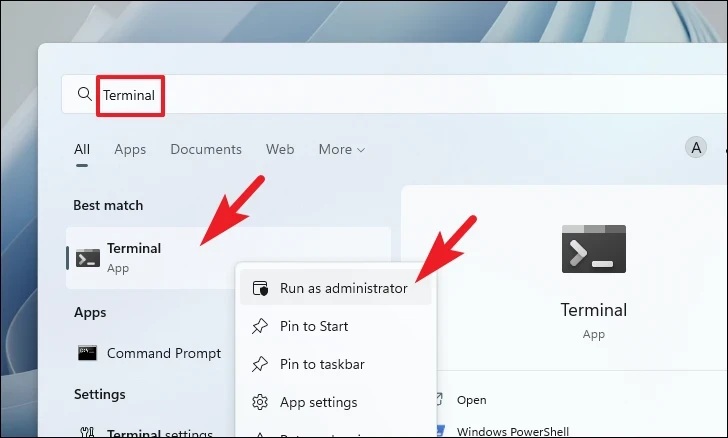
- In the Terminal window, ensure you’re in the Command Prompt tab.
- Type the following command and press
Enter:chkdsk /f
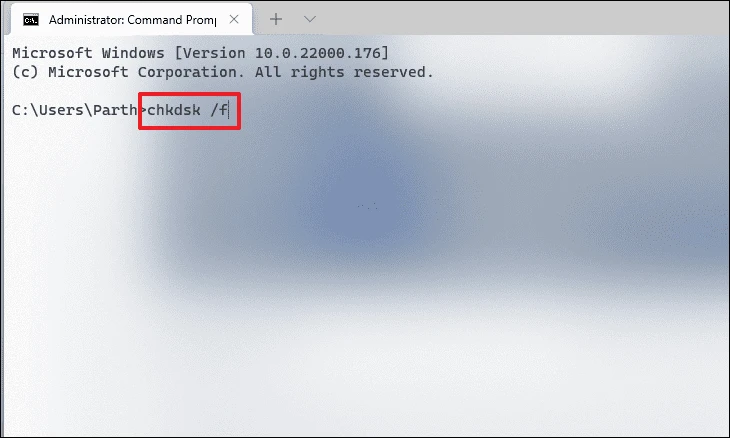
- When prompted to schedule a scan, type
Yand pressEnter. - Restart your computer to allow CHKDSK to run.
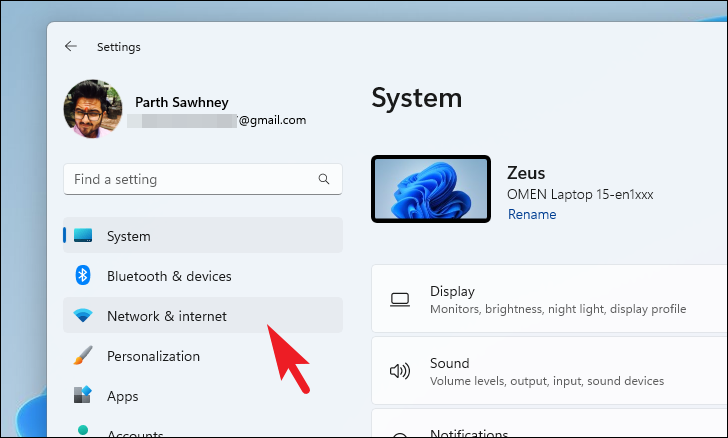
8. Set Your Internet Connection as Metered
Setting your connection as metered can prevent Windows from automatically downloading updates, potentially reducing disk usage.
- Open Settings by pressing
Windows + I. - Click on Network & internet from the left sidebar.
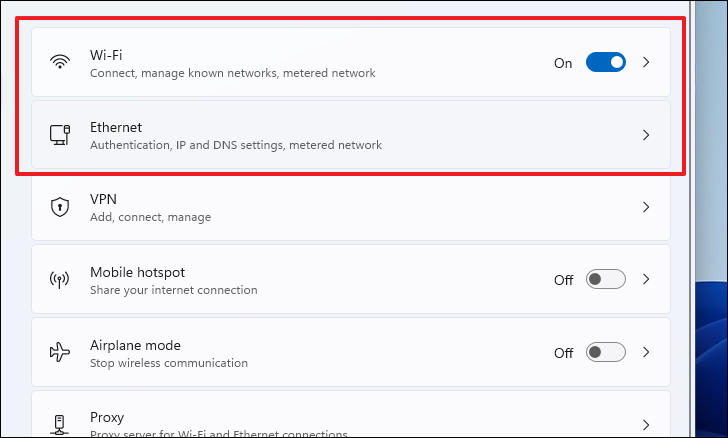
- Select Wi-Fi or Ethernet, depending on your connection type.
- Click on your network name.
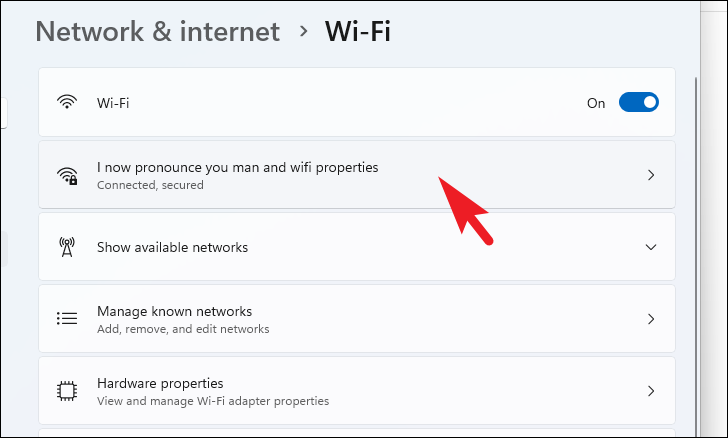
- Toggle the switch for Metered connection to On.
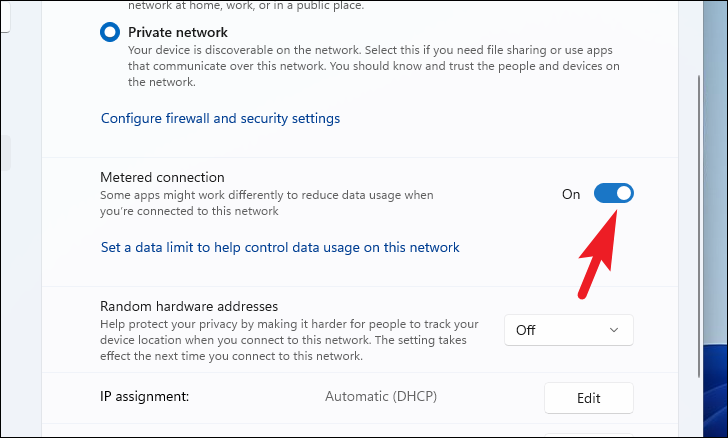
This will limit background data usage and may reduce the high disk activity.
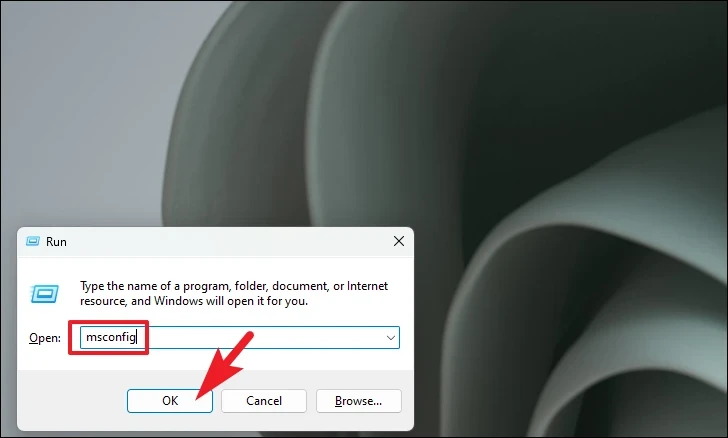
9. Perform a Clean Boot
A clean boot starts Windows with a minimal set of drivers and startup programs, which can help you determine if a background program is causing the issue.
- Press
Windows + Rto open the Run dialog box. - Type
msconfigand pressEnterto open System Configuration.
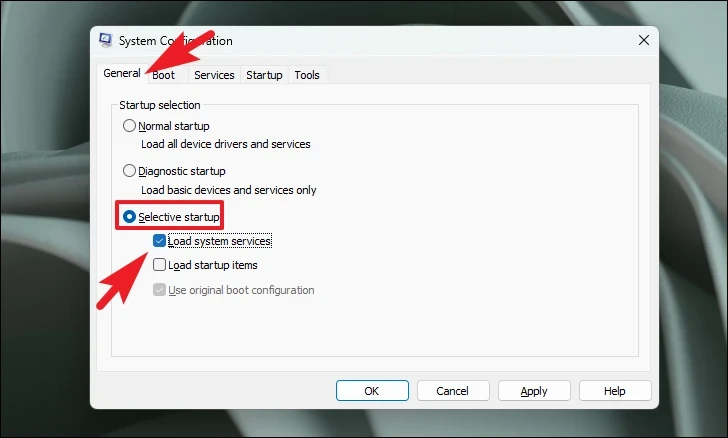
- In the General tab, select Selective startup and uncheck Load startup items.
- Go to the Services tab.
- Check the box for Hide all Microsoft services.
- Click on Disable all.
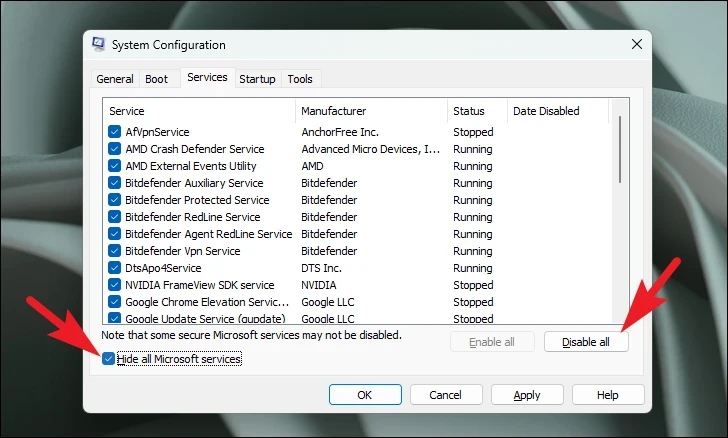
- Click Apply and then OK.
- Restart your computer.
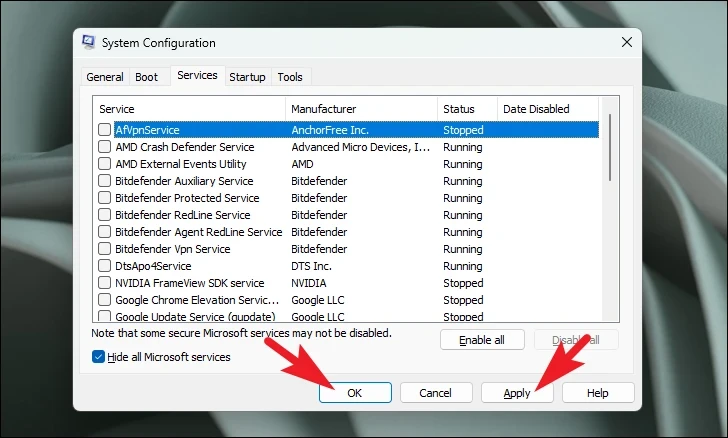
After the restart, check if the high disk usage issue persists. If it doesn’t, gradually enable the services you disabled to identify the culprit.
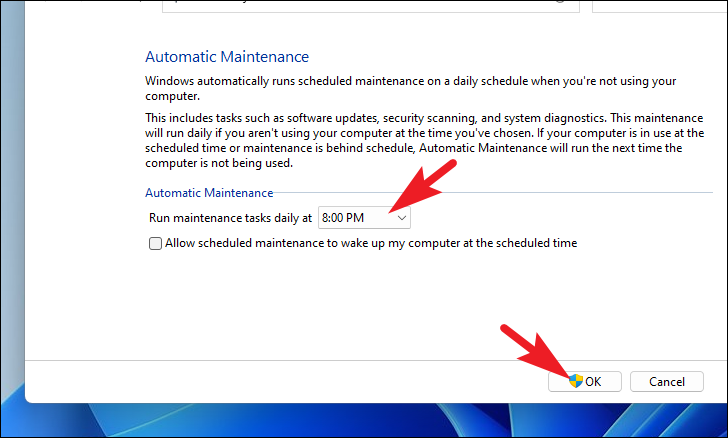
10. Change the Maintenance Schedule
Windows performs automatic maintenance tasks that can sometimes cause high disk usage. Adjusting the maintenance schedule can help.
- Press
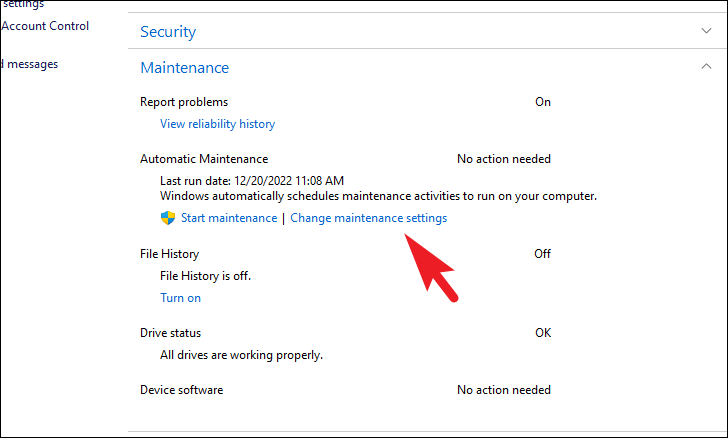
Windows + R, typecontrol panel, and pressEnter. - Select Security and Maintenance.
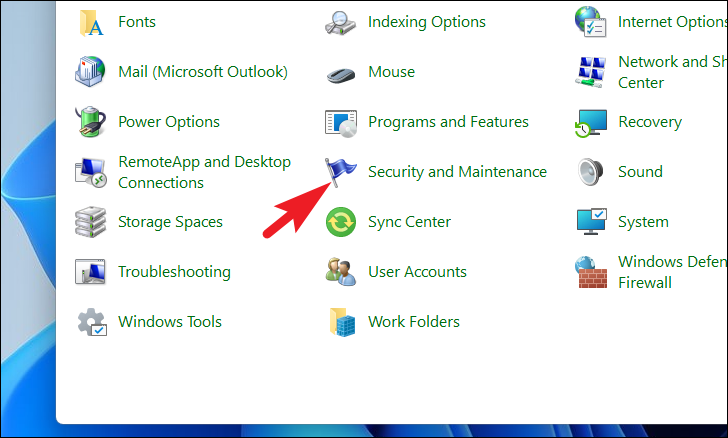
- Click on Change maintenance settings under the Maintenance section.
- Set the maintenance time to a period when you’re not using your computer.
- Click OK to save the changes.
11. Run Windows Memory Diagnostic Tool
Faulty RAM can cause system processes to malfunction. Running the Windows Memory Diagnostic Tool can identify memory issues.
- Press
Windows, typeWindows Memory Diagnostic, and select it from the search results.
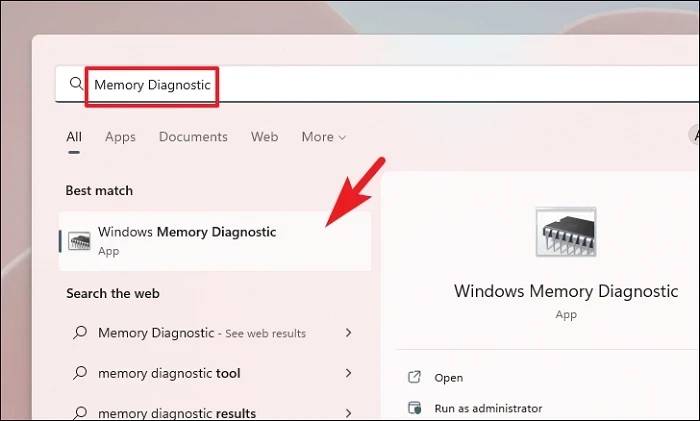
- Choose Restart now and check for problems to begin the scan immediately, or Check for problems the next time I start my computer to schedule it.
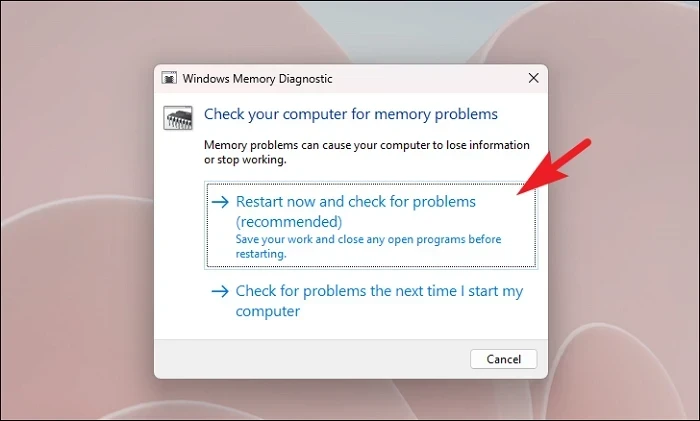
After the test completes, Windows will display the results. If memory issues are detected, you may need to replace your RAM.
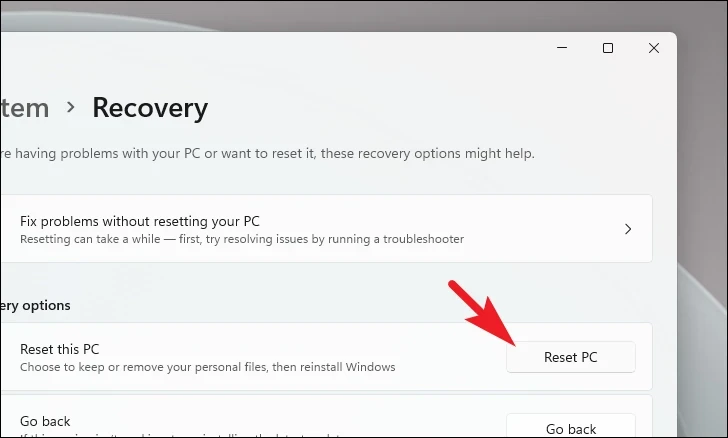
12. Reset Your PC
If none of the above methods work, resetting your PC may resolve the issue. This process reinstalls Windows but allows you to keep your personal files.
- Open Settings by pressing
Windows + I. - Select System from the left sidebar.
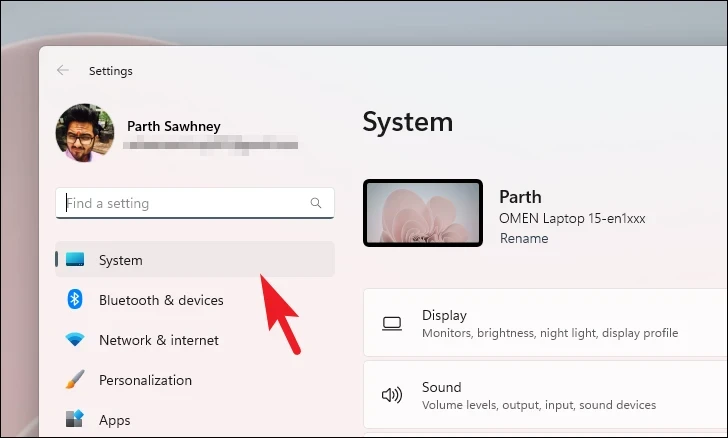
- Scroll down and click on Recovery.
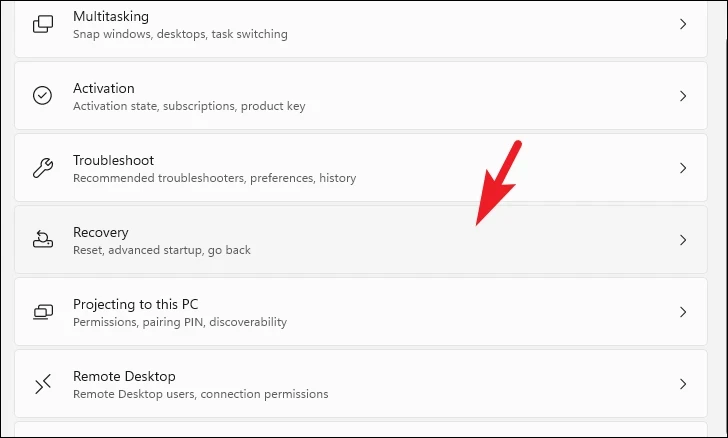
- Under Reset this PC, click on Reset PC.
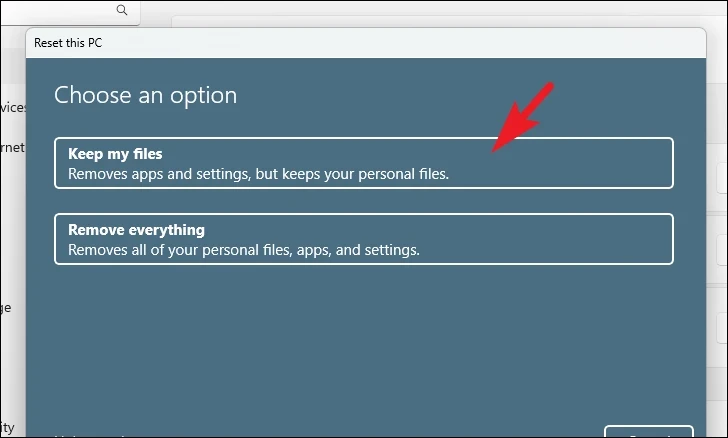
- Choose Keep my files to preserve your personal data, or Remove everything if you prefer a fresh start.
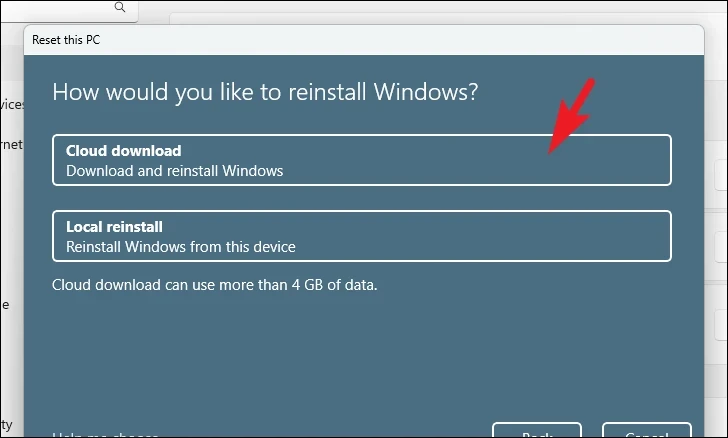
- Select Cloud download to download a fresh copy of Windows.
Note: Cloud download requires an internet connection and may use over 4GB of data.
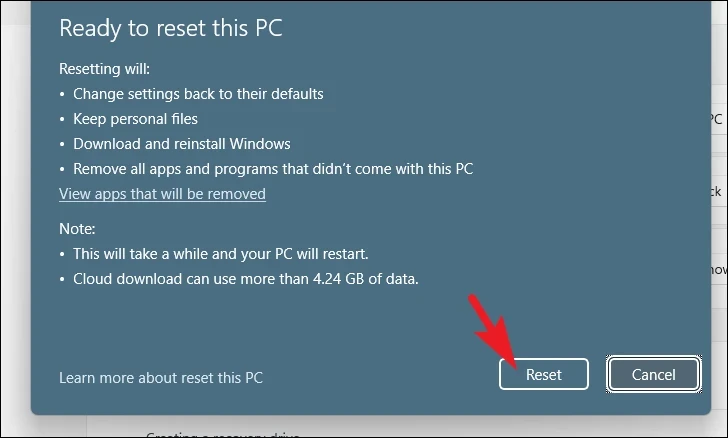
- Review the settings and click Next.
- Click Reset to begin the process.
Experiencing high disk usage due to the Windows Modules Installer Worker can be a significant inconvenience, but applying these methods should help you resolve the issue and improve your system’s performance.


