
Grouping text and pictures in Microsoft Word streamlines document editing by letting you move, resize, or format multiple objects together. This technique is especially useful for creating layouts, headers, or infographics where text and images must stay aligned. However, grouping is only possible when certain formatting conditions are met, and recent Word updates have changed how grouping works in some cases.
Group Text Boxes and Pictures Using the Format Tab
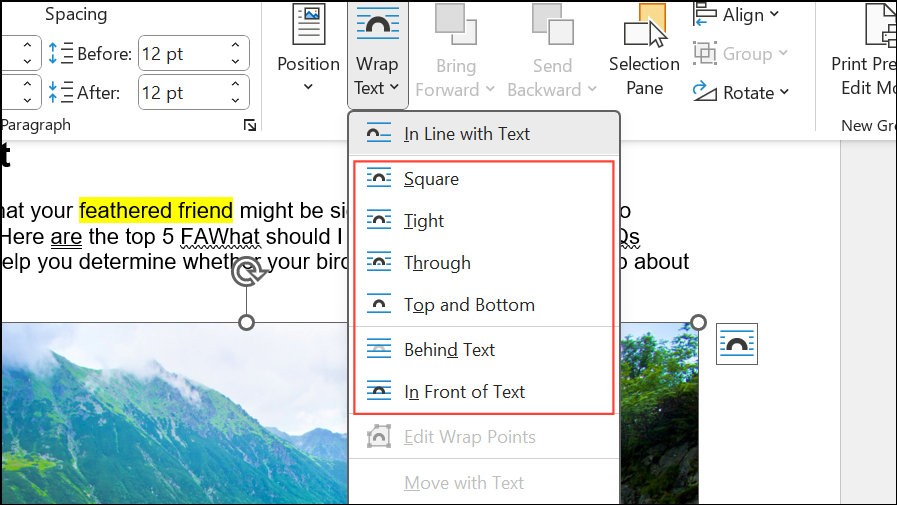
Step 1: Change the text wrapping style for each object you want to group. Click on a picture, text box, or shape, then select the Layout Options icon next to it. Choose any wrapping style except In Line with Text—options like Square, Tight, or Behind Text will work. This step is crucial, as grouping is disabled if any object uses In Line with Text.
Step 2: Hold the Ctrl key (or Command on Mac) and click each object you want to group. Ensure all objects are selected; you’ll see selection handles around each one.
Step 3: Go to the Picture Format or Shape Format tab on the ribbon. Click Group in the Arrange section, then select Group from the dropdown menu. The selected objects will now act as a single unit.
Step 4: To edit an individual object within the group, click the group to select it, then click the specific item you want to modify. You can also ungroup objects by selecting the group and choosing Ungroup from the same menu.
Troubleshooting When Grouping Is Unavailable
If the Group option is grayed out or you cannot select multiple objects, review these points:
- Verify that every object uses a floating text wrapping style (not
In Line with Text). - Ensure the document is not in Compatibility Mode (
.docformat). Save the file as.docxto access newer grouping features. - If objects still can't be grouped, copy them into a new Word document. Sometimes, document corruption or legacy formatting blocks grouping.
- Check that you are not attempting to group incompatible object types (e.g., grouped images from different sources or formats).
Some users report persistent issues even after changing all settings. In rare cases, grouping works in a new document but not in the original file—copying content to a fresh document often resolves this.
Alternative Methods for Grouping
Using a Drawing Canvas
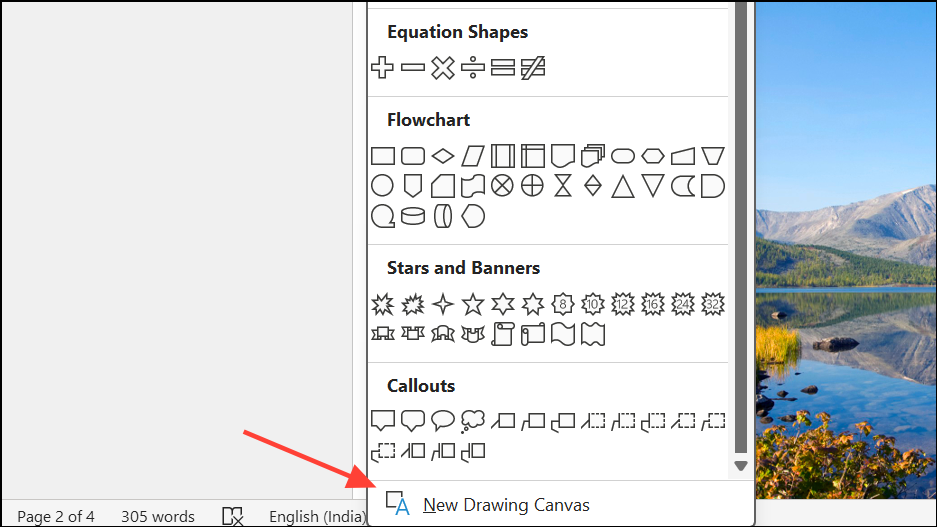
Step 1: Insert a drawing canvas by going to Insert > Shapes > New Drawing Canvas (found at the bottom of the shapes menu).
Step 2: Place your pictures, text boxes, and shapes inside the canvas. Objects within a canvas can be grouped more reliably, even when standard grouping fails.
Step 3: Select multiple objects inside the canvas, then use the Group command as described above.
Using PowerPoint as a Workaround
Step 1: Open a blank PowerPoint slide and insert your images and text boxes.
Step 2: Select and group the objects in PowerPoint using Ctrl+click and the Group function.
Step 3: Copy the grouped object and paste it into your Word document. The group will function as a single image, but you may lose some text wrapping and editing flexibility.
This method is useful if Word’s grouping feature is unavailable, but note that some formatting options may not transfer perfectly.
Combining Objects with a Screenshot
Step 1: Arrange your text and images exactly as you want them to appear.
Step 2: Use the Windows + Shift + S shortcut to take a screenshot of the layout.
Step 3: Paste the screenshot back into your Word document. The result is a single image containing all the elements you arranged.
This approach is quick and bypasses grouping limitations, but the combined object is now a static image and cannot be edited as separate elements.
Grouping text and pictures in Word improves layout control and saves time when moving or resizing related objects. If grouping fails, adjusting text wrapping or using a drawing canvas usually solves the issue, while PowerPoint and screenshot workarounds offer alternatives when standard methods don’t work.