
Notion is an all-in-one productivity solution for writing, planning, knowledge management, data management, team collaboration, among others things.
Notion is one of the most advanced and useful database tools available today. Notion allows you to create two types of databases: Full-page database or In-line database (which means a database component like a table in the middle of a text or other document). Also, there are five important types of databases you can create on Notion, they are list, gallery, table, boards, and calendar.
More and more users transitioning from Google Sheets and Microsoft Excel to Notion due to its flexibility and customization capabilities. If you have decided to move your databases to Notion, but don’t know-how. Here in this post, we are going to show how to import your Google sheets and Excel (.xslx or .xls) files into Notion tables.
Importing a Google Sheet or Excel File into Notion
Notion is a great online database platform that can be used by both individuals and professionals.
Notion allows you to import data from the following file types:
- Plaintext (.txt)
- Markdown (.md or .markdown)
- Microsoft Word (.docx)
- CSV (.csv)
- HTML (.html)
You can also import data from various applications into Notion.
Besides these, you can also embed Google sheets into Notion. But the problem with embedding Google Sheets is when you lose access to the file or the file is deleted on Google drive or if the URL breaks, the embedding will also break.
The best way to import an Excel file or a Google sheet is to convert them into a CSV (.csv) file first and upload them into Notion.
How to Import an Excel File into Notion
Since Notion doesn’t support .xslx (Excel) files, you need to export them into a .csv file and then upload/import them into Notion.
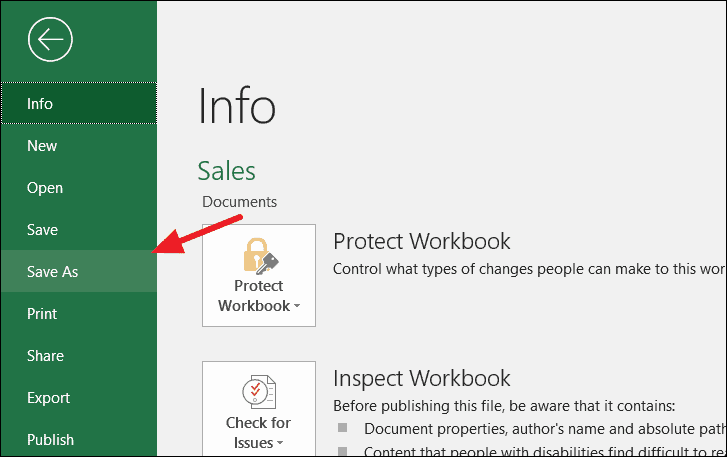
First, open the Excel workbook that you want to import into Notion. Then go to the ‘File’ tab to open Excel backstage view and select ‘Save As’.
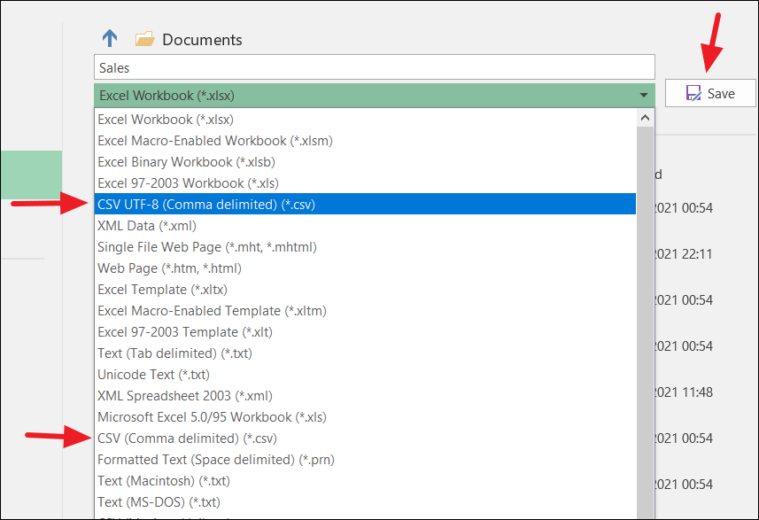
In the Save As page, select ‘CSV UTF-8 (Comma delimited)(*.csv)’ as your save as file type. This format also supports Non-English characters and Unicode-8 characters. Or you can choose the simple ‘CSV (Comma Delimited)(.*csv)’ file type which does not support special characters. Both will work fine if your table only contains texts, numbers, and dates.
CSV is a delimited text file that contains a list of data. They are often used for importing and exporting data in applications.
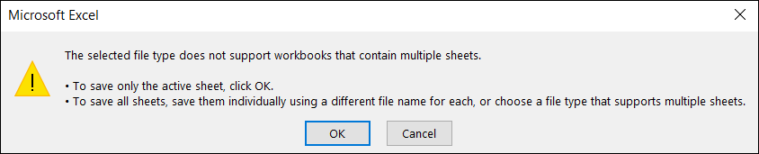
Then, click the ‘Save’ button. If you have only one sheet in the workbook, it will be saved right away. Or if you have multiple sheets in the workbook, Excel will show you this warning message, saying click ‘OK’ to save only the active sheet as a CSV file and if you have multiple sheets, save them individually with different names.
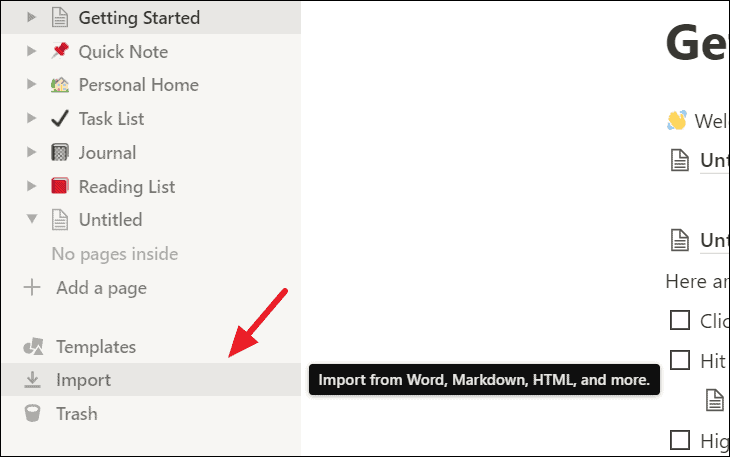
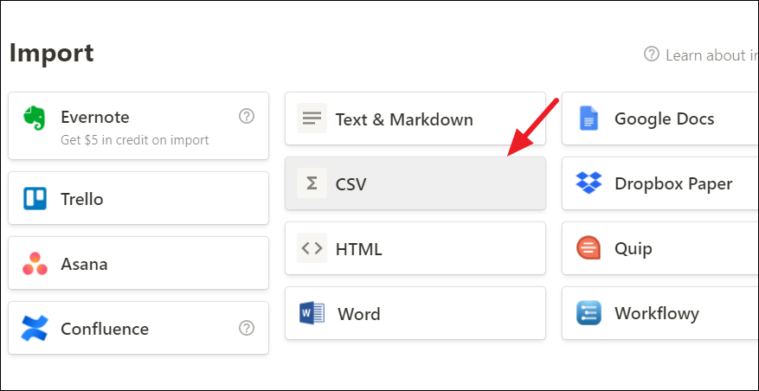
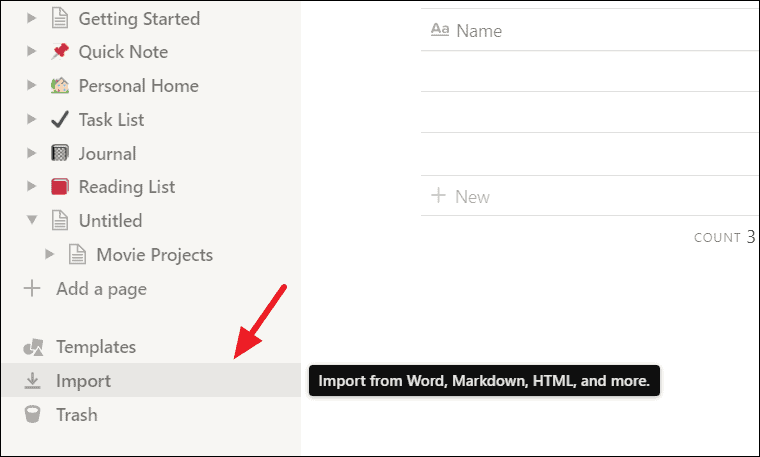
Once you saved your data as a CSV file, open your Notion application or open Notion on your browser. Then, open the notion page where you want to import the CSV file and click ‘Import’ in the left panel as shown below.
The Import dialog window will open-up. Choose ‘CSV’ option in the dialog box.
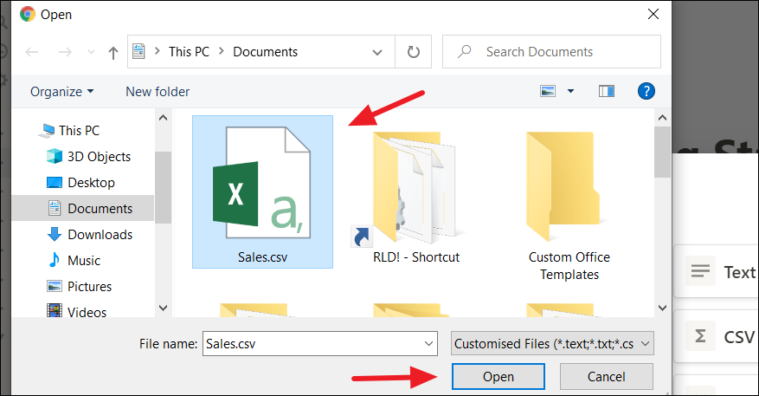
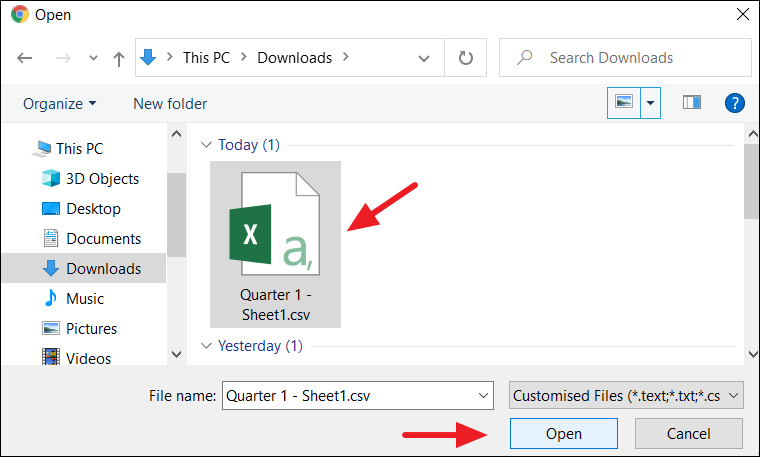
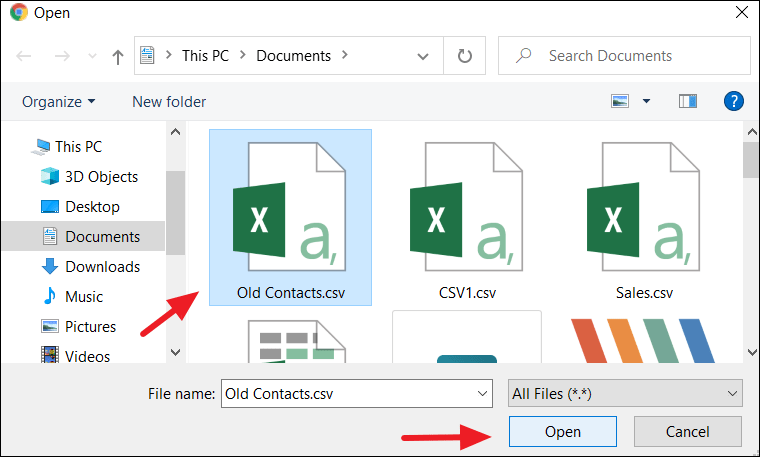
Now, navigate to the folder containing your CSV file in the file chooser, select it and then, click ‘Open’.
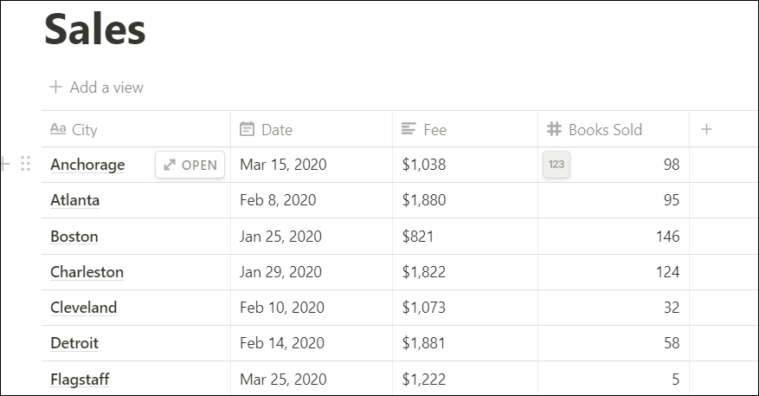
The CSV file will be imported into Notion and your Excel data will appear as a table.
Changing Property Type in Notion
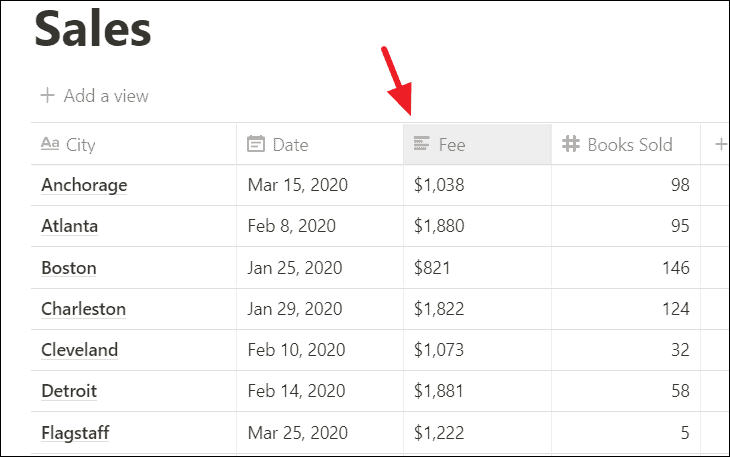
Once the data has been successfully imported, there’s one more thing you need to do that is checking if the property types (data types) of each column match the data. Most of the time you’ll get the correct data types, but sometimes data will come into Notion as texts. For example, if you import currency data or unrecognized Date format, etc., it will come as text.
So when that happens, you will need to convert your columns to the appropriate property type. You can find out you’re column’s data type by looking at the icon before the column title. If you have texts, it will be a paragraph icon, calendar icon for dates and hash sign for numbers, and so on.
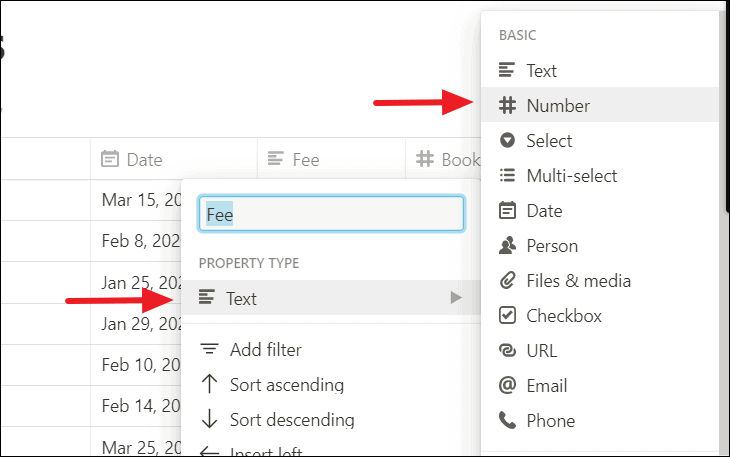
As you can see below when we imported this table from an Excel file, the ‘Fee’ column with currency values is formatted as a text column. Now we need to change the property type (data type) of the ‘Fee’ column to number.
To do that click on the column title and you’ll get a drop-down. In that, click ‘Text’ under Property Type and choose the appropriate data type (Number).
Now, we converted the values but we lost the currency format. Don’t worry it’s easy to add. To convert the number to a specific format, just hover your cursor over one of the values of the column and you will see a 123 button.
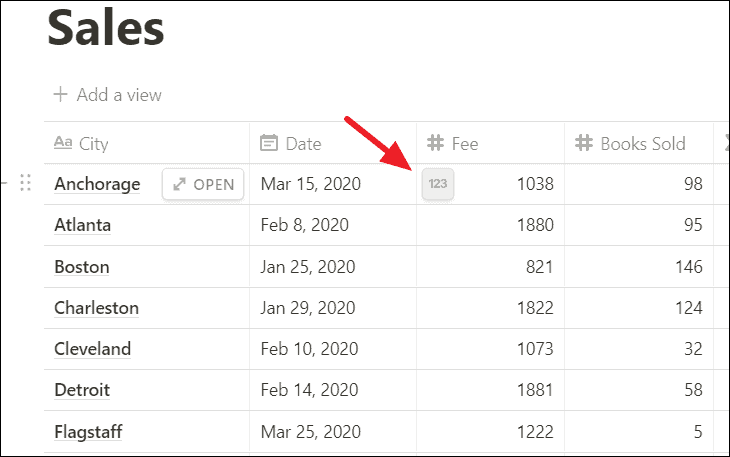
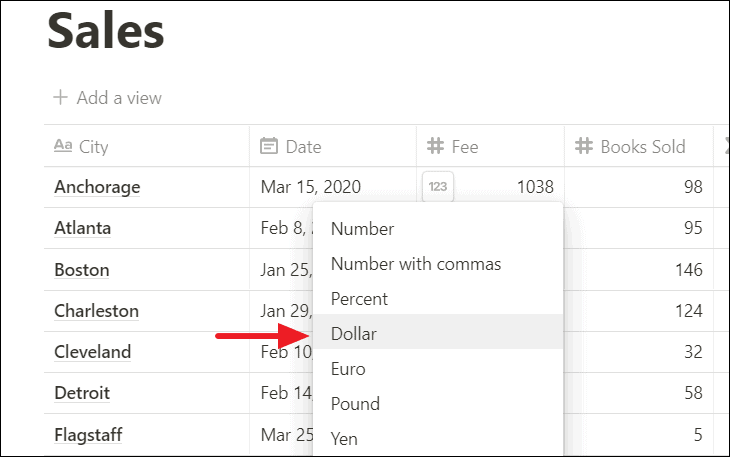
Click on the 123 button and choose your preferred number format from the list.
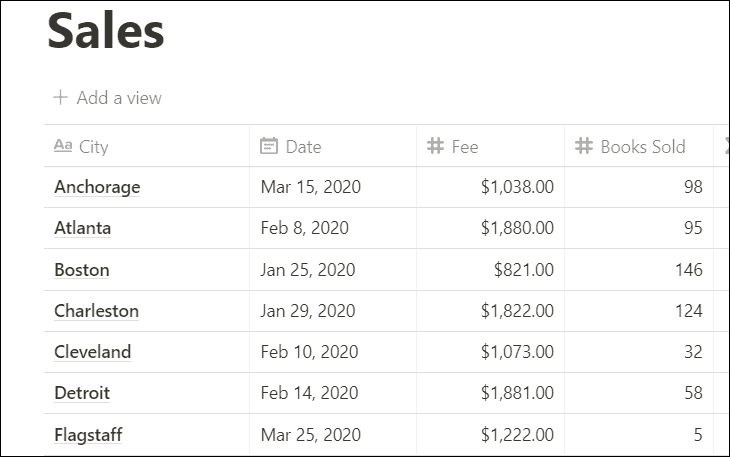
Now, the number values in the Fee column are formatted as currency.
How to Import a Google Sheet into Notion
To import Google sheets into Notion, you need to download the spreadsheet as a CSV file first.
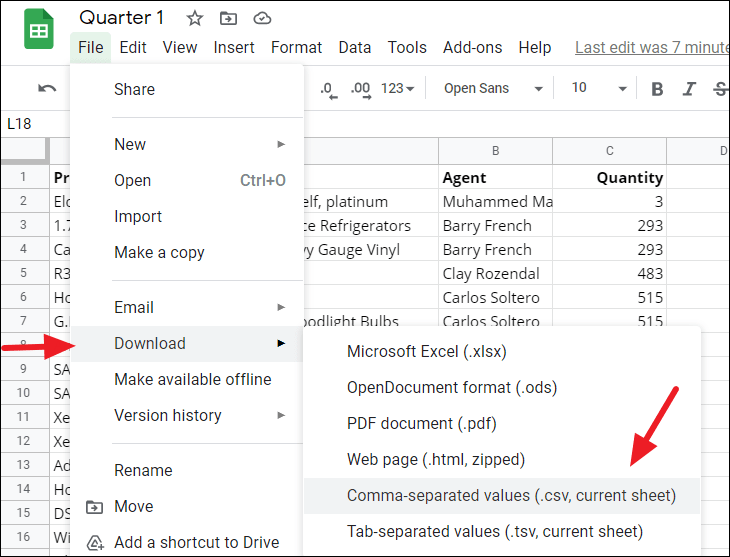
To download Google sheets, open the Google spreadsheet that you want to import and click the ‘File’ menu in the menu bar. In the drop-down, expand the ‘Download’ option and choose ‘Comma-separated values (.csv, current sheet)’ to download the file as a CSV file.
Next, open the notion page where you want to import the CSV file and click ‘Import’ in the lower part of the left sidebar.
Select your file from the File chooser and click ‘Open’ to import that CSV file into Notion.
Now, your Google sheet is imported into Notion and displayed as a table.

Appending an Excel File or a Google Sheet to a Notion Database
Instead of importing data into a new Notion table, you can merge contents from an Excel file or Google sheet into an existing Notion table. Remember you can only do this with full-page tables, not in-line tables.
But first, you need to make sure that both your Excel/Google Sheet table and your Notion table have common column names (for example, both should have “First name”, “Last name”, “Date” etc. columns).
First, export your Excel/Google sheets worksheet into a CSV file as we did for importing Excel/Google sheets into Notion.
Next, open the Notion page containing the table you want to merge with and click on the horizontal ellipsis (…) in the upper-right corner of the Notion window.
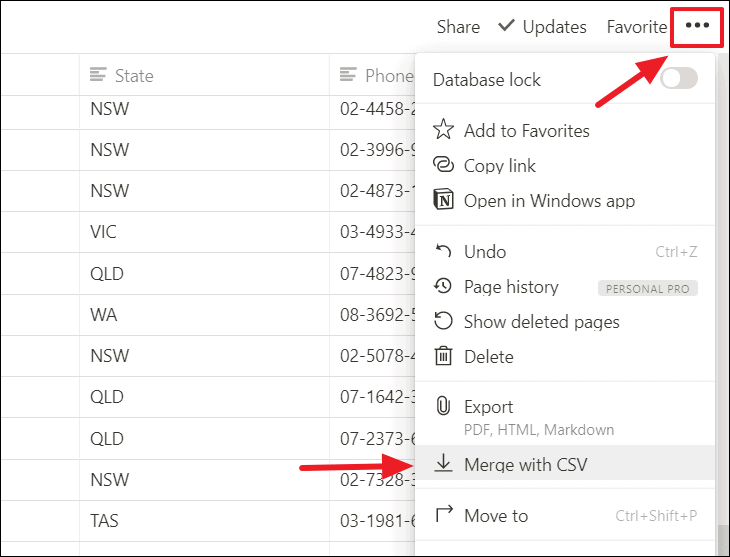
Then, navigate to the folder containing your exported CSV file in File explorer and select it. And click ‘Open’ to merge the file.
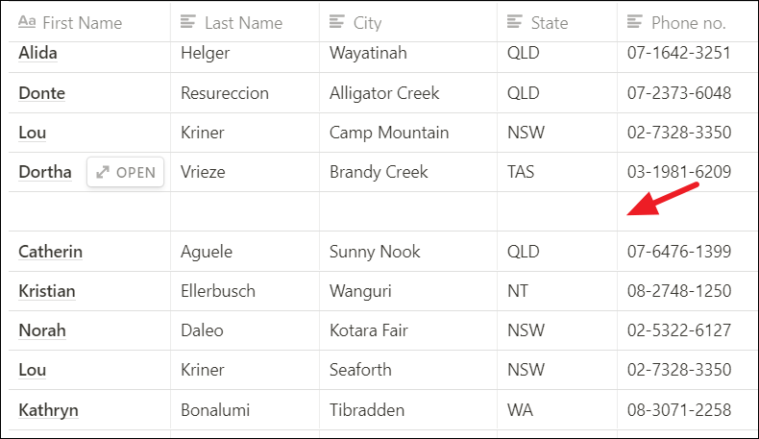
Now the CSV file is merged (appended) with your Notion table and its contents will be added to the end of the existing Notion table (see below).
That’s how you import Excel and Google sheets databases into Notion.


