
If you are organizing a trip with your friends or family, it can be hard to find the right time that fits everyone’s schedule. Sharing your calendar with everyone can help you see when they are available and when they are busy so that you can plan your trip accordingly. With Google Calendar, you can share your events and schedules with specific people, your organization, or everyone.
Google Calendar is a great time-managing and scheduling tool that can be used to keep track of important events, holidays, doctor’s appointments, work meetings, vocations with friends, and much more. Google Calendar allows you to schedule events, add event locations, set reminders, and share your schedules with anyone you like. Let us see how to create and share your Google Calendar with others.
Sharing Google Calendar
Shared Calendar makes scheduling meetings, events, and get-togethers easy and seamless. Please note that you can only create and share calendars from a computer or mobile browser (Desktop mode) as the Android and iOS apps do not support this feature yet.
To share a calendar with someone (friend, family, or colleague), you need to follow three steps. First, you will need to create a calendar or have an existing calendar; second, send invitations to people; third, they will have to accept that invitation to use your calendar.
Create a New Google Calendar
If you don’t have a calendar that you want to share, you need to create one on Google Calendar. You can also create different types of calendars for different purposes (for work, family events, vacations, friends’ get-togethers, etc.). Follow these steps to create a new calendar on Google Calendar:
First, go to calendar.google.com in your browser or mobile browser in desktop mode. Alternatively, you can also click the Google Apps icon (9 dots icon) on any of your Google pages or Google Apps page and select ‘Calendar’. Then, log in to your Google account if you haven’t already done so.

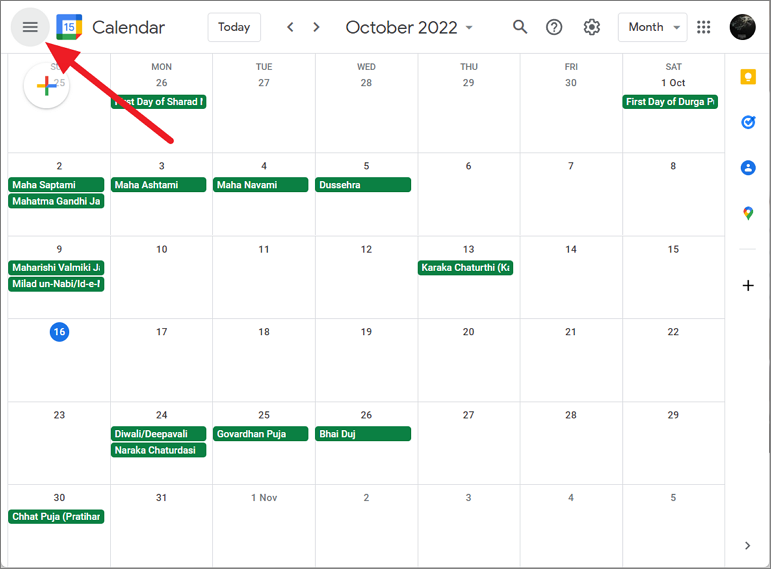
On the top left corner, click the ‘Main menu’ (hamburger icon) button to reveal the left-side menu panel.
Then, click on the ‘+’ sign next to the Other Calendars in the sidebar.
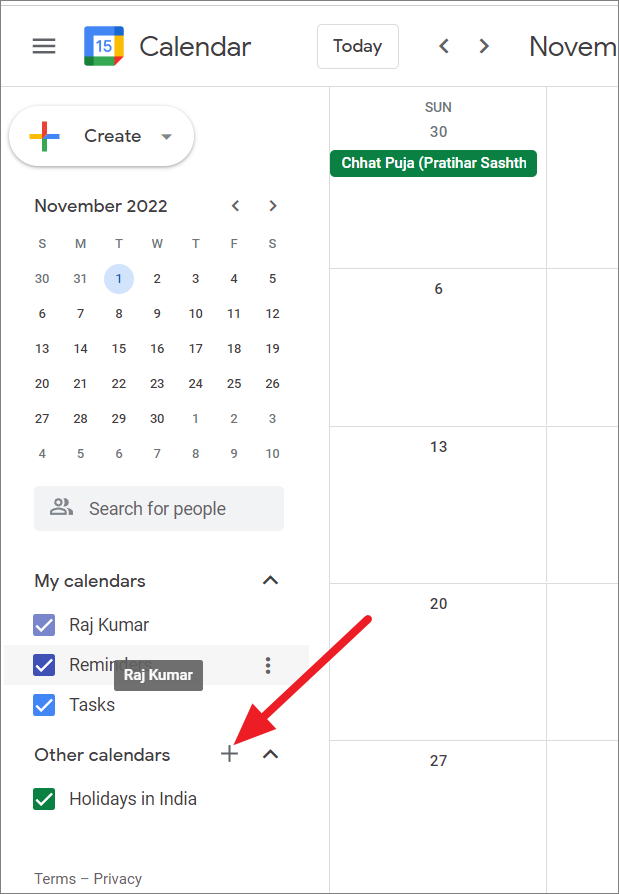
From the submenu, choose the ‘Create new calendar’ option.

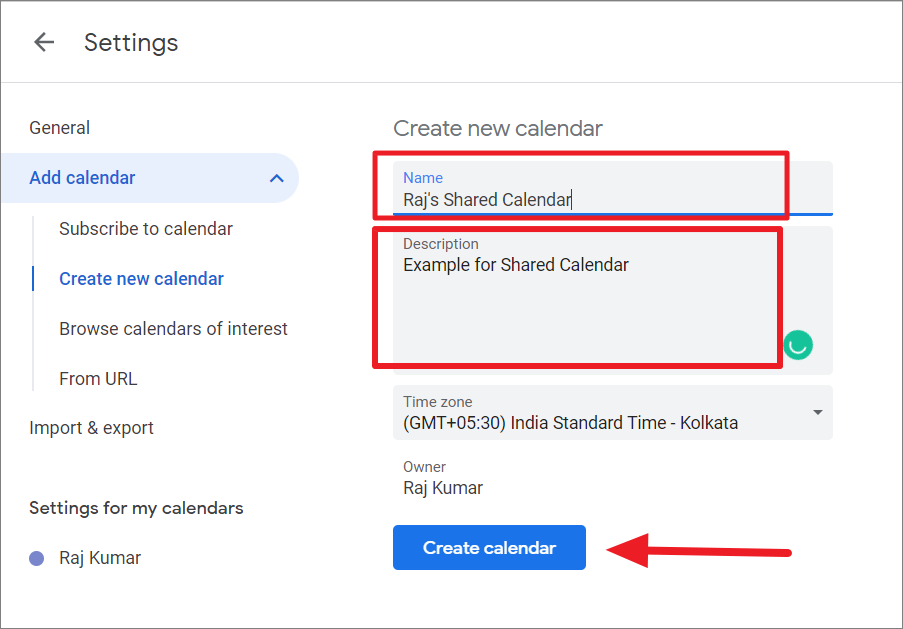
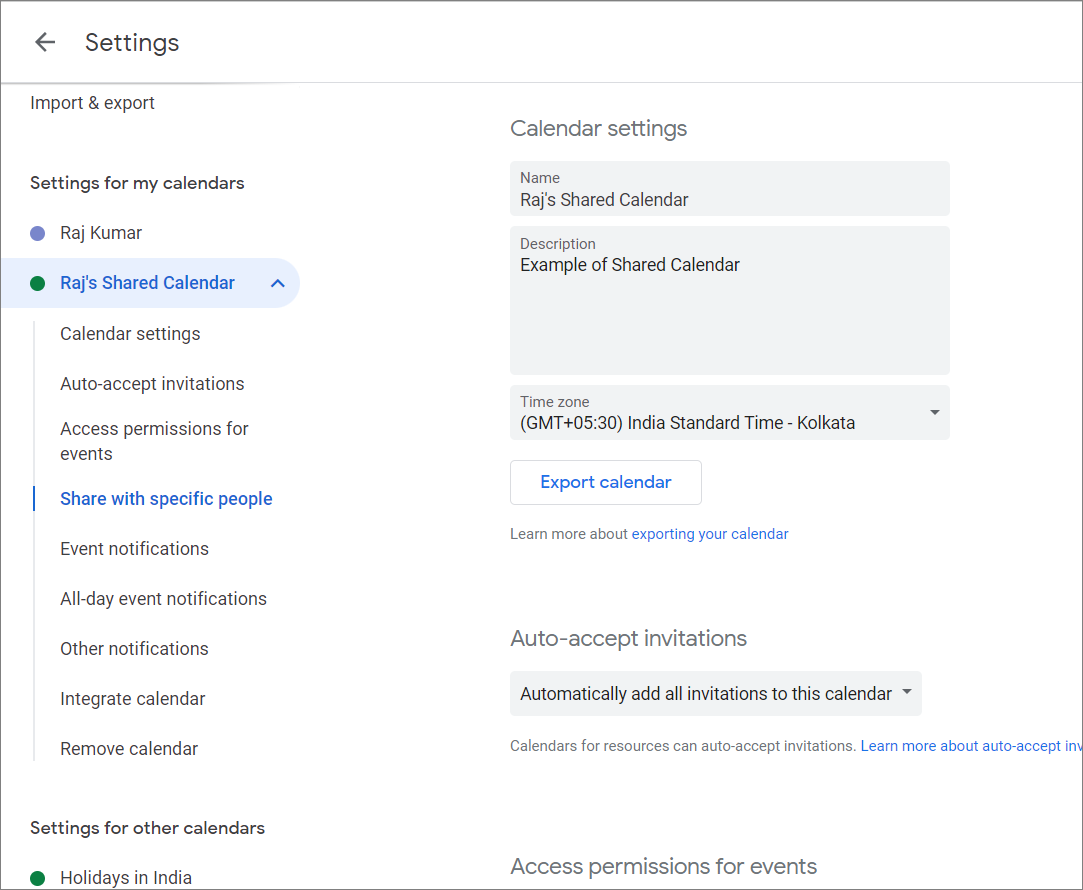
Now, you will be taken to the Settings page for the new calendar. Here, you can provide a ‘Name’ and a ‘Description’ for your calendar. For example, we are naming this calendar ‘Raj’s Shared Calendar’. You can also set your time zone here using the drop-down menu. When you are done, click the ‘Create calendar’ button to create a new calendar.
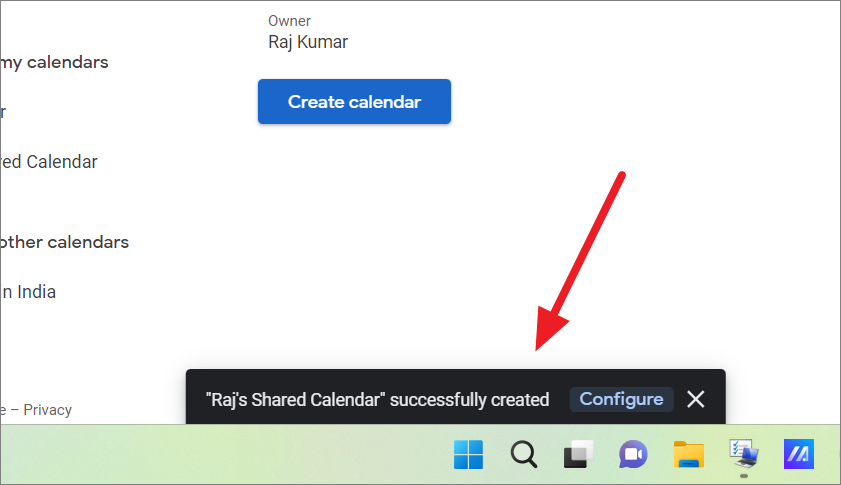
Once the calendar is created, there will be a notification at the bottom of the page as shown below. Then, go back to your calendar view. You can click the arrow button at the top left corner to get back to the Calendar view.
Follow the above instructions to create as many calendars as you want. You can add different calendars for work, family, friends, vacation, etc.
All your calendars will be located under the My Calendar section on the left sidebar (including your private calendars, shared calendars, and calendars shared by others).
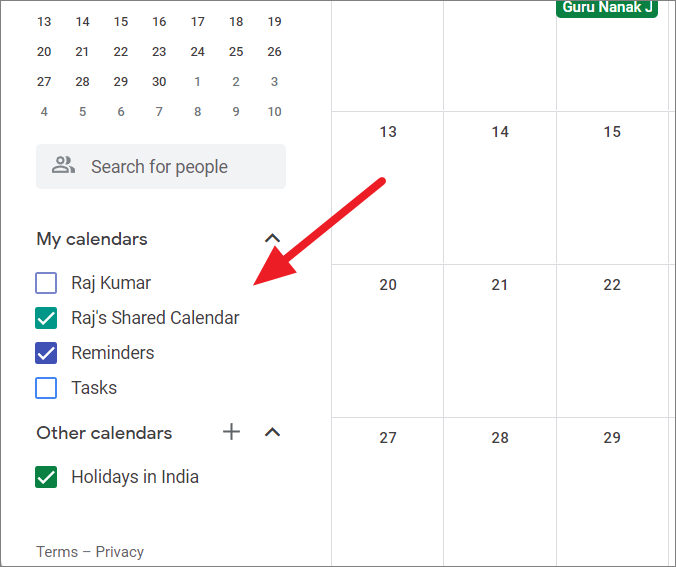
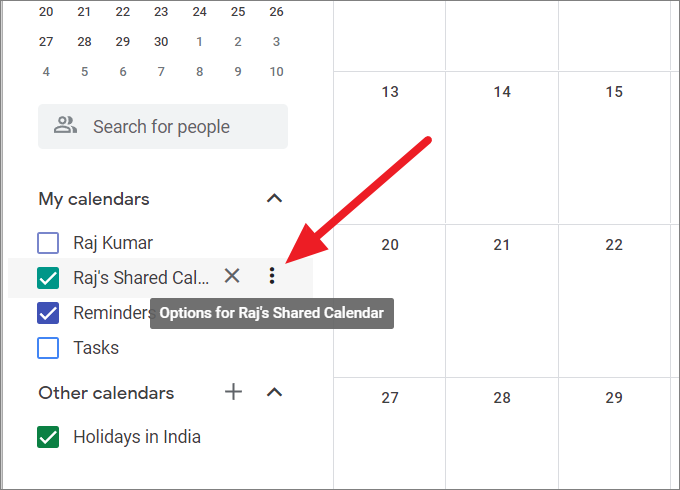
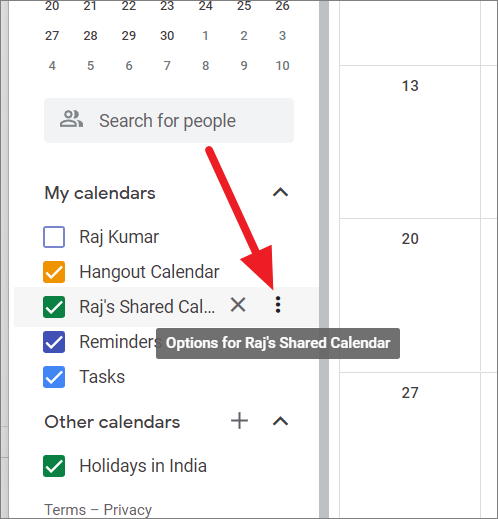
To change Calendar settings, hover over the calendar you want to share and click on the ‘Options’ (ellipsis) button.
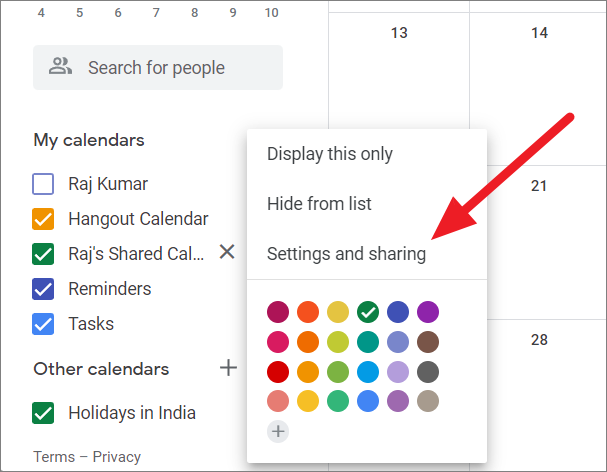
To display only this calendar on your calendar view, choose ‘Display this only’ from the menu. If you want to hide the calendar from the list, select ‘Hide from list’.
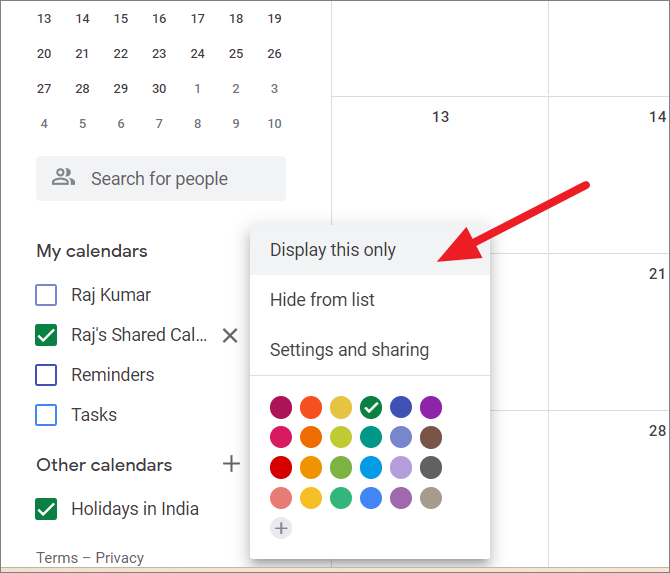
To change the color hue of this shared calendar, choose a color from the sub-menu. All the events and tasks you add to this shared calendar will be highlighted with the selected color so that you can tell apart the events between different calendars in the calendar view.
Share a Google Calendar
After the calendar is created, you can send invites to the people. There are three ways to share your calendar – Share with individuals, the public, or your organization. Let us see how to share a google calendar.
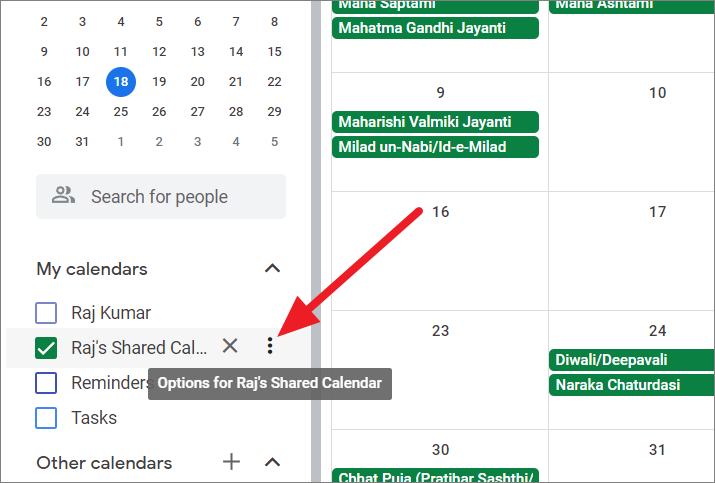
First, open Google Calendar on your browser. Under ‘My calendars’ on the left panel, hover over the calendar you want to share, click on the three-dot menu icon (vertical ellipsis), and select ‘Settings and sharing’ from the menu.

You will be taken to the calendar settings page. Before you share your calendar, you need to confirm the calendar name and time zone. In case the person you are sharing with is in a different time zone, make sure you have the correct time zone to avoid confusion.
Share a Calendar with Specific People
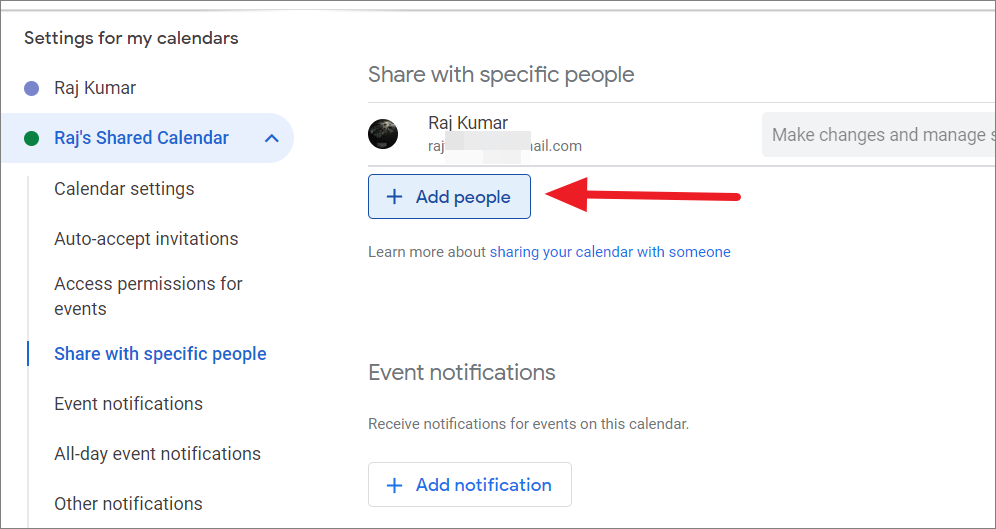
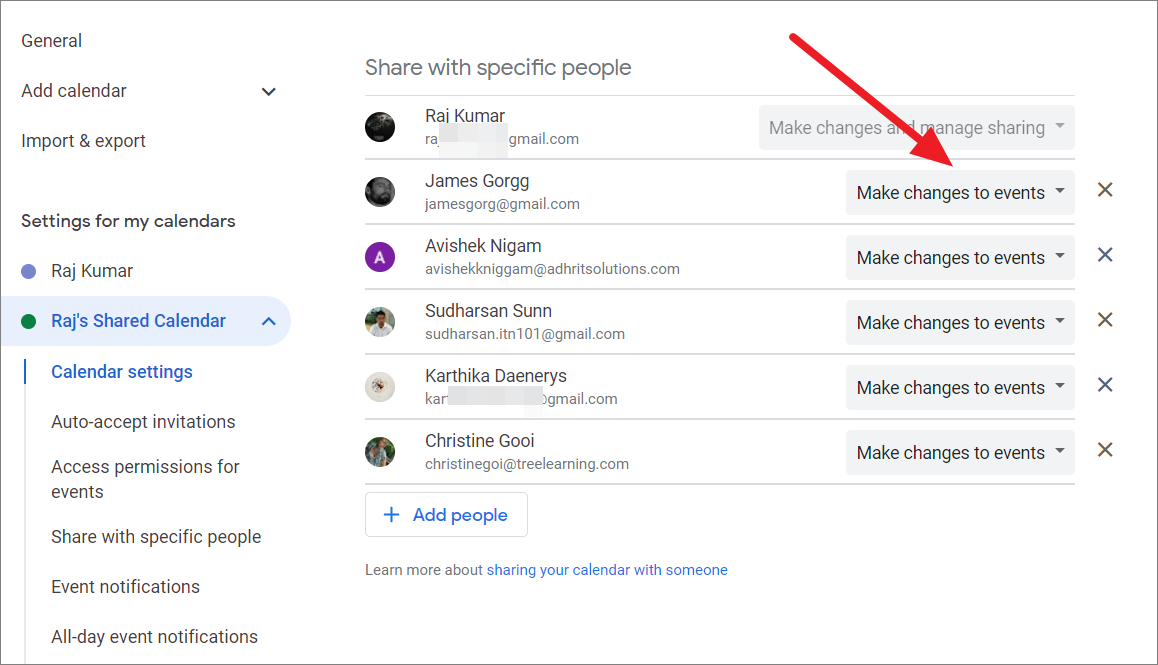
To share your calendar with specific people (friends, family, co-workers), scroll down on the Calendar settings page to the ‘Share with specific people’ section or you can just click the ‘Share with specific people’ option on the left sidebar.

Then, click the ‘+ Add people’ button to add the people you want to share with.
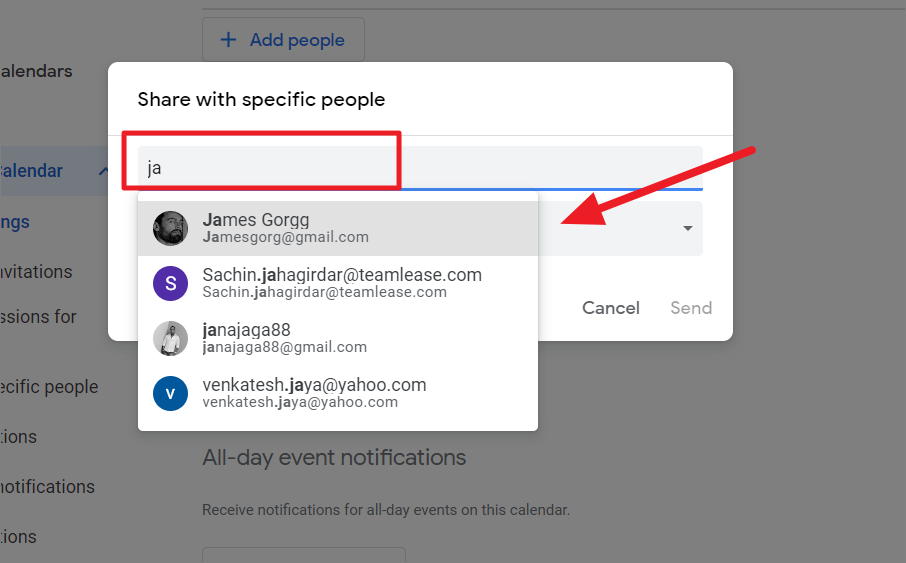
In the ‘Share with specific people’ dialog box that pops up, type the name and email of the person you want to share the calendar with. If you have that person in your contacts list, you can choose them from the suggestion, or you need to enter their email address and add it to the shared list.
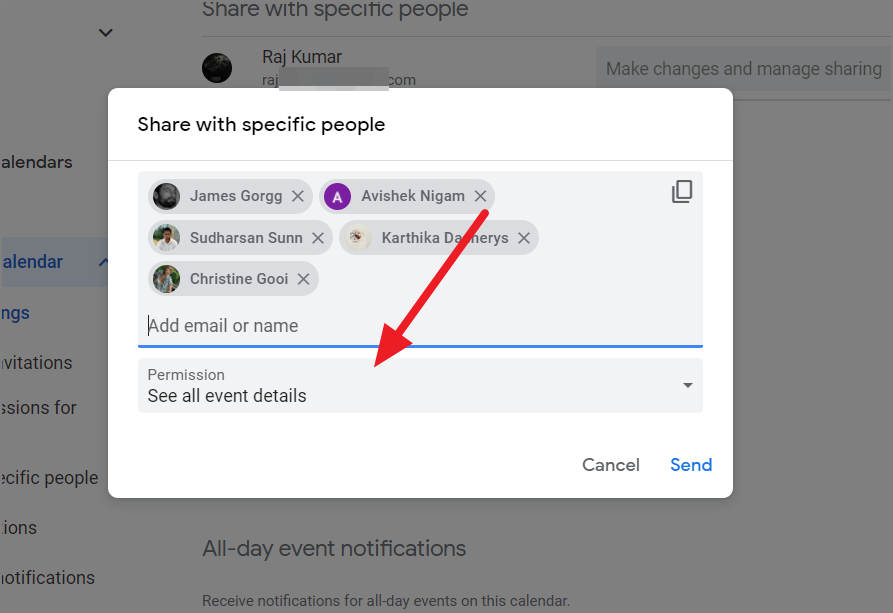
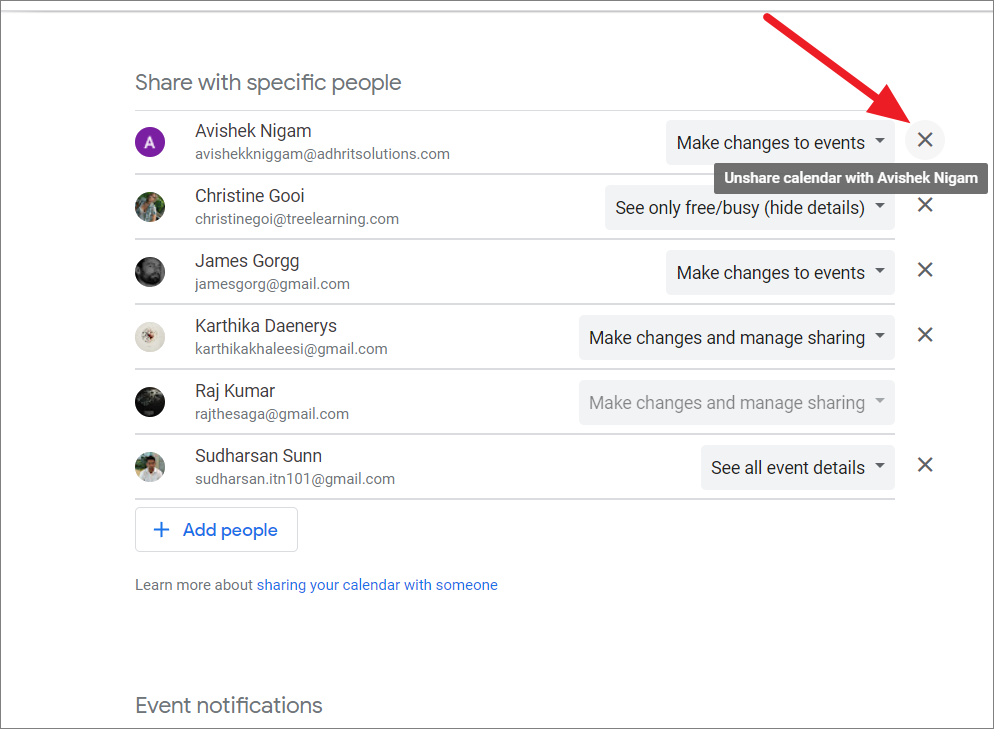
Add as many people as you want to the list. Then, click the ‘Permission’ drop-down menu to manage access to the shared calendar.
Manage Access to the Shared Calendar (Sharing options)
After adding the people to the shared calendar, you can control how much information they can see about your events, whether they can make changes to events (schedule, reschedule, and cancel), as well as manage sharing options.
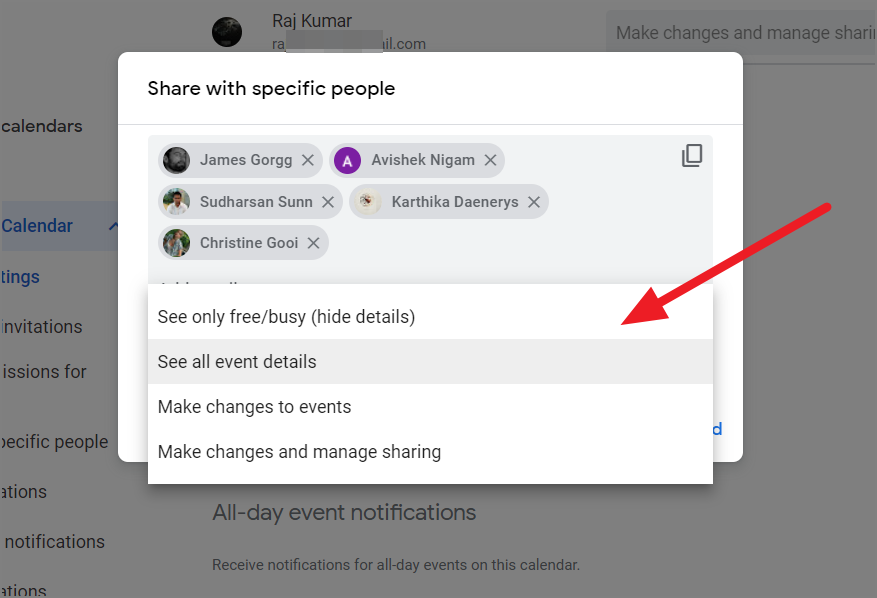
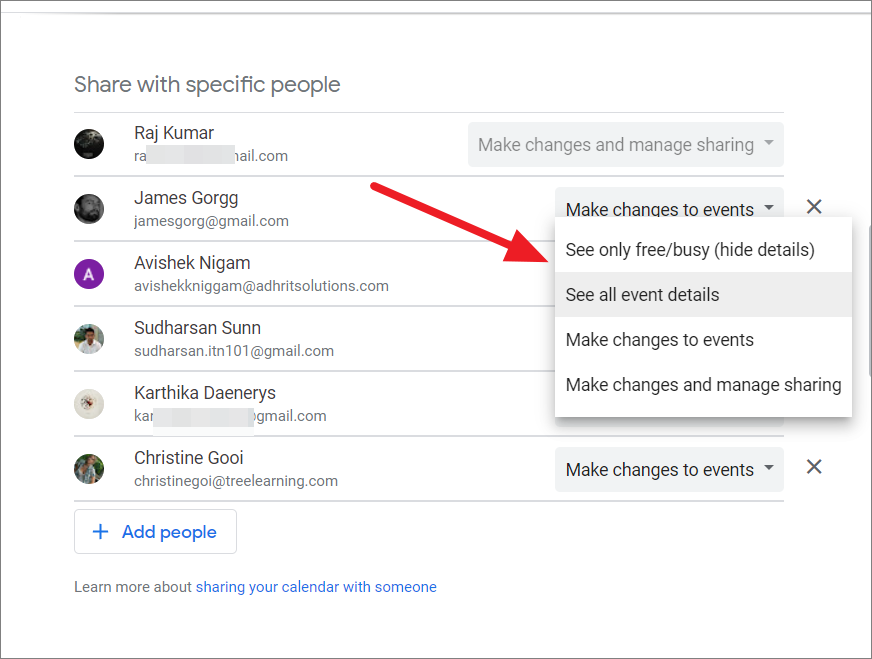
Google offers four types of permissions for Calendar sharing; these include:
- See only free/busy (hide details) – When you choose this setting, the recipient or people who you are sharing the calendar with can only see whether you are free or busy at a specified time and date. They cannot see any details about the events in the calendar, including the names and descriptions.
- See all event details – When you choose this option, the people sharing the calendar can see all of your events and the details, including the name, description, time, and location of the events.
- Make changes to events – With this setting, the people sharing the calendar can not only view the events and their details but also make changes to them. People with this permission can schedule, reschedule, and delete events in the shared calendar.
- Make changes to events and manage sharing – With this permission level, the people with whom you are sharing your calendar have complete access to your calendar. They can view the calendar, make changes to the events as well as share your calendar with anyone they want.
When you are ready, click on the ‘Send’ button to send the invites.
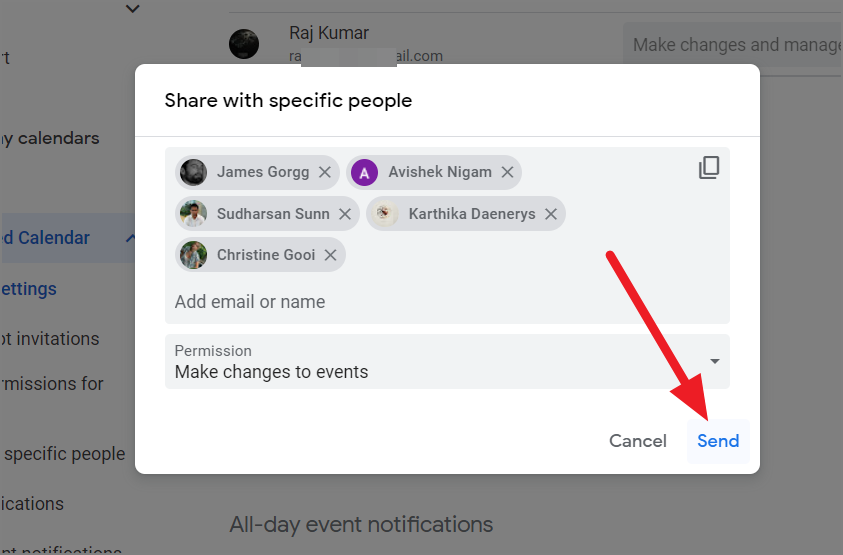
Once you click ‘Send’, Google will send the calendar invites to the email address of the selected people. However, the calendar will not be shared with those people until they accept your invitation.
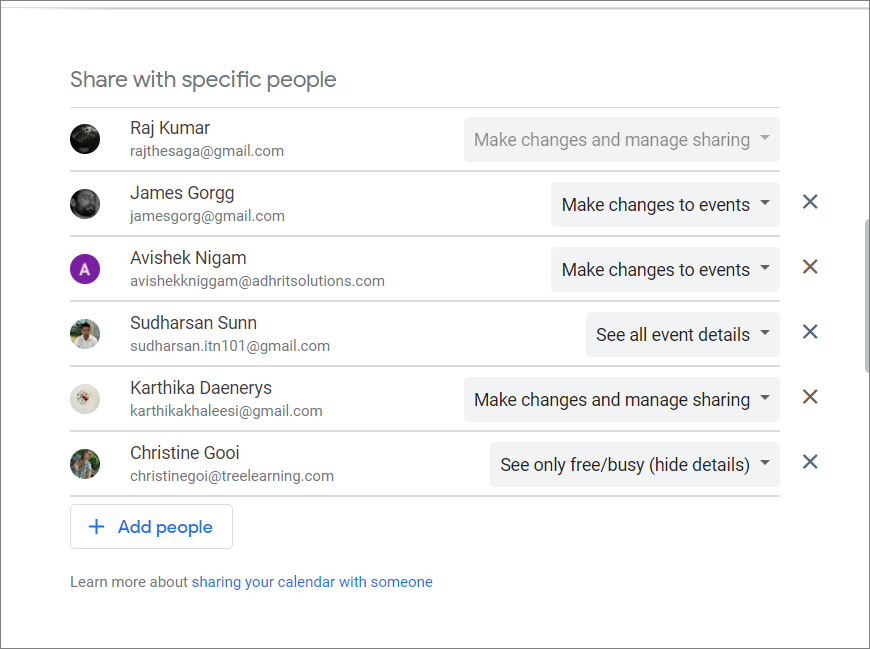
Change Permission for Shared Calendar
After sharing the calendar, you can change permission for individual users anytime you want. Go back to the settings of the shared calendar and click on the drop-down menu next to a specific user under the ‘Share with specific people’ section.
Then, choose different permission from the menu.
You can alter the permission for any user at any time you want.
Share a Calendar with the Public
Are you a doctor who wants your patients to see your appointments and schedules so they can make an appointment when you are free? Are you a motivational speaker or a businessman who wants everyone to see your upcoming events? Then, you can make make your Google Calendar public easily.
Open your Google Calendar and go to the ‘My Calendars’ section on the left sidebar. Then, hover over the calendar you want to make public, and click on the three dots icon. Then, select ‘Settings and Sharing’ from the menu.
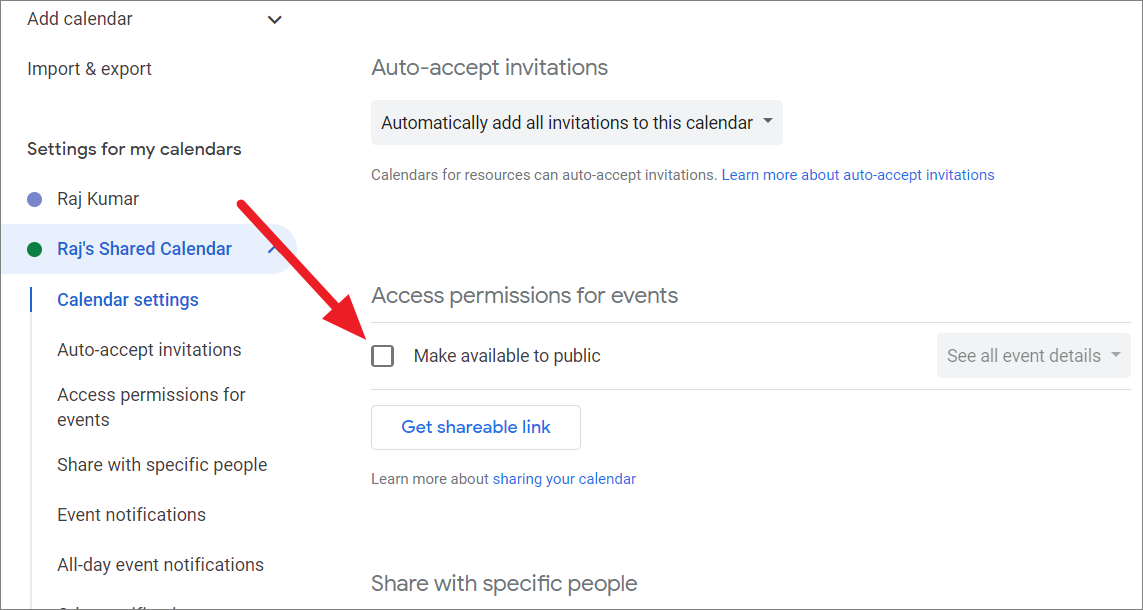
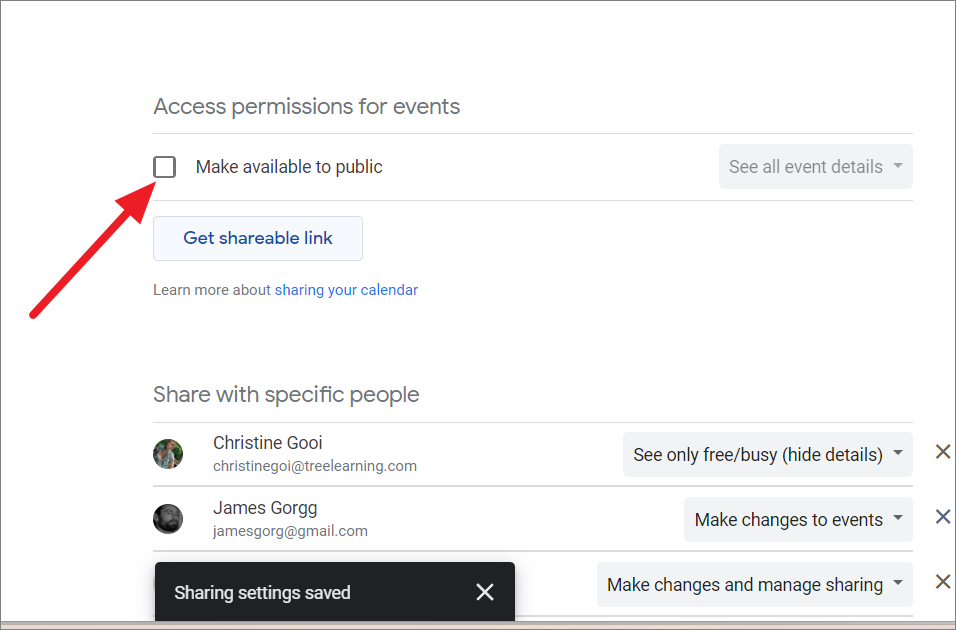
Scroll down the calendar settings to the ‘Access permissions for events’ section and check the ‘Make available to public’ option.
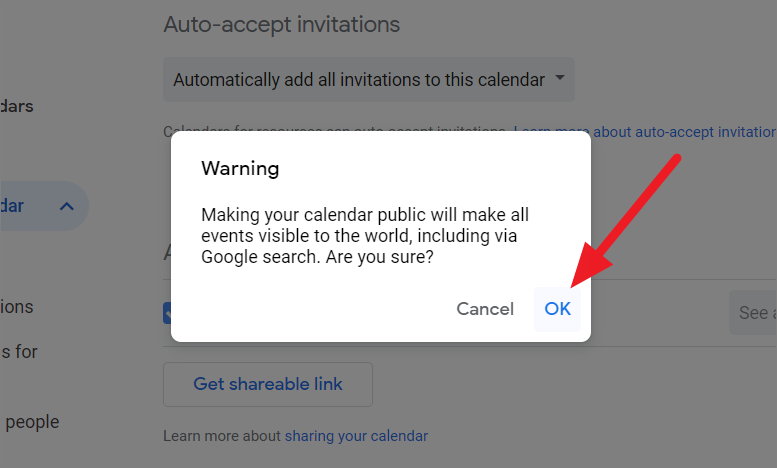
You will be warned that making your calendar public will make all your events visible to everyone. That means anyone who has the link to your calendar can view your events even if you don’t share the link individually. Click on ‘OK’ to continue.
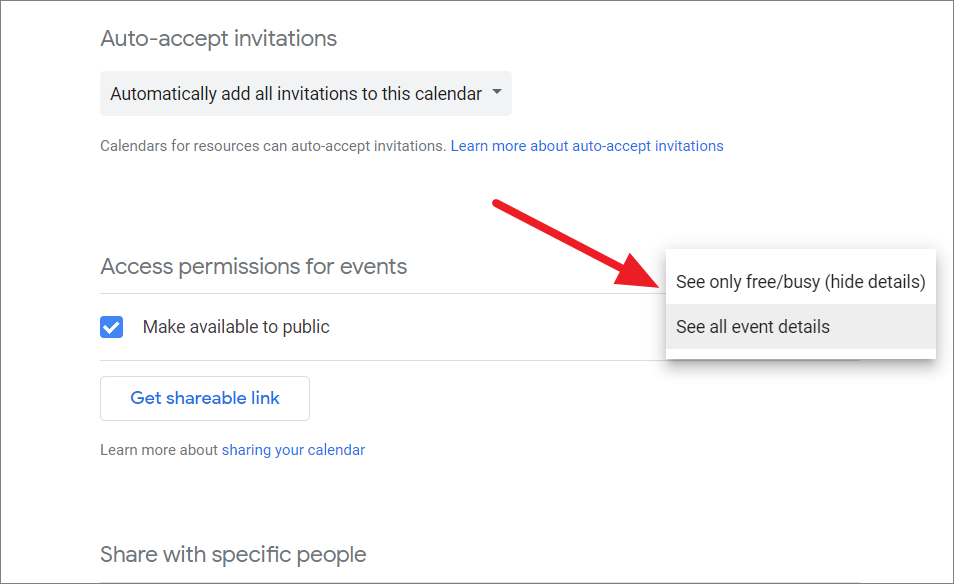
This will publicize your calendar. After enabling this feature, you can manage the sharing options with a drop-down menu next to it. Permissions for publically sharing your calendar are limited to ‘See only free/busy (hide details)’ or ‘See all event details’.
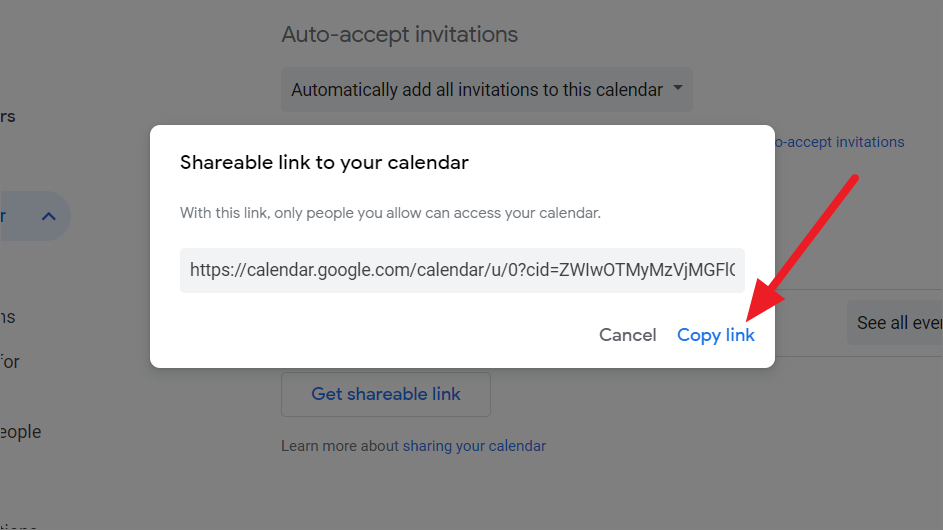
You can also click the ‘Get shareable link’ button and select the ‘Copy link’ option to copy the calendar link and share it with anyone you want.
If you want to share your Calendar with your work, school, or other organization, you will need to be logged into the work Google account. Then, check the ‘Make available for your organization’ box under the Access permissions section.
Accept the Invitation and View a Shared Calendar
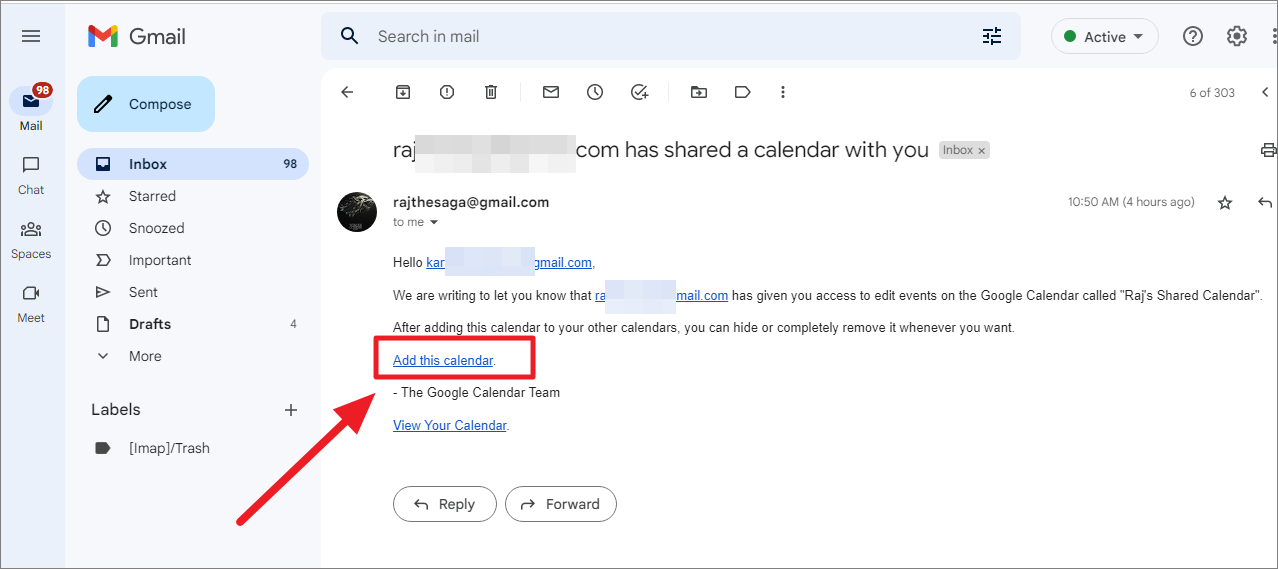
As we mentioned before, when we are sharing a calendar with specific people, your calendar will still not be shared until the people accept your invitation. You will also get an email if someone shares a calendar with you. To accept an invitation and view a shared calendar, follow these steps:
Go to your email and open the mail with the invitation. Then, simply click the ‘Add this calendar’ link on the mail.
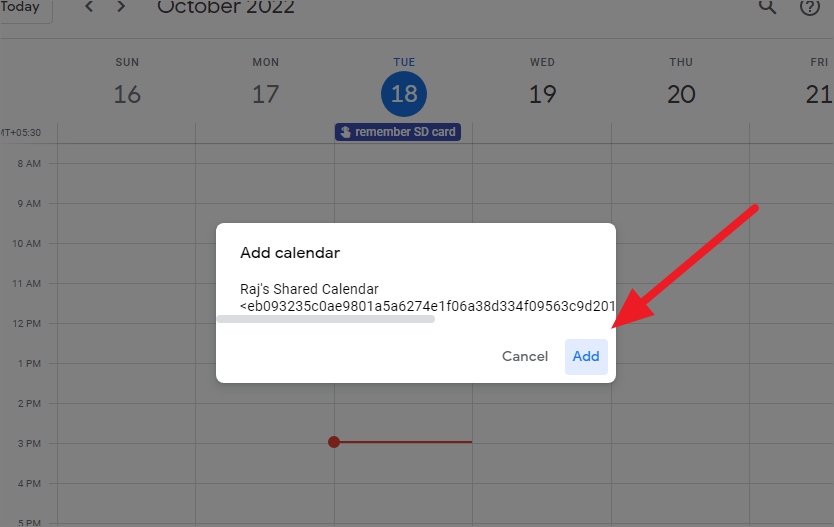
You will be redirected to your Google calendar page and prompted to add that calendar. Click the ‘Add’ button on Add calendar prompt to add it to your calendar.
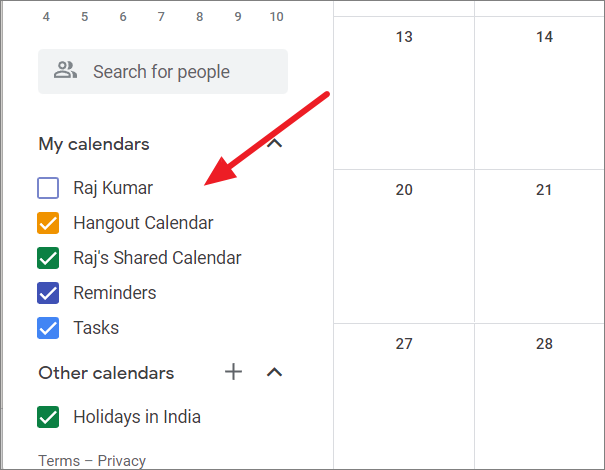
Once a shared calendar is added, it will show up in the sidebar, under the ‘My Calendars’ section. You can also click on a calendar’s name in the sidebar to toggle it on and off.
Unshare or Stop Sharing your Google Calendar
If you no longer want someone or anyone to access your shared calendar, you can stop sharing your Google calendar.
First, open your Google Calendar using calendar.google.com. Then, hover over the calendar you want to unshare and click the three vertical dots to the right.
Now, select ‘Settings and sharing’ from the sub-menu.
Then, navigate to the ‘Share with specific people’ section on the right-side page. Find the individual you’d like to remove and click on the ‘X’ button next to their name.
To stop a publically shared calendar, move to the ‘Access permissions for events’ section and uncheck the ‘Make available to public’ checkbox.
Add an Event to the Shared Calendar
Once a calendar is shared, anyone who has access to edit the calendar will be able to add or remove an event from the calendar.
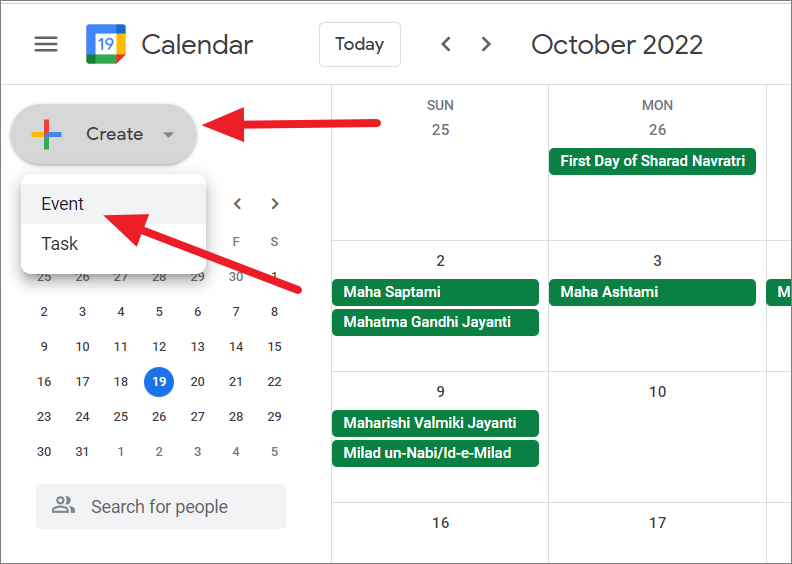
To add an event to the shared calendar, open your Google Calendar, click the ‘+ Create’ button in the upper left-hand corner, and then select ‘Event’ or just click on a specific date.
This will open a small window over the calendar where you can add the title and details of your event. You can also click on an existing event or task to edit it.

Then, add a title to the event and choose the event’s time and date with the options below.

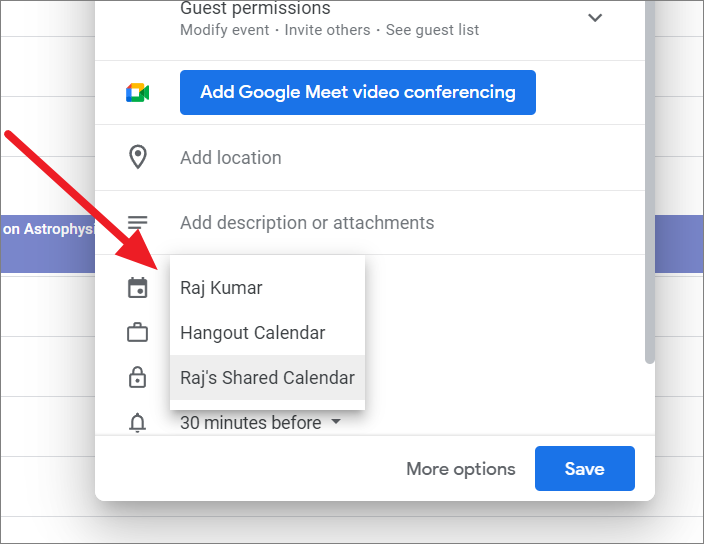
After that, add guests and specify the permissions by clicking the down arrow button.

You can also add Video conferencing to the event using the ‘Add Google Meet video conferencing’ button. Then, make sure that you select the shared calendar next to the calendar icon. Click on the drop-down menu that shows the calendar currently selected, and then the shared calendar you want to add your event to.
Include other details of the event such as location, description, and notifications as well as change visibility and privacy settings of the event. By default, the event uses the sharing settings of the selected calendar.
To change the visibility, click the ‘Default visibility’ and choose ‘Public’ or ‘Private’. When you choose ‘Public’, anyone can see this event’s details, including the description and names of attachments. But if you select ‘Private’, the event’s details can’t be seen by others unless they have at least the ‘Make changes to events’ permission for this calendar.

After adding all the necessary details, click ‘Save’.

In case you have added guests to the event, you will be prompted to send invitations to the guests. Click ‘Send’ to invites and save the event or click ‘Do not send’ to save without sending the invites.

Now you, and everyone else who has access to the calendar, will see the event on your shared calendar.
Remove a Shared Google Calendar
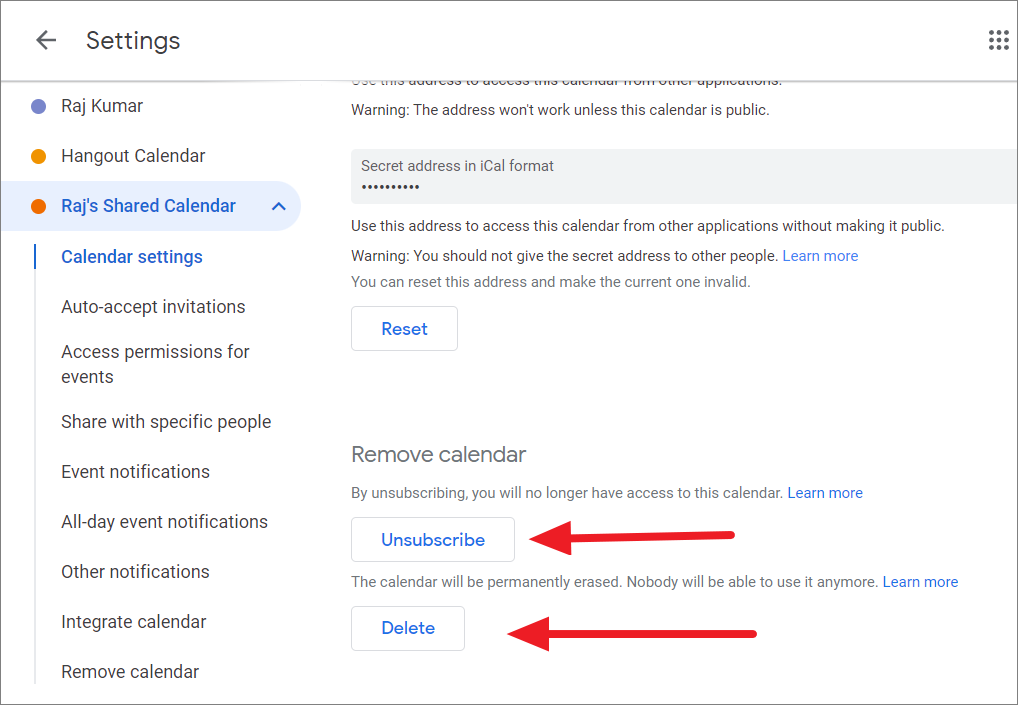
There are two ways to remove a shared calendar: you can either unsubscribe from the calendar or delete it. By unsubscribing from a shared calendar, you will no longer be able to access it but it will still be available to other shared users. If you delete a shared calendar, no one will be able to use it anymore.
To unsubscribe from a shared calendar, go to the specific calendar settings, scroll down to the bottom of the page (Remove calendar section) and click on the ‘Unsubscribe’ button. Alternatively, you can also click the ‘X’ icon next to the calendar name under My calendars.
To permanently delete a shared calendar, click the ‘Delete’ button.
That’s it. Now that you know how to make and manage a shared Google calendar, you can use it to enhance your productivity.


