
Windows 11 can sometimes interrupt critical processes like app installation or uninstallation by shutting down or restarting unexpectedly, or by displaying messages such as "This app is preventing shutdown." These interruptions can disrupt workflows, cause data loss, or leave software in an incomplete state. Adjusting system settings and troubleshooting problematic applications can stop these shutdowns and ensure smoother software management.
Automatically End Tasks That Prevent Shutdown
Configuring Windows 11 to auto-close apps that block shutdown or restart is the most direct way to resolve this issue. By default, Windows waits for user confirmation if an app is still running or not responding, which can stall shutdowns during installations or removals.
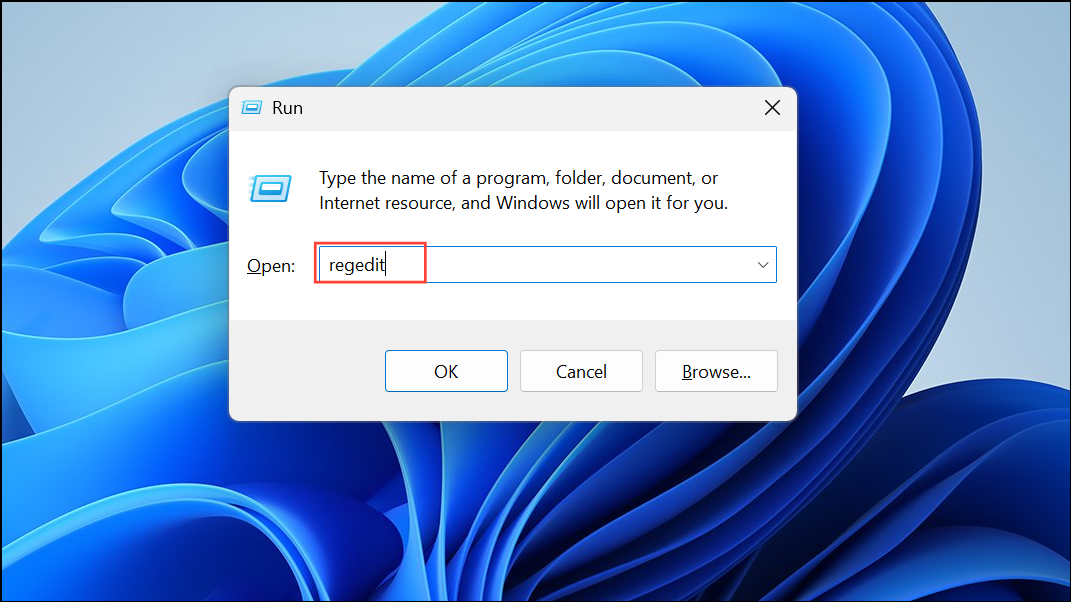
Step 1: Open the Registry Editor by typing regedit in the Start menu search and pressing Enter. Accept any permission prompts.
Step 2: Navigate to HKEY_CURRENT_USER\Control Panel\Desktop in the left sidebar.
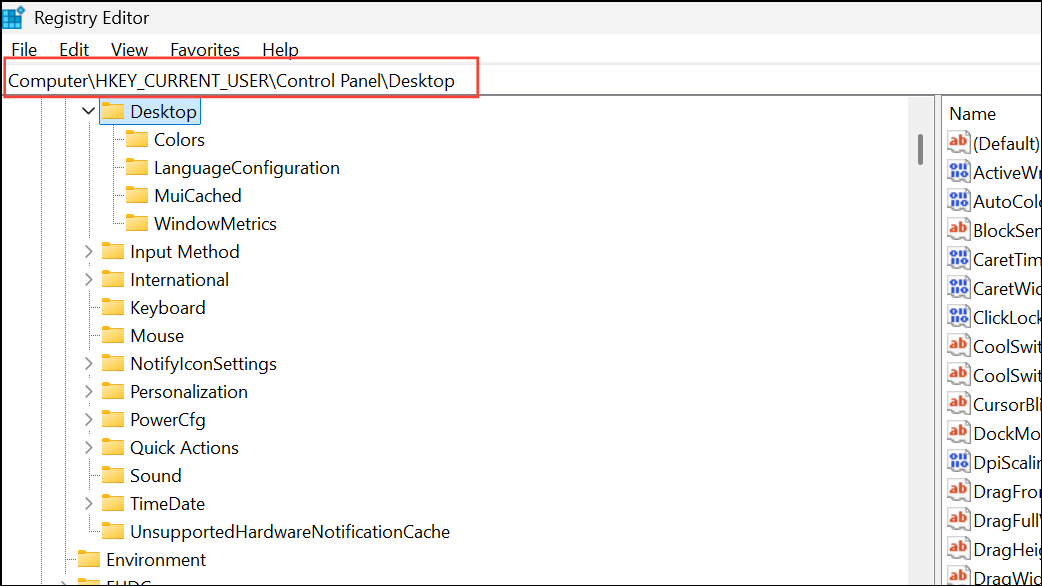
Step 3: In the right pane, check for a string value named AutoEndTasks. If it does not exist, right-click, select New > String Value, and rename it to AutoEndTasks.

Step 4: Double-click AutoEndTasks and set its value to 1. This instructs Windows to automatically close any apps blocking shutdown or restart.
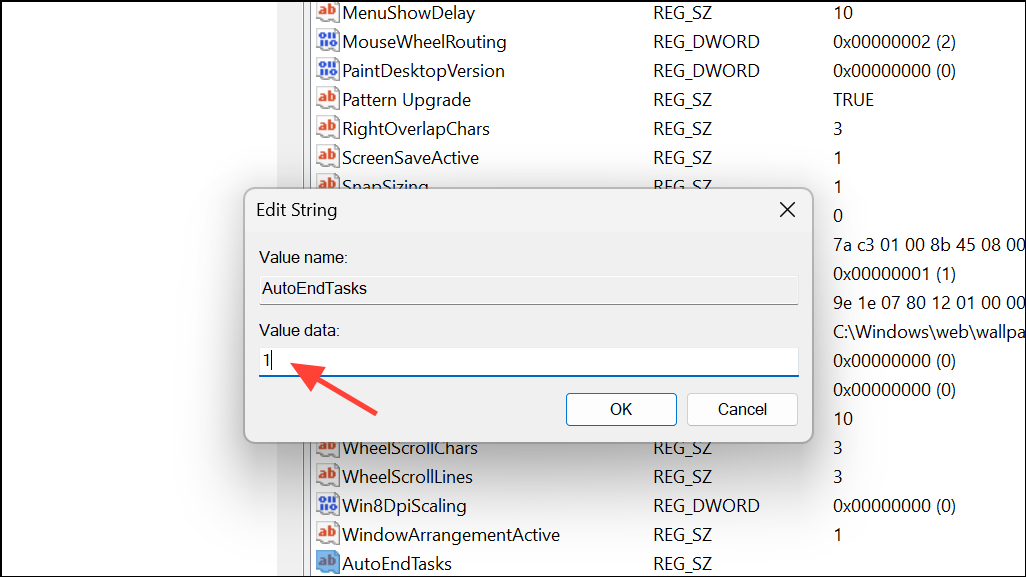
Step 5: Optionally, reduce shutdown delays by creating or editing these string values in the same location:
WaitToKillAppTimeout: Set to2000(milliseconds) to shorten the wait before Windows kills open apps.HungAppTimeout: Set to2000for faster closure of non-responsive apps.
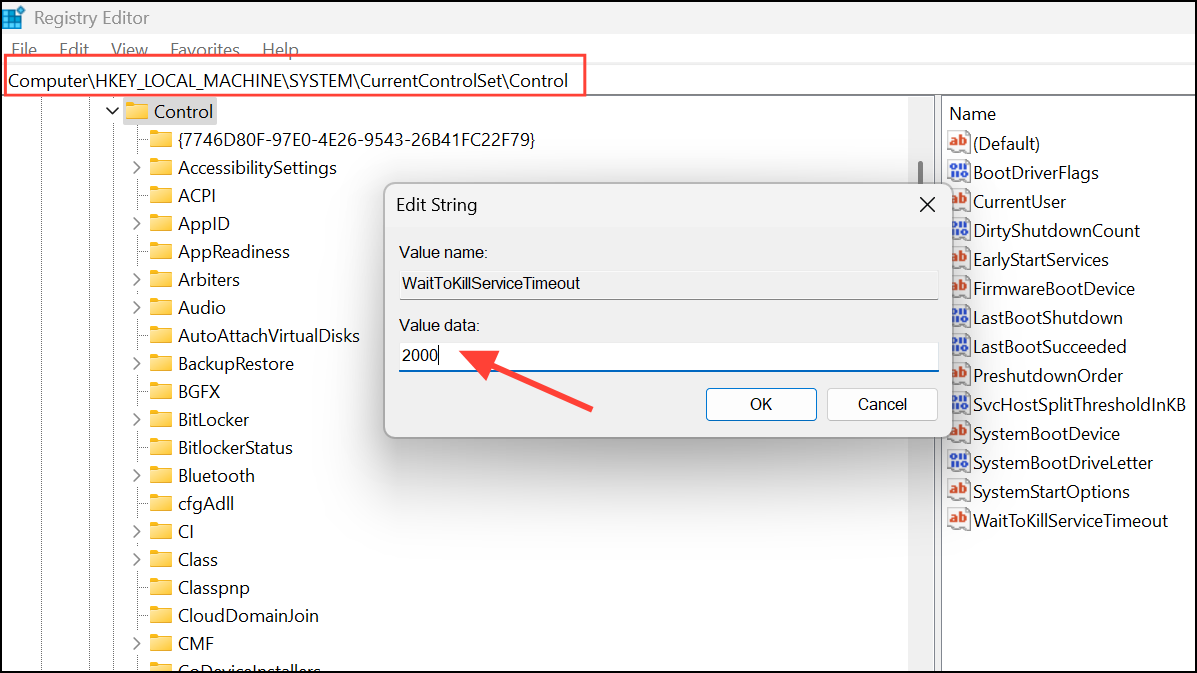
Step 6: To speed up shutdown for services, navigate to HKEY_LOCAL_MACHINE\SYSTEM\CurrentControlSet\Control and set WaitToKillServiceTimeout to 2000.
Step 7: Close the Registry Editor and restart your PC for the changes to take effect. Windows will now close blocking apps automatically, minimizing shutdown interruptions during installations or removals.
Adjust Power and Sleep Settings
Incorrect power settings can cause Windows 11 to shut down or sleep during lengthy installations or uninstallations. Ensuring your device remains active prevents interruptions.
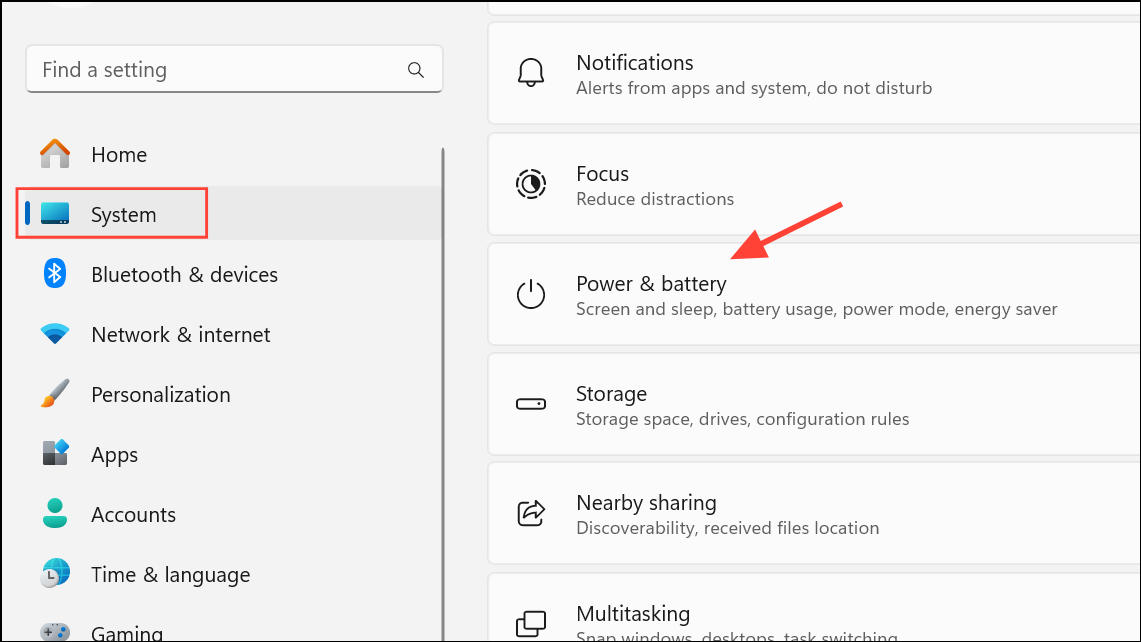
Step 1: Open Settings by pressing Windows + I.
Step 2: Go to System > Power & battery (or System > Power & sleep on some builds).
Step 3: Set both Screen and Sleep options to Never while installing or uninstalling software. This keeps the system awake and prevents automatic shutdowns.
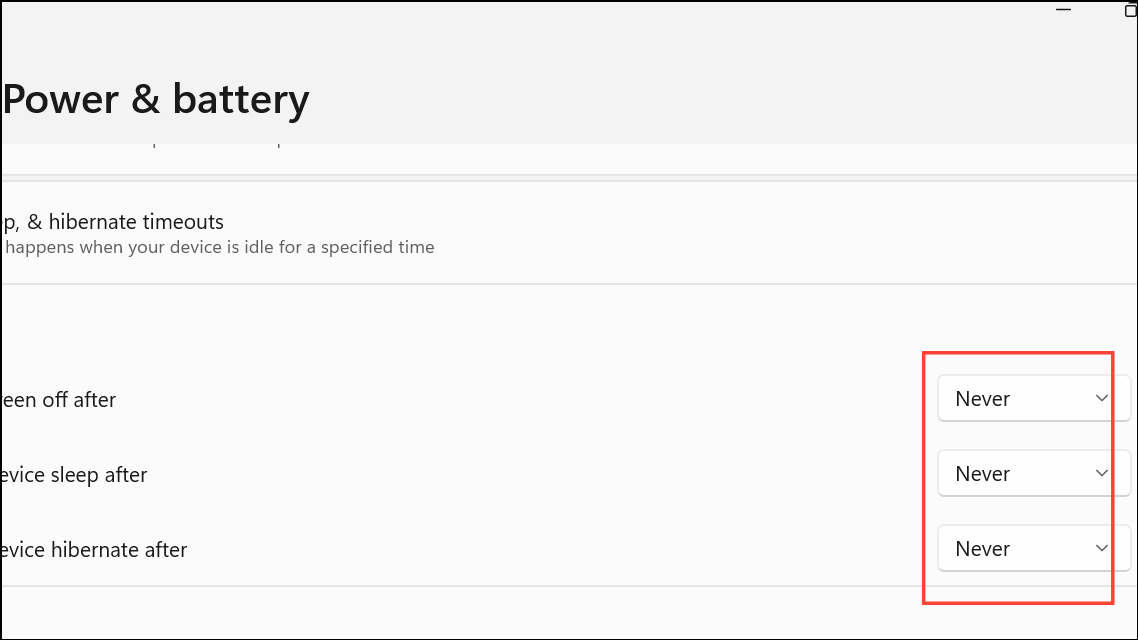
Step 4: If using a laptop, adjust both On battery and Plugged in settings as needed.
Temporarily Disable Third-Party Security Software
Antivirus or firewall programs may interfere with installations or cause Windows to halt shutdowns. Temporarily disabling them can resolve these conflicts.
Step 1: Open your antivirus or firewall application from the system tray.
Step 2: Locate the option to disable real-time protection or firewall, and turn it off temporarily.
Step 3: Proceed with the installation or uninstallation. Re-enable your security software as soon as the process completes to keep your system protected.
Clean Up Temporary Files and Perform a Clean Boot
Corrupted temporary files or conflicting startup programs can cause shutdown or installation issues. Cleaning up temp folders and performing a clean boot removes potential sources of conflict.
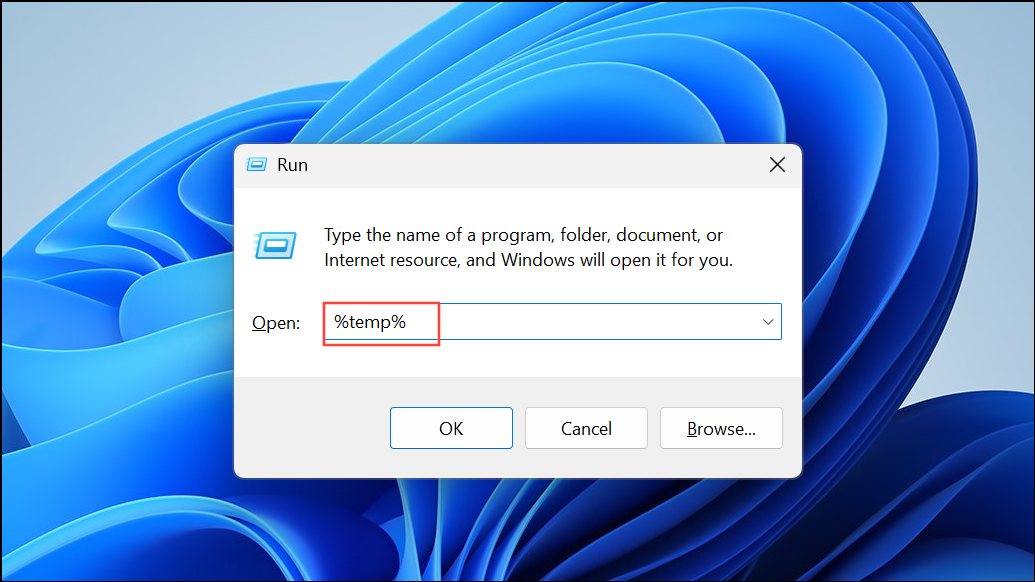
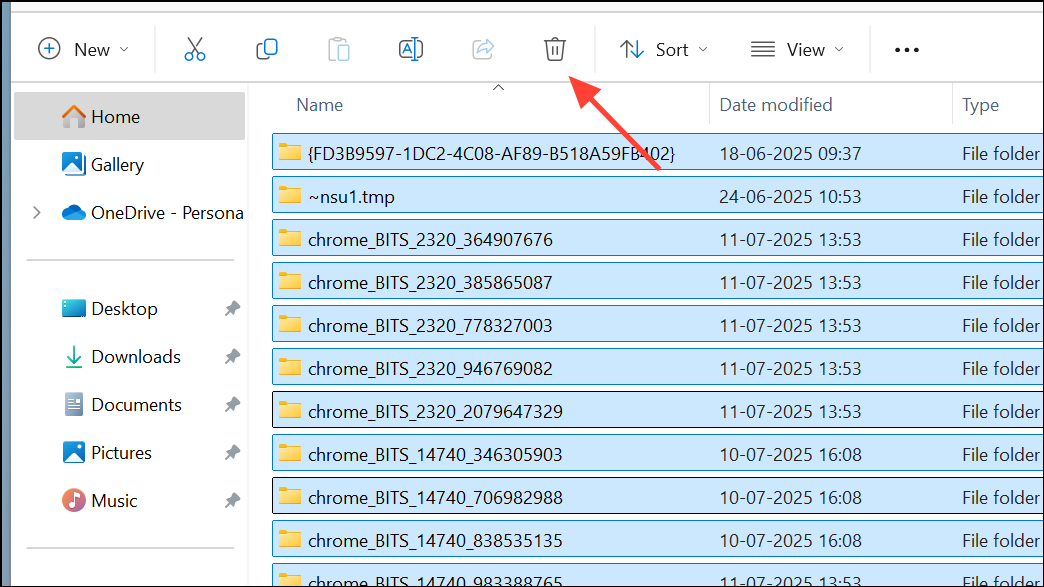
Step 1: Press Windows + R, type %TEMP%, and press Enter. Delete all files in the folder.
Step 2: Repeat with C:\Windows\Temp and %USERPROFILE%\AppData\Local\Temp.
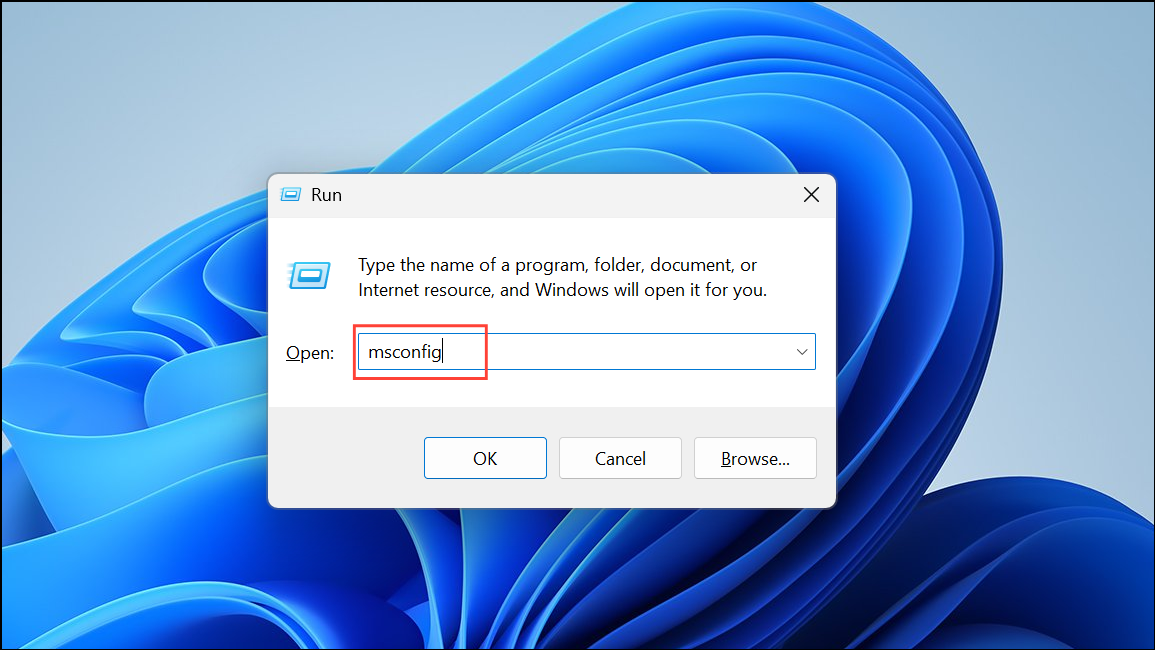
Step 3: For a clean boot, press Windows + R, type msconfig, and press Enter.
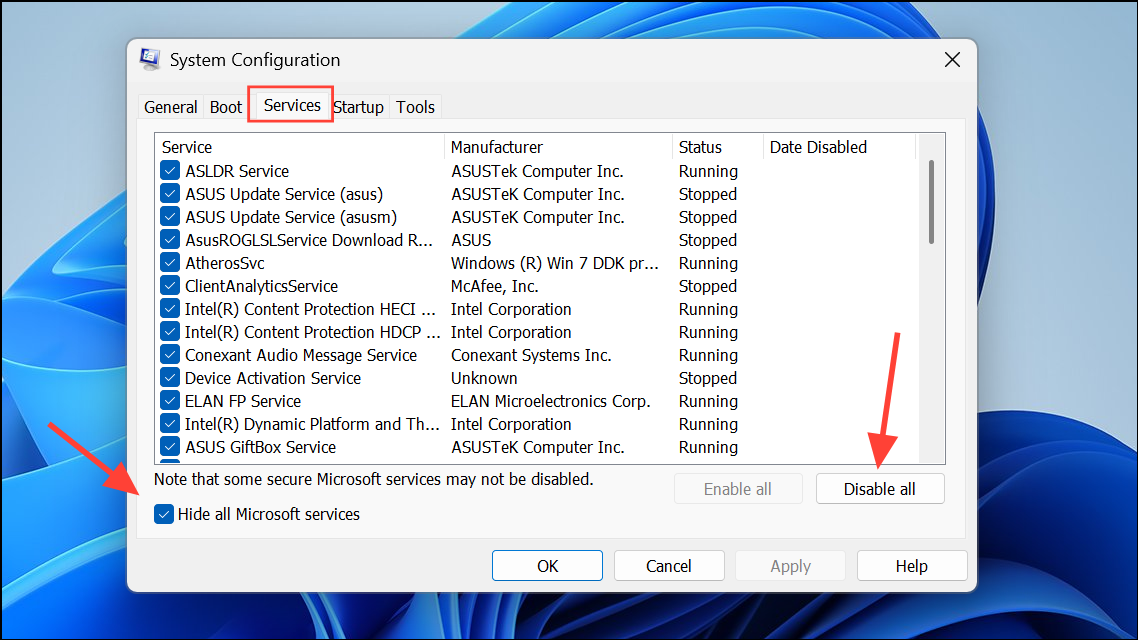
Step 4: In the Services tab, check Hide all Microsoft services and click Disable all.
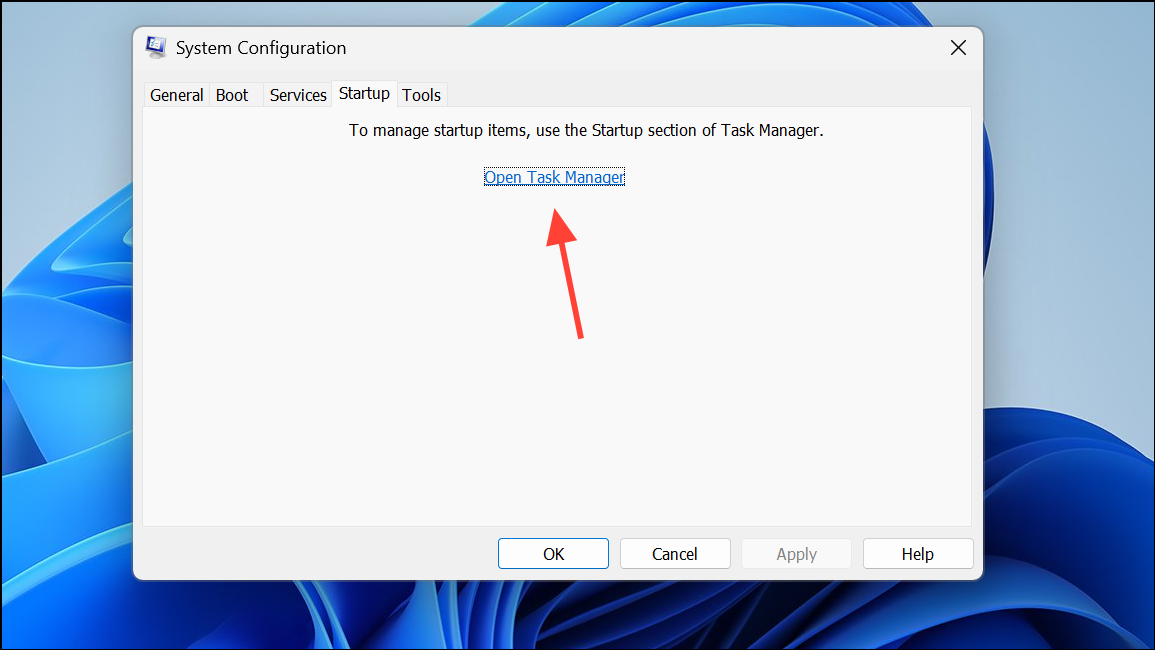
Step 5: In the Startup tab, open Task Manager and disable all non-essential startup items. Restart your PC.
This process starts Windows with only necessary services, helping identify if a background app is causing shutdown or installation problems.
Uninstall Problematic Applications via Control Panel
If Windows 11 Settings closes unexpectedly during app uninstallation, use the classic Control Panel or a third-party uninstaller.
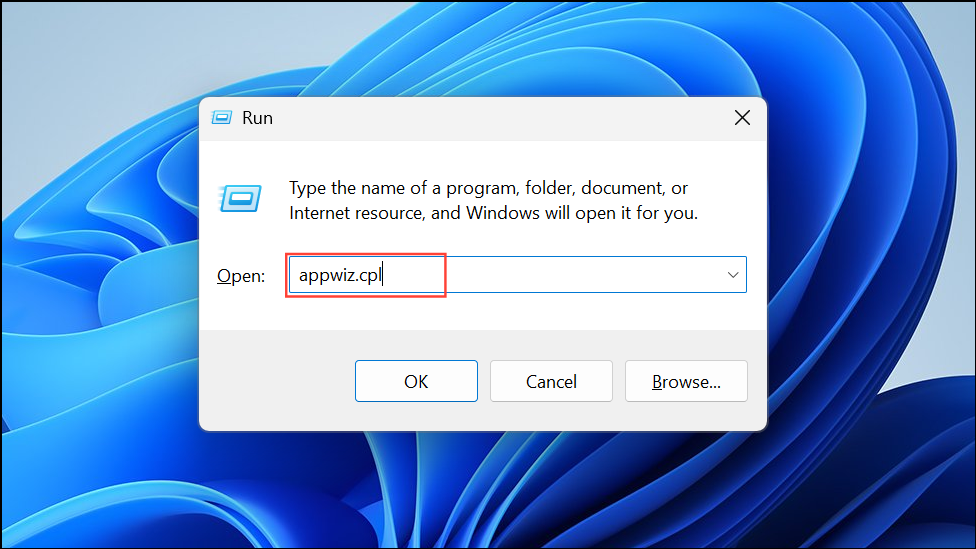
Step 1: Press Windows + R, type appwiz.cpl, and press Enter to open Programs and Features.
Step 2: Scroll to the application you want to remove, right-click it, and select Uninstall. Follow the prompts to complete removal.
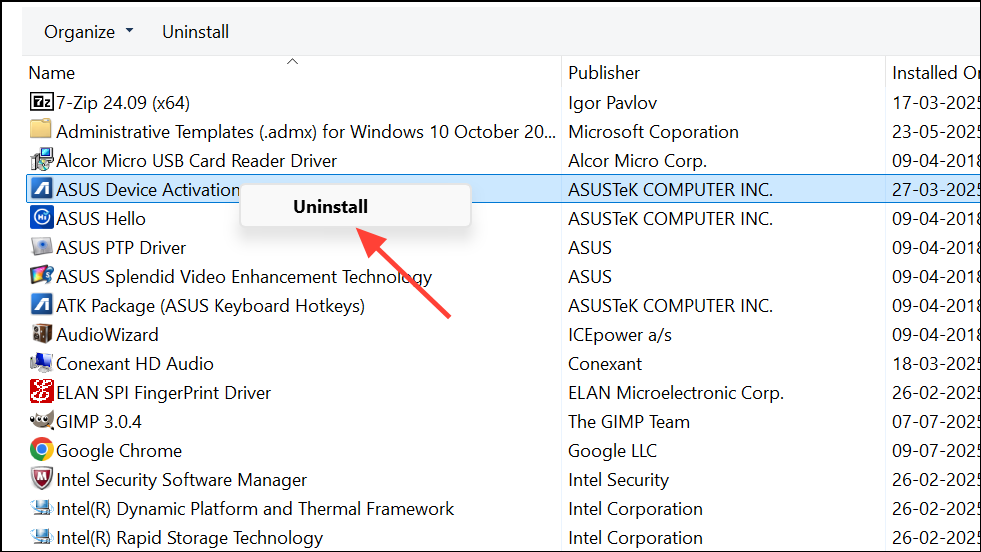
Step 3: If this method fails, consider using a reputable uninstaller like Geek Uninstaller to force removal of stubborn apps.
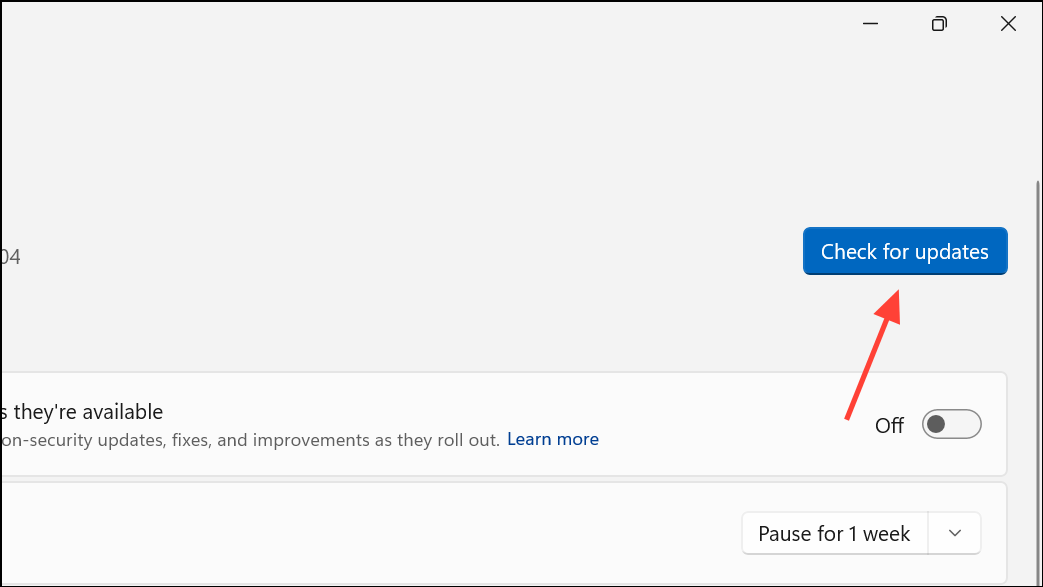
Check for Windows Updates and System File Issues
Corrupted system files or problematic updates can trigger shutdown or installation failures. Addressing these issues stabilizes your system.
Step 1: Open Settings > Windows Update and install any pending updates.
Step 2: To repair system files, open Command Prompt as administrator and run:
sfc /scannow
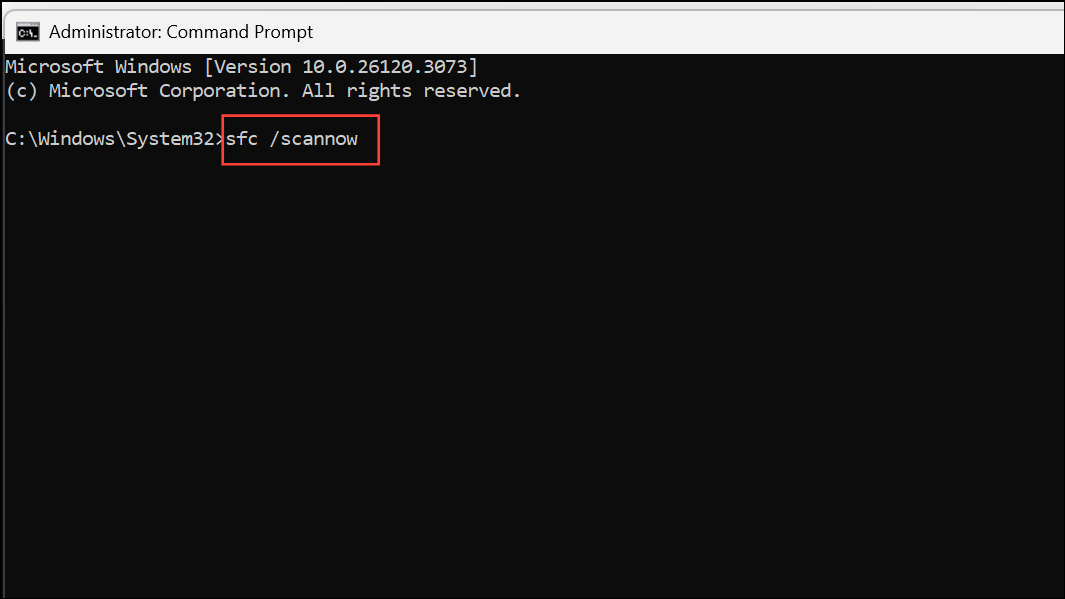
Wait for the scan to finish and follow any on-screen instructions.
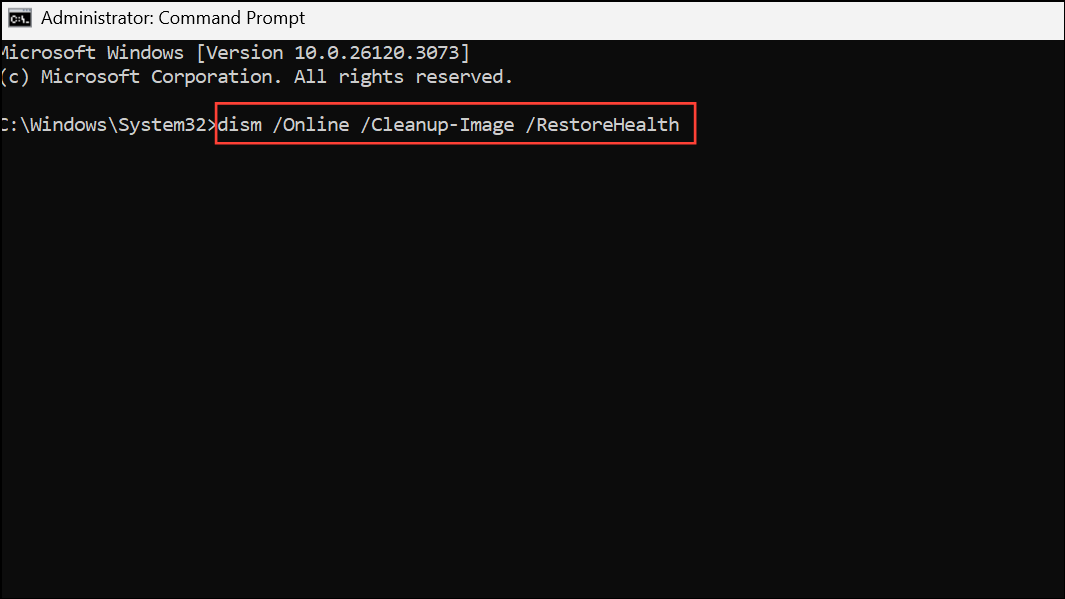
Step 3: If issues persist, run the following DISM commands one by one:
DISM.exe /Online /Cleanup-image /Scanhealth
DISM.exe /Online /Cleanup-image /Restorehealth
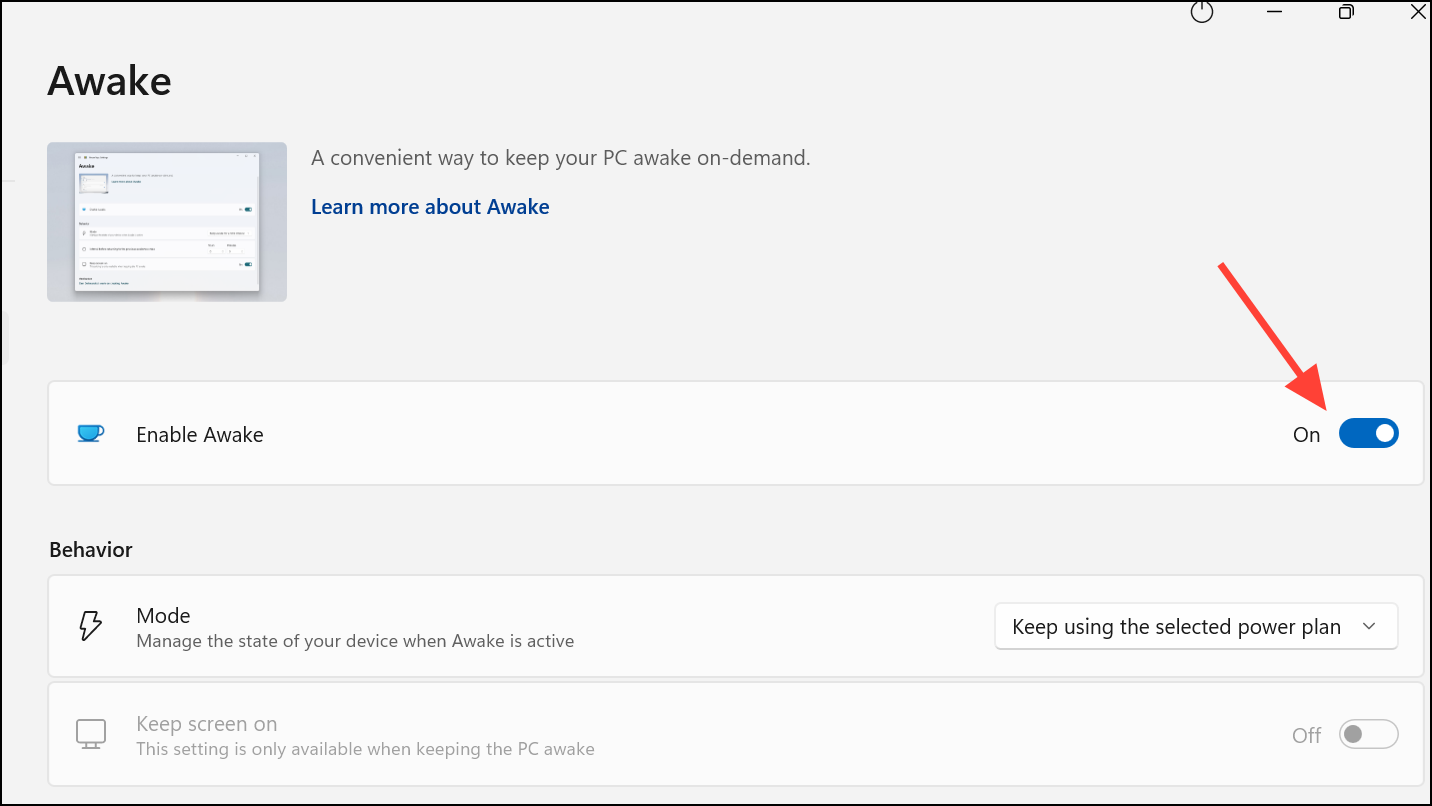
Use Utilities to Keep Windows Awake During Installations
Utilities like Microsoft PowerToys Awake or third-party tools such as Caffeine simulate activity to prevent your PC from sleeping or shutting down during lengthy installations or removals.
Step 1: Download and install PowerToys from the official Microsoft site.
Step 2: Open PowerToys and enable the Awake utility. Choose to keep your PC awake indefinitely or for a set duration.
Step 3: Alternatively, install lightweight tools like Caffeine, which simulate key presses to keep the system active.
By adjusting shutdown behavior, managing power settings, and troubleshooting app conflicts, you can stop Windows 11 from shutting down during installations or uninstallations. Regular system maintenance and careful monitoring of third-party apps further reduce interruptions for a smoother experience.