
In-Meeting chat in Zoom is very handy. Whether you want to set down meeting agendas, or exchange information with meeting participants, you can do it with meeting chats. You can talk to all the meeting participants as a group or have private chats with individuals, given, of course, there are no restrictions in place by the meeting host.
But In-Meeting chats on zoom have a very interesting feature. Zoom does not save meeting chats in the app like normal chats. Maybe it can be attributed to an enhanced security attempt, as the exchange of sensitive information can happen during meetings. No matter the reason, the bottom line is that the meeting chats are not saved in Zoom automatically.
You might have noticed the word ‘automatically’ sneak in earlier. It means exactly what you think it means. You can save the in-meeting chats on Zoom manually.
Some Things to Know Before Diving In
In-Meeting chats can be saved manually by any meeting participants unless the meeting host has not disabled the ability to save the chat for participants. And only those chats are saved that you can see. It means you can only save the private chats you were a part of and the group chat that involved everyone in the meeting. It also means you don’t have to worry about your private chats.
The in-meeting chat can be saved locally on your computer or uploaded to the cloud. And you can also enable auto-saving for in-meeting chats.
Note: The option for saving the chat to the cloud is only available for licensed users.
Now, that you’re all caught up, let’s dive in!
How to Manually Save a Zoom Meeting Chat
To save the meeting chat in Zoom, click on the ‘Chat’ icon on the call toolbar to open the chat screen. The chat window will appear on the right of your screen and the meeting chat will be displayed.
Go to the bottom of the chat window, and click on the ‘More’ option (three dots) on the right side of the area housing the ‘To’ option.
In the context menu that appears, select ‘Save Chat’.
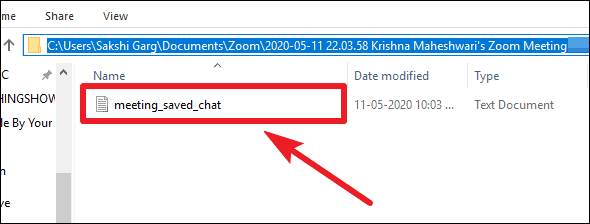
The chat is saved as a text file locally to your computer by default. The default location for the file is C:\Users\[Username}\Documents\Zoom\ [Folder with Meeting Name, Date and Time]
How to Save a Zoom Meeting Chat in the Cloud
Manually saving the meeting chat always saves it on your computer. But if you don’t want to save the chat locally on the computer, there is always the option of saving it to the Zoom cloud.
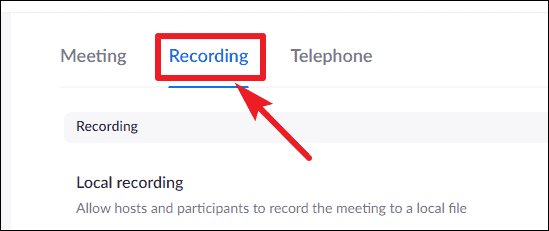
If you have a Pro Zoom account, open the Zoom Web Portal and log in to your account. Click on ‘Settings’ from the navigation menu on the left.
In the settings, go to the ‘Recording’ tab.
Scroll down and under the ‘Cloud Recording’ section, check the option for ‘Save chat messages from the meeting/webinar’ to enable it. The changes will save automatically.

When this option is enabled, you can save the chat to the Zoom Cloud. The In-Meeting Chat saved to the cloud includes messages sent to everyone when you were cloud recording.
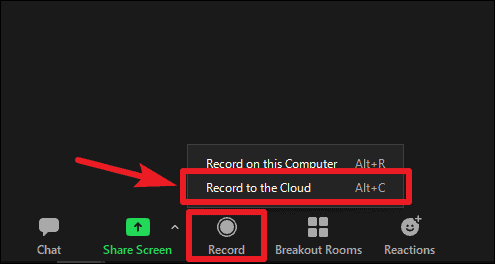
To start cloud recording in the Zoom meeting, click on the ‘Record’ button on the call toolbar, and select ‘Record to the Cloud’ from the menu.
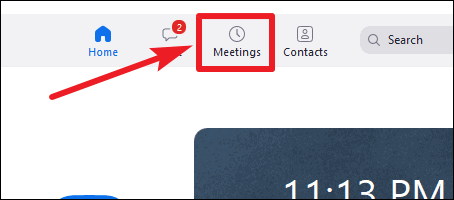
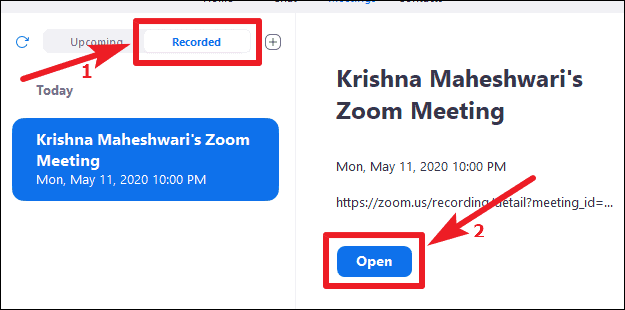
After you stop the recording, it takes a few seconds to process after which it becomes available to you. To access the chat saved to the cloud, go to the ‘Meetings’ tab on the Zoom Desktop Client.
The upcoming meetings will open. Switch to ‘Recorded’ meetings instead. All your recorded meetings will appear. Go to the meeting you want to access the chat for and click on the ‘Open’ button.
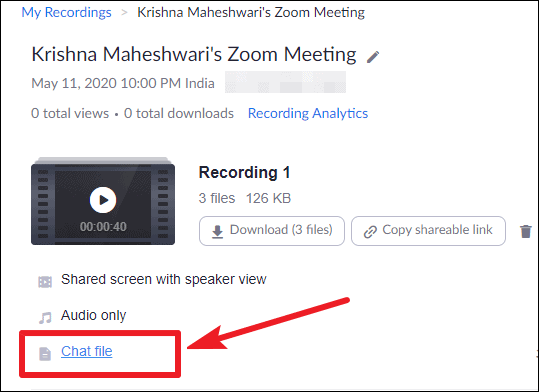
The Zoom Web Portal will open and all the meeting recording files will appear there. Click on ‘Chat file’ to open the saved chat.
How to Automatically Save Zoom Meeting Chats
If you frequently save the meeting chats, you can also enable auto-saving for it so you don’t have to go through the hassle of saving the chats manually every time. Open the Zoom Web Portal and go to ‘Settings’ from the navigation menu.
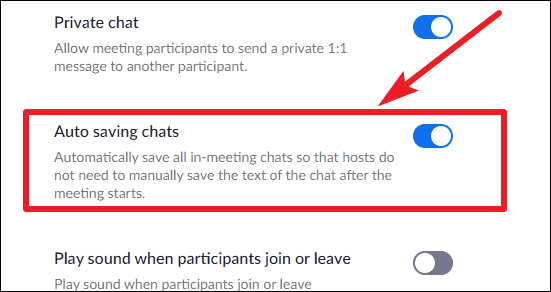
Further, click on ‘In Meeting (Basic)’ on the sub-navigation menu on the Settings page.

Then, enable the toggle for ‘Auto saving chats’. When this option is enabled, the meeting chats will be saved automatically on your computer.
If you want to save the chats every time to the Zoom cloud instead, you will need to enable auto-recording for the Cloud.
In the Settings on the Zoom Web Portal, go to the ‘Recording’ tab. Scroll down for a bit in the recording setting to find the setting for ‘Automatic Recording’. Then, turn on the toggle for it. Select the ‘Record in the Cloud’ option and click on ‘Save’ to change your settings.
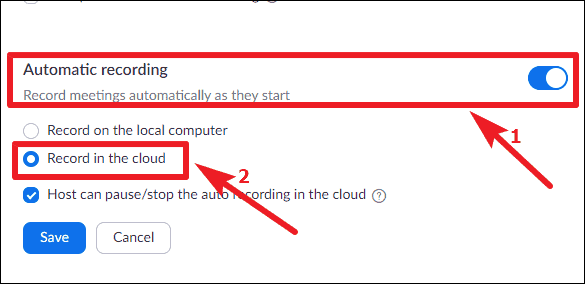
Now all your meetings will be recorded in the cloud along with the meeting chat.
The in-meeting chat in zoom has a quirky feature that leads to it not being saved automatically in your app. But it does provide provisions to configure your account settings so you can save the chat either to the Zoom cloud or your computer as a text file or both if you wish.


