Anchor is Spotify’s very own podcast platform. It is a super simplified space where anyone with a voice can make a podcast. Anchor is an all-in-one space to kickstart your podcasting journey.
The first step in this route to making your own podcast is creating the identity of your podcast. This stage is all about getting the name, description, cover image, URL, overall visual appeal, and information of the podcast together.
In this guide, we’ll walk you through the process of naming your podcast, adding a description, adding a cover image, and so much more. Read on!
Setting Up an Anchor Podcast
Anchor provides a user-friendly experience while setting up a podcast and using it. There are a couple of steps to follow while setting up your podcast. We’ll cover all the steps to creating your podcast’s identity along with some tried and tested methods to save time.
First, make sure you have downloaded Anchor on your mobile device for quick access. Currently, Anchor does not have a desktop application. You could use the platform’s web client if you prefer a desktop view.
Podcast Settings
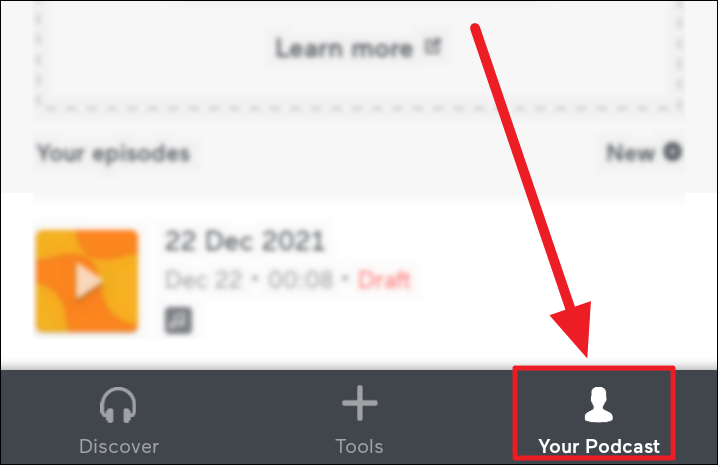
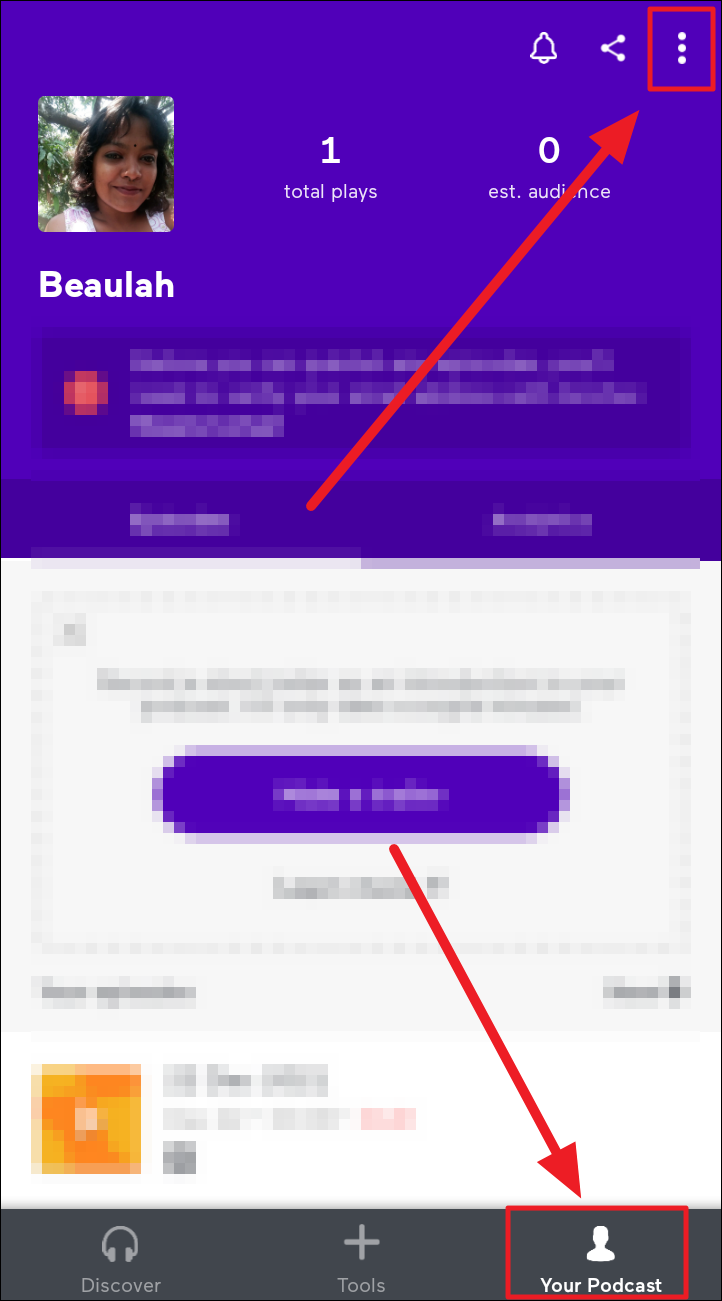
To customize your podcast, you must first open ‘Podcast Settings’. Launch Anchor on your phone and tap the ‘Your Podcast’ button to the bottom right corner of the screen.
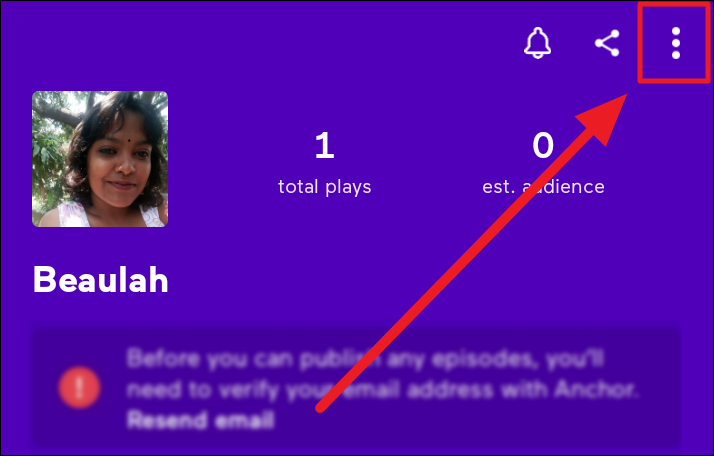
Then, tap the ellipsis icon (three vertical dots) to the top right corner.
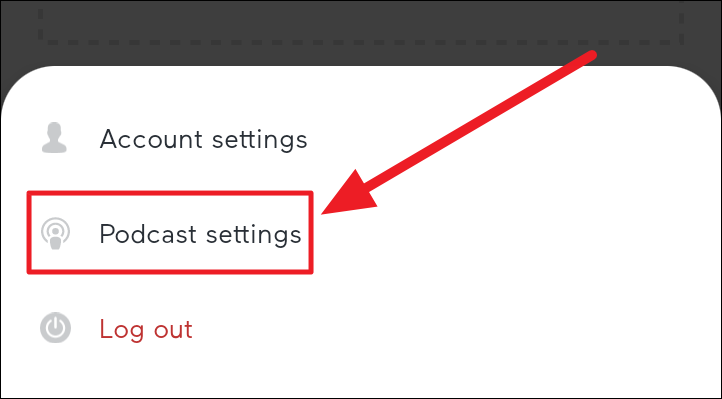
You will see a short pop-up menu at the bottom of the screen. Select ‘Podcast Settings’ from this menu.
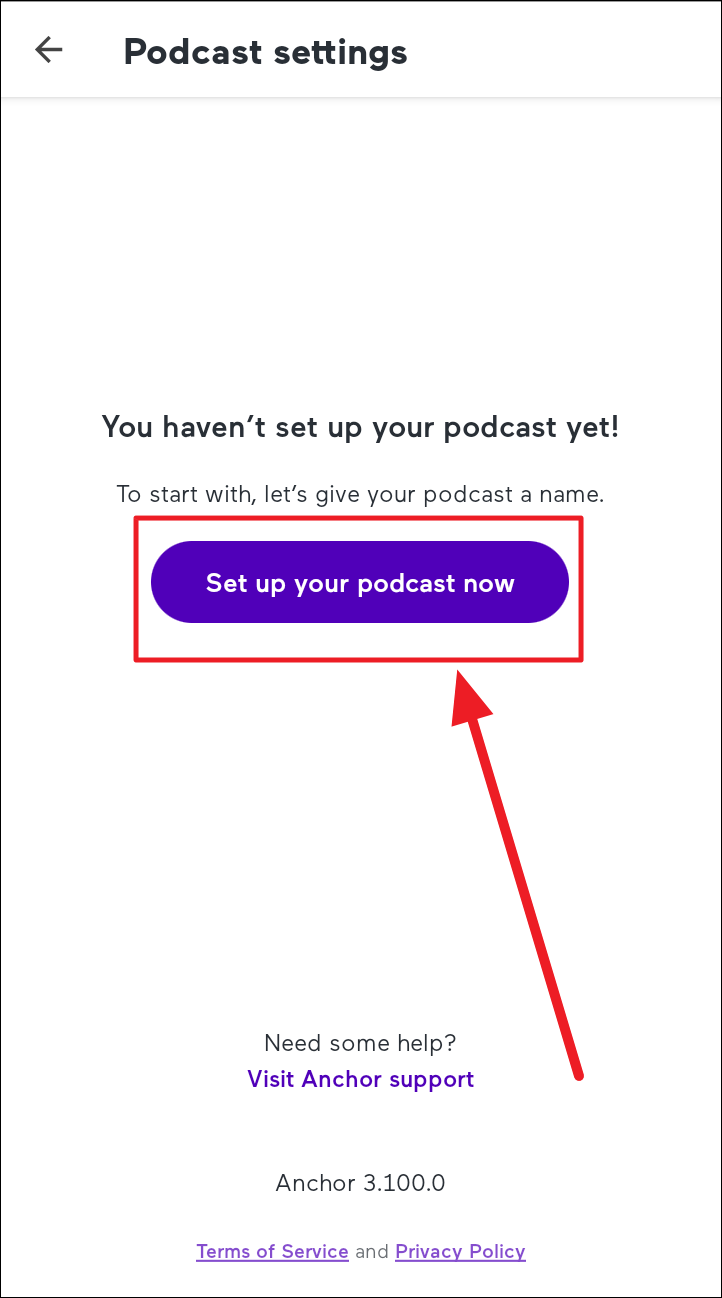
You’re now on the ‘Podcast Settings’ screen. Tap the ‘Set up your podcast now’ button to proceed.
Choosing Your Podcast Name and URL
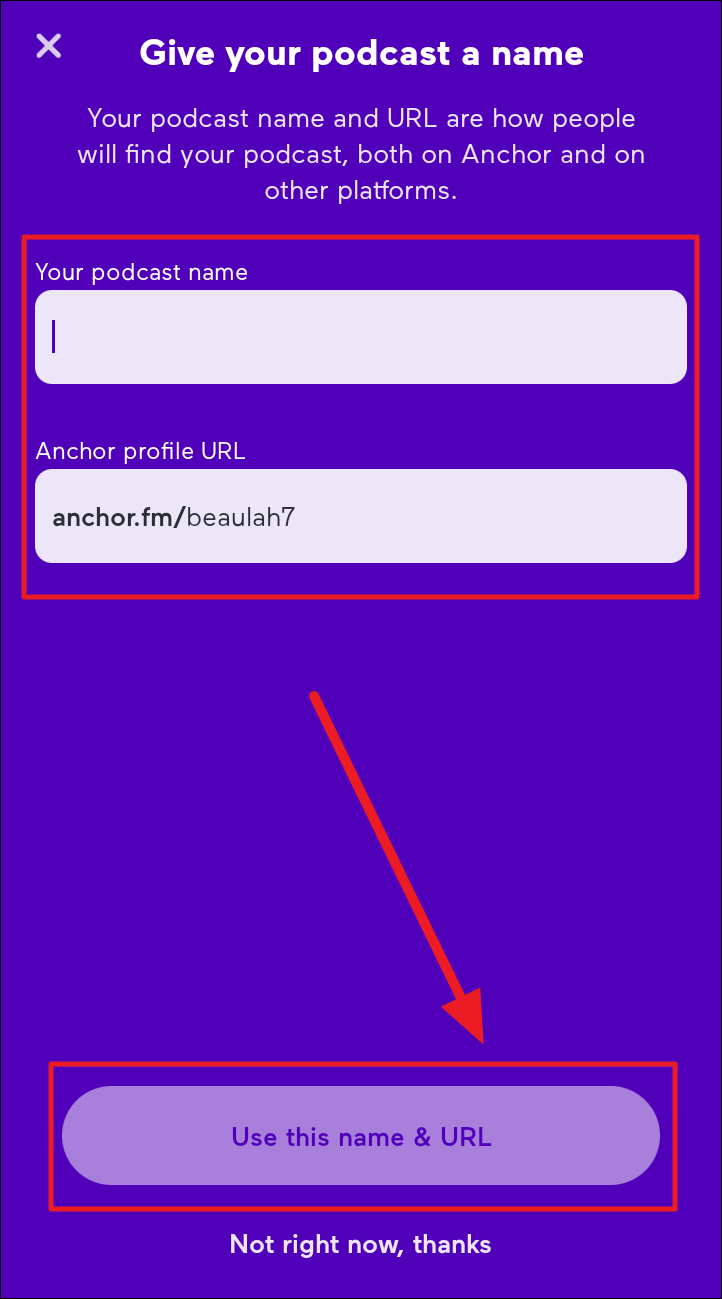
The first step to creating an identity for your podcast is giving it a name and a suitable profile URL (Uniform Resource Locator). Type in a name of your choice in the ‘Your podcast name’ text field. Then, enter a name/word/phrase in the ‘Anchor profile URL’ box following the pre-set part of the URL — anchor.fm/.
Anchor usually suggests an available URL name that you can keep or change. With each change, you’ll receive ‘Taken’ or ‘Available’ prompts below this box. Customize and set your URL accordingly. Once done, hit the ‘Use this name and URL’ button at the bottom.
Describing Your Podcast
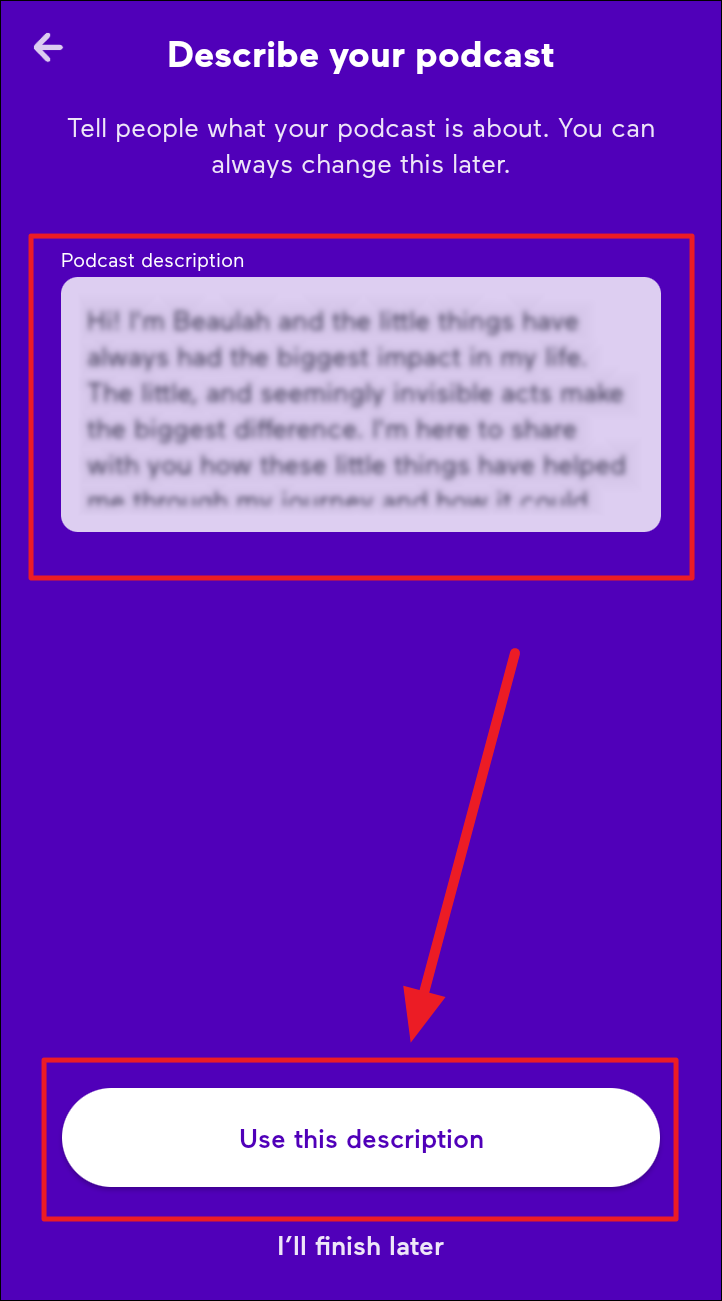
Next is the podcast description screen. Here, you must write an informative bit about your podcast – preferably including a USP. A podcast’s description is crucial. Make sure you write the aptest information about your podcast in the ‘Podcast description’ box.
When you’re done, tap the ‘Use this description’ button at the bottom of the screen.
Cover Image
Another important part of your podcast’s identity is the cover image. The cover art will further help identify your podcast or brand. It’s advisable to have a relevant and uniform cover image for your podcast. There are three options to choose your cover image on Anchor – ‘Search for a photo’, ‘Upload an image’, and ‘Choose one for me’.
Choose the source of the image on the ‘Choose your cover art’ screen based on your choice of the image source.
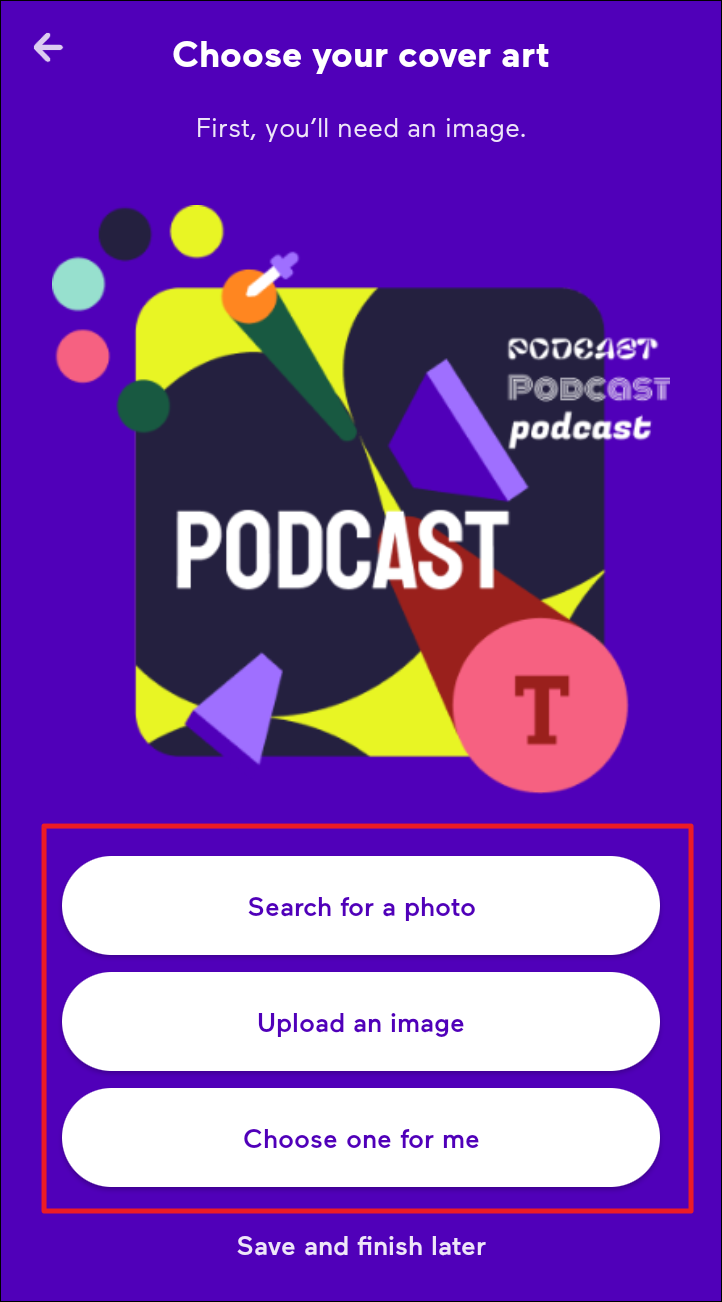
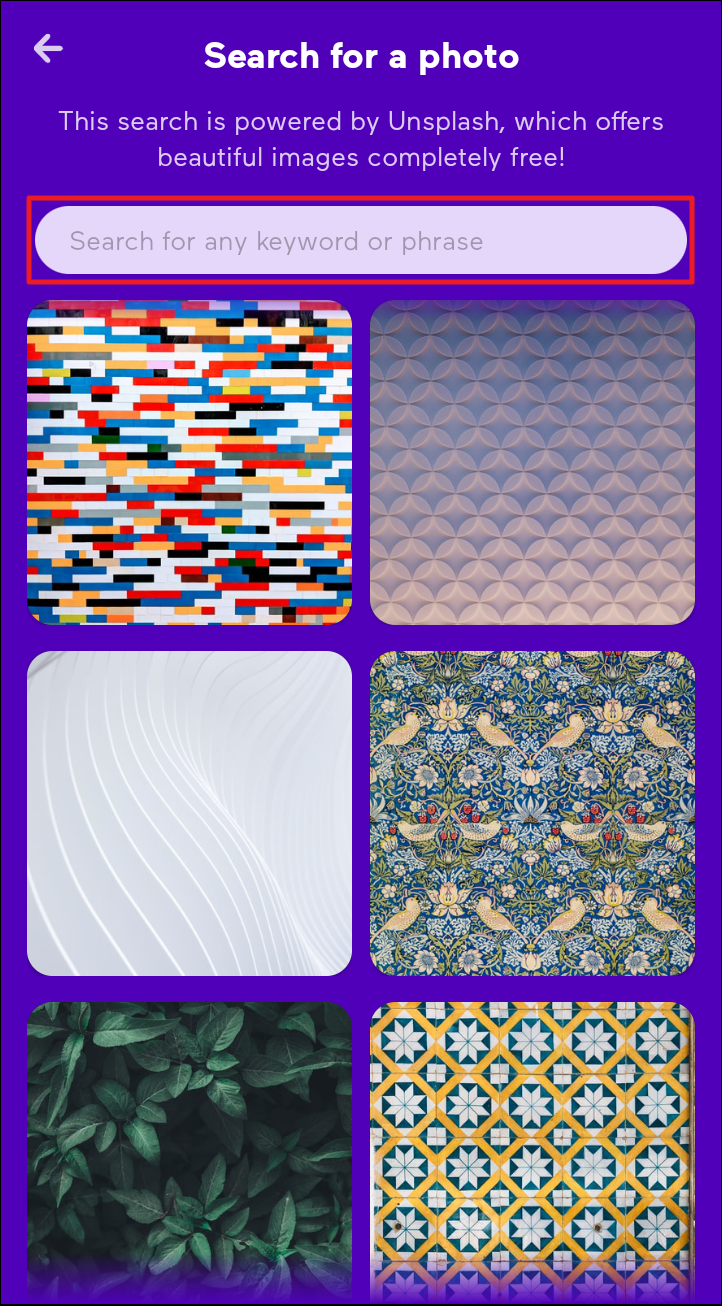
Search for a photo: This option opens Anchor’s own gallery of Unsplash powered images that are free to use. Scroll through and tap to choose your favorite image. You can also insert a keyboard or phrase related to your podcast or something you’d like to see in your cover art, in the ‘Search for any keyword or phase’ textbox.
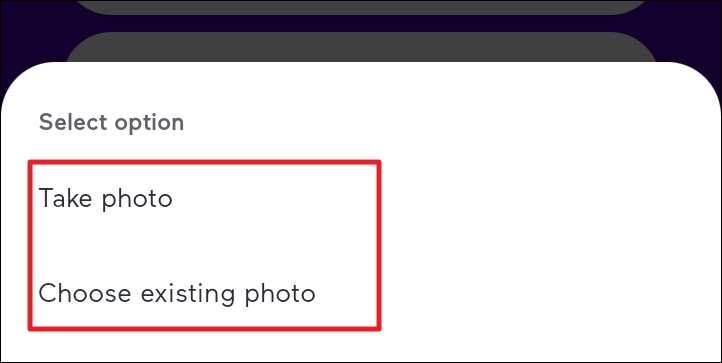
Upload an image: This option allows you to take a photo and directly use it as the cover image of your podcast or upload an image of your choice from your phone’s camera roll and gallery. Choose ‘Take photo’ or ‘Choose existing photo’ respectively to apply the image.
Choose one for me: If you want Anchor to be the better judge of your cover image, tap this option, and Anchor would randomize its Unsplash gallery and paste an image for your cover art. To reshuffle, simply hit the back button on the screen and reselect the ‘Choose one for me’ option on the ‘Choose your cover art’ screen.
In all methods, you can zoom and crop the chosen cover image. Once you’ve found the perfect dimension for your cover art, hit ‘Continue’.

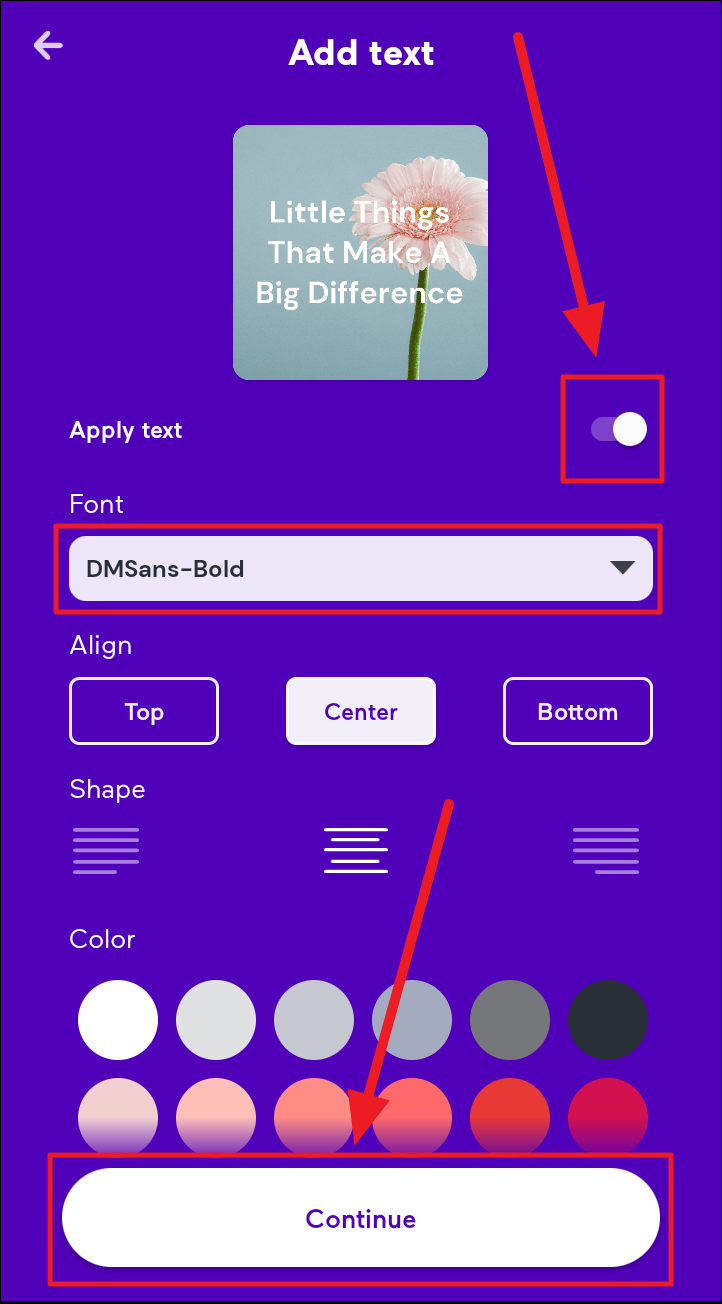
Adding Text to Your Cover Image
The next step is to textualize your cover image. Textualizing your cover image is optional and you can choose to add or remove text on the next ‘Add text’ screen. Tap the toggle next to ‘Apply text’ to remove text and all text-related customization options. This toggle is enabled by default. If you want text on your cover art, go ahead and customize the text.
Tap the ‘Font’ drop-down box to choose your font. Select your alignment – ‘Top’, ‘Center’, and ‘Bottom’, and the shape of your text – right-aligned, justified, and left-aligned. You can also choose the color of your text from a limited set of colors.
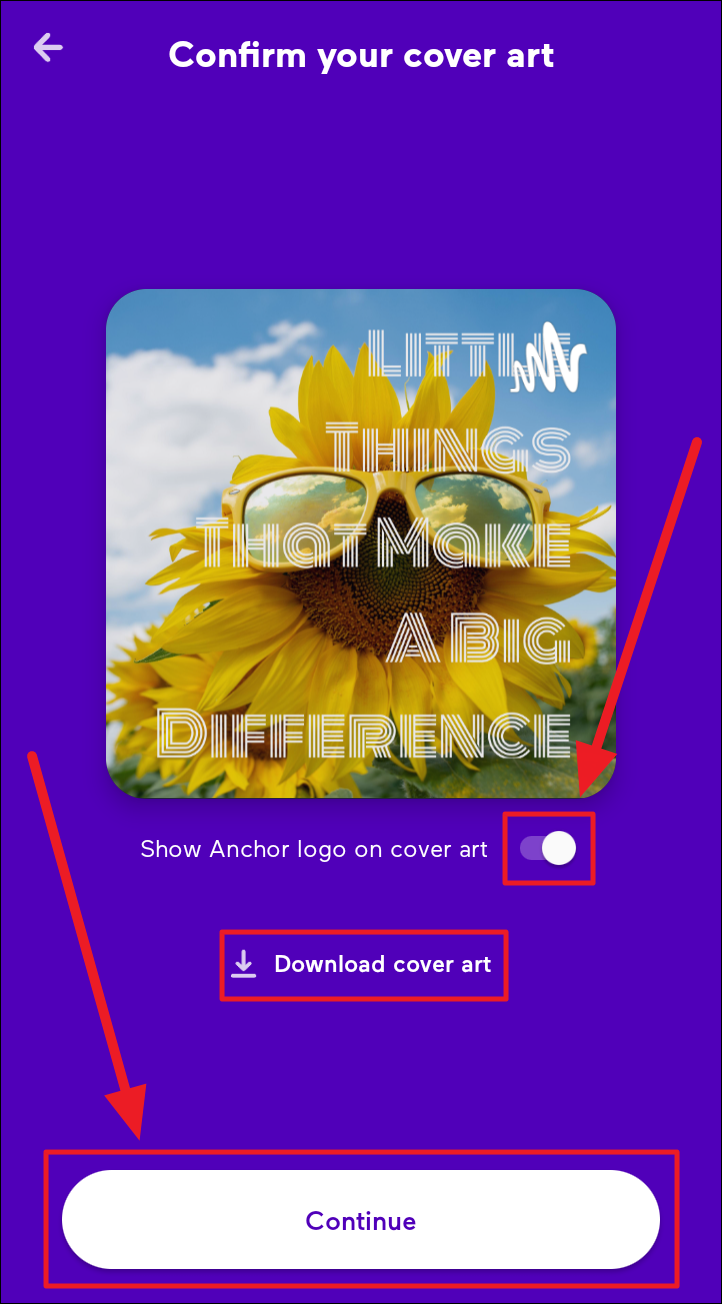
Confirming Your Cover Art
The final step in the cover image section is finalizing your cover image! You will see how your cover art looks with the chosen image and text (if any). Anchor’s logo will also be visible on the cover image. You can keep or remove it by tapping the toggle next to ‘Show Anchor logo on cover art’. It will be enabled (moved to the right) by default. To disable it (remove the logo) the toggle must be moved to the left.
If you want a copy of your cover image, hit the ‘Download cover art’ button below the cover image and Anchor logo customization. Once done, click ‘Continue’.
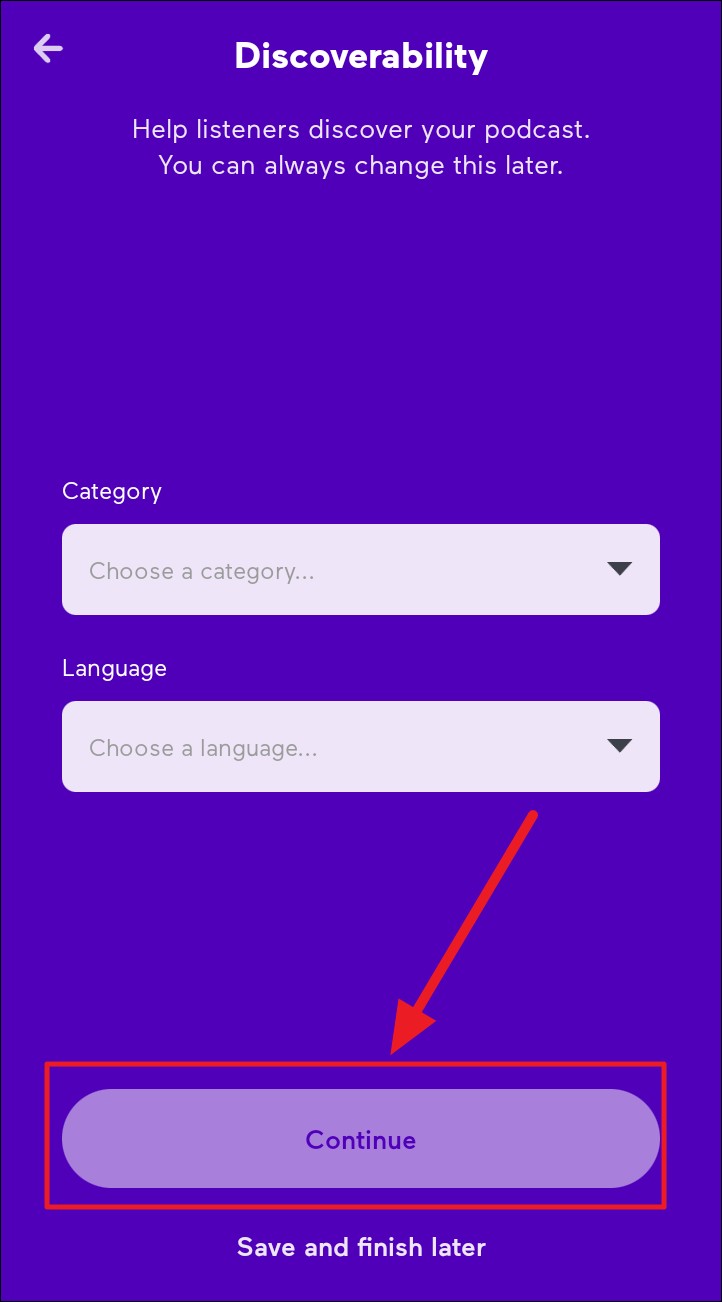
Discoverability
You must next choose the category and language of your podcast. Tap the respective drop-down boxes (category and language) to choose your podcast category and language. This helps users quickly find your podcast based on their query and language. Hit ‘Continue’ once done.
Reviewing Your Podcast’s Identity
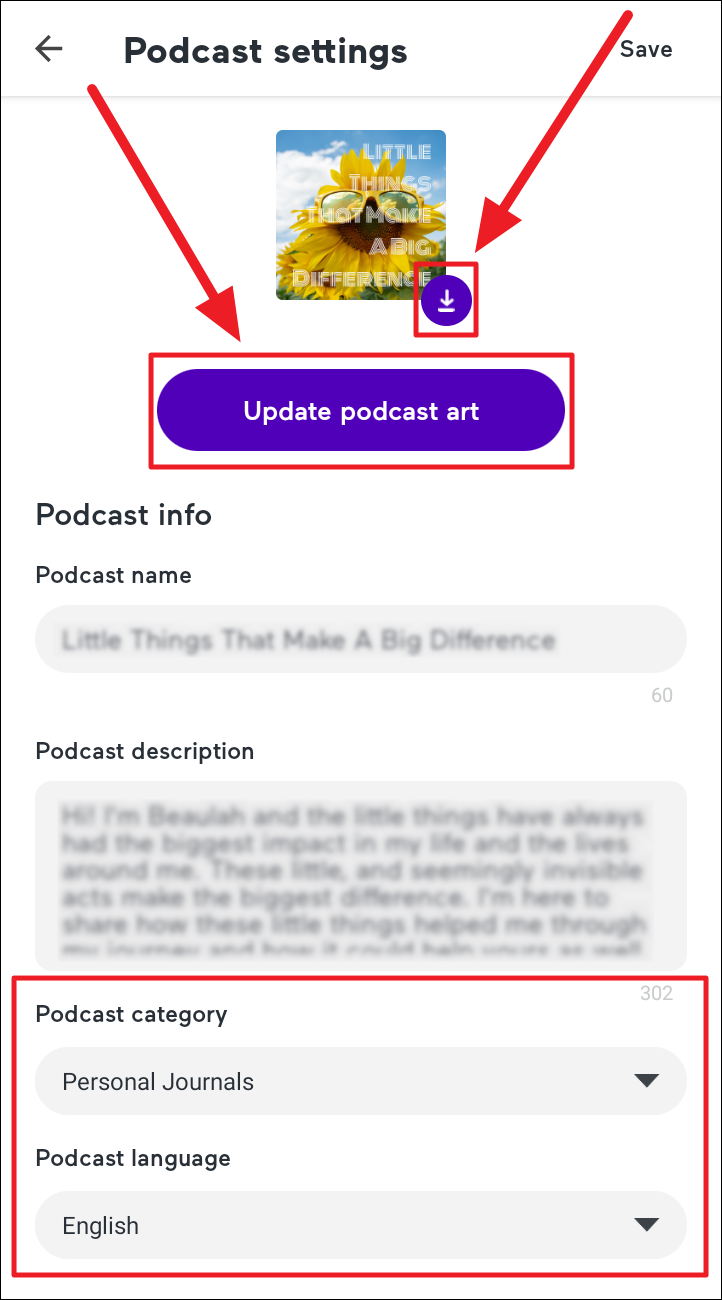
That was about customizing your podcast’s identity. Now, review all the elements on the face of your podcast. You will direct to the initial ‘Podcast settings’ screen, but with complete information or as much as you have provided.
On this screen, you can edit your podcast art by tapping the ‘Update podcast art’ button below the current cover art. You could also hit the ‘Download’ button to the bottom right of the cover image to download the cover art.
To edit your podcast name or description, simply tap the respective text fields and start editing. To change your podcast category or language tap the respective drop-down boxes and choose your option(s).
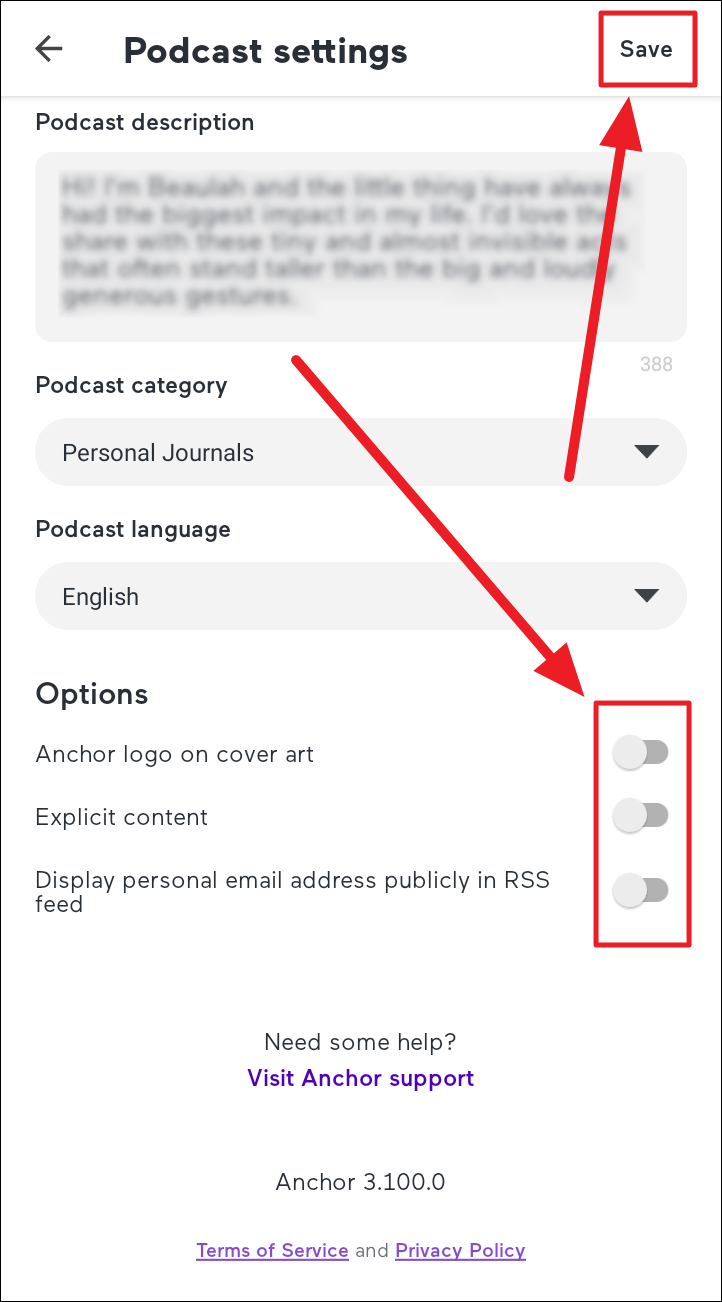
There are additional options on the ‘Podcast settings’ screen. Scroll to the end of the screen to find the ‘Options’ section. Here, you can make additional changes to your podcast’s information and privacy.
- Anchor logo on cover art – Option to show or hide anchor’s logo on your cover image. If you change your mind about your previous selection, tap the toggle here.
- Explicit content – If your podcast is explicit or has explicit content, in terms of the subject matter, language, anecdotes, and anything that would require a mature audience, you want to enable the toggle for explicit content.
- Display personal email address publicly in RSS feed – If you are comfortable with your personal email ID being publicly displayed on the RDF-Site Summary, tap the toggle to enable this setting. If not, leave it as it is – the setting is disabled by default.
Once you’re done making changes and/or simply reviewing your podcast settings, hit the ‘Save’ button to save your changes.
And that’s it! Your podcast’s identity is all set.
Editing Your Podcast Information
To make future edits to any of your podcast’s information, reach ‘Podcast settings’ in the same way as discussed at the start. Tap the respective aspect in ‘Podcast settings’ that need changes and make them in the same manner as discussed through the guide.
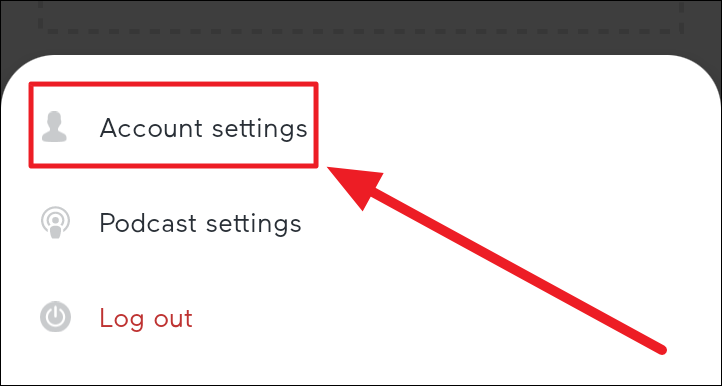
However, the procedure to change your Anchor profile URL is a little different. First, tap the ‘Your Podcast’ button and hit the ellipsis icon (three vertical dots) to the top right corner of the screen.
Now, select ‘Account settings’ in the short pop-up menu at the bottom of the screen.
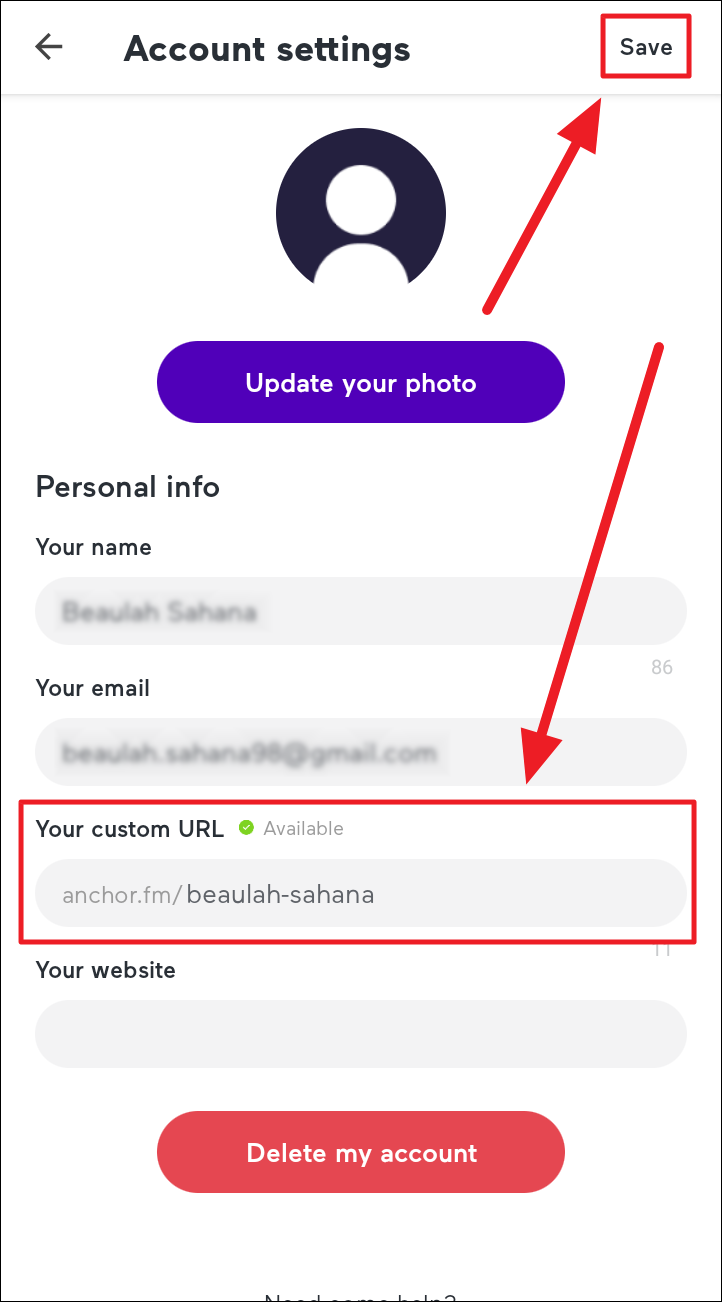
On the following ‘Account settings’ screen, you can customize your URL in the ‘Your custom URL’ textbox. You can also change your name, email ID, and add a website in the respective text boxes. When you’re done, hit the ‘Save’ button to the top right corner of the screen to save and apply your changes.
And that’s about personalizing your podcast and giving it a face of its own. We hope you found our guide useful in setting up your podcast and saving time while doing so!


