
Video is one of the most sought-after content types these days. Not only is it gaining traction in the content creation field, but it has also become a popular medium in organizations and corporates ever since the pandemic. Whether it’s about sharing training materials or meeting recordings, video content has become more relevant than ever. It’s even becoming the go-to content type for pot pitches and presentations.
No matter what your video creation needs are, Clipchamp is the perfect choice for you. Especially if you’re not a professional video creator, you need a beginner-friendly software. Clipchamp offers that ease of use with its incredibly intuitive software.
What is Clipchamp Video Editor?
Clipchamp is an in-browser video editing software. But with the simplicity of the web app, it also brings the full power of your PC to the software with GPU (graphics processor unit) acceleration. So, you get all the video editing capabilities even without needing an app. And you can use it on Windows as well as Mac systems.
It has a template-driven user experience that’s made for everyone and not just professional video creators. It offers a rich library of filters, styles, transitions, and stock media for video creation. The editor’s multi-track audio and video composting also give users more control over their video editing.
There’s also an app you can download from the Microsoft Store if you prefer a desktop app over a web app. There’s even a mobile app so whether you’re working from your desktop or mobile, you can edit and create videos at any time with Clipchamp.
Clipchamp has also been recently acquired by Microsoft. So, it’s all going to get even better with more options, according to Microsoft.
You can also make teams on Clipchamps to collaborate with others in real-time and edit and create videos together.
Is Clipchamp Free?
Clipchamp offers various plans for different types of users. The basic features are free forever, but there are plans you could buy that offer more premium features.
Using the free basic version, you can create unlimited videos by using your audio, videos, and images. If you use any premium videos or audios from Clipchamps stock-media, you’d either have to upgrade your plan or the final video will have a watermark. But the export quality for finished videos is only SD (480p). The basic version also offers all basic editing tools, webcam recording, and screen recording.
Other plans are Creator plan ($9/mo), Business plan ($19/mo), and Business Platinum ($39/mo). As the price of the plan increases, so does the number of premium features you get access to. The video quality bumps from 480p to 70p to 1080p. There’s access to stock audio and videos. All these plans also offer cloud backup for your media to name a few.
Getting Started with Clipchamp
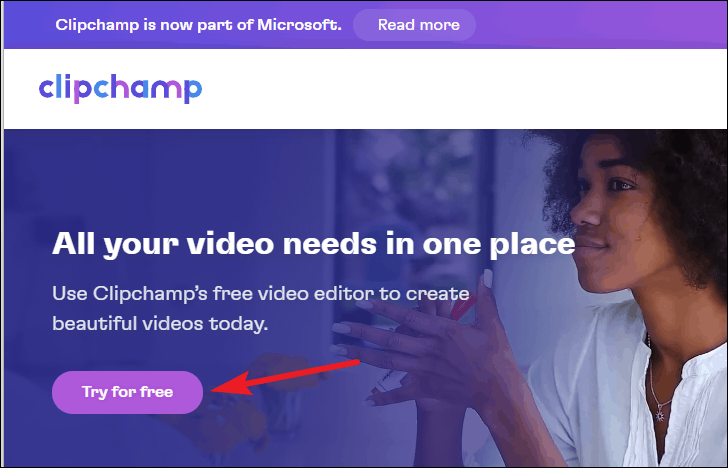
The easiest way to use Clipchamp is from your browser. Clipchamp is supported on both Google Chrome and Microsoft Edge browsers. On either of these browsers, go to clipchamp.com.
Then, click the ‘Try for Free’ button to get started with the basic, free version of Clipchamp.
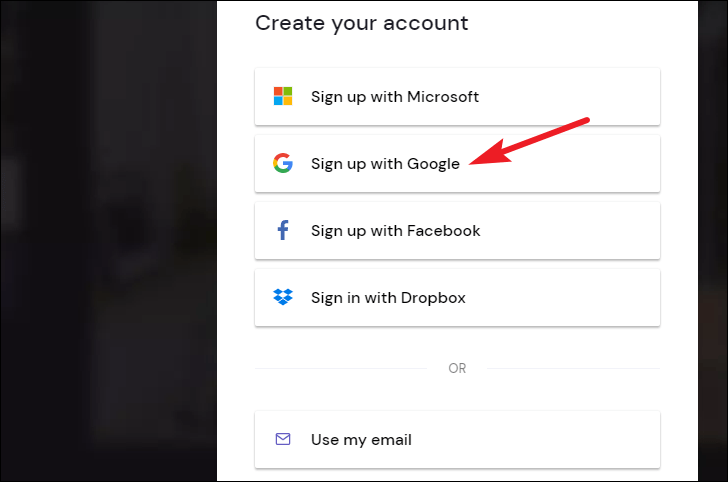
The signup screen will open. You can sign up with your Microsoft, Google, Facebook, or Dropbox account or you can create an account with your email address. Click the option you want to proceed with. Based on the option you choose, your next steps will vary. But they’ll include logging in to your account and giving any permissions if prompted.
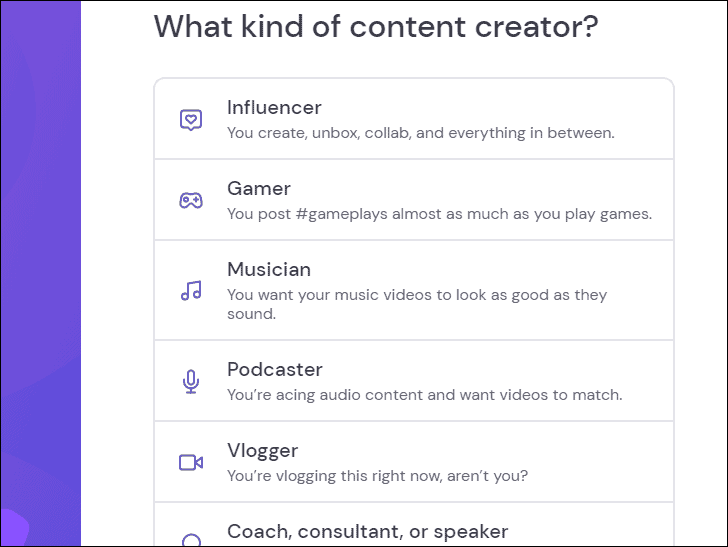
Once you’re logged in to your account, you’d have to set up your Clipchamp account. First, select what type of videos you’re going to be creating. Categories include Education, Content, Business, Corporate, or Personal videos.

Clipchamp will recommend templates based on the category you choose so you don’t have to filter through unnecessary content. Based on what you choose, you’d also need to select some further options. For example, if you choose ‘Content’, you’d need to choose what type of Content Creator you are.
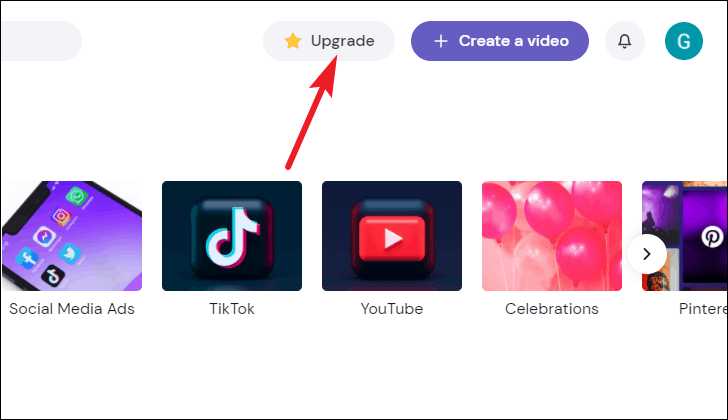
Once you’ve set up the profile, you’d reach the Clipchamp home page.
To upgrade to another plan, click the ‘Upgrade’ button from your Clipchamp home page and complete the payment process.
Navigating the Interface of the App
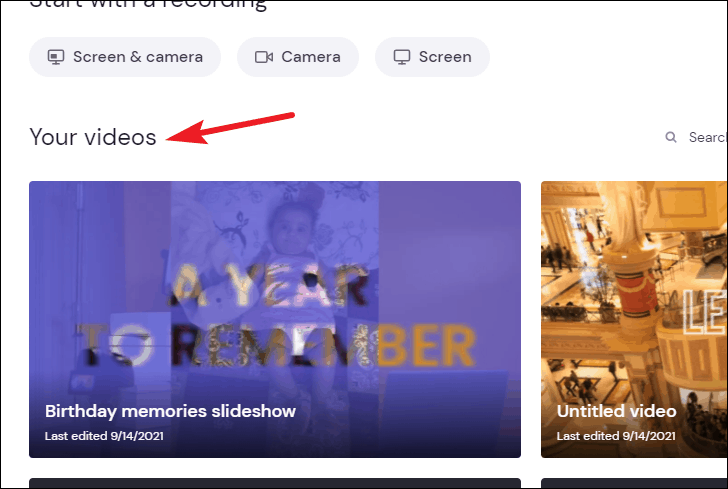
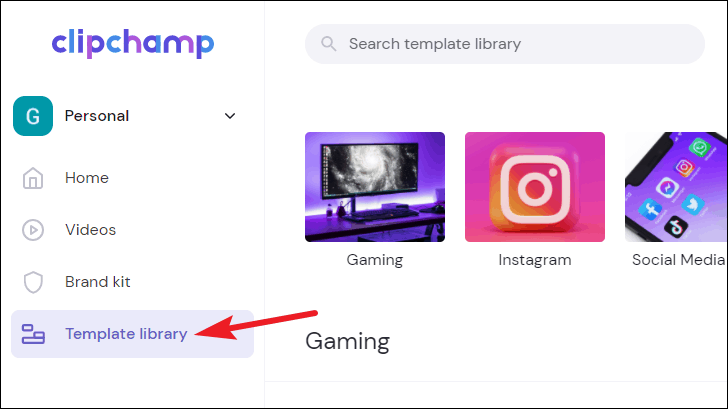
The home screen of the app has the navigation panel on the left. You can go to your Videos, Brand Kit (available only for Business and Business Platinum users), and the template library.
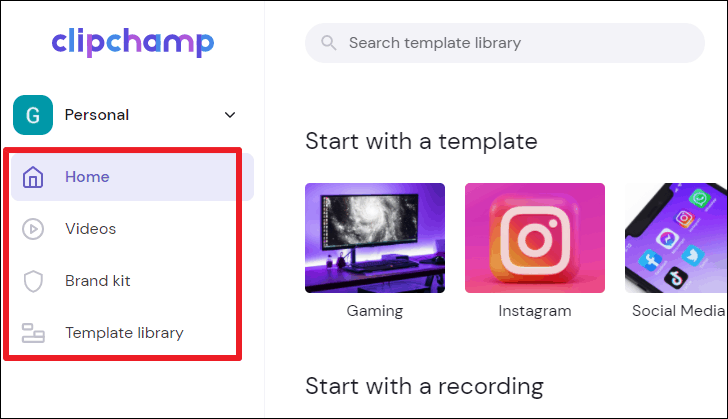
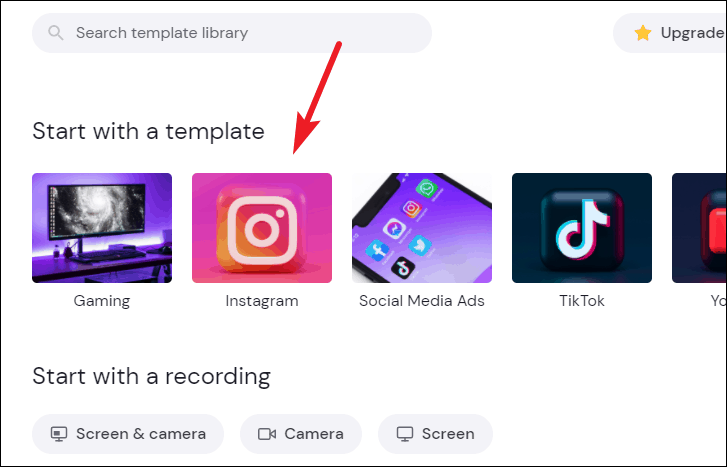
The home page also offers some templates to explore right there.
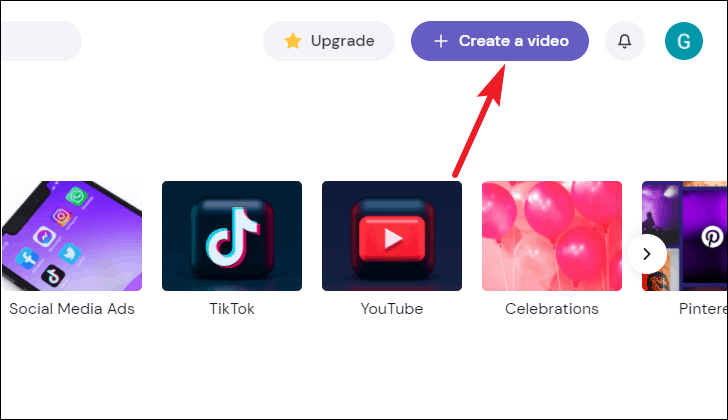
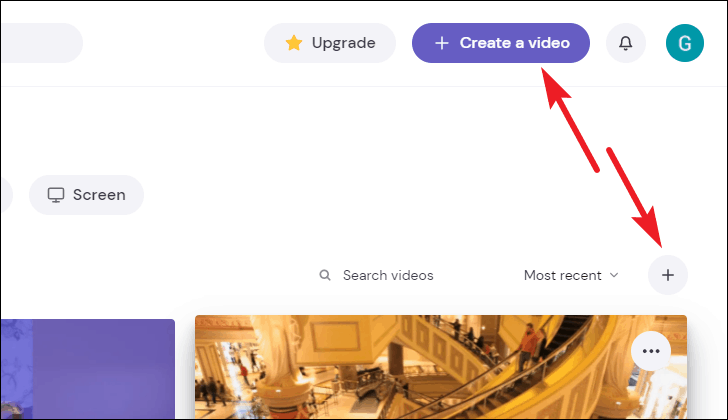
You can create a new video by clicking the ‘Create a Video’ button.
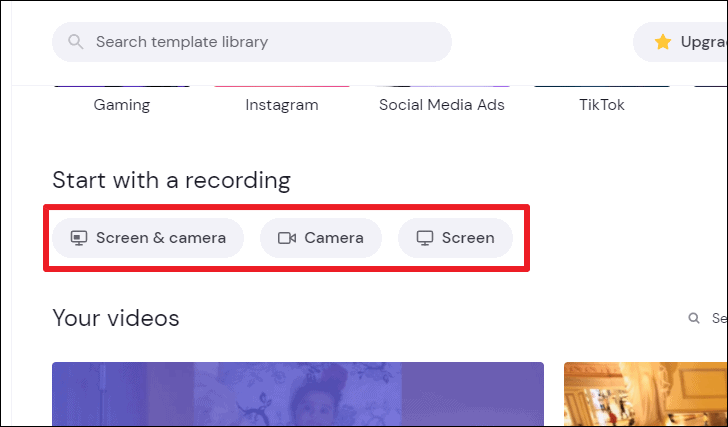
Or you can also start with a recording from either camera, your screen, or both screen and camera.
Your most recent videos will also appear right there on the home screen.
Creating a Video on Clipchamp
Once your account is created, you can go to the app directly by entering the link app.clipchamp.com. If you instead go to clipchamp.com, you’d have to log in with your account every time.
You can either use a template and create a video from there or start from scratch in Clipchamp.
To create a video from scratch, either click the ‘Create a Video’ button or the ‘+’ icon above videos. The editor will load where you can start creating the video.
Using a Template
To use a template, click the ‘Template library’ option from the navigation panel on the left.
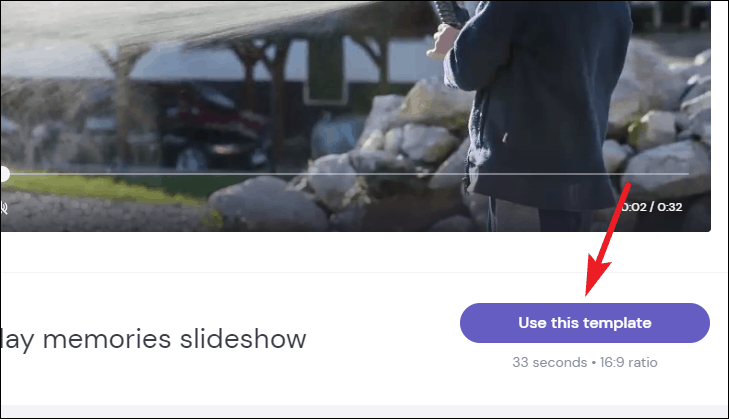
To preview a template before selecting it, hover over it. Then, click the template you want to use.
Another screen will appear where you can view the template fully and that has more details about the template like the duration and the aspect ratio. Click ‘Use this template’ and the template will load into the editor.
You can also add a template even if you’ve started a video from the scratch. Go to ‘Templates’ from the pane on the left.
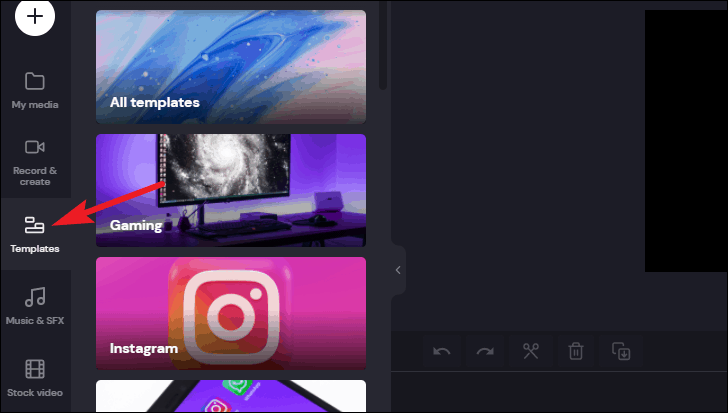
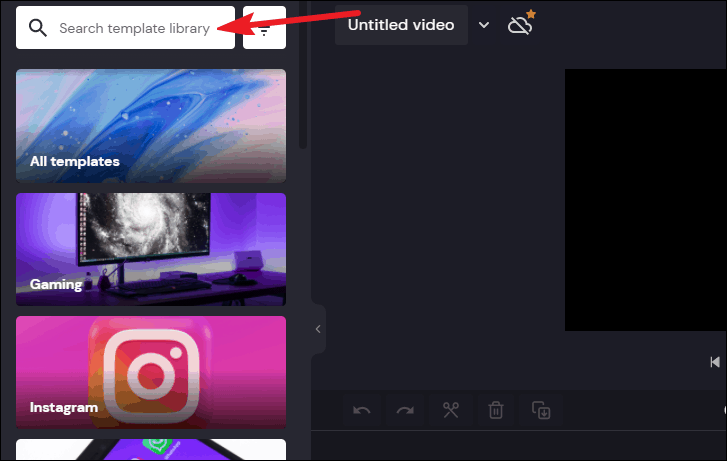
Then, you can either search for a template using the search option or go to one of the categories to browse them categorically. Then, click the template you want to use and it’ll load into the editor.
When you’re using a template, you’re not starting with a blank slate so it’s not as overwhelming to create a video, especially when first getting started with the software.
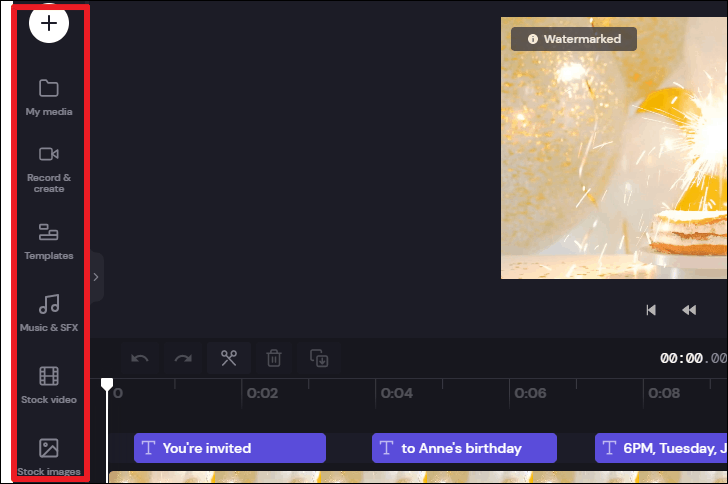
All the elements of the template will load into the timeline. You’ll also be able to see all media from the template in the ‘My Media’ tab on the left sidebar.

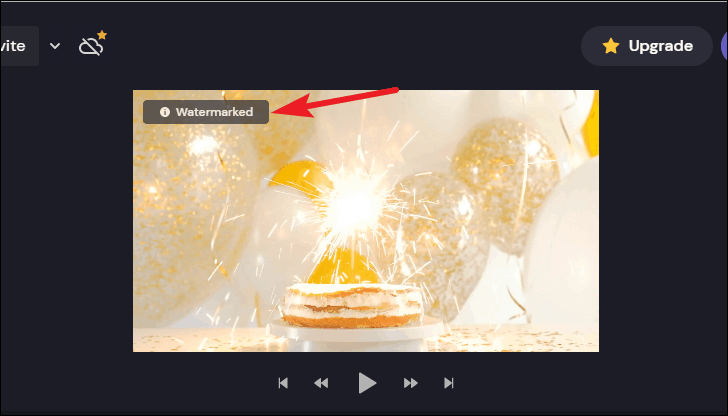
If the template has any premium media, you’ll see ‘Watermarked’ on the preview for the video. You can delete any of these elements and replace them with your own media. But if you keep them when you’re exporting the video, you’d either need to upgrade your plan or the final video will have a Clipchamp watermark.
Whether you’re using a template or starting from scratch, learning to navigate and use the editor will stay the same in both scenarios.
Navigating the Editor
The editor has the navigation pane on the left. You can go to different categories like your media, templates, stock audios, videos, and images, filters, and transitions, etc. from here.
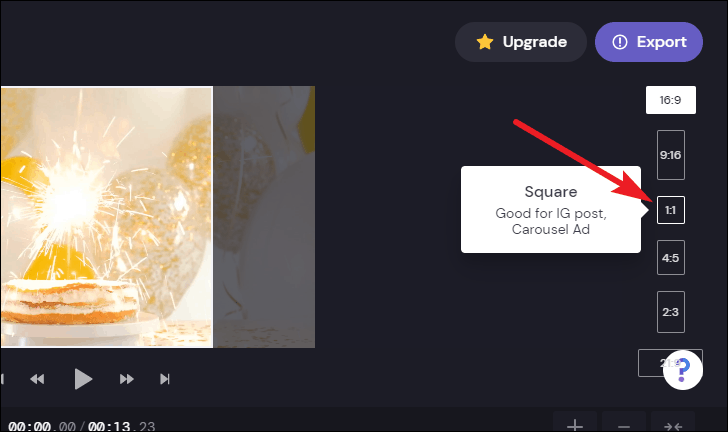
To change the size of the video, go to the ratio aspect option to the right of the video and click it.
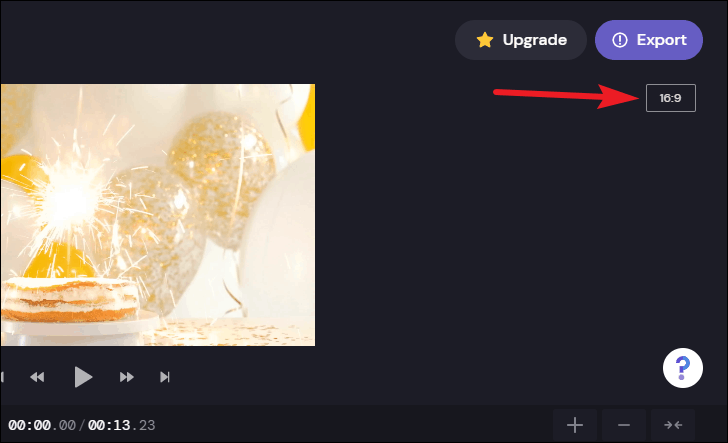
Then, select one of the ratios from the ones available. When you hover over a ratio, Clipchamp will also suggest which size is good for which platforms, and you can see the preview of the new ratio on the video.
Adding your own Media to the Video
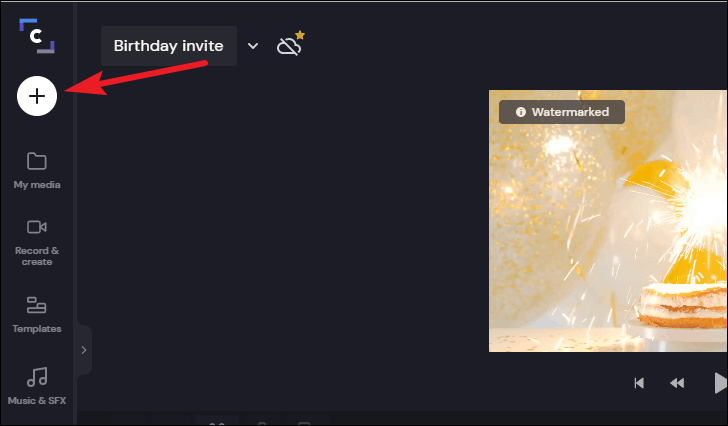
To add your own media, click the ‘+’ icon at the top of the left panel. You can add your media whether you’re making the video from scratch or using a template.
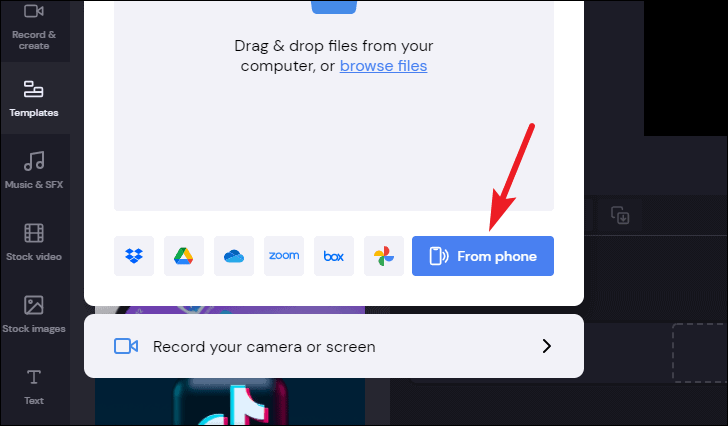
Then, either drag or drop the files from your computer or click ‘Browse files’ to upload them from the ‘Open’ dialog box.

Clipchamp supports a gamut of file types for videos, audio, and images. For videos, you can use MP4, MOV, WEBM, AVI, DIVX, FLV, 3GP, WMV, VOB, DCM, and MKV video files and it also supports a wide variety of video codecs as well. But some of these file types will convert before you can start using them.
These video file types don’t need to be converted so you can start using them almost immediately – .mp4 (MPEG-4), .mov (Quicktime Movie File), .webm.
You can use all types of audio files in Clipchamp as they’ll be converted automatically to a supported file format. But these file types will work directly – .mp3, .wav, .ogg
For images, you can only use these file types – .jpeg, .jpg, .png, .tiff, .bmp (windows bitmap), .gif
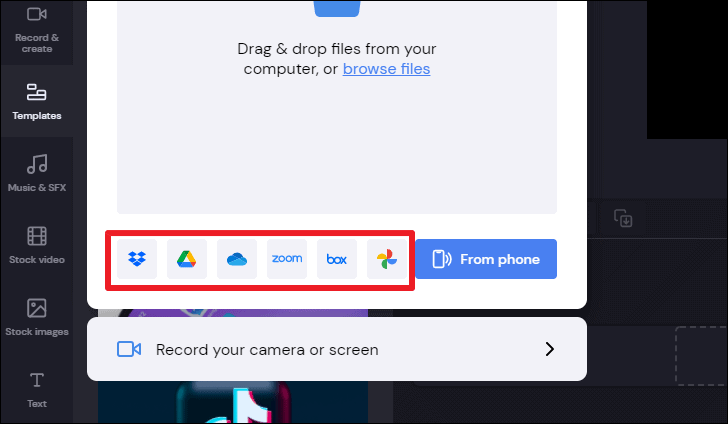
Clipchamp also lets you add media directly from Dropbox, Google Drive, Google Photos, OnDrive, Zoom, or Box. Select one of the options to upload the files. Then, provide access to the service so Clipchamp can access and upload the media from the selected service.
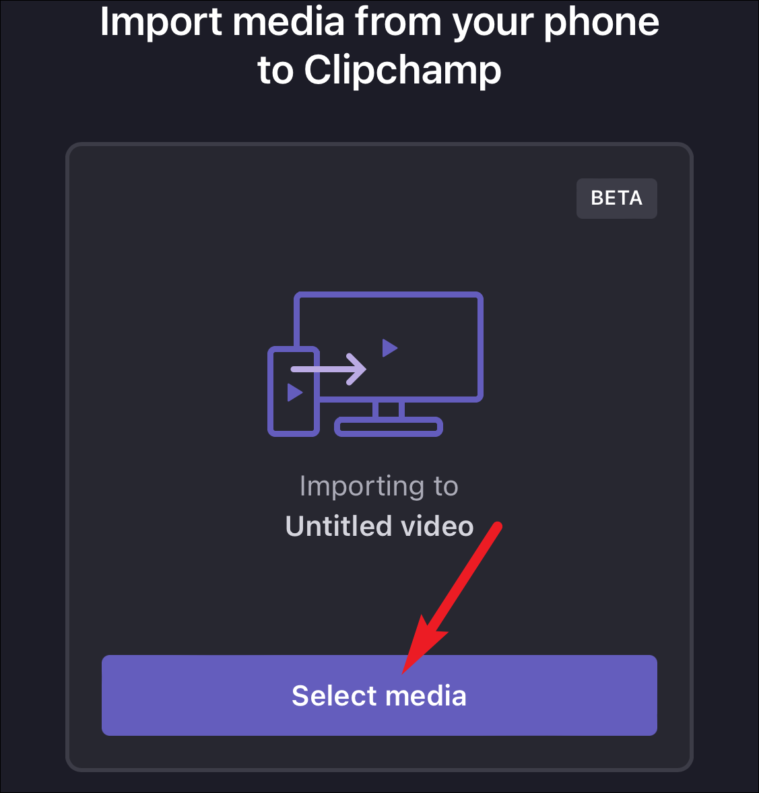
You can even select media directly from your phone with just a couple of clicks. Click the ‘From phone’ option.
Then, scan the QR code on your phone and open the website the QR code shows.
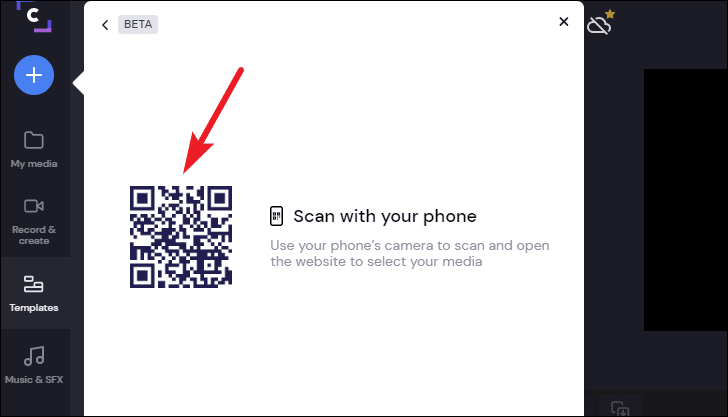
Upload the media to that website and keep the project open on your computer all the while.
The media will upload to your computer in real-time and you can even see the progress on your computer as it uploads from your phone.
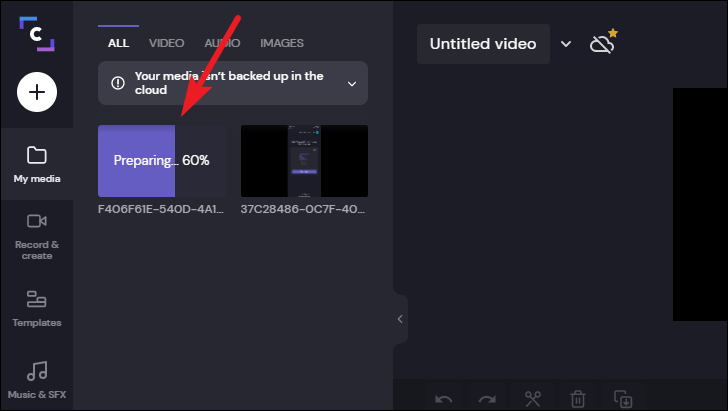
Any media you upload will be available in the ‘My Media’ folder in the left pane. If your plan doesn’t include cloud backup, your media will only be available on the device you’re working on.
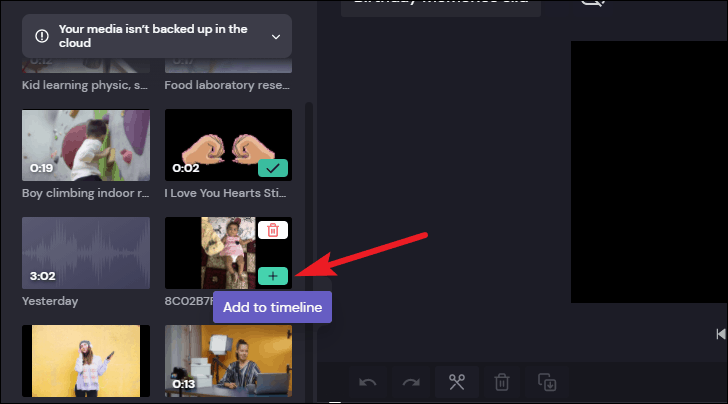
To add the media to your video, drag it onto the timeline at the bottom of the editor and drop it where you want to add it. If it’s the first element in your video, you can adjust its position later at any time.
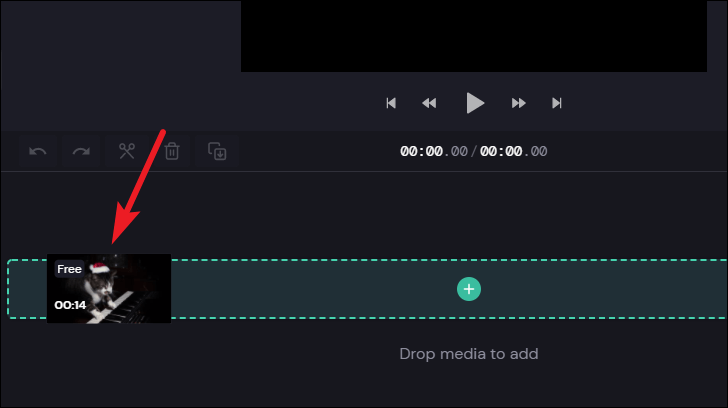
You can also click the ‘+’ icon from the media thumbnail to add it to the timeline.
Once you add either image/ video or audio, you’ll be able to see which section to drop the other type of media to.
Using Camera or Screen Recording
You can also record from your camera or your screen. Click the option to ‘Record your camera or screen’ button from the ‘Add media’ menu.
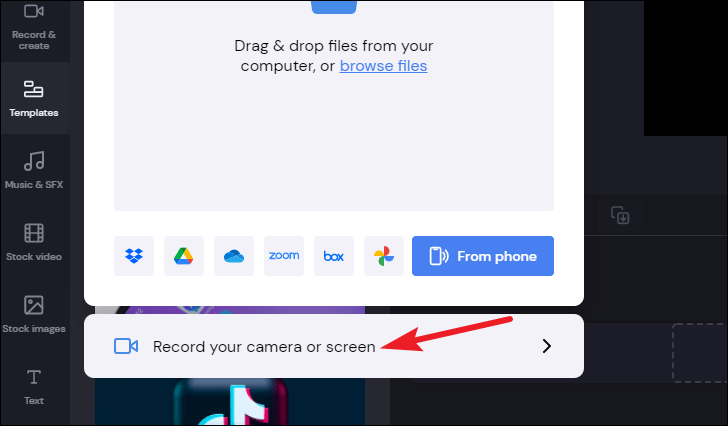
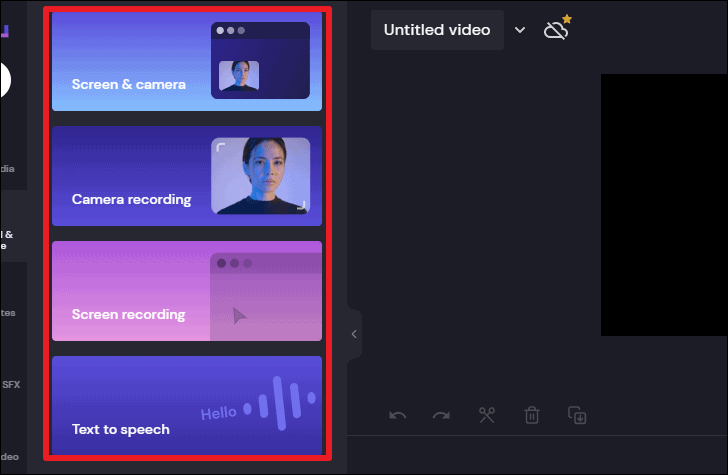
You can also access the option directly by clicking the ‘Record & create’ button from the left sidebar.
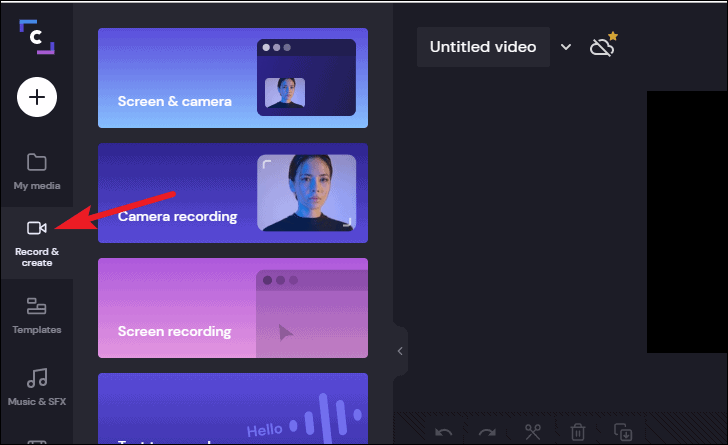
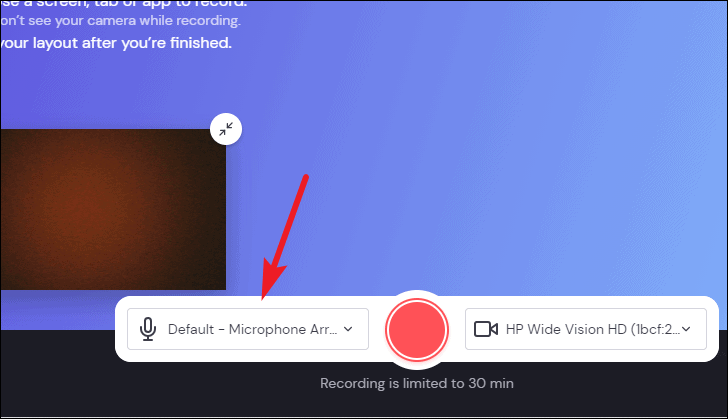
The Record & create panel will open. Click one of the options from ‘Screen & camera’, ‘Camera recording’, ‘Screen recording’, and ‘Text to speech’.
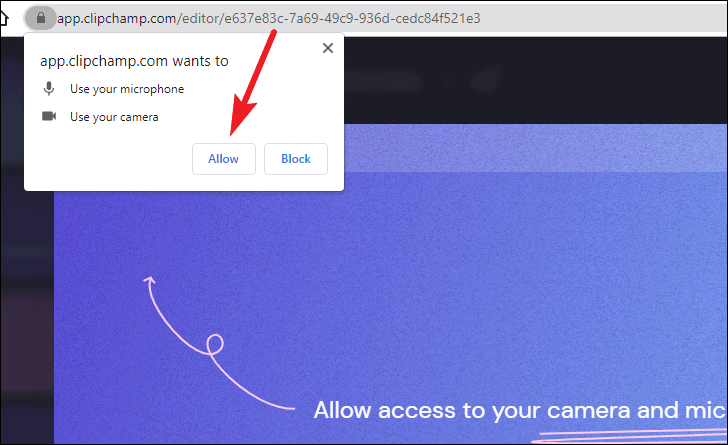
To record the video from the camera, you’ll need to give Clipchamp access to your camera and microphone. Click the ‘Allow’ button from the permission prompt. You can change it later at any time.
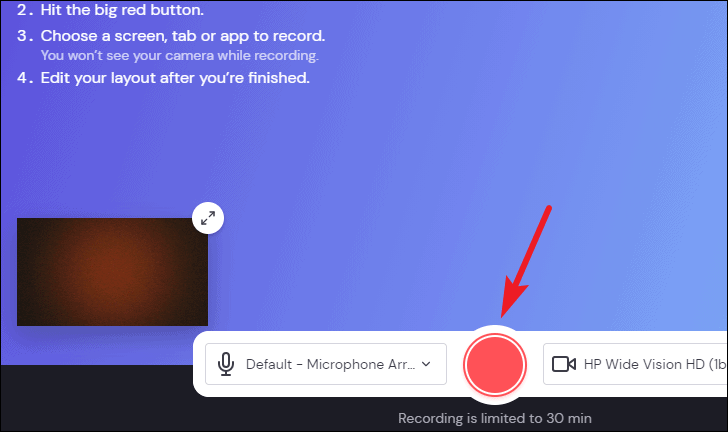
Recordings are limited to 30 minutes for all types of recordings. Click the ‘Record’ button (the big red button) to start the recording.
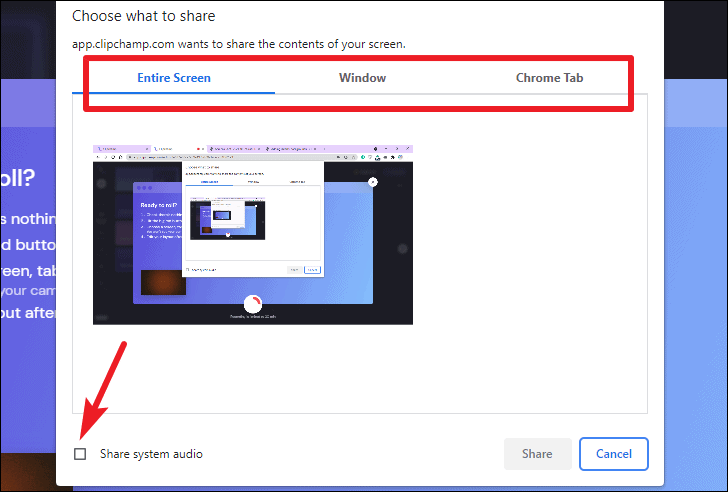
For a screen recording, after clicking the record button, select what you want to record. You can record your entire screen, an application window, or a Chrome (or, Edge) tab. You can also include the system audio with your screen recording.
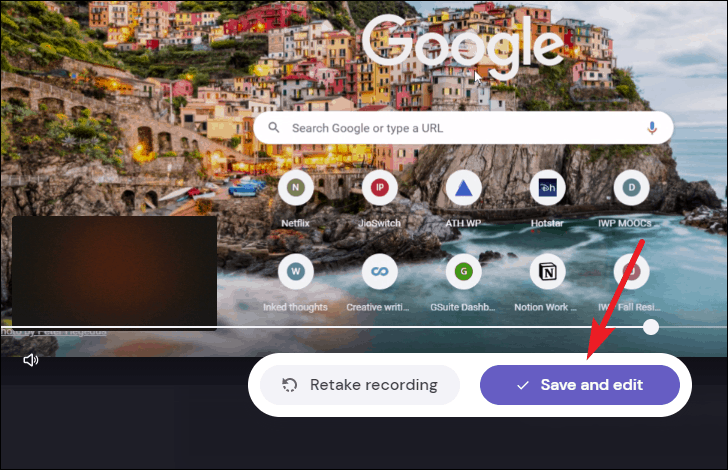
After finishing the recording, you’ll b able to see the preview on your screen. If you’re not happy with it, click the ‘Retake Recording’ button. Otherwise, click the ‘Save and Edit button. The recording will be added to the timeline automatically, and also appear in your ‘My media’ folder.
You can then edit it, even cut out any bloopers from the recording using the tools Clipchamp offers. For screen & camera recording, the video of the screen and from your camera is available separately so you can edit them independently of each other.
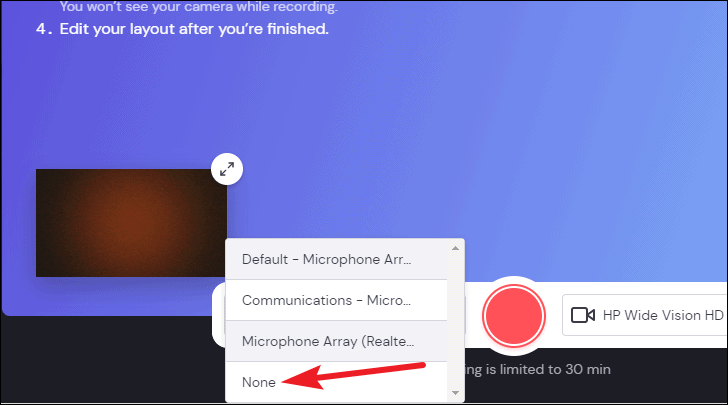
Whether you’re recording your screen or camera (or both), Clipchamp also has access to your microphone for audio. If you don’t want to include the audio, click the option for ‘Microphone’.
Then, select ‘None’ from the options.
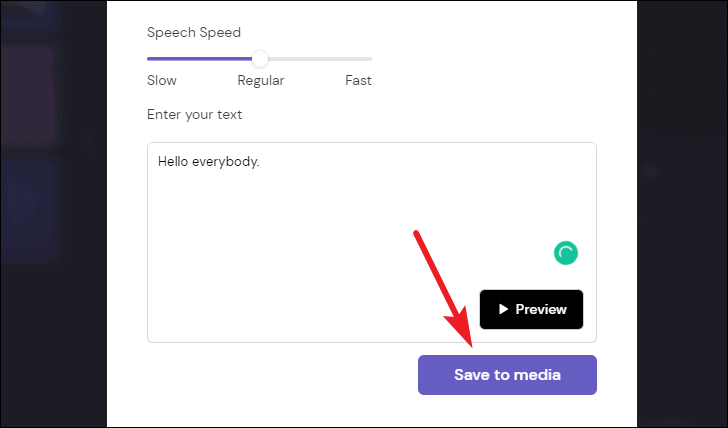
The Text to speech option can be useful in these instances. Whether you don’t want to record the audio yourself in camera/ screen recordings, or just need audio for your video, just reach out for Text to speech. You can choose from different available languages and voices and control the speed. Tweak these settings from the dialog box.
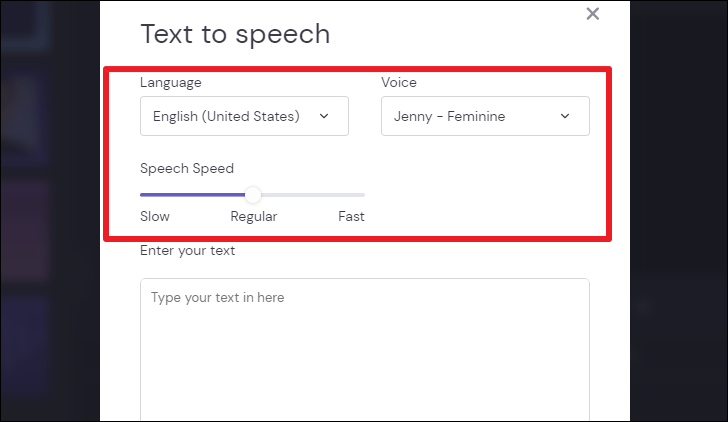
Then, enter your text in the textbox and click the ‘Preview’ button. If you like the audio, click the ‘Save to media’ button and you can use it in your video.
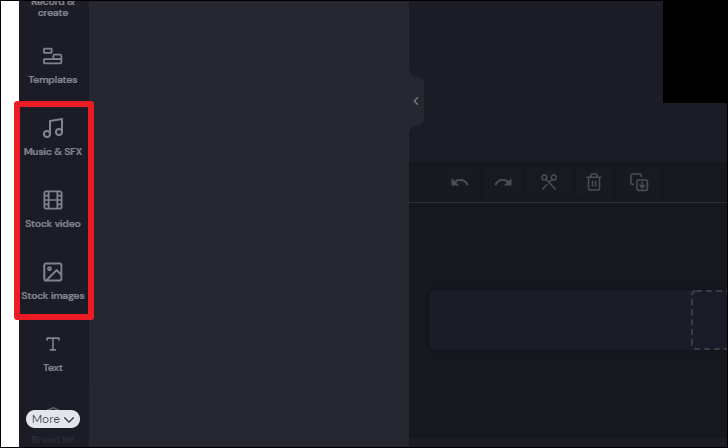
Using Stock Images, Music or Videos
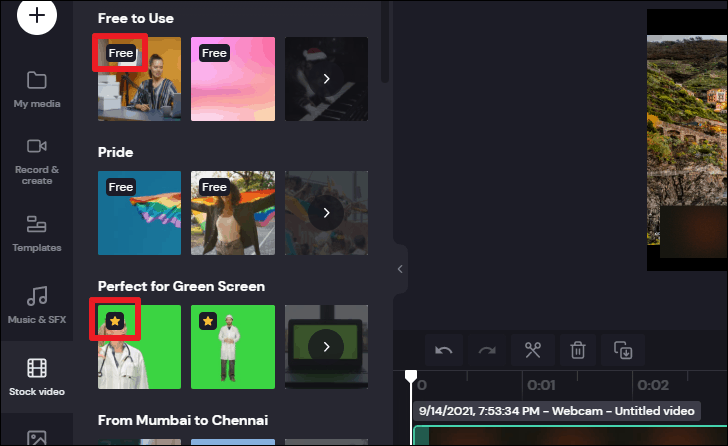
Other than uploading your own media, you can also use videos, audio, and images from Clipchamps stock library. If you’ve got the basic free plan, you can use the stock media that is free to use. Other subscribers can use the premium stock media according to their plan.
From the left pane, go to the respective category that you want to add to your video: ‘Music & SFX’, ‘Stock video’, or ‘Stock images’.
The thumbnail of each media file will either have ‘Free’ to indicate you can use it or a star to indicate its premium status.
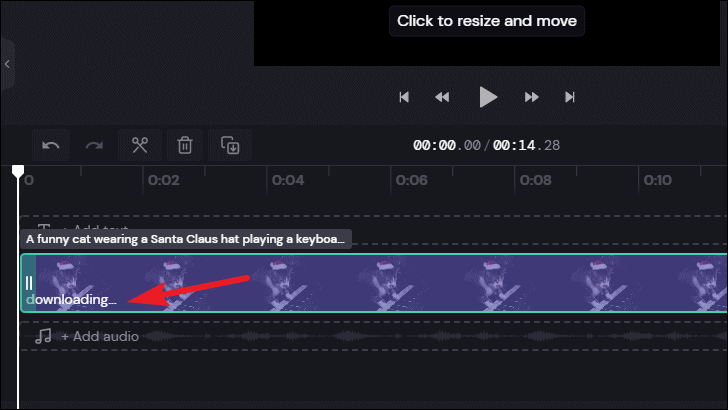
To add any media, either drag it onto the timeline or click the ‘+’ button from the thumbnail.
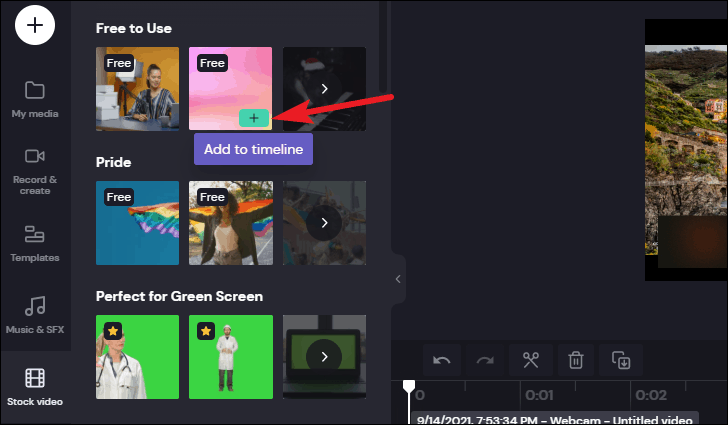
The media will be available once it finishes downloading. You can also first add it to your media and then add it to the timeline.
Adding Text to Your Video
From the navigation pane on the left, go to the ‘Text’ tab.
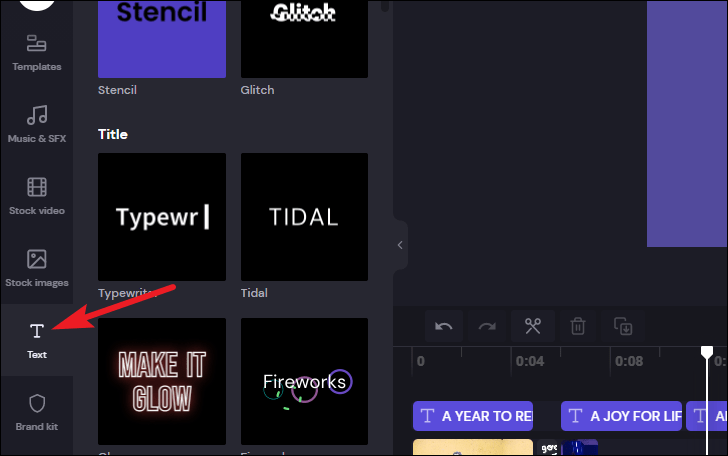
Then, scroll through the different categories and options until you find the one. Click ‘+’ or drag it onto the timeline to add it to the video.

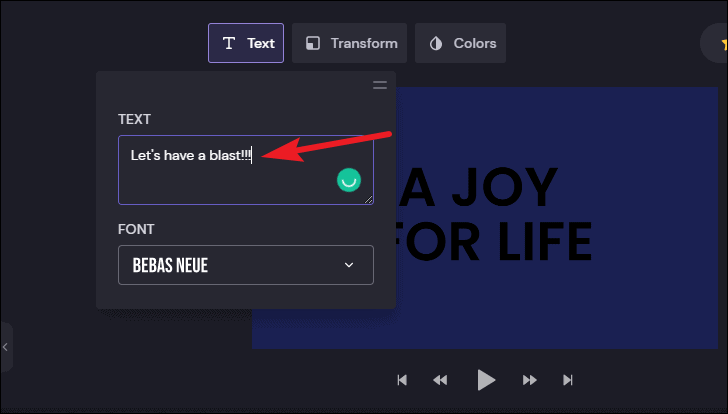
Then, click the text element from the timeline so it is highlighted and go to the option ‘Text’ from the toolbar at the top of the editor.
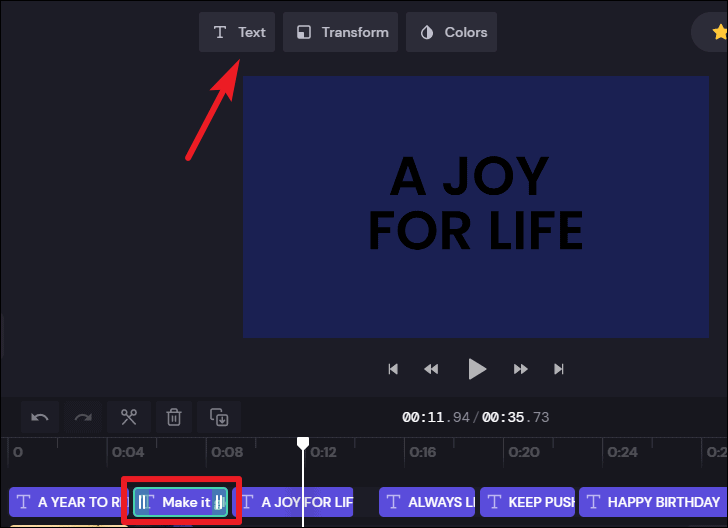
Enter your text in the textbox here. You can also change the font face from here.
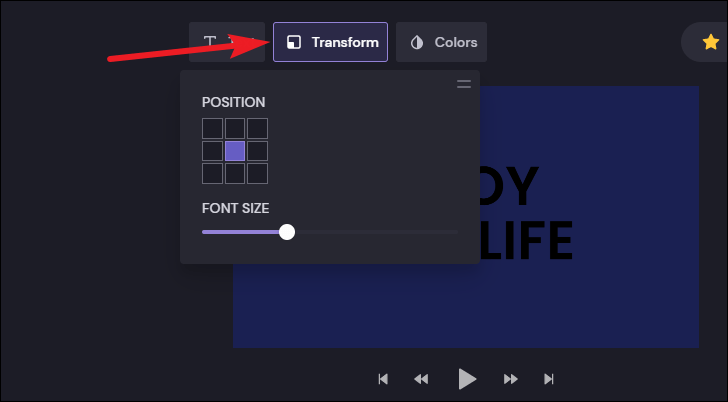
To change the font size or the position of the text, click the option ‘Transform’ from the toolbar. Drag the slider beneath ‘Font Size’. to adjust the font size. To change the position, select the position from the 3×3 tiles under ‘Position’ where each tile indicates the respective position on the screen.
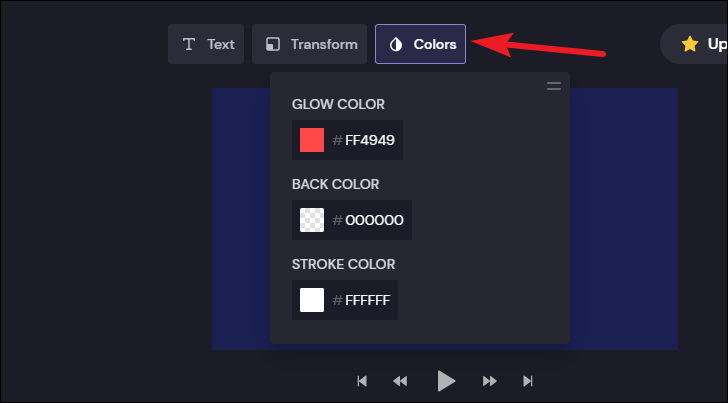
You can also change the color of the text from the ‘Colors’ option.
Note: Templates have text that appears in certain motions. You cannot change that. To change it, you’d have to select an entirely different template altogether.
Using the Editing Tools
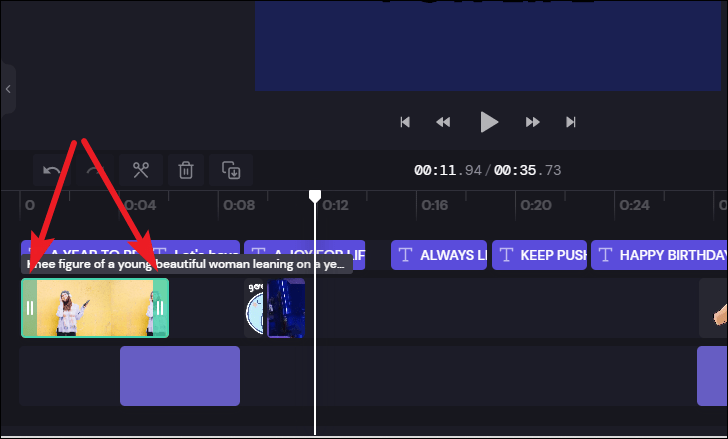
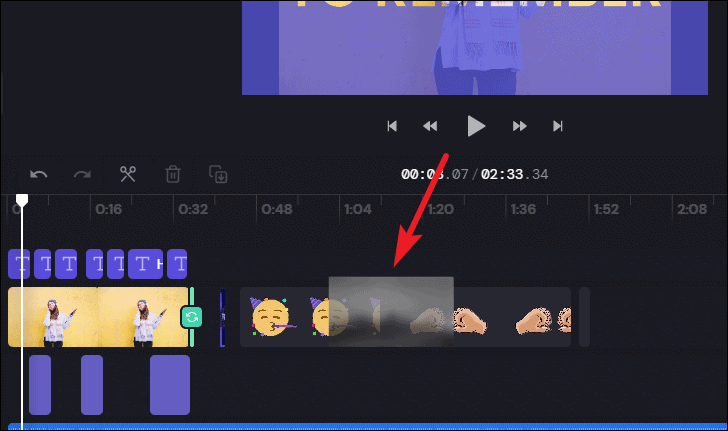
All the elements in the video can be dragged and arranged. Whether it’s the video, audio, image, or text, you can drag it from any position and drop it anywhere.
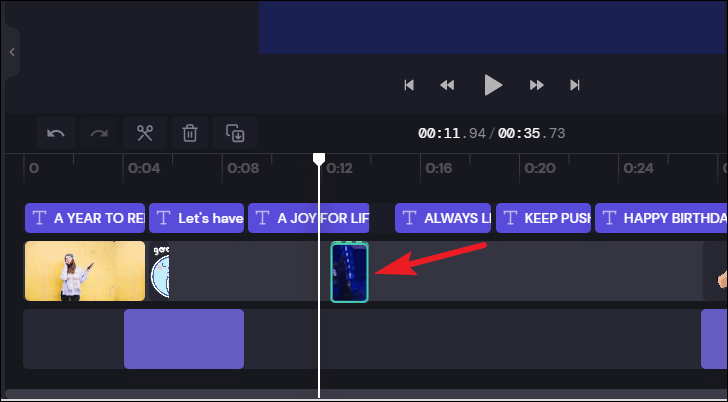
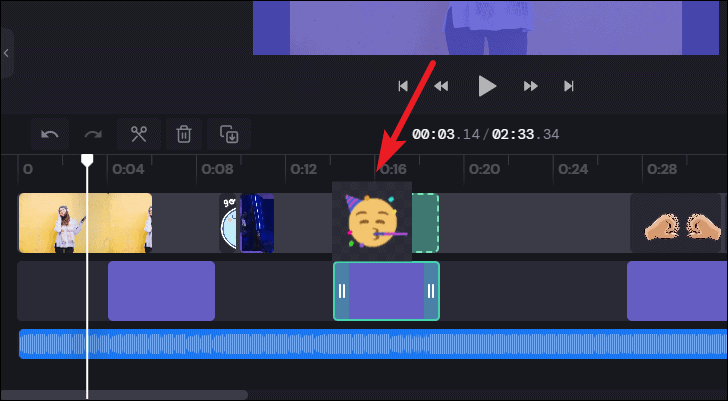
To trim the size of the element, click the element. Then, drag the edges back and forth from either corner to trim the size of the element in the video.
To edit an element in the video, select it from the timeline. Tools like split, delete, and duplicate will appear right above the timeline in the editor.
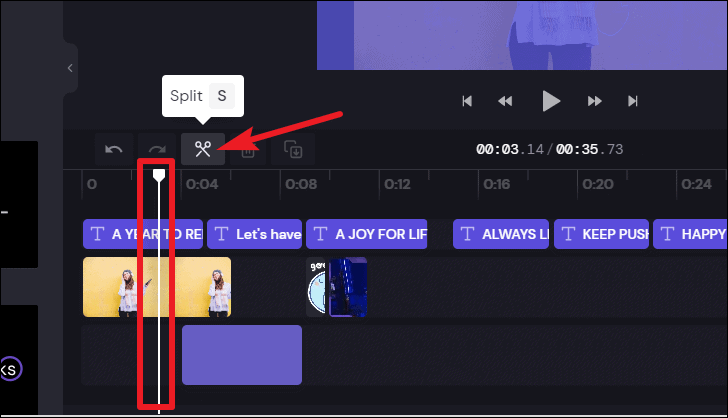
To split the video, place the scrubber (the vertical white line) to where you want to split it. Then, click the ‘split’ option (scissor icon).
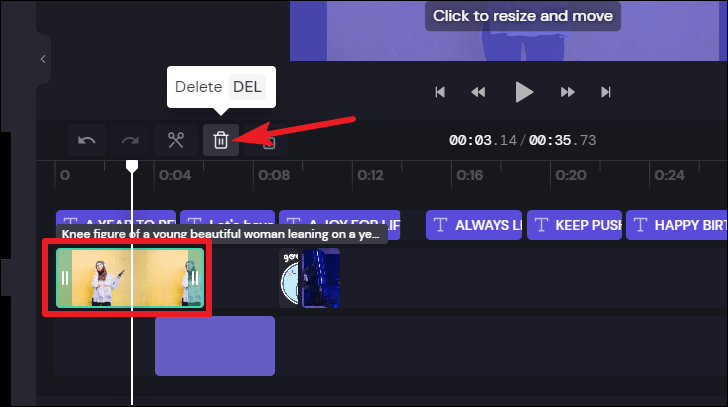
To delete an element, select it and click the ‘Delete’ option (trash icon) from the toolbar. Alternatively, you can also use the Delete button on your keyboard.
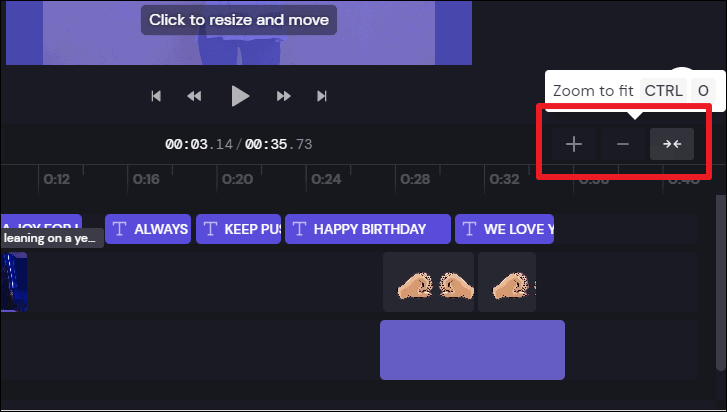
To navigate the timeline, you can scroll using your mouse/ trackpad. Or use the Zoom in (+)/ Zoom Out (–) options to move left and right. To fit the entire timeline on your screen, use the ‘Fit to Screen’ (two inward arrows) option.
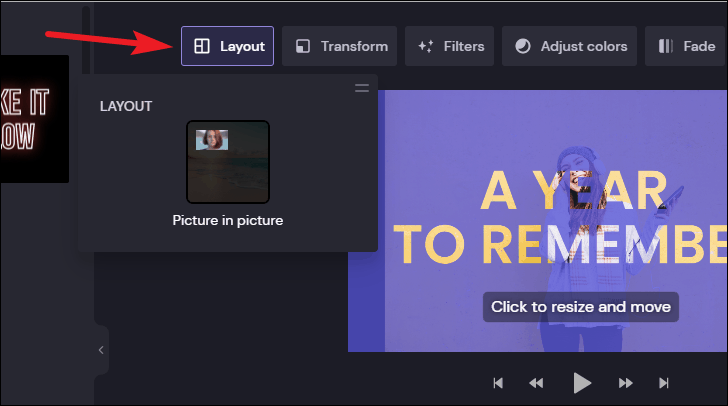
Other options like Layout, Crop, Rotate, Flip, Opacity, Filters, Fade, Speed, etc., will appear in the toolbar above the video preview.
Using the ‘Layout’ option, you can have an image or video on another as Picture-in-Picture.
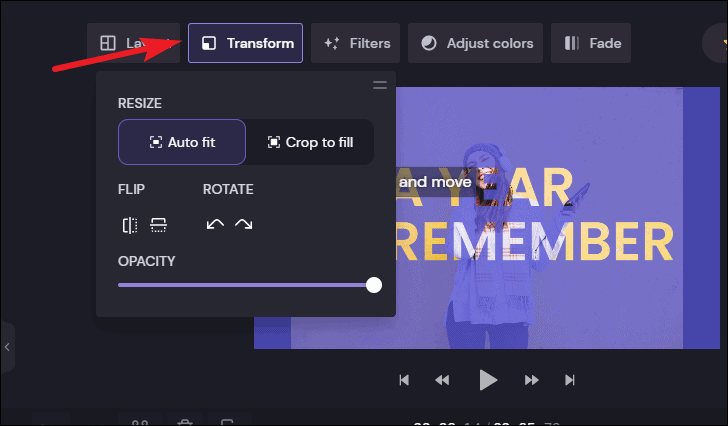
To crop, rotate, flip, or change the transparency of a clip or image, select it and go to ‘Transform’ from the toolbar above the editor. Then, select the option from the expanded menu.
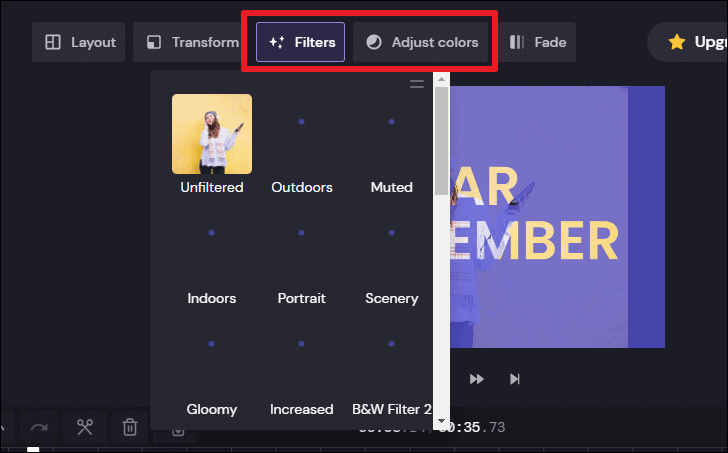
You can also apply filters or color correct your video by using the ‘Filters’ and ‘Adjust Colors’ options.
To speed up or slow down the video, select the clip and go to ‘Speed’. Then, select from ‘Fast’ or ‘Slow’ to change its speed.
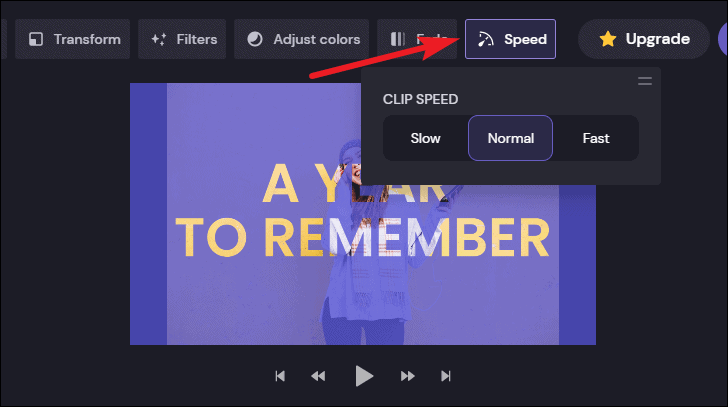
Note: The speed of audio cannot be changed currently. If you change the speed of audio to anything other than normal, the audio will stop playing.
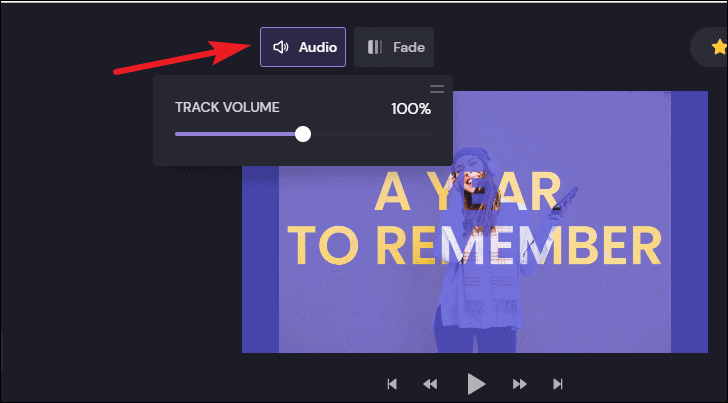
You can also change the volume of the audio for your video. Select the audio clip from the timeline. An option ‘Audio’ will appear on the toolbar above the editor; click it. Then, drag the slider to adjust the volume.
Using Graphics
The ‘Graphics’ tab on the left navigation menu lets you add solid colors, GIFs, stickers, overlays, etc. to your video. You can use it to add backgrounds in the video or add other fun elements.

To add a background, drag either black, white, or solid color from the Graphics menu and drop it onto the timeline where you want to place it. You can drop it between two clips to add it there.
Or, you can drop it beneath the video clip timeline to serve as a background for the image/ video clip. This method can come in handy when the ratio of a particular image or video doesn’t match the ratio of the video and you want a background in its place.
You can also use solid colors as backgrounds under other graphics like stickers and GIFs in the same manner by placing them underneath the timeline.
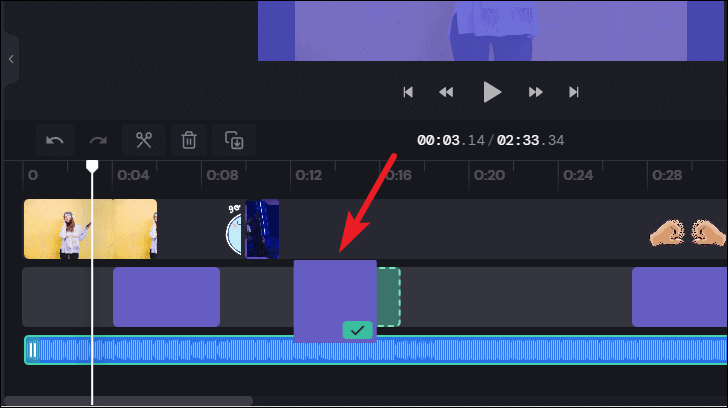
To use stickers and GIFs, drag them onto the timeline where you want to add them.
Then, click the ‘Click to Resize’ option to adjust their size.

Using Transitions
The last option on the navigation pane is for ‘Filters & Transitions’. You’ll soon be able to use filters from the sidebar, but currently, you can only use them from the toolbar above the editor as we’ve already seen.
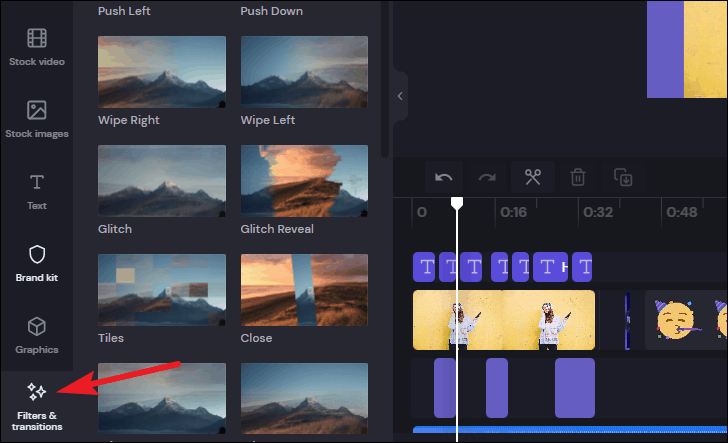
To use transitions between video clips, select the transition you want to use and drag it between the video clips in the timeline where you want to add it.
Exporting your Video
You can save the finished videos on your computer by exporting them. The video will be saved as an mp4 file.
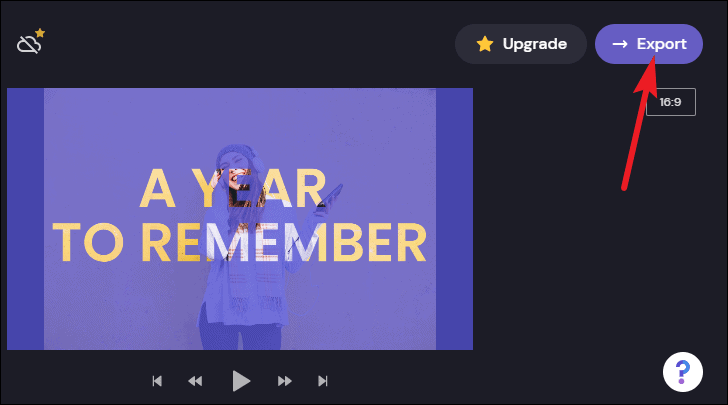
Click the ‘Export’ button in the top-right corner of the screen.
The Export menu will open. The default title for the video will appear. Enter your title in its place, or it’ll be saved with the default title name.
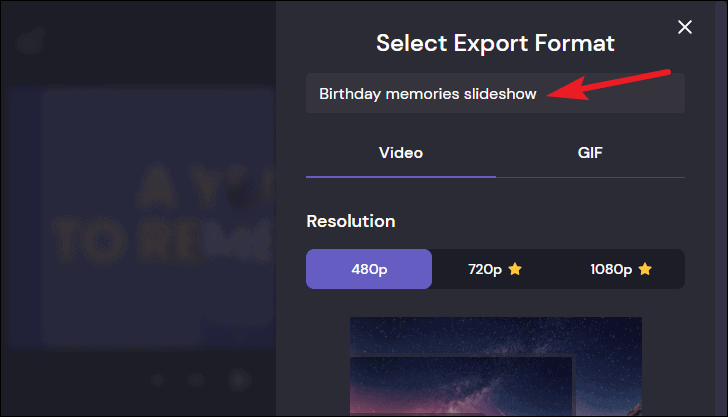
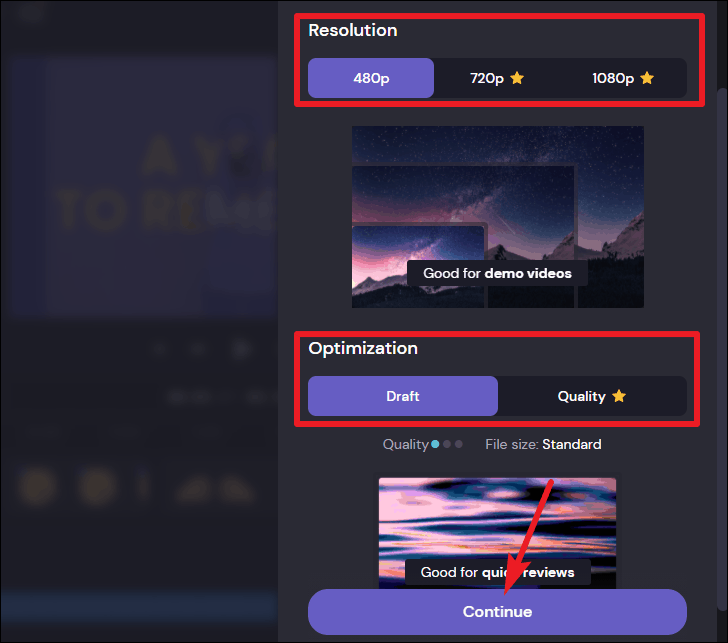
Then, select the resolution and optimization for the video. Basic accounts don’t have this option as the only resolution available is 480p in the Draft Optimization. Finally, click the ‘Continue’ option.
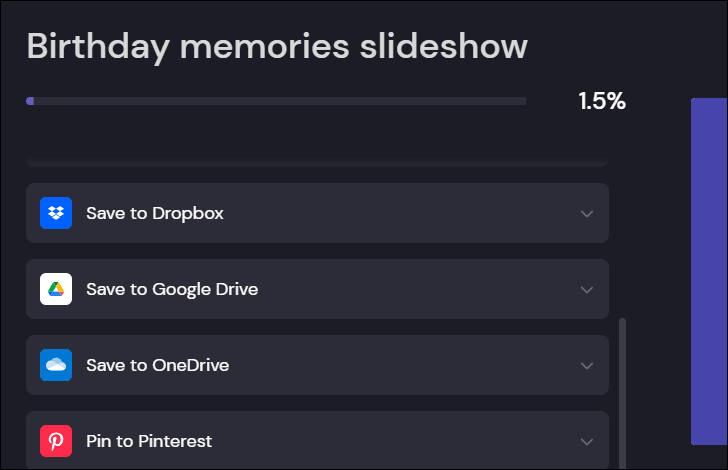
The exporting screen will open. Once the export is complete, you can download it to your computer or save it to one of the services Clipchamp offers integration with.
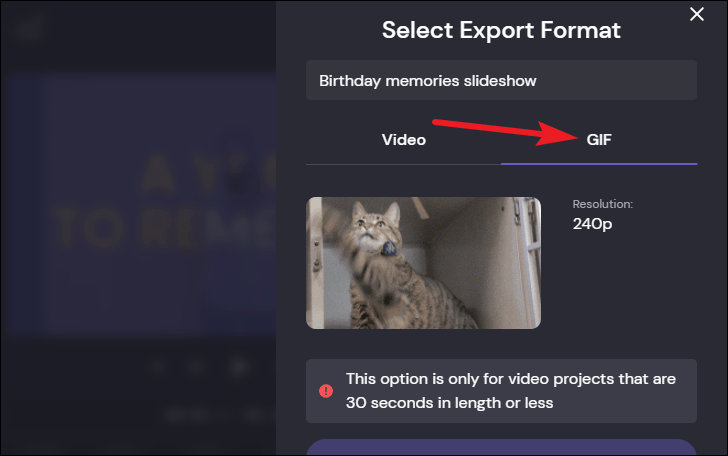
Note: For videos shorter than 30 seconds, you can also save them as GIFs. From the Export menu, switch to the GIF tab.
Clipchamp is a great tool to create and edit videos. The interface is easy to navigate to empower everyone to be a creator. And hopefully, with this guide, you can create your own fantastic videos.


