
Waiting Rooms are a highly coveted feature in the virtual conferencing ecosystem. They safeguard your meetings from any security mishaps like unwanted people dropping and disrupting the entire meeting. The extent of how disastrous it could be became entirely clear earlier this year in the shape of Zoombombings.
Ever since, all meeting hosts, whether they are hosting professional meetings or classes, have realized the importance of a waiting room.
What is a Waiting Room?
A waiting room in a virtual meeting ecosystem is a buffer of sorts. All meeting participants go through it before being admitted into the meeting room. The host of the meeting has complete control over who to admit to the meeting. This way, any uninvited guests cannot just drop into the meeting. As you can see, they are highly functional and necessary to protect your meetings.
How to Use a Waiting Room in Webex
Webex users have been asking for a waiting room or lobby in meetings forever where participants can wait before joining the meeting. Previously, you could have a waiting room in Personal Meeting Rooms, but not in scheduled meetings. But Webex Meeting version 40.9 has changed that.
How to Use the Waiting Room in a Personal Meeting Room
Every Webex user has a personal meeting room in Webex that has a customizable link and never expires. It’s unique to only you and is always available; you don’t have to pre-book it to use it. All impromptu meetings that you have in Webex take place in this Personal Meeting Room.
Now, by default, meetings in a Personal Room don’t have a waiting room either. But you can configure the settings to have one. Webex has the option to lock the meetings. When a meeting is locked, any participants who try to join it enter the lobby instead. The host can then let them in if they want.
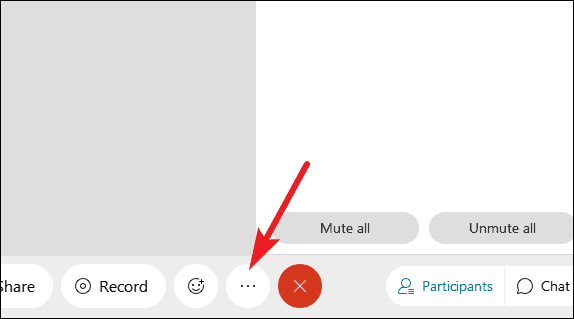
To lock a Personal Room Meeting, go to the meeting toolbar and click the ‘More options’ (three-dot menu) icon.
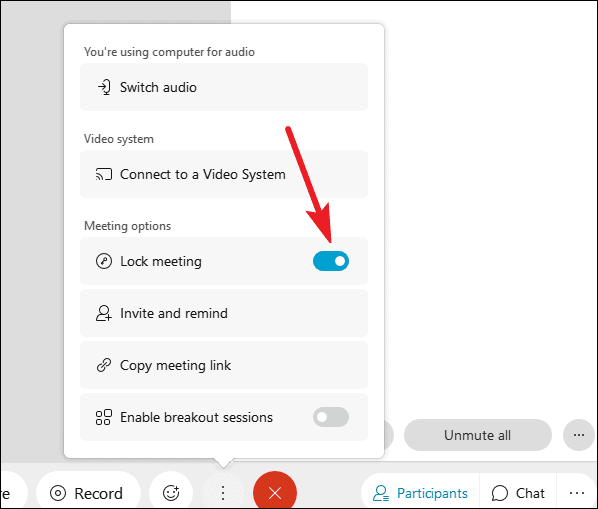
Then, turn on the toggle for the ‘Lock Meeting’ option from the menu.
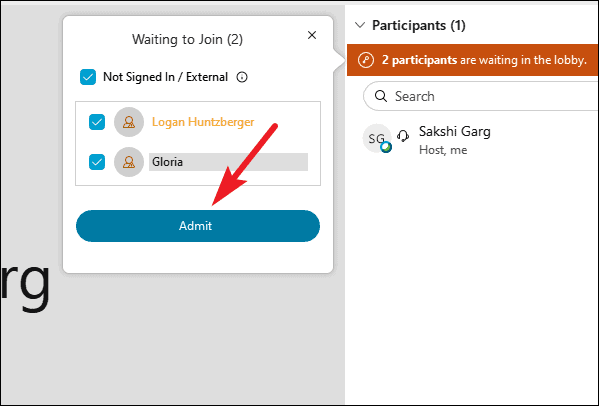
Any participants who join after you lock the meeting will have to wait in the lobby. You’ll get a notification on your screen that there are participants waiting in the lobby. Click it to view the list.

You can admit them all in a single click by selecting them all, or only admit the participants you want to let in. Select the participants, and click the ‘Admit’ button.
Now, you’ll have to do this for every Personal Room meeting you want to lock. But considering that you’ll be the first one in the meeting as it’s impromptu, it isn’t that much of a problem. This solution is perfect for people who might not want a waiting room in every meeting.
But for people who want the waiting room functionality by default in all meetings, there’s another way. Configuring this little setting automatically locks every Personal Room Meeting as soon as it starts.
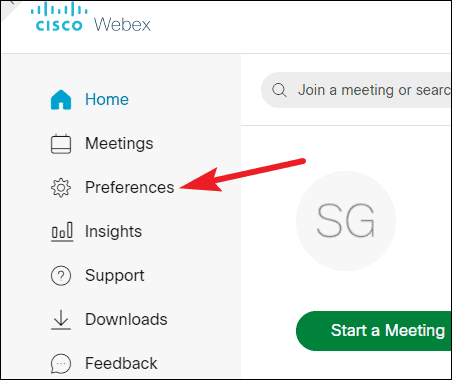
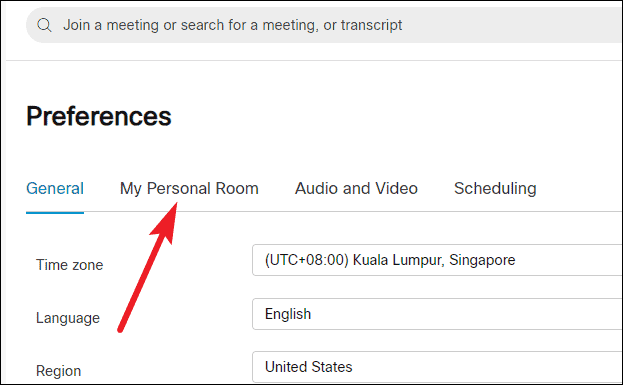
Go to webex.com and log in to your Webex Meeting space. From the navigation menu on the left, click ‘Preferences’.
Then, go to ‘My Personal Room’.
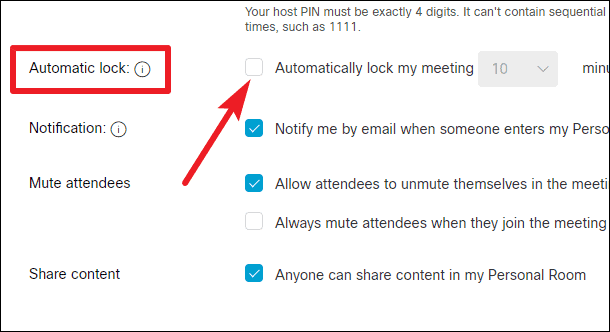
Your personal room settings will open. Scroll down to the ‘Automatic lock’ setting. Then click the checkbox next to it to select it.
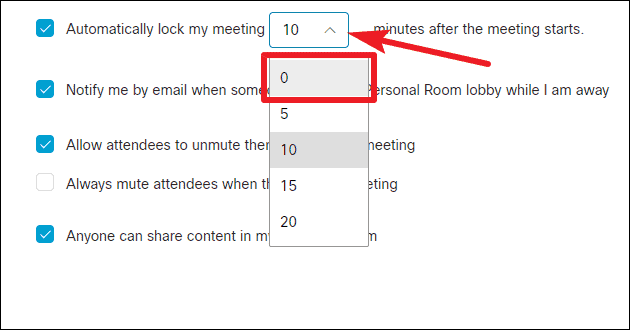
When you select it, the drop-down menu for time will become clickable. Click on it and select ‘0’ from the options.
Then click the ‘Save’ button.
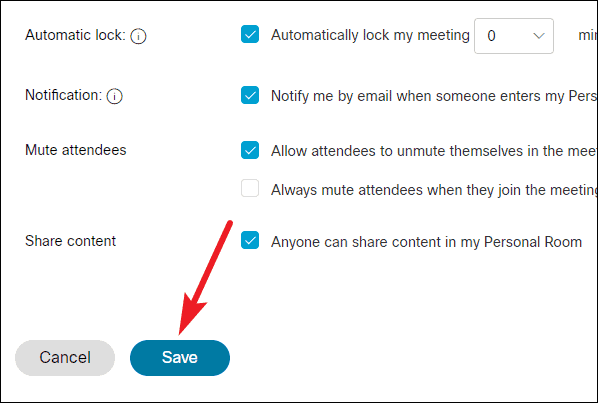
Now all your personal meeting rooms will have a waiting room by default.
Note: To be able to admit people from the lobby in a locked meeting, you should be using the Webex Meetings desktop app, Webex Teams desktop app, or Cisco Webex cloud registered room or desk device. Otherwise, you won’t be able to admit people in without unlocking the meeting.
How to Use a Waiting Room with a Scheduled Meeting
For scheduled meetings, having a waiting room is particularly important. If other participants arrive before the host, they should be in the waiting room from where the host can let them in.
But previously, you could not have this waiting room functionality in a scheduled meeting on Webex. Any participants who arrived before the host were unable to join the meeting at all if the meeting was locked. They had to refresh and try to re-join the meeting after the host arrived. As you can imagine, that’s not intuitive at all. How is a participant to know of the host’s arrival in the meeting?
But from Webex 40.9 onward, you can have a waiting room for guests in scheduled meetings. Guests are users who are either not signed in to their Webex accounts or external users who don’t have a Webex account on your site. So any guests who arrive before the host will have to wait in the meeting room. But any organization members who arrive before the host will be able to join directly.
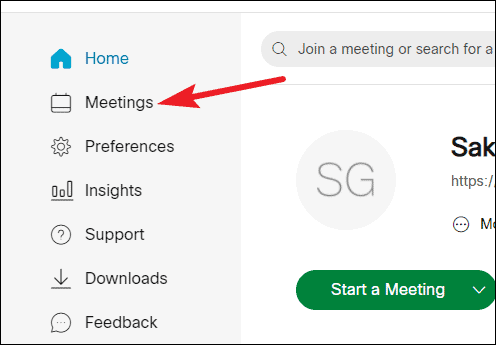
Go to webex.com and log in to your meeting space. Then, go to ‘Meetings’ from the navigation menu on the left.
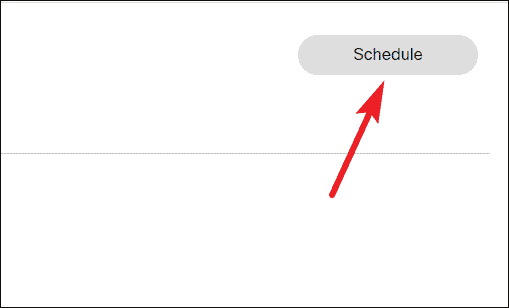
Click the ‘Schedule’ button to schedule a new meeting.
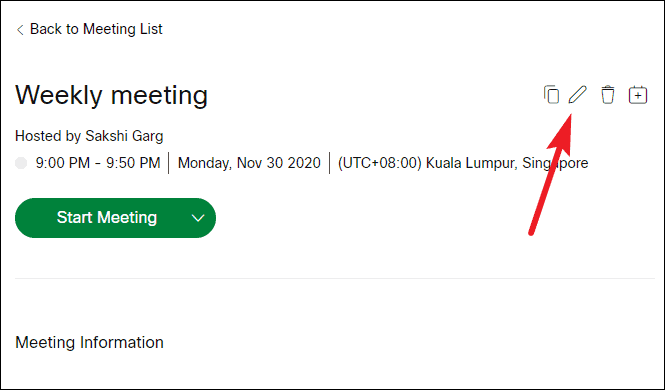
Or you can also edit a previously scheduled meeting with the new settings. Open the meeting, and click the ‘Edit’ button.
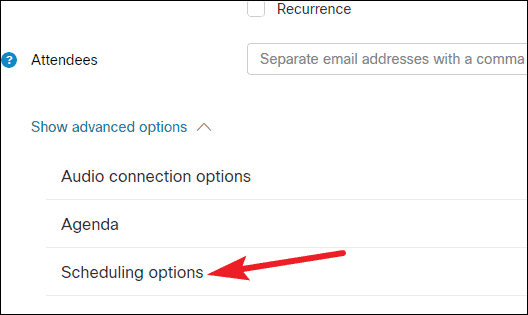
Then, after scheduling the meeting as you would, scroll down and click ‘Show Advanced Options’.
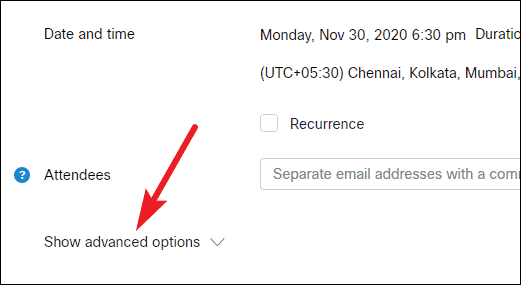
A few options will expand underneath it. Click on ‘Scheduling options’.
In Scheduling Options, go to ‘Unlocked Meetings’. The default setting for this option is set to ‘Guests can join the meeting’. Click the radio button for ‘Guests wait in the lobby until the host admits them’ to select it.
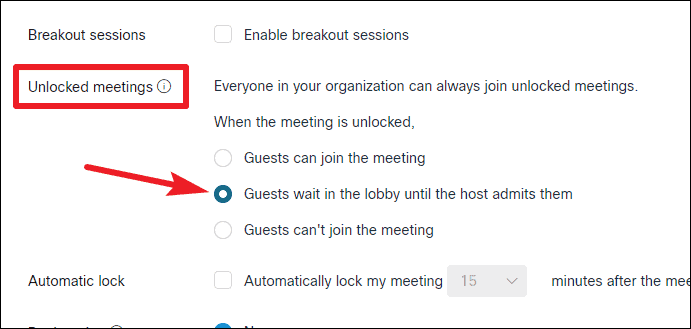
Now, just like with the settings for your Personal Meeting Room, you’ll see the option for ‘Automatic Lock’. It might lead you to wonder why you just can’t lock the meeting to enable the waiting room like with Personal Meeting Rooms.
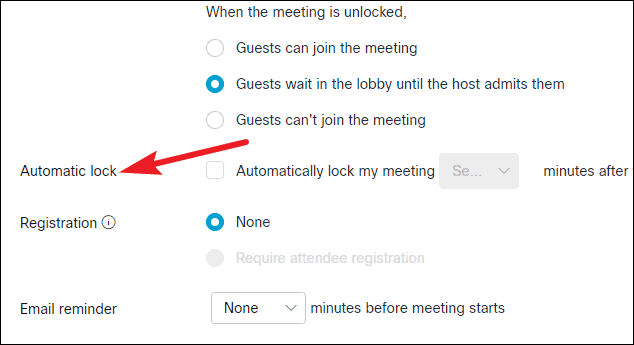
Just locking the meeting without enabling the previous setting won’t create a waiting room for guests who arrive before the host. Instead, they’d directly enter the meeting. So enabling the previous option is important. But it’s also important to remember that it only creates a waiting room until you’ve joined the meeting. To create a waiting room for after, you need to lock the meeting.
Now, you can enable the ‘Automatic Lock’ while scheduling the meeting, or you can lock the meeting from the meeting toolbar after you’ve joined the meeting; it’s entirely up to you. Once the meeting is locked, all participants, guests, and organization members alike would have to go through the waiting room.
Finally, click the ‘Save’ or ‘Schedule’ button.

For scheduled meetings, there’s no generic option that’ll create a waiting room for every meeting. You’ll have to perform these steps for every meeting you schedule.
Waiting rooms in a virtual meeting are extremely important to avoid any mishaps. And although you can have a waiting room in Webex meetings, the mechanics aren’t all that simple and straightforward. But once you know how to, you can ensure your meetings are as secure as they should be.


