Lacrimosa is an S-rank Chaos Main DPS in Neverness to Everness who wins fights by stacking the Nightmare damage-over-time effect and detonating it through Scorch and Discord reactions. Her kit scales off ATK, rewards continuous on-field attacking, and gains a large burst whenever Discord lands on a Broken enemy. Build her around Chaos damage, Nightmare uptime, and reaction triggers, and she fits cleanly into most endgame teams.
Lacrimosa overview and role
Lacrimosa fights as a mid-range carry. Her Basic Attack runs up to five hits, and the final hit fires a pigment cannon for area damage with knockback. Holding the Basic Attack lets her copy a non-boss enemy’s moveset through her Mimic Transformation, which she can use to adapt to specific fights. She also drains a portion of incoming damage back into her own HP, which softens survivability gaps.
| Attribute | Detail |
|---|---|
| Rarity | S-rank |
| Element | Chaos |
| Combat role | Main DPS |
| Core mechanic | Nightmare DoT (scales off ATK) |
| Signature passive | Discord on a Broken target deals 400% ATK extra damage |
The Nightmare effect is the heart of her damage. Each hit applies a stack up to 10, and Nightmare ticks Chaos damage every second for three seconds, with the duration extendable through her awakenings.
Best Arc for Lacrimosa
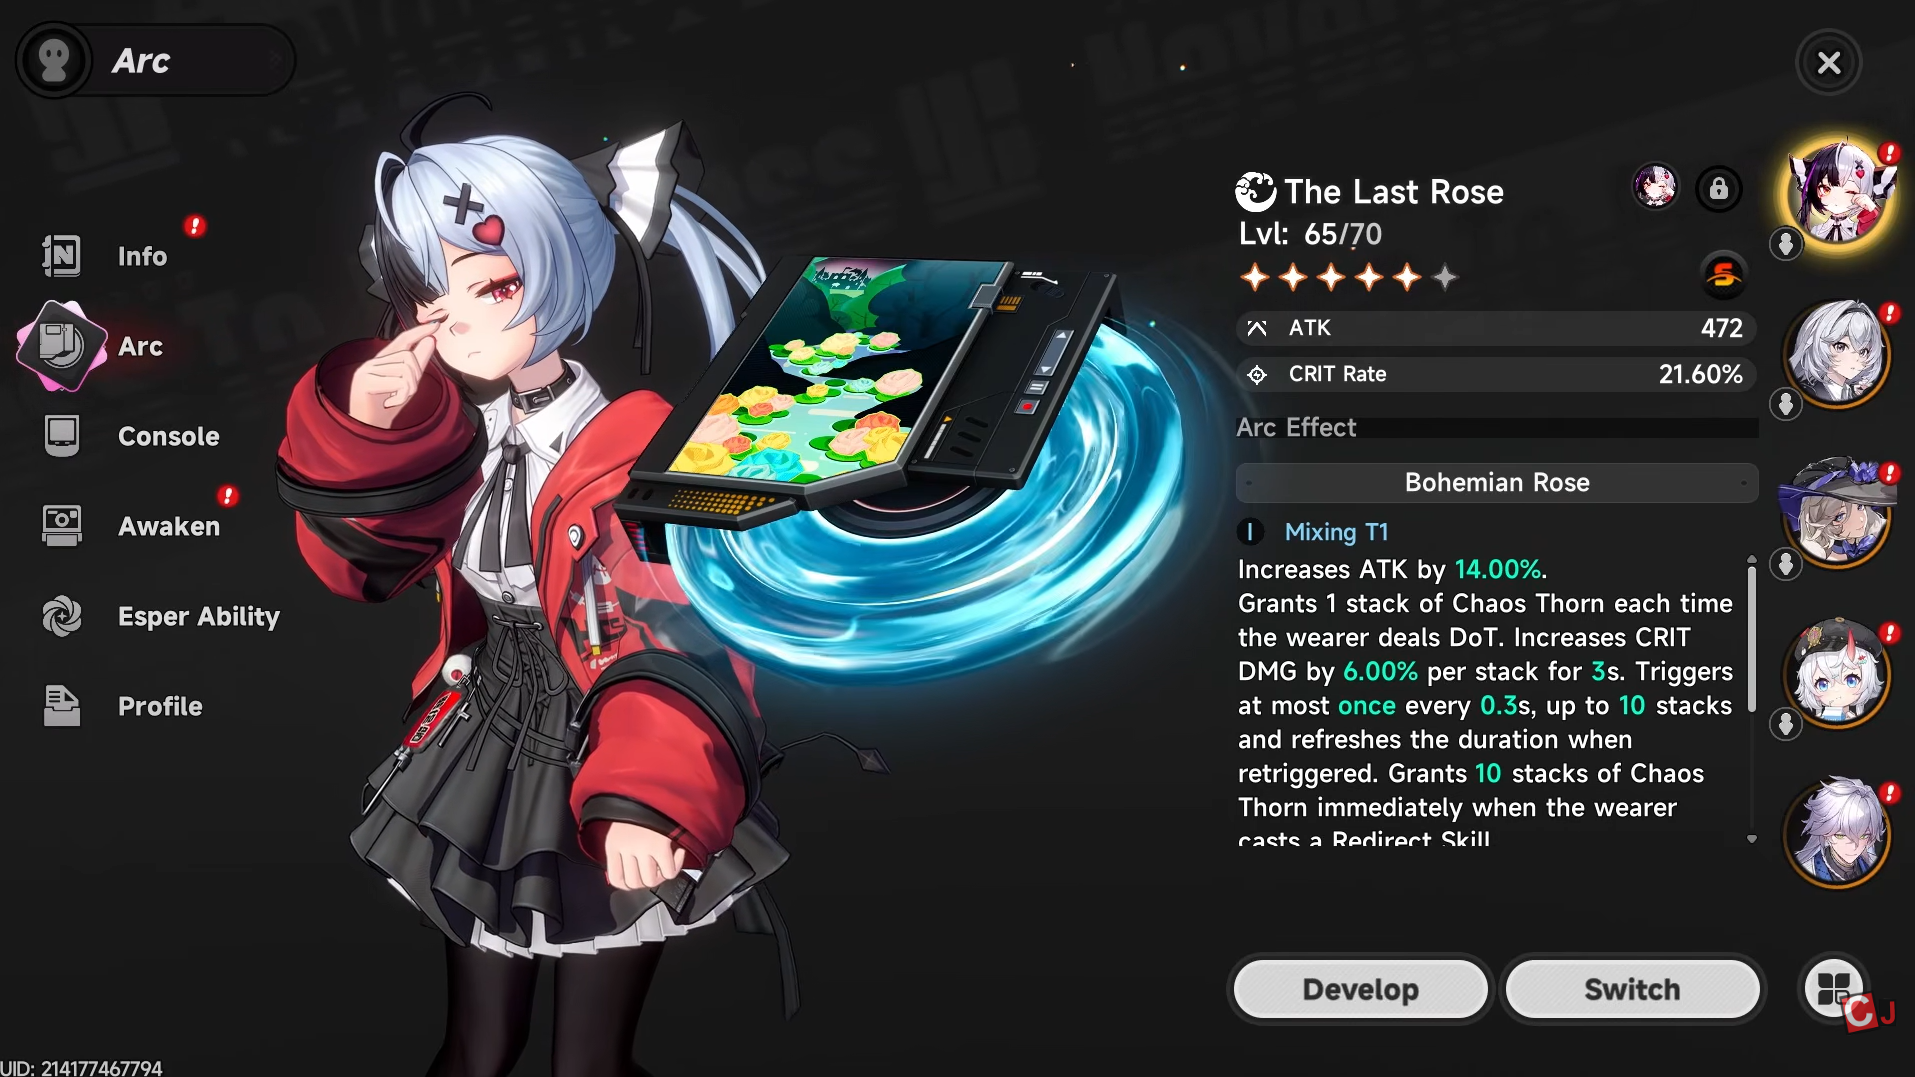
Her signature Arc, The Last Rose, is the clear first choice because every part of its effect feeds her playstyle. It boosts ATK, stacks CRIT DMG each time she deals DoT, and extends an enemy’s Broken window when she damages a Broken target. If you do not have it, the alternatives still cover ATK or Ultimate energy.
| Rank | Arc | Effect summary |
|---|---|---|
| 1st | The Last Rose (S) | +14% ATK; each DoT instance grants a Chaos Thorn stack for +6% CRIT DMG (up to 10, 3s); 10 stacks on Redirect Skill; extends a Broken enemy’s Broken state by 3s. |
| 2nd | Fluff of Fleetness (S) | +5% ATK every second while she is the active character, up to 5 stacks; resets on swap-out. |
| 3rd | Mind Royale (S) | Grants 10 Ultimate Energy when casting a Redirect Skill, once every 20s. |
Best Cartridge and Module stats
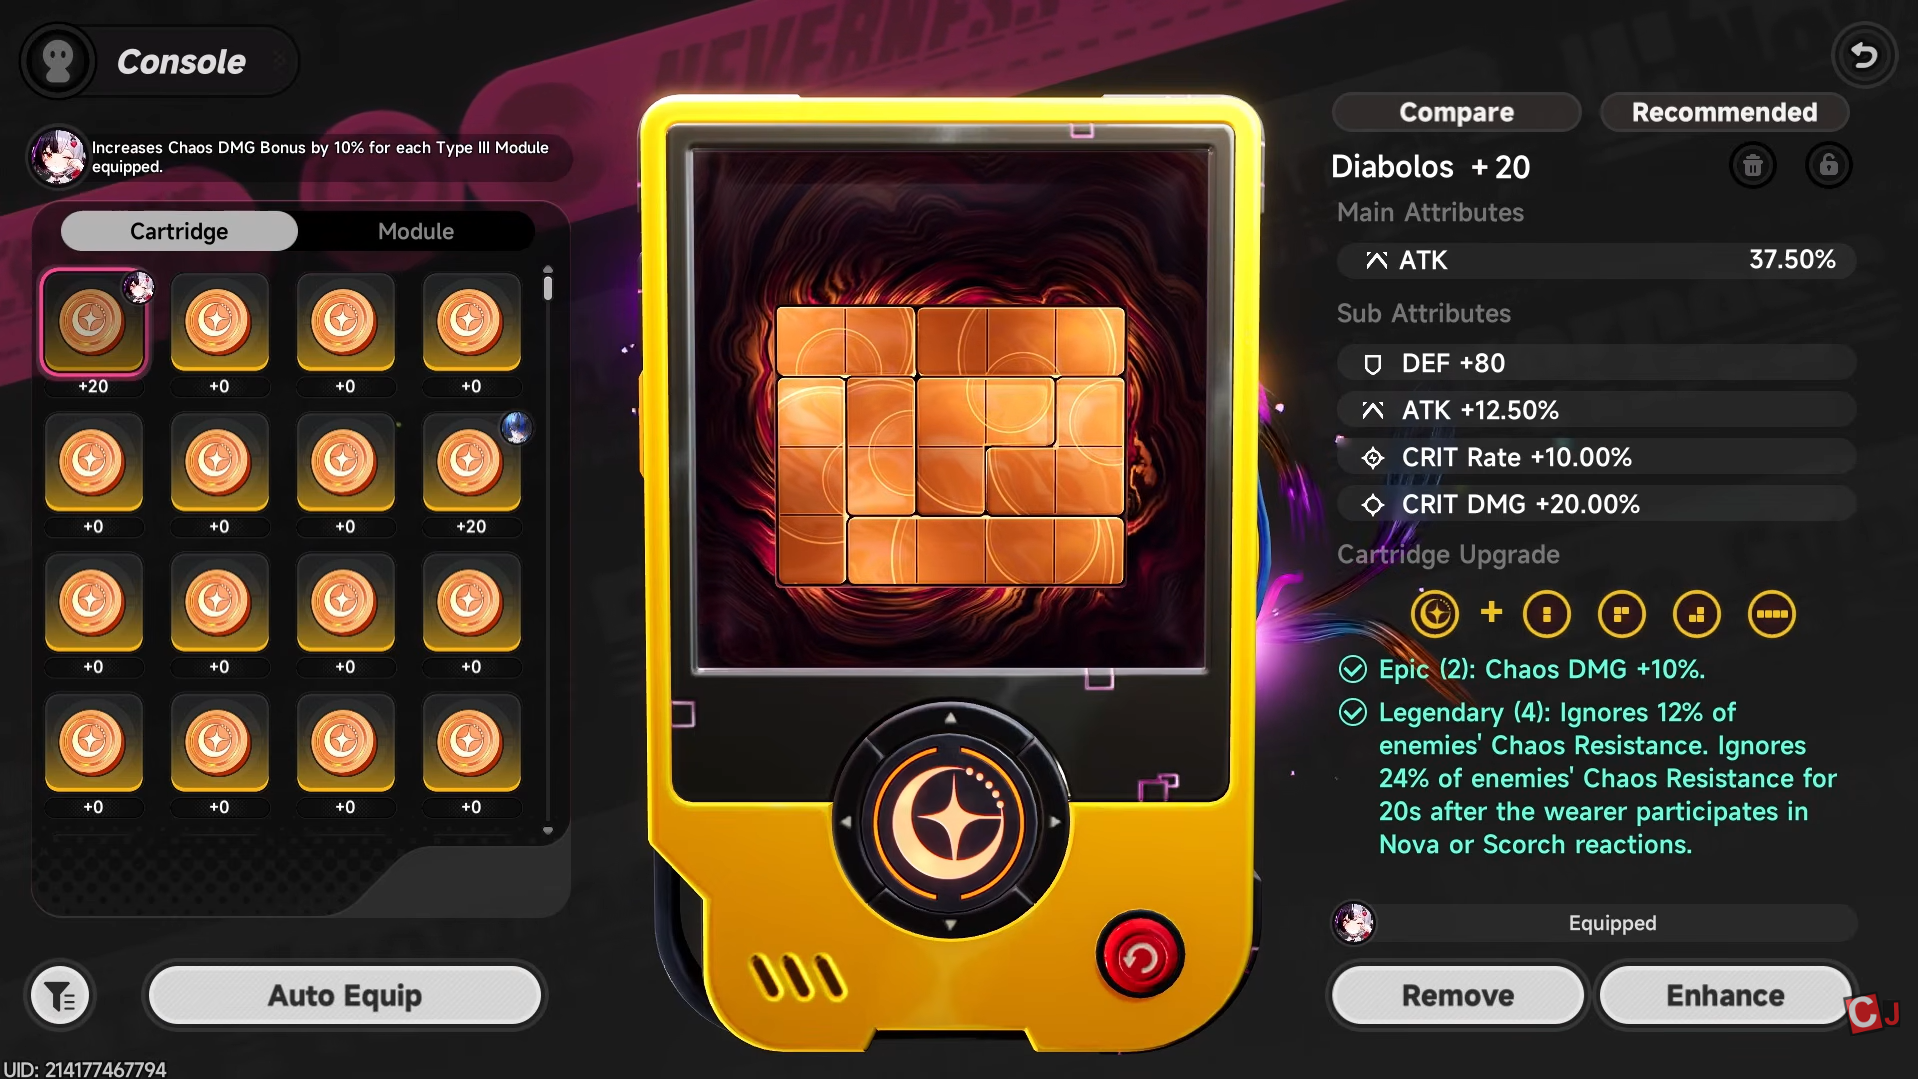
Diabolos is her best-in-slot Cartridge in every scenario. The 4-piece effect ignores enemy Chaos resistance, which directly multiplies both her Nightmare DoT and her burst. Because she plays in reaction teams that trigger Nova or Scorch, she keeps the full resistance-ignore value active.
| Rank | Cartridge | Effects |
|---|---|---|
| 1st | Diabolos | 2-pc: Chaos DMG +10%. 4-pc: Ignores 12% Chaos RES; ignores 24% Chaos RES for 20s after the wearer joins a Nova or Scorch reaction. |
| 2nd | Shadow Creed | 2-pc: ATK +10%. 4-pc: ATK +25% for 20s after casting a Skill. |
| 3rd | Quiet Manor | 2-pc: Mental DMG +10%. 4-pc: +12% Mental DMG per Basic Attack, up to 3 stacks (6s each). |
For Modules, build the full Diabolos 4-piece layout plus a Type III bonus Module for +40% total Chaos DMG. Prioritize CRIT and damage substats, and keep ATK high because her DoT scales from it.
| Slot | Priority |
|---|---|
| Cartridge main stat | Chaos DMG > ATK > Cycle Intensity > CRIT |
| Substats | ATK% > Universal DMG% > Cycle Intensity > CRIT > ATK |
| Module substat focus | CRIT Rate, CRIT DMG, ATK%, DMG, ATK |
Skill upgrade priority
Her Basic Attack carries the Nightmare DoT, so it is the foundation of her damage. After that, her Ultimate and Skill both apply Nightmare and deal heavy damage, so they share the next tier of investment. Her Support Skill comes last.
| Skill | Priority |
|---|---|
| Sweet and Sour (Basic Attack) | Highest — scales Nightmare DoT |
| Working Day Judgement (Ultimate) | High |
| Morning Tomato (Skill) | High |
| Microwake (Support Skill) | Last |
Awakening priority
Every recommended awakening points back to maximizing Nightmare. The most valuable picks raise its damage, extend its duration, and keep it from being cleansed. If you only own a few, prioritize the ones that protect and amplify the DoT before grabbing the support-trigger node.
| Order | Awakening | Why it matters |
|---|---|---|
| 1st | Tempered Glass Judgement | Reduces the target’s Max HP from her DoT, heals her from DoT damage, and stops Nightmare from being removed when the target is healed. |
| 2nd | Clock Out Clemency | Increases Nightmare DoT damage directly. |
| 3rd | Almighty Lord of Tomatoes | Extends Nightmare duration so it ticks for longer. |
| 4th | Molten Ice Cream | Detonates all Nightmare stacks on a full Basic Attack combo, speeding up kills. |
| 5th | Morning Spell | Auto-casts her Support Skill and triggers the cycle reaction even without enough Cycle Energy. |
| 6th | Rise and Shine | Adds damage whenever she swaps in using a Support Skill. |
Best teams for Lacrimosa
Lacrimosa peaks in a DoT and Discord team. She wants an Incantation character to apply Scorch, a Psyche character to apply Nova and trigger Discord, and a Break unit to open enemies up for her 400% ATK Discord burst. Sakiri is a high-priority partner because she increases the team’s DoT and groups enemies.

| Team | Members | Why it works |
|---|---|---|
| Core DoT / Discord | Lacrimosa, Sakiri, Haniel, Daffodill (or Fadia) | Sakiri groups and boosts DoT, Haniel buffs and applies Nova, Daffodill breaks enemies for the Discord burst, or Fadia for survivability. |
| Quick-swap boss team | Lacrimosa, Daffodill, Sakiri, Haniel | Break with Daffodill, then swap in Lacrimosa for big Nightmare and Discord bursts. Strong for bosses and high-difficulty content. |
| Budget Discord | Lacrimosa, Sakiri, Haniel (A-rank), Adler (A-rank) | Sakiri groups and applies Curse, Adler shields and amplifies Curse, Haniel applies Soul and stacks ATK. Low cost, but no dedicated healer. |
Gameplay loop and rotation
The goal of every rotation is constant Nightmare uptime followed by a reaction detonation. Open with a support to set up Cycle Energy, swap to Lacrimosa to apply Scorch, stack Nightmare with her on-field attacks, then trigger Nova and Discord with a Psyche character.
You know it is working when Nightmare ticks Chaos damage each second on the target and Discord lands on a Broken enemy for the bonus 400% ATK hit. If Discord is not firing, the usual cause is missing a Break unit or skipping the Nova trigger after Scorch.
Build Lacrimosa around The Last Rose and Diabolos, keep Nightmare applied through her Basic Attacks and Ultimate, and lean on Sakiri, Haniel, and a Break partner to chain Scorch into Discord. Done right, she clears trash with her ranged combo and deletes bosses with stacked Nightmare and the Discord burst, making her one of the most flexible Chaos carries to invest in.