The Skill Builder V2 in The Strongest Battlegrounds is a private server tool that lets you stitch together existing in-game skills, animations, sound effects, trails, and props into a single custom move with its own name, cooldown, and conditional variants. The flow is straightforward once the interface is sized correctly: configure the move, lay out the timeline, decorate it with assets, run the validator, and save.
Open the Skill Builder and fix the UI first
The Skill Builder lives inside the private server tool menu under the Map section. Before touching anything else, resize the interface, because the default UI is too small to work with comfortably on most screens.
Configure the move: name, cooldown, and variants
The Move Settings panel defines the identity of the skill. A move must have a name and a cooldown before it can function correctly. If the name field turns red and blocks you from entering the timeline, type a temporary placeholder name, build the move, then rename it before pressing build again.
| Setting | What it controls |
|---|---|
| Skill Name | The display name shown in your moveset |
| Cooldown (s) | Seconds before the move can be used again |
| Move Type | The category the move slots into |
| Variants | Alternate versions of the same skill, each with its own timeline |
Variants let one skill behave differently based on the player’s state at the moment of use. Each variant has an independent timeline, so editing one does not affect the others. The trigger conditions available are:
- Awakening bar usage and cost
- User HP thresholds
- User state, airborne or grounded
- Movement direction: forward, back, left, or right
Build the timeline
The timeline is a chain of nodes, and each node represents one step in the move’s execution. For every node, pick an existing in-game skill, pair it with an animation, and tune how fast it plays.
| Node setting | Effect |
|---|---|
| Skill | The underlying ability that plays during the node |
| Animation | The character animation played during the node |
| Attack Speed | Speed of the attack logic on that node |
| Animation Speed | Playback speed of the animation |
Chain as many nodes as the move needs. For a simple custom finisher you might use one node, like Cosmic Strike paired with Animation #12. For longer combos, lay out each hit in order.
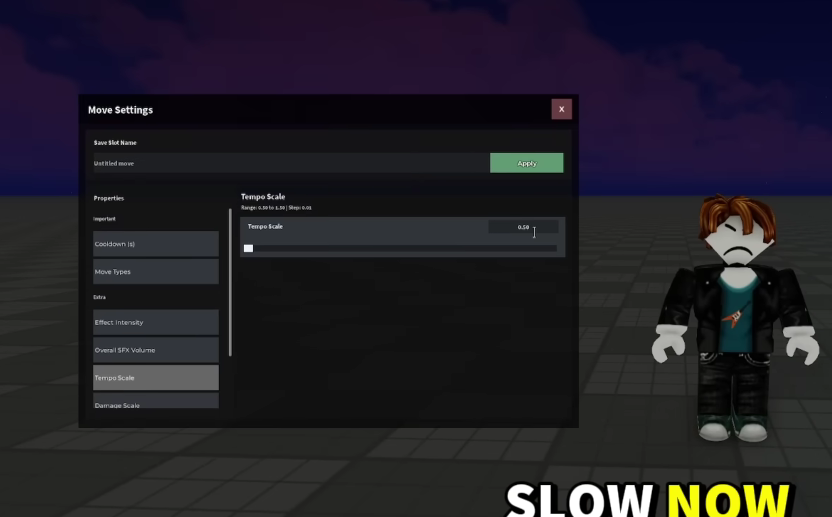
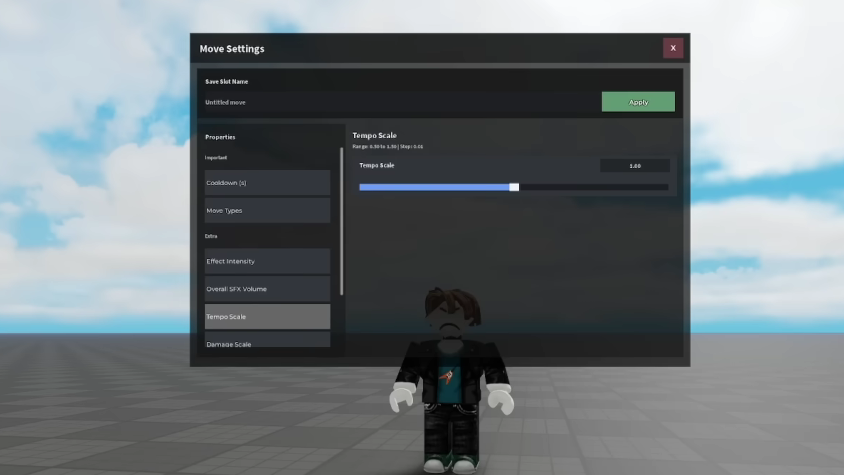
Tune the audio and visual feel
The Extra panel applies global settings to the entire skill rather than to single nodes. Adjust these after the timeline is locked in.
| Setting | Effect |
|---|---|
| Effect Intensity | Volume of the move’s sound effects |
| Overall FX Volume | Overall audio level for the skill |
| Tempo Scale | Playback speed of the whole move; lower is slower, higher is faster |
| Damage Scale | Multiplier on damage output |
| Knockback Scale | Multiplier on knockback force |
| Color Effects | Custom color theme for visual effects |
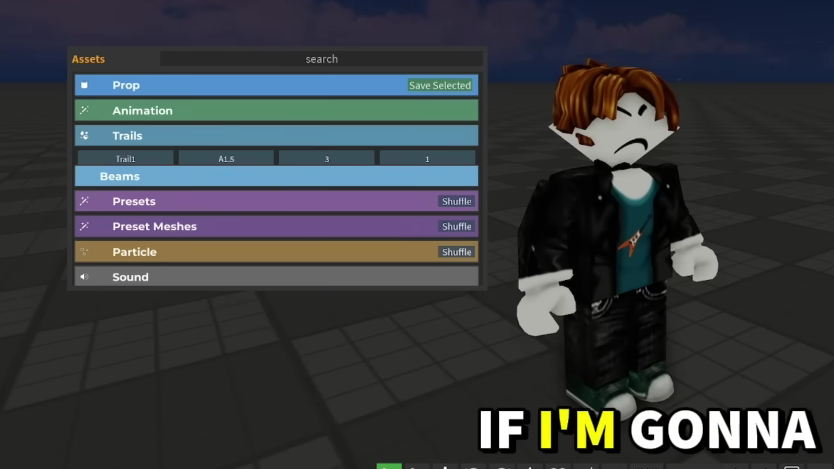
Add presets, trails, and props
The Assets panel holds pre-made meshes, effects, trails, and props. Open Presets or Preset Meshes to drag ready-made effects directly onto the timeline. Once an asset is placed, click it to tweak centering, size, color, and other properties so it sits cleanly inside the move.
Trails: Pick a Trail from the Assets panel, then open its Position tab and set the HumanoidPart, for example Right Arm, so it follows that body part as the animation plays. The Shape tab controls size, and the color picker sets the streak color. Duration controls how long the trail lingers after the move ends.
Props: Props like a katana spawn attached to a default body part, usually the hand. To move one, open the prop’s settings, change the HumanoidPart to Head, Right Arm, Left Arm, or RightHand, then manually drag and rotate the prop until it lines up with the animation.
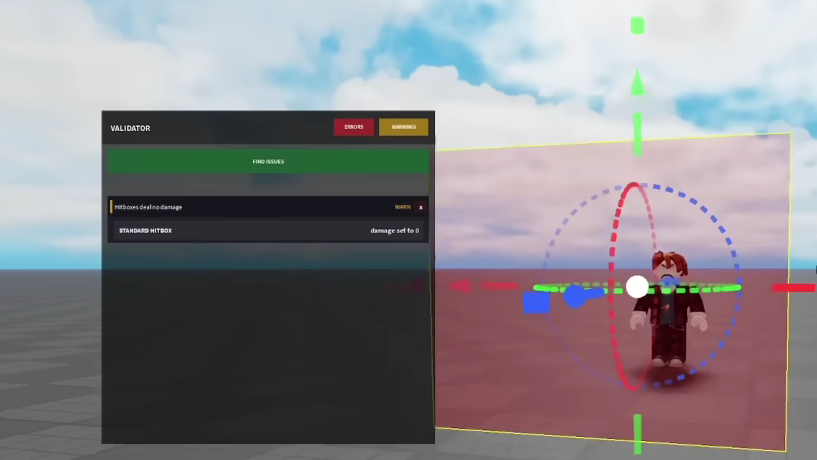
Run the Gauntlet Validator before saving
The Validator catches the errors that quietly break custom moves, especially missing hitboxes and hitboxes that deal zero damage. Click Find Issues and the validator highlights each problem and lets you jump straight to the offending node.
The most common flagged error is “Hitbox deals no damage.” Select the flagged hitbox, open its properties, and set a damage value. A move with no hitbox or zero damage will still save and play its animation, but it will not register hits on the dummy or other players.
Save the move and equip it
You will know the move is working when the dummy takes damage and reacts with the expected knockback during the animation. If the move only triggers visuals, the hitbox is either missing, disabled, or set to zero damage on at least one node.

Common reasons a custom move fails
- The name field is tagged or duplicated, blocking entry to the timeline. Use a placeholder name first, then rename before the final build.
- A timeline node has no hitbox attached, so the animation plays without dealing damage.
- A hitbox exists, but its damage value is zero, or its scale is too small to connect.
- A prop or trail is attached to the wrong HumanoidPart, making the move look broken even when the underlying logic works.
- Running the Skill Builder on console, where it is not currently supported.
The Skill Builder rewards iteration. Build a short, one-node move first, validate it, save it, and test it on a dummy before chaining longer combos, swapping in presets, or layering trails and props. Once the validation loop becomes habit, longer custom skills with conditional variants are mostly a matter of stacking nodes and tuning the Extra panel.