
Everyone is well versed with the Blue Screen of Death errors, and in Windows 11, similar to that is a Black Screen of Death error; The DPC_Watchdog_Violation is one of the black screens of death errors. The error can present itself mainly when the Deferred Procedure Call) the process runs longer than it typically should.
Initially, the issue arose in computers having SSD storage drives having an outdated or incompatible driver for the operating system. However, it is not limited to just that and can be faced in PCs with problems such as corrupted system files, incompatible external hardware, and software conflicts. Moreover, another identified cause for this error is an incompatible SATA AHCI driver.
Whatever be the cause of the issue, BSOD errors can be identified and resolved by yourself in the comfort of your home, and in this guide, we are going to showcase some methods using which you can fix this issue on your computer once all.
We will be first starting with the fixes requiring the least intervention from your side and then moving towards the ones depending almost completely on your input. Since there could be more than one reason behind this BSOD error, you might need to perform more than one fix in order to eradicate this issue from your system.
1. Unplug All External Hardware Devices
Since at times external devices connected to your computer tend to bring this issue on your computer. Hence, disconnecting them and checking if the issue still persists definitely cannot hurt.
Hence, unplug all non-essential external devices such as hard disks or USB storage, printers, game controllers, mouse, and keyboards can be plugged in though.
After you have disconnected all peripherals, check if the error occurs, if the error doesn’t present itself even after a while, connect the external devices one by one and check which one is incompatible with your PC.
Once identified, you can update the external device’s driver in order to rectify the issue on your PC.
2. Run CHKDSK on your Computer
The primary function of the command is to check the integrity of the file system on the hard drive and make necessary fixes. The command can also fix bad sectors on your hard drive.
Running CHKDSK Using File Explorer
If you are not very tech-savvy, Windows gives you the option to run the CHKDSK command from the file explorer without typing any sort of commands in the Command Prompt.
To do so, first, double-click on the ‘This PC’ icon present on your desktop. Alternatively, you can press the Windows+E shortcut on your keyboard to open it as well.

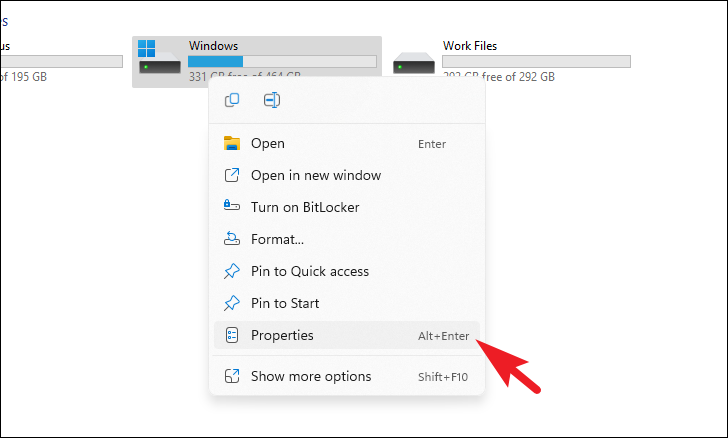
Now, right-click on the Windows installer drive and choose the ‘Properties’ option from the context menu.
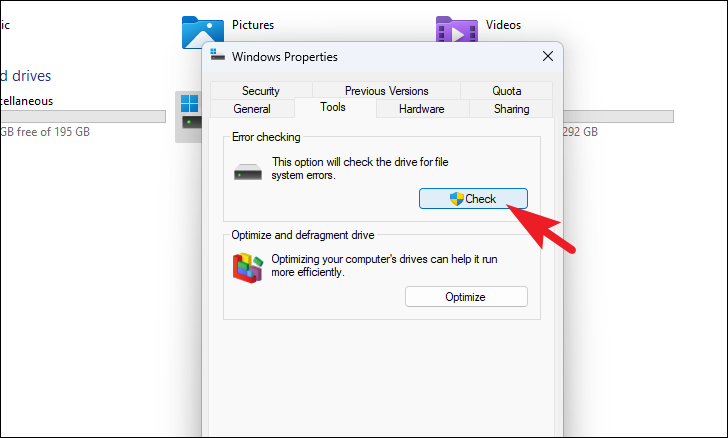
Click the ‘Tools’ tab on the ‘Windows Properties’ window, and then click on the ‘Check’ button in the ‘Error Checking’ section.
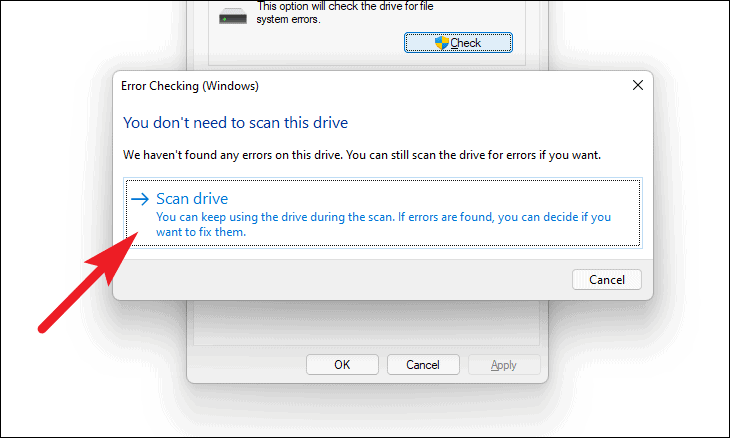
If there are no errors on the drive, you might receive a prompt from the system stating so. In case you still wish to continue with the scanning, click on the ‘Scan drive’ option on the prompt.
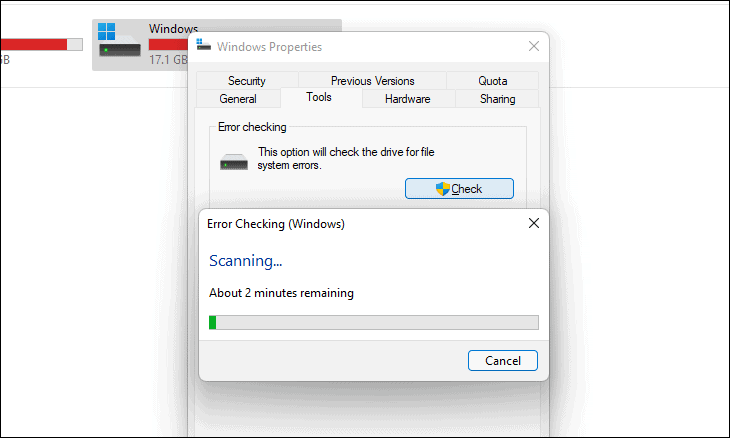
The scan may take a while. Wait patiently while the process runs in the background.
If you wish to gain more control over the CHKDSK command, you can invoke it using the Command Prompt.
Running CHKDSK Using Command Prompt
While this method does not offer the convenience of GUI, it definitely offers complete control and more flexibility in using the commands with the help of parameters.
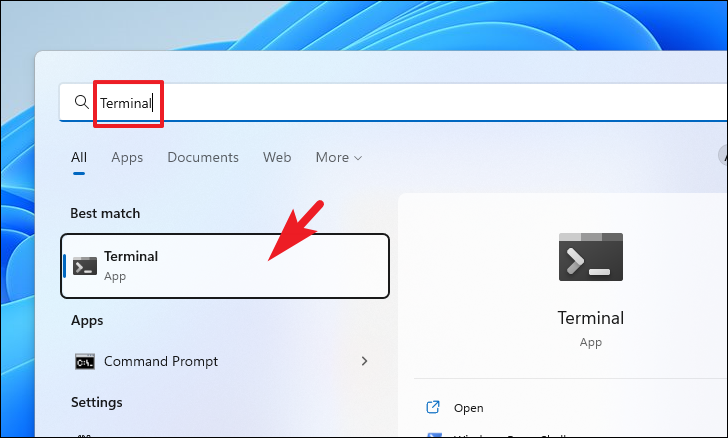
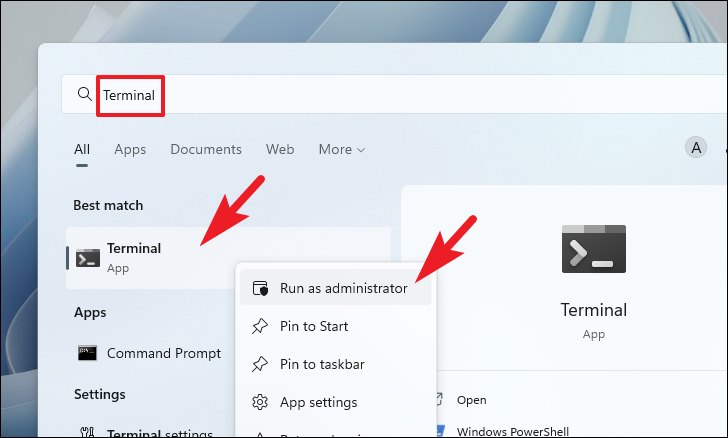
First, head to the Start Menu and type Terminal to perform a search for it. Then, from the search results, right-click on the ‘Terminal’ tile and select the ‘Run as administrator’ option from the context menu to proceed.
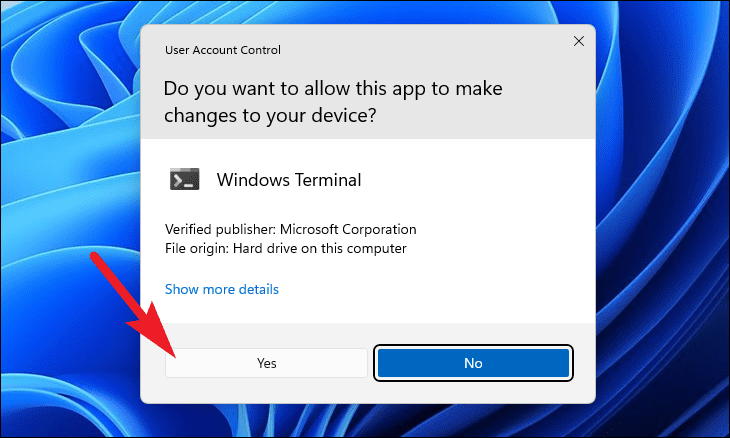
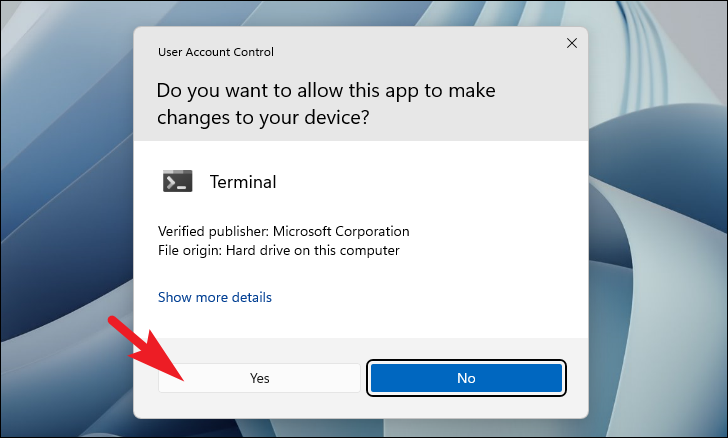
Now, a UAC (User Account Control) window will appear on your screen, if you are not logged in with an admin account, enter the credentials for one. Otherwise, click on the ‘Yes’ button to continue.
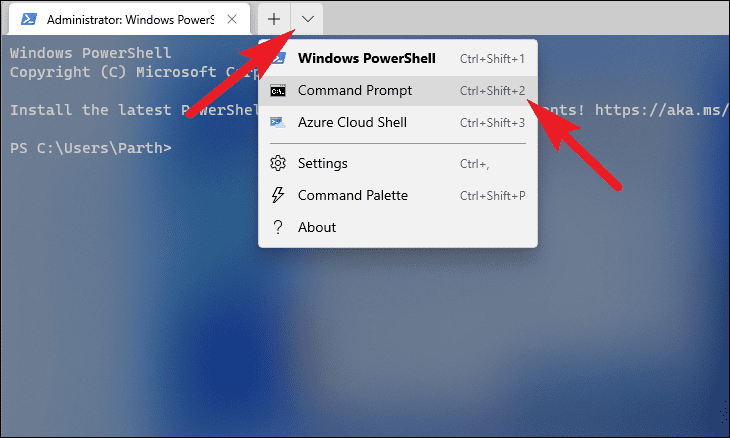
Next, click the carat icon (downward arrow) on the Terminal window, Then, select the ‘Command Prompt’ potion from the overflow menu. You can alternatively press the Ctrl+Shift+2 keys together on your keyboard to do so.
Now, type or copy+paste the below-mentioned command in the Command Prompt window and press Enter.
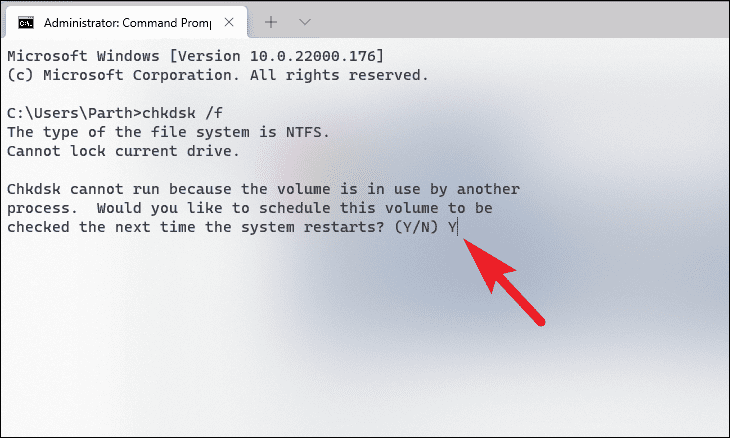
chkdsk /f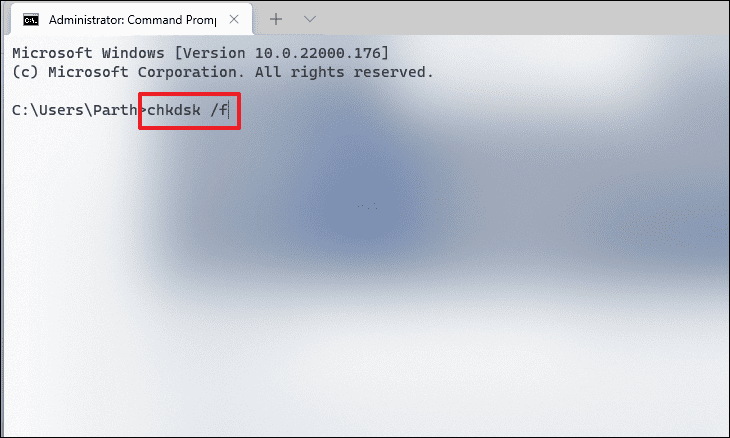
You may receive a prompt to schedule the CHKDSK procedure on the next boot of your computer since the drive cannot be in use while the tool is running its operation. To schedule press Y on your keyboard.
Finally, shut down your computer from the Start Menu and turn it back on. The CHKDSK tool will automatically start scanning the storage volume before the PC boots up.
3. Run SFC and DISM Scan Using Command Prompt
The first and foremost is to run a System File Checker (SFC) and Deployment Image Servicing and Management scan in order to check if there are any damaged or corrupted system files and download new system files from Microsoft servers to replace them.
To do so, open the Start Menu and type Command Prompt to perform a search. Then, from the search results, right-click on the ‘Command Prompt’ tile and select the ‘Run as administrator’ option to open the Terminal with admin rights.
Now, a UAC (User Account Control) screen will appear. If you are not logged in with an admin account, enter credentials for one. Otherwise, click on the ‘Yes’ button to proceed and open the Command Prompt window.
After that, type or copy+paste the below-mentioned command and hit Enter on your keyboard. This will run the DISM tool on your PC which will reinstall the system image that is used to repair your Windows PC.
Note: This command requires an active internet connection to download the system image files from the Microsoft Server.
DISM /Online /Cleanup-Image /RestoreHealth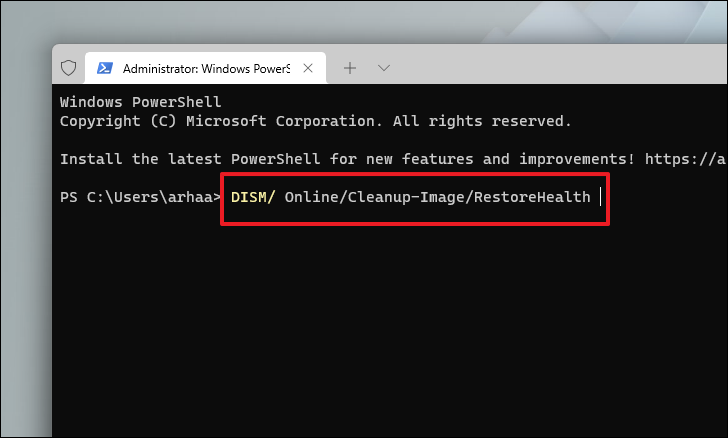
The DISM command may take up to several minutes depending on the speed of your internet connection, it may also appear stuck at times and it is a normal behavior of the command. Wait patiently till the execution of the command completes.
Once completed, type or copy+paste the below-mentioned command to invoke the SFC (System File Checker) that will scan your currently installed Windows image and fix the damaged computer files using the one you downloaded in the previous step.
SFC /scannow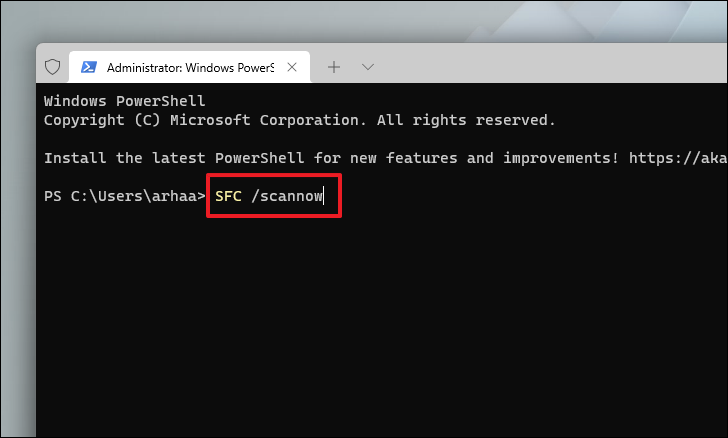
Once the SFC command is finished executing, head to the Start Menu and restart your PC.
4. Roll Back to a System Restore Point
If you are able to log into your machine and are still able to perform basic tasks, this option will fit you best.
Note: Performing a System Restore uninstalls programs and updates you have installed after the creation of System Restore Point.
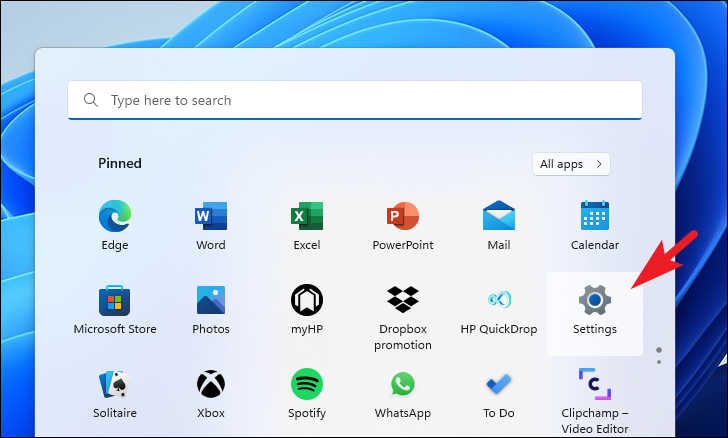
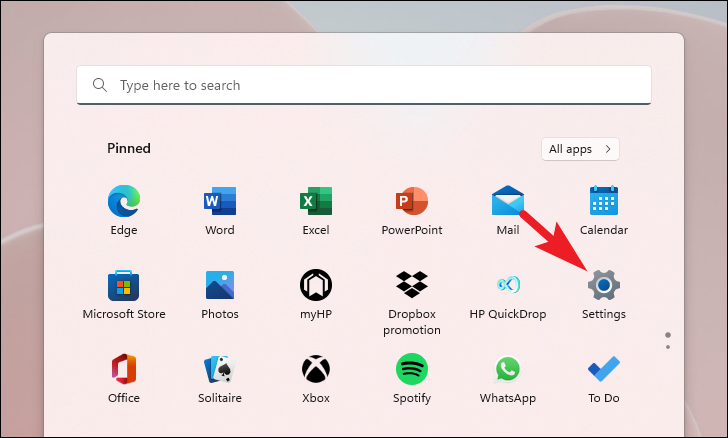
To roll back your computer to a previous state, open the Start Menu and open the Settings app by either clicking on its tile present in the ‘Pinned apps’ section or by searching for it.
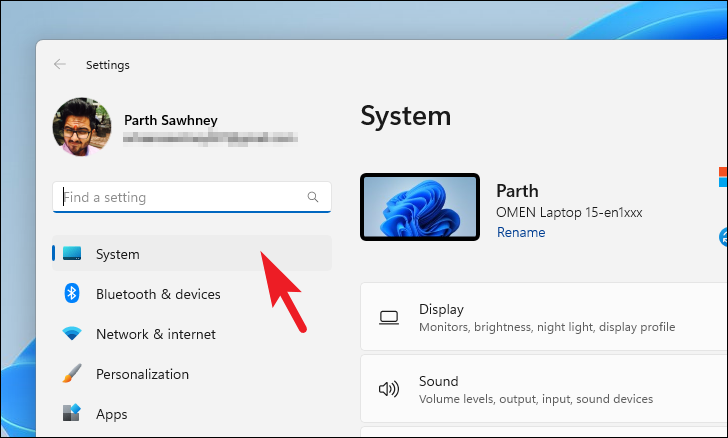
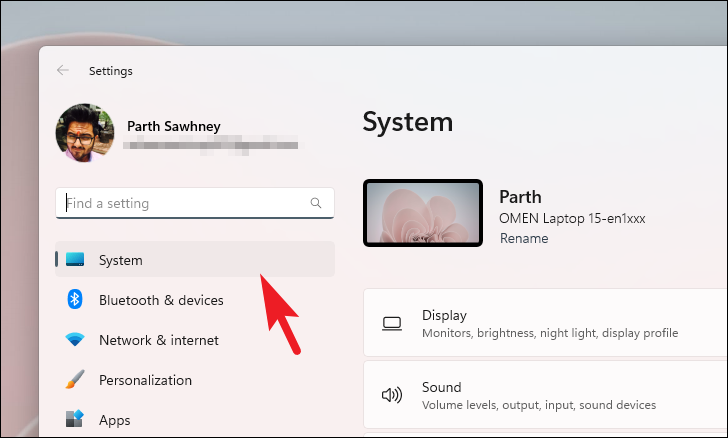
Then, make sure you have selected the ‘System’ tab present on the left sidebar of the Settings window.
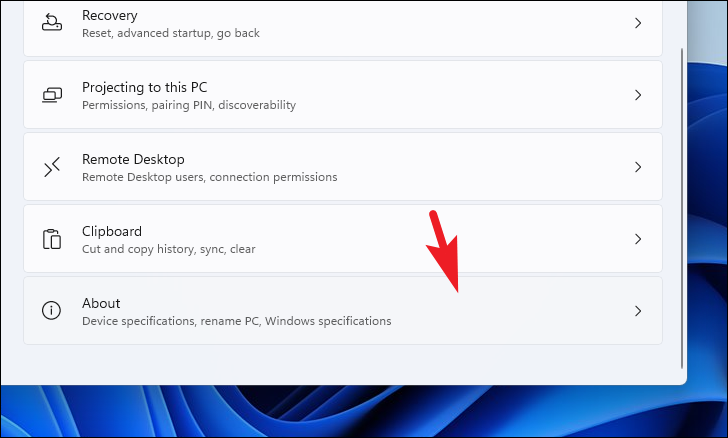
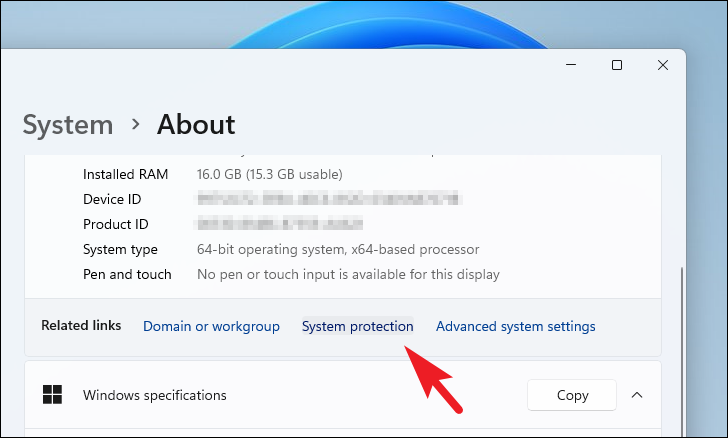
Now, from the right section of the window, scroll down to locate and click on the ‘About’ tile to continue.
Then, on the next screen, locate and click on the ‘System protection’ option present in the ‘Related links’ section. This will open a separate window on your screen.
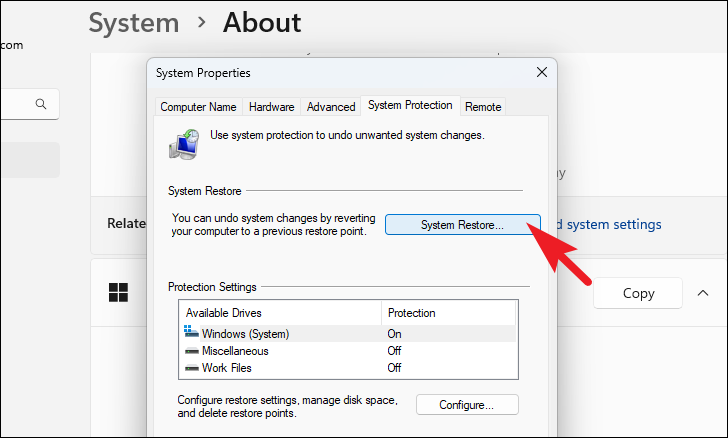
Now, from the separately opened window, locate and click on the ‘System Restore’ button. This will open a separate window on your screen.
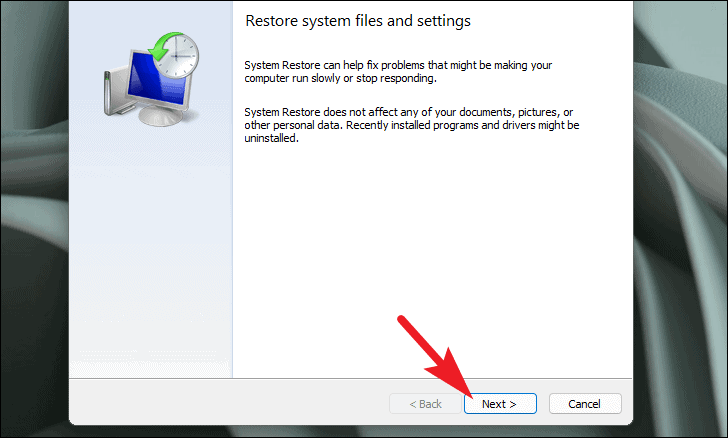
Then, click on the ‘Next’ button from the ‘System Restore’ window on your screen.
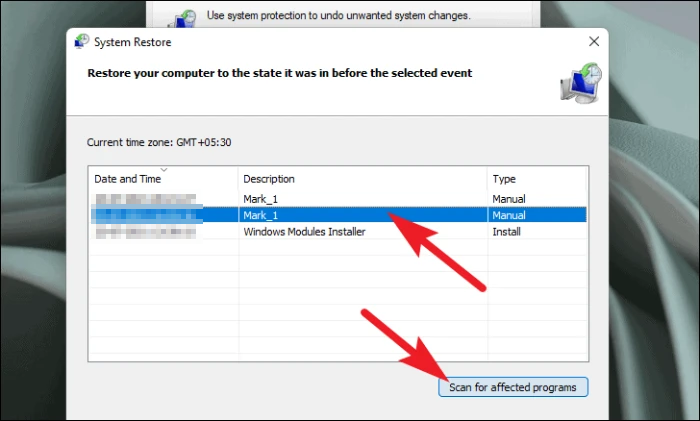
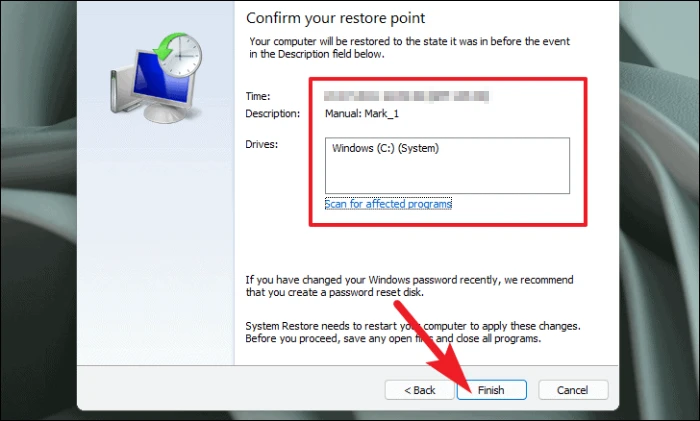
Then, click to choose the System Restore point from the list displayed in the window. After that, click on the ‘Scan for affected programs’ button if you wish to see the programs/apps which will be impacted by the restore. Then, click on the ‘Next’ button to proceed.
After that, on the next screen, you will be able to see the information regarding the ‘Restore Point’ you are restoring your computer from. Next, read the instructions present on the screen carefully and click on the ‘Finish’ button to start the ‘System Restore process.
Your Windows PC will now restart and restore it to its best working state.
5. Reset your PC
In case no method has been able to fix the issue on your PC, the last resort is to reset your PC. Thankfully, you will not lose your personal files and folders, however, resetting your PC will remove all the programs that you have installed and also bring all the settings to their default configurations.
To reset your PC, head to the Start Menu, and click on the ‘Settings’ tile present under the ‘Pinned apps’ section. Alternatively, type Settings in the menu to perform a search.
After that, from the Settings window, make sure you have selected the ‘System’ tab present on the left sidebar.
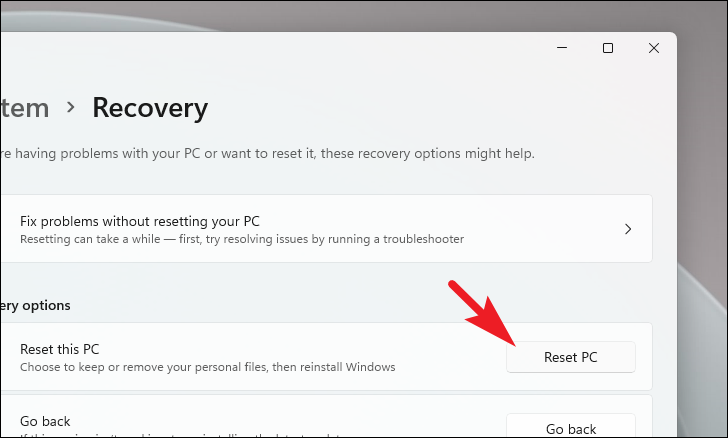
Next, from the right section of the window, scroll down to locate and click on the ‘Recovery’ tile to proceed.
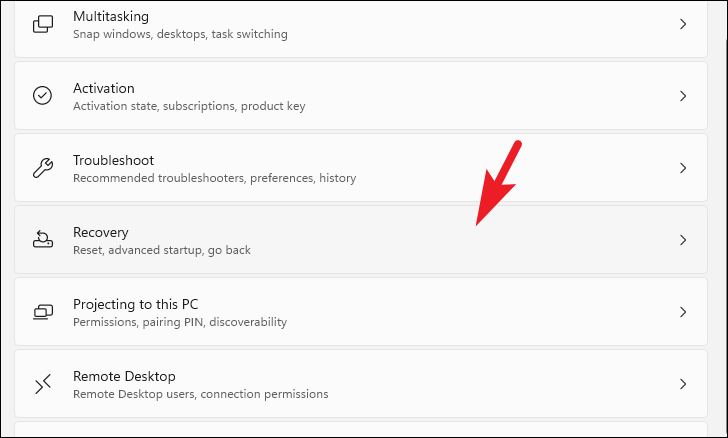
Then, on the ‘Recovery’ settings screen, locate the ‘Reset this PC’ tile and click on the ‘Reset PC’ button present on the far right edge of the tile to proceed. This will open a separate window on your screen.
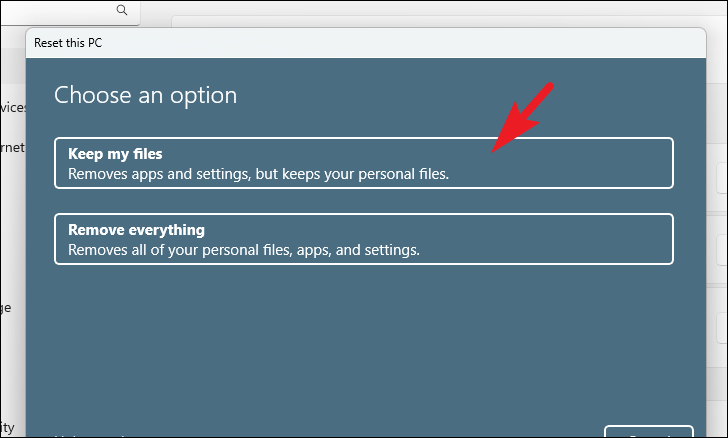
After that, from the separately opened window, click on the ‘Keep my files’ tile to proceed. In case you wish to remove all your personal files as well when resettings, click on the ‘Remove everything’ option.
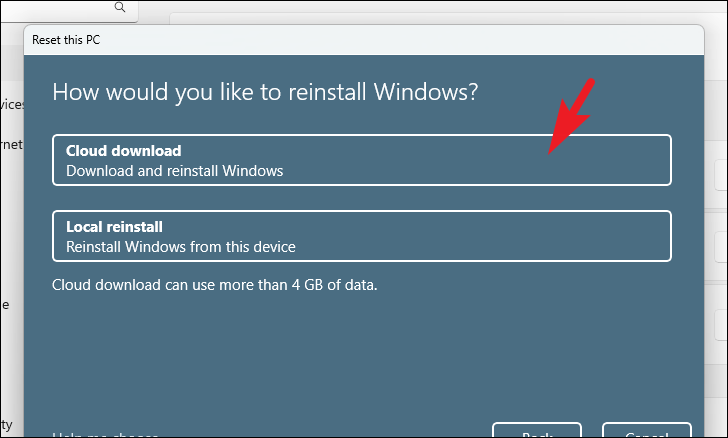
On the next screen, you will need to choose a method for reinstalling the operating system on your machine. Since there could be an issue with the copy already present on your machine. Since there could be an issue with the copy already present on your system, it is recommended that you click on the ‘Cloud download’ route.
Note: ‘Cloud download’ will require an active internet connection and will consume upwards of 4GB of data.
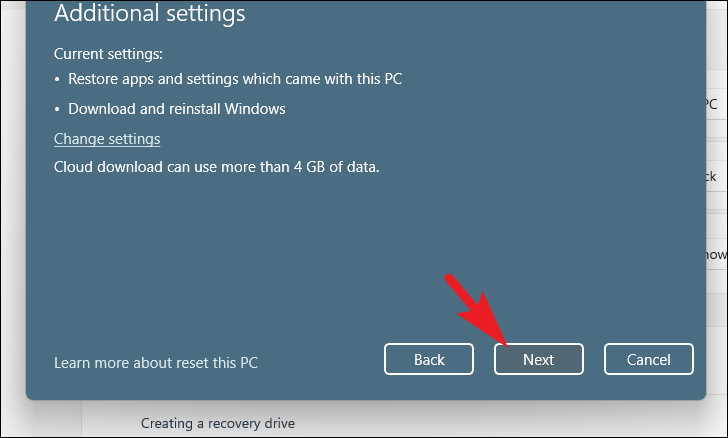
After that, Windows will list the settings that you have chosen. In case you wish to change any of it, click on the ‘Change settings’ option to continue.
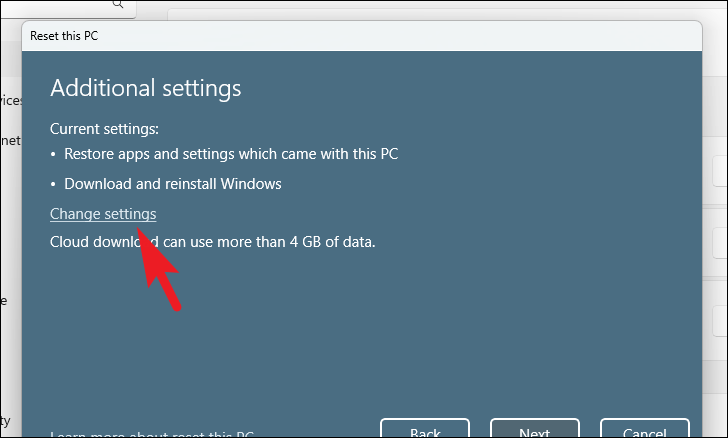
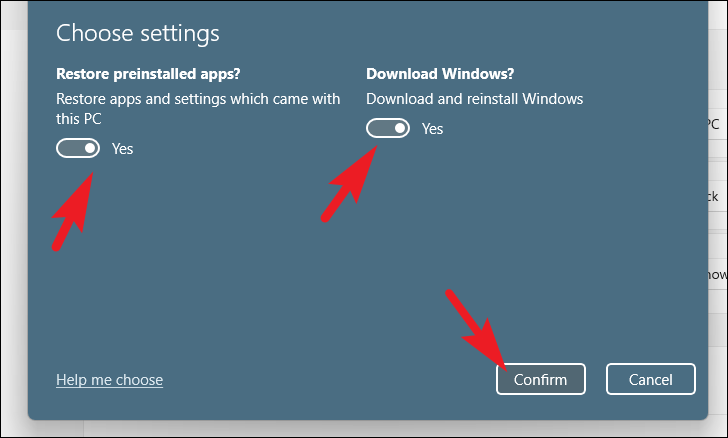
If you chose to change the settings, on the next screen, can choose to not restore the apps and settings, by clicking on the toggle switch present under the ‘Restore preinstalled apps?’ option to bring it to the ‘No’ position. You can even switch from the CLoud download to locate install by clicking on the toggle switch present under the ‘Download Windows?’ option to change the install method. Once adjusted according to your preference, click on the ‘Confirm’ button to proceed.
After that, from the main window, click on the ‘Next’ button to continue.
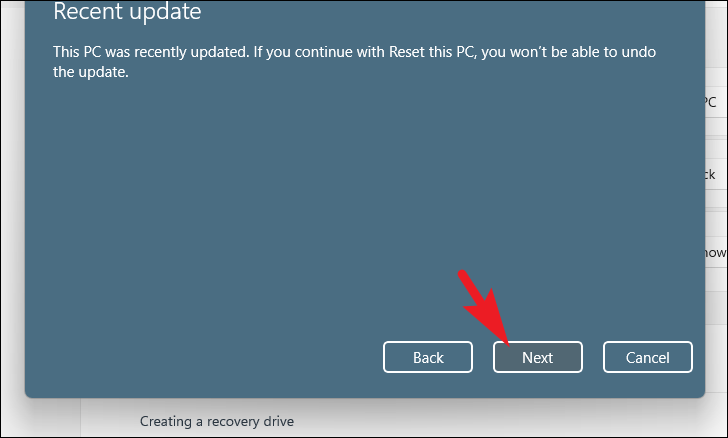
In case your PC was updated recently, you will receive a message on the screen stating that you will not be able to roll back once you reset the PC. To continue, click on the ‘Next’ button.
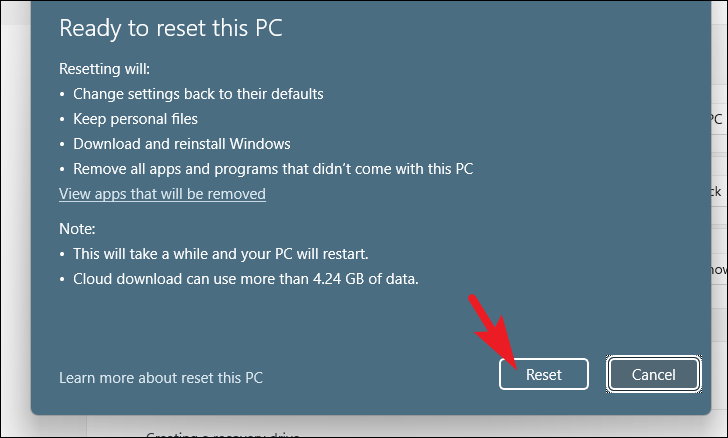
After that, Windows will list out all the impacts resetting your PC will have on your system. Read them carefully and click on the ‘Reset’ to commence the resetting process.
There you go folks, hopefully, using the above listed methods, you will be able to stay away from the BSOD error on your Windows 11 computer.


