
If your Snipping Tool is not working in Windows 11, try restarting your computer and making sure it’s up to date. You can also try resetting the Snipping Tool app or reinstalling it. If none of these solutions work, consider using a different screenshot tool like Greenshot or Lightshot.
The Snipping Tool is a built-in screen capture tool in Windows that has recently undergone a visual overhaul. While the updated user interface and added features have improved the user experience, some users have reported issues with the app, such as it not opening or repeatedly crashing.
Although the Snipping Tool is not a critical software for the Windows operating system, a malfunctioning app can disrupt your productivity if you rely on it regularly. Additionally, it could be a symptom of a larger underlying problem that needs attention.
Fortunately, since this is a software-based issue, you can diagnose and resolve it from the comfort of your home. However, there could be multiple reasons for the problem, and you may need to try several fixes outlined in this guide to completely resolve the issue on your system.
Method 1: Reset or Repair the Snipping Tool
Resetting or repairing the Snipping Tool is one of the most elementary and convenient methods to eradicate the problems in the app. Moreover, this is also one of the methods requiring the least intervention from you, as Windows handles the majority part by itself.
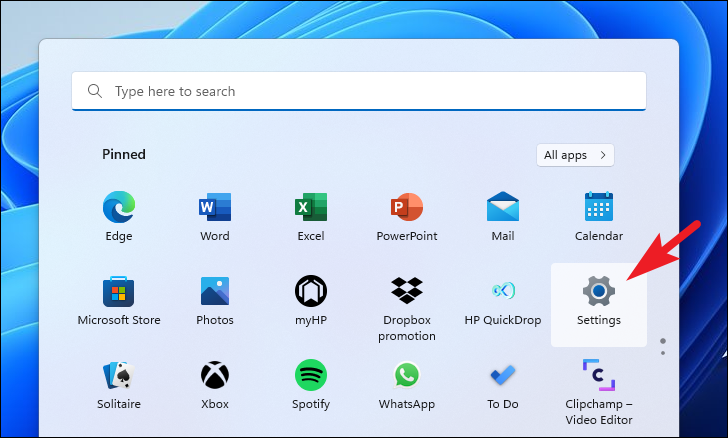
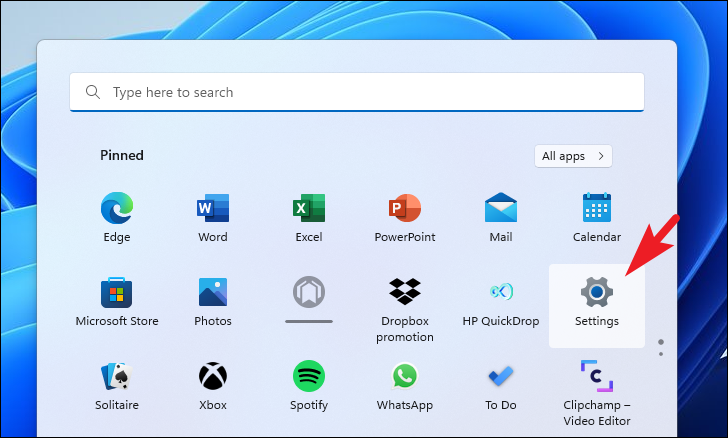
First, head to the Start Menu and click on the ‘Settings’ tile present under the ‘Pinned apps’ section to continue. Otherwise, type Settings in the menu to perform a search for it. Alternatively, you can also press the Windows+I keys together on your keyboard to open the app.

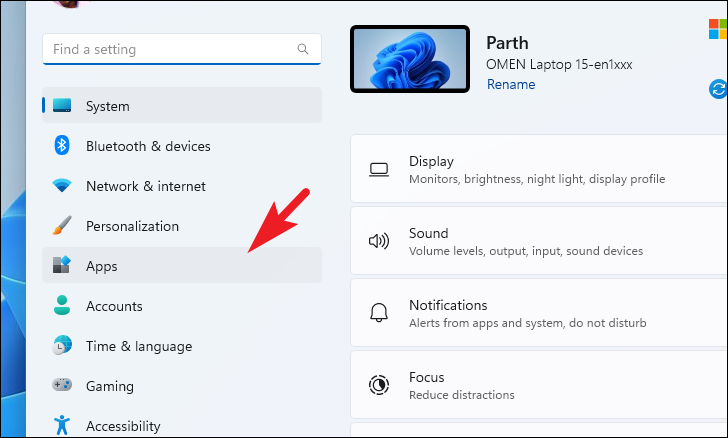
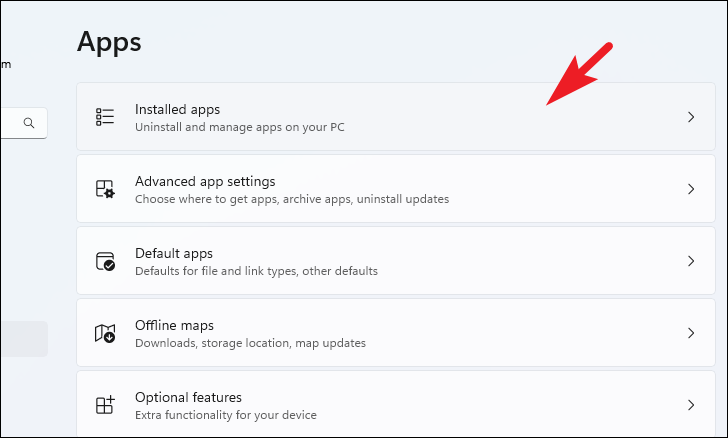
After that, click on the ‘Apps’ tab present on the left sidebar of the Settings window to proceed.

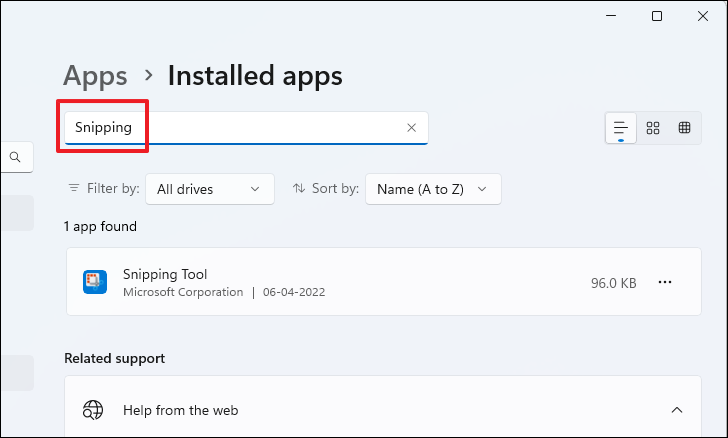
Next, from the right section of the window, locate and click on the ‘Installed Apps’ tile to continue.

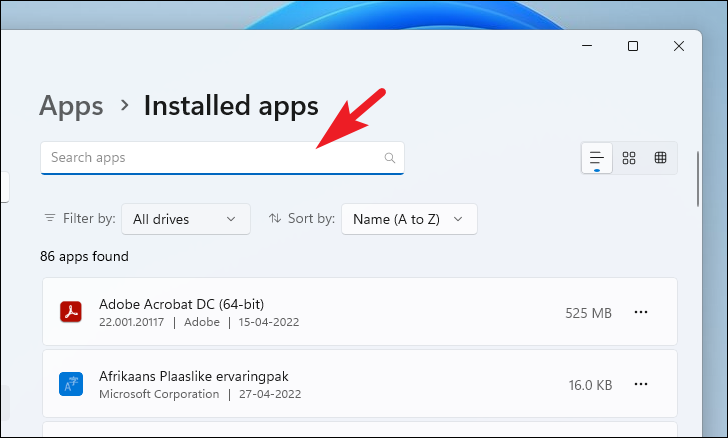
After that, you can either click on the ‘search bar’ present on the topmost section of the page and type Snipping Tool in it to perform a search. Otherwise, manually scroll down the list of apps to locate the ‘Snipping Tool’ app.
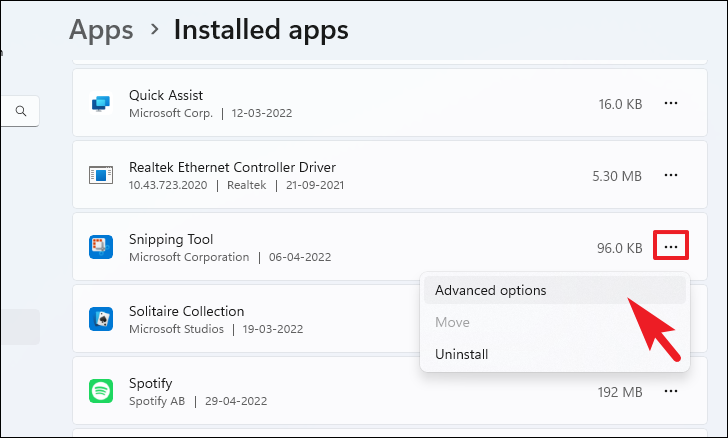
Once located, click on the ‘ellipsis’ icon (three horizontal dots) present on the far right edge of the tile and then click on the ‘Advanced Options’ item present on the context menu to proceed.
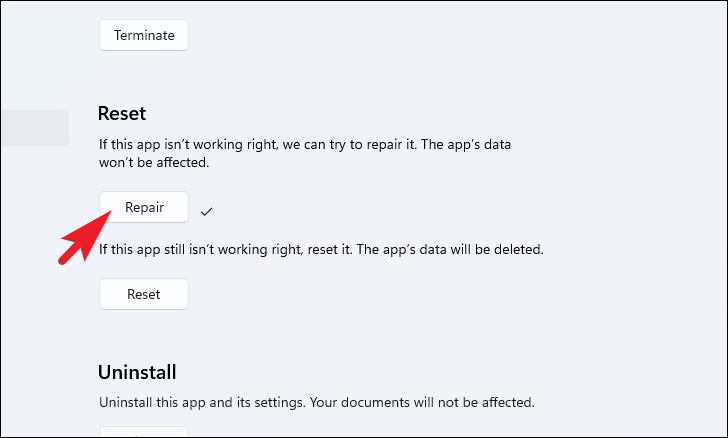
After that, on the next screen, scroll down till you locate the ‘Reset’ section. Then, first, click on the ‘Repair’ button present right underneath the section. Once the repair has been performed successfully, you will see a ‘tick’ icon right beside it.
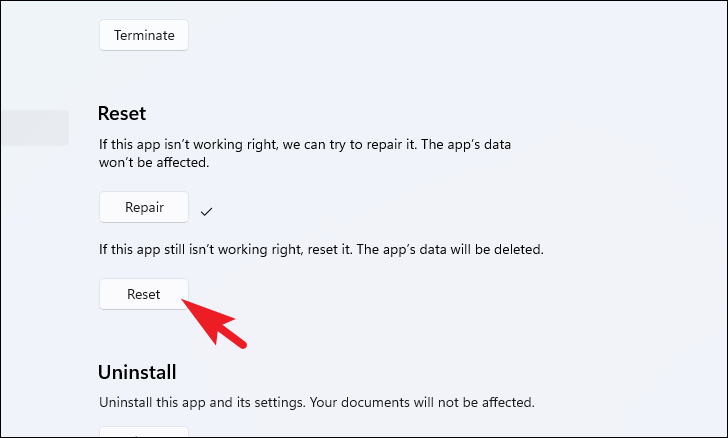
Now, launch the Snipping Tool app on your PC, in case it is still not working or keeps on crashing, head back to the Settings window, and click on the ‘Reset’ button to completely reset the app. All preferences and previous data of the app will be deleted as well.
Once reset, again launch the app to check if it resolved the issue for you.
Method 2: Whitelist Snipping Tool
Focus Assist is an amazing way to manage notifications on your Windows 11 device. But in some scenarios it can also create problems in launching some apps, like the Snipping Tool. However, many users reportedly were able to resolve the Snipping Tool issue by whitelisting the app for priority notifications.
To do so, first, head to the Start Menu and click on the ‘Settings’ tile present under the ‘Pinned apps’ section to continue. Otherwise, type Settings in the menu to perform a search for it. Alternatively, you can also press the Windows+I keys together on your keyboard to open the app.
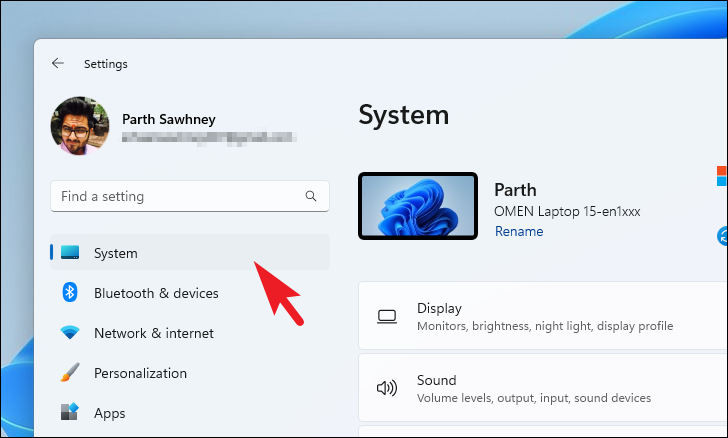
After that, make sure you have selected the ‘System’ tab present on the left sidebar of the Settings window.
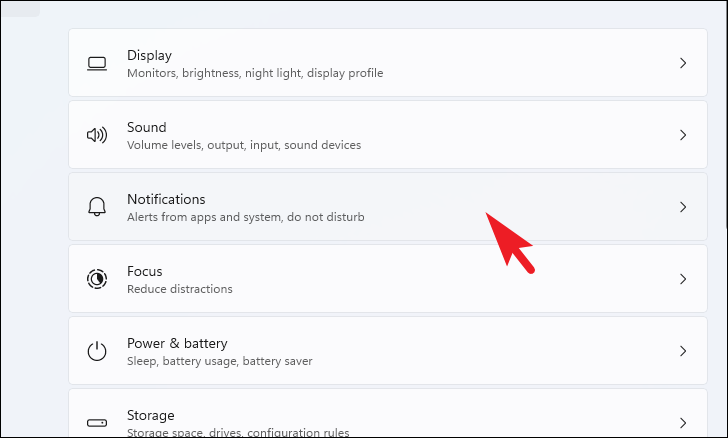
Next, from the right section of the window, locate and click on the ‘Notifications’ tile to continue.
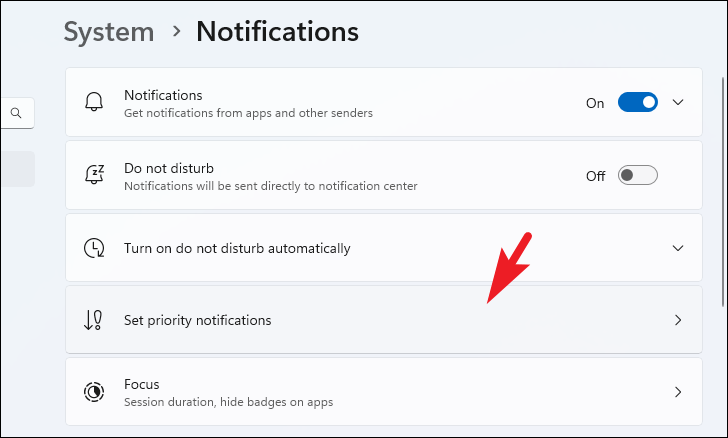
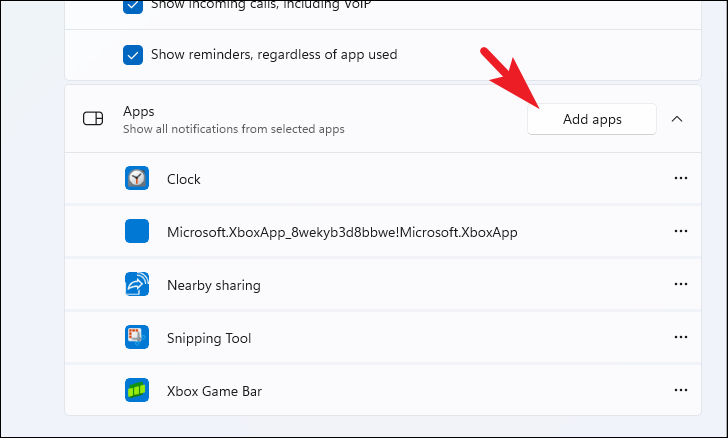
After that, locate and click on the ‘Set priority notifications’ tile to proceed.
Then, on the next screen, locate the ‘Apps’ section and click on the ‘Add app’ button present on the far right edge of the tile. This will open an overlay window on your screen. Then, from the overlay window, scroll down to locate and click on the ‘Snipping Tool’ app to add it to the list.
Once done, close the Settings app and launch the Snipping Tool app on your PC to check if the issue persists.
Method 3: Perform a Clean Boot
In case nothing until now has worked for you,your next option is to clean boot your PC where all services except Microsoft essential services are turned off. You can then check if the Snipping Tool app can run without any issues and turn third-party services on one by one to pinpoint what software/services are causing the problem.
Note: Clean Boot does not remove any data from your system. It just disables all but Microsoft essential services on your computer that are required for system operations. Hence, any third-party services that might be interfering with the ‘Memory Integrity’ functionality will also be turned off and this will allow you to turn it on without any hurdles.
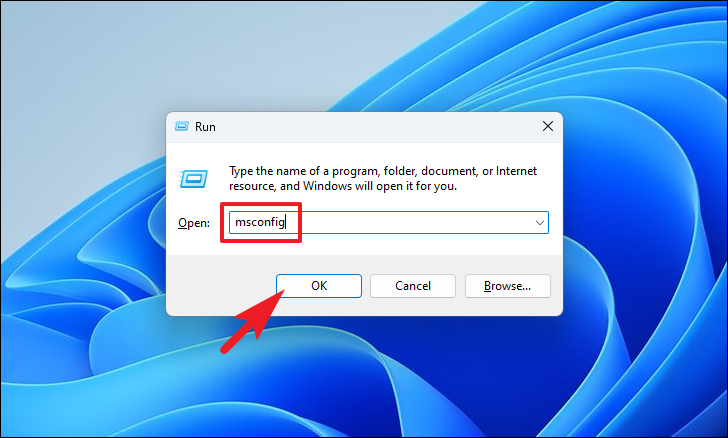
Booting your PC into a clean boot state is fairly easy and straightforward. First, press the Windows+R keys together on your keyboard to bring up the Run command utility. Then, type msconfig and hit Enter on your keyboard to bring up the system configuration window on your screen.
After that, on the System Configuration window, make sure you have selected the ‘General’ tab. Then, click on the radio button preceding the ‘Selective startup’ option. After that, click on the checkbox preceding the ‘Load system services’ option and uncheck every other option if checked.

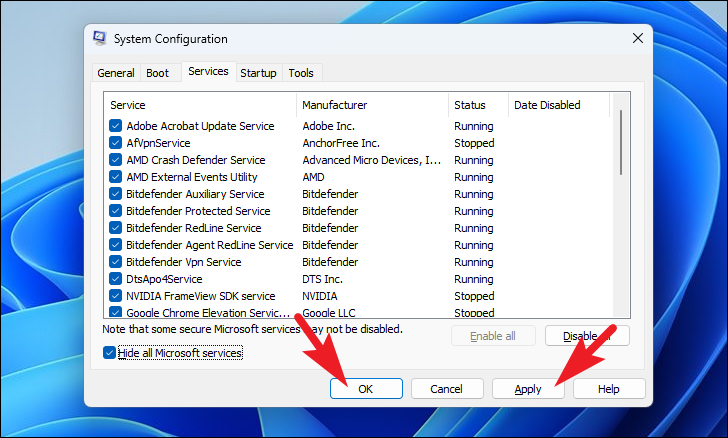
Next, click on the ‘Services’ tab present in the window and then, click on the checkbox preceding the ‘Hide all Microsoft services’ option located in the bottom left corner of the window. Then, click on the ‘Disable all’ button to disable all but Microsoft services.
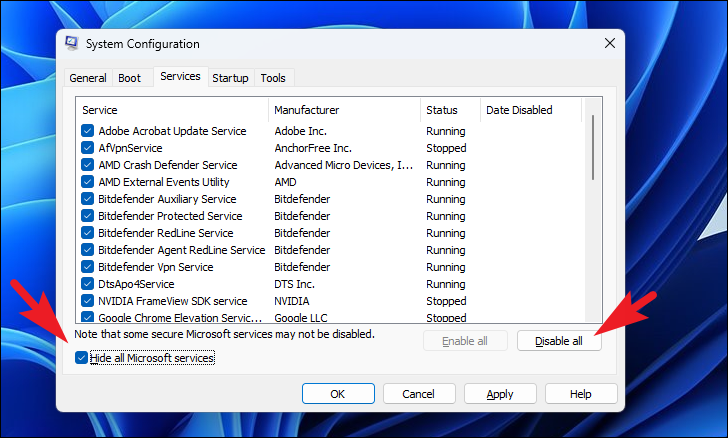
Then, click on the ‘Apply’ button to apply the changes and click on the ‘OK’ button to close the window.
Now, restart your PC from the Start Menu to load the system in a clean boot environment. After the restart, launch the Snipping Tool app and check if it is operating normally. If it is then restart your PC again normally, enable the services one by one to understand which service/software is causing the issue on your PC.
Method 4: Force Enable the Snipping Tool Using Registry Editor
Since Snipping Tool comes as a bundled app with Windows, it is typically enabled by default. However, many times a third-party software or service might interfere with these settings and disable the Snipping Tool on your PC. Force enabling the app from the Registry Editor will solve this and it is a very straightforward process.
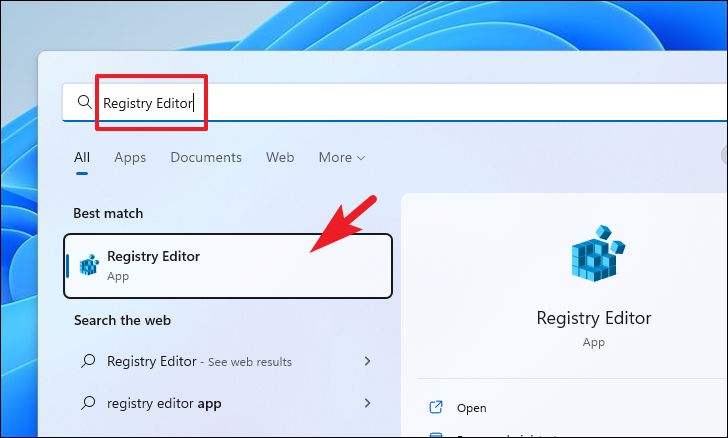
First, head to the Start Menu and type Registry in the menu to perform a search for it. Then, from the search results, click on the ‘Registry Editor’ tile to open the app.
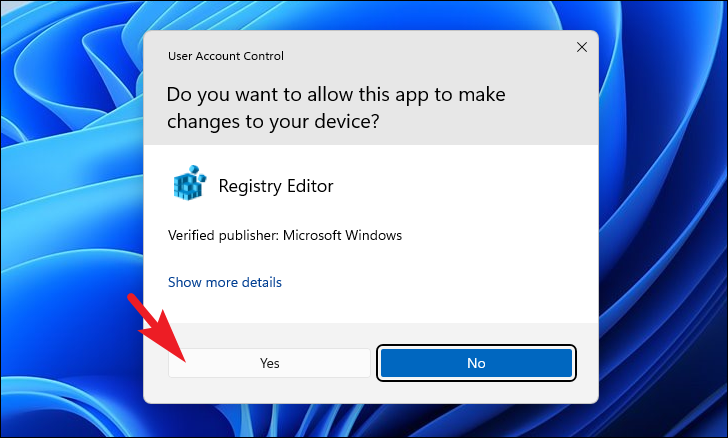
Now, a UAC (User Account Control) window will appear on your screen. If you are not logged in with an admin account, enter the credentials for one. Otherwise, click on the ‘yes’ button to proceed.
Now, on the ‘Registry Editor’ window, navigate to the below-mentioned address or you can even copy+paste the address in the address bar present on the topmost section of the window.
Computer\HKEY_LOCAL_MACHINE\SOFTWARE\Policies\Microsoft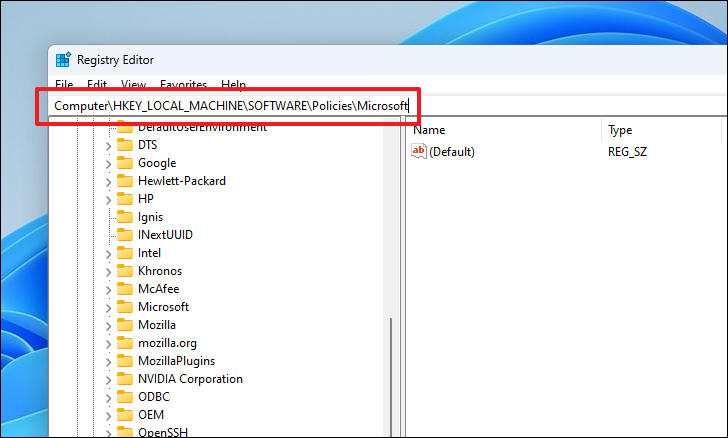
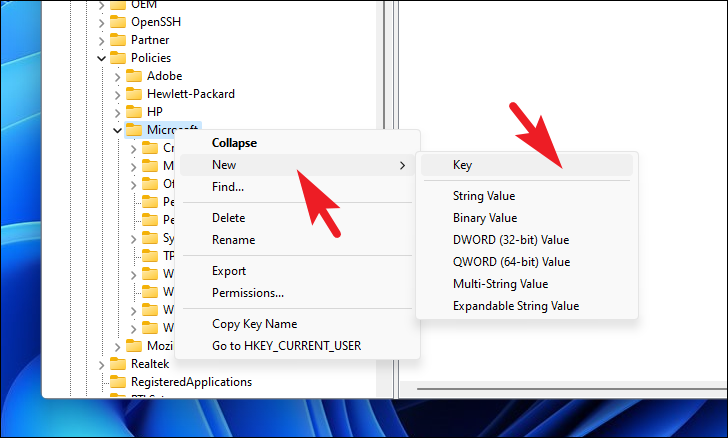
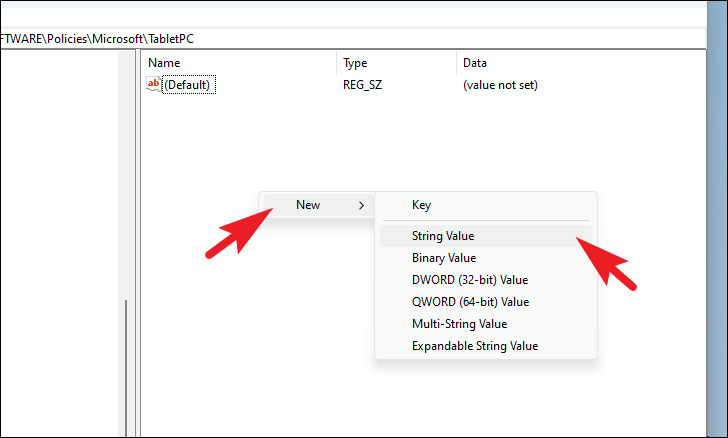
Now, on the left section of the window, right-click on the ‘Microsoft’ key to reveal the context menu. Then, hover over the ‘New’ option to expand the section and click on the ‘Key’ option from the list to create a new directory. Once created, name the key TabletPC.
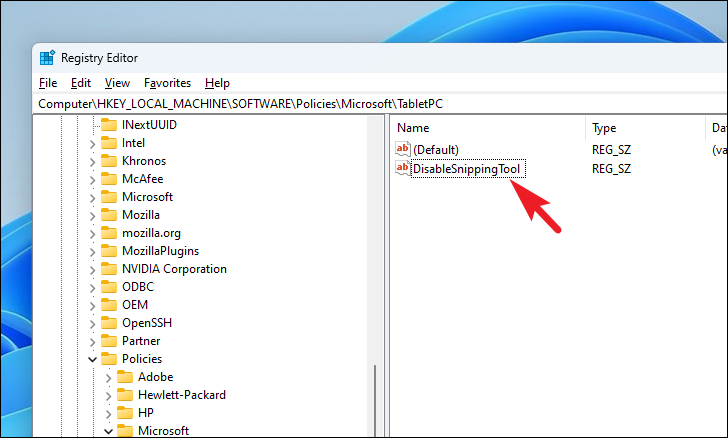
Now, select the newly created key and from the right section of the window, right-click on the empty space to reveal the context menu and hover over the ‘New’ option to expand the section. Then, click on the ‘DWORD’ option to create a new DWORD file in the directory. Finally, name the file DisableSnippingTool.
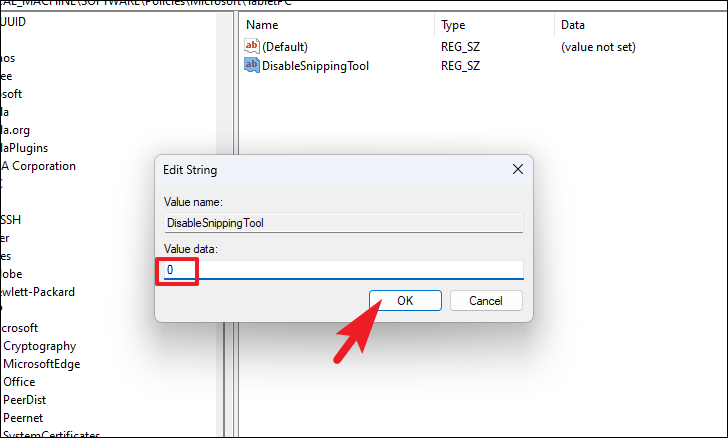
After that, double-click on the newly created file, to edit its properties. This will open a separate window on your screen.
Now, from the separately opened window, locate the ‘Value’ field and enter 0 in the textbox present right underneath it. Then, click on the ‘OK’ button to save and close the window.
Once done, restart your PC from the Start Menu, and after the restart launch the Snipping Tool app on your PC to check if the issue has been resolved.
Method 5: Uninstall and Reinstall Snipping Tool
One more great method to restore the app completely to a fresh state is to uninstall and reinstall it completely on your Windows PC. Moreover, the process hardly demands any significant effort from you.
To uninstall the app, head to the Start Menu and click on the ‘Settings’ tile. You can also use the Search option or the Windows+I keyboard shortcut to open the app.

After that, from the Settings window, click on the ‘App’ tab present on the left sidebar to continue.
Next, from the right section of the window, locate and click on the ‘Installed apps’ to proceed.
Then, on the next screen, either type Snipping Tool in the search bar present on the topmost section of the page or scroll down the list of apps manually to locate the app.
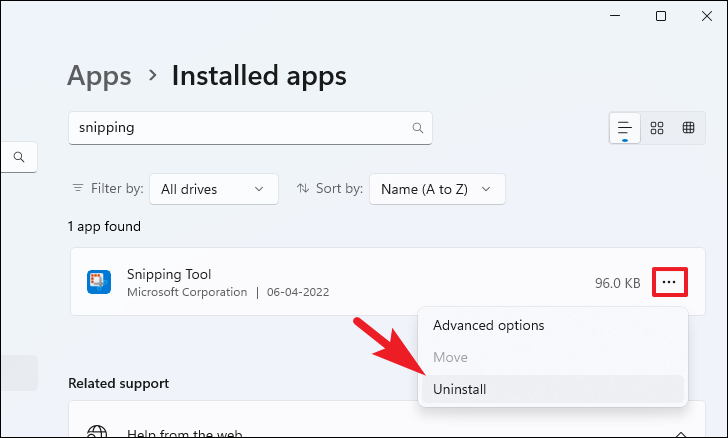
Once located, click on the ellipsis icon (three horizontal dots) present on the far right edge of the tile to reveal the context menu. Then, click on the ‘Uninstall’ option from the menu to proceed. This will bring up a separate window on your screen.
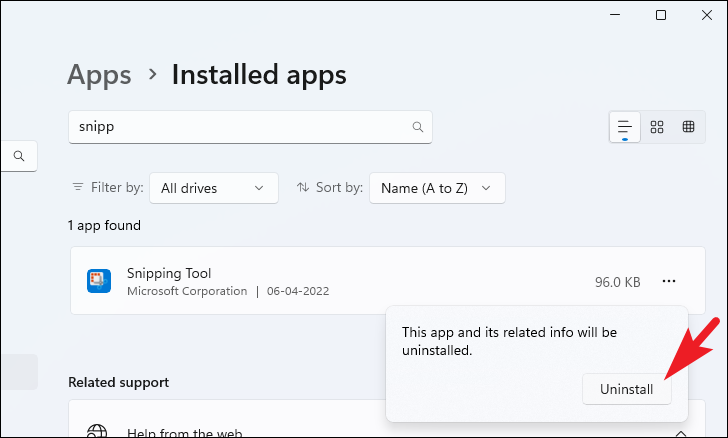
Now, from the separately opened window, click on the ‘Uninstall’ button to remove the app from your system. Once removed successfully, restart your Windows PC from the Start Menu to clear the residue files of the app as well.
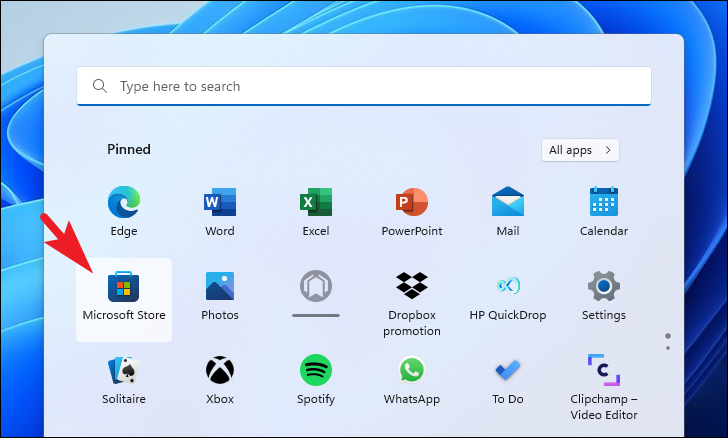
After the restart, head to the Start Menu and click on the ‘Microsoft Store’ icon to open the app. Otherwise, type Microsoft Store in the Start Menu to perform a search for it.
Then, on the Store window, click on the search bar and type Snipping Tool, next Hit Enter on your keyboard to perform a search for it.

Next, from the search results, click on the ‘Snip & Sketch’ tile from the grid of options to proceed.
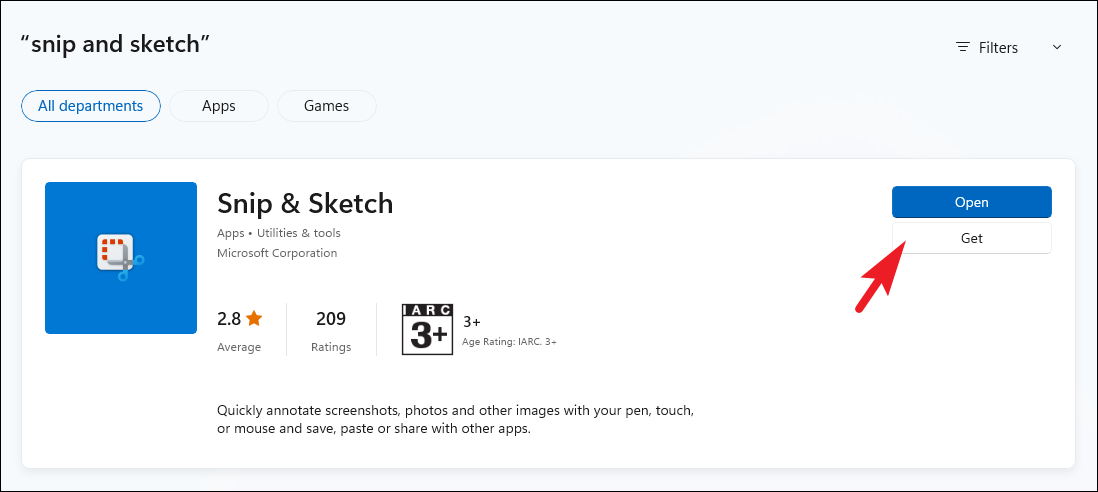
Then, on the next screen, click on the ‘Get’ button present in the right-most section of the page to download and install the app on your device. Once installed successfully, launch the Snipping Tool app on your PC by searching for it from the Start Menu to check if the issue has been resolved.
Method 6: Make Sure the Background App Permissions are Enabled
Typically Snipping Tool has access to your system screen in the background in order to take screenshots. However, a faulty update or a third-party software/service might tinker with this setting and disable the access to Snipping Tool.
To tweak background permission for Snipping Tool, open the Settings app from either the Start menu or using any other method.
Then, click on the ‘Apps’ tab present on the left sidebar of the window to continue.
Next, from the right section of the window, locate and click on the ‘Installed apps’ tile from the list to continue.
After that, you can either type Snipping Tool in the search bar to perform a search for it or you can manually scroll down the list to locate the app.
Once located, click on the ellipsis icon (three horizontal dots) present on the far right edge of the tile to reveal the context menu. Then, from the context menu, click on the ‘Advanced options’ item to proceed.
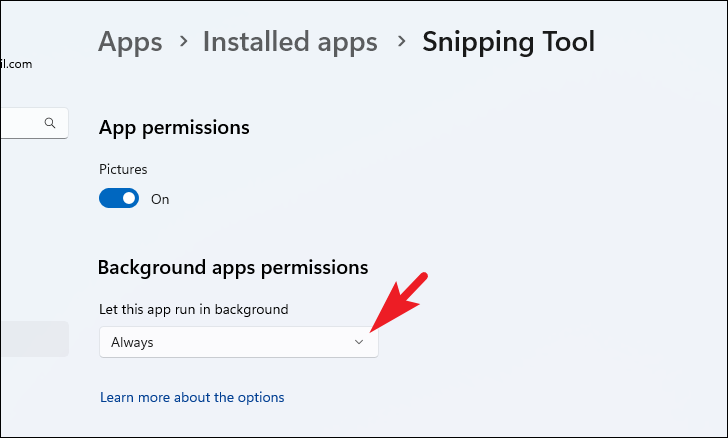
On the next screen, scroll down to locate the ‘App permissions’ section and then make sure the toggle switch present under the section is in the ‘On’ position. If not, click on the switch to bring it to the ‘On’ position.
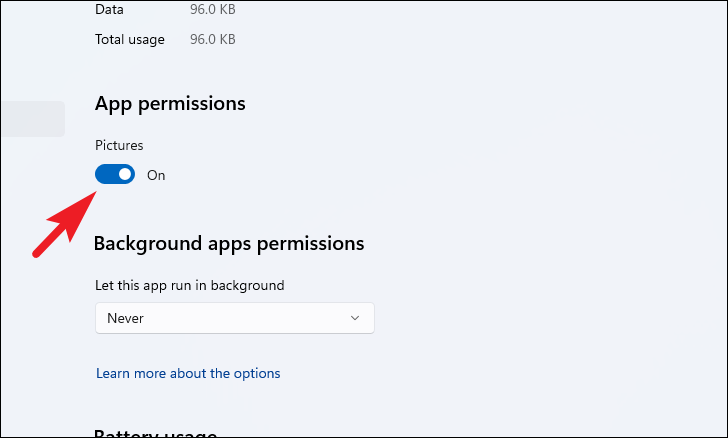
After that, head to the ‘Background apps permission’ section on the same page and click on the drop-down menu present right underneath the ‘Let this app run in the background’ field to reveal the list of options. Then, click to select the ‘Always’ option in the menu.
In case this fix did not resolve your issue, head to the next one.
Method 7: Disable Automatic Time from Settings
Microsoft Community chatter indicates some of the users have been able to resolve the Snipping Tool issue by temporarily disabling the automatic update of time on their PC. Well, since it hardly requires any effort from your side, trying this fix cannot hurt.
Open the Settings app from the Start menu, search bar, or Windows + I keyboard shortcut.

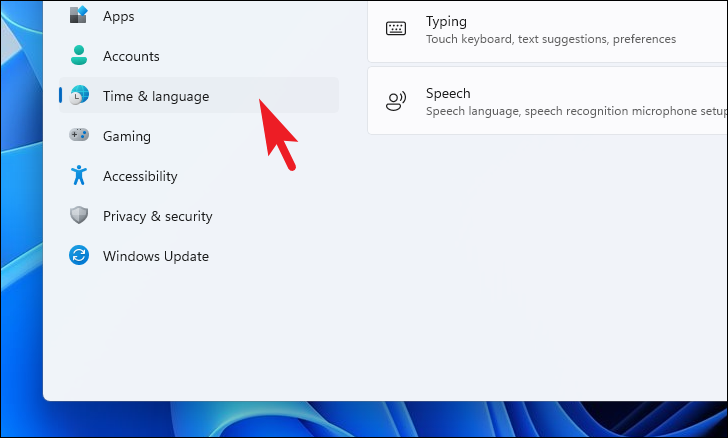
After that, on the Settings window, locate and click on the ‘Time & language’ tab present on the left sidebar to proceed.
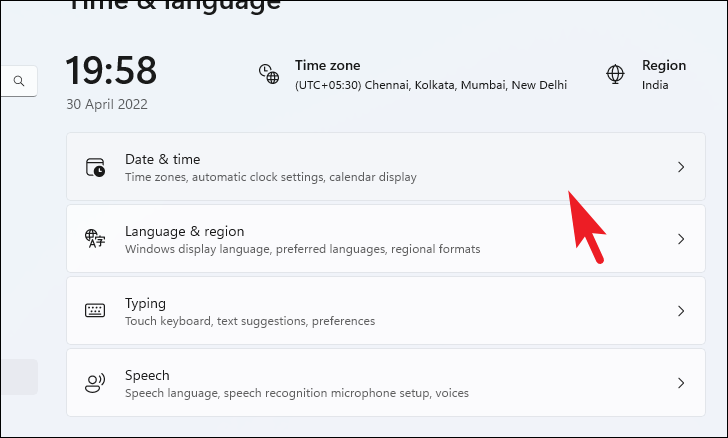
Then, from the right section of the window, locate the ‘Date & time’ tile from the list.
On the next screen, locate the ‘Set time automatically’ tile and click on the toggle switch present on the far right edge to bring it to the ‘Off’ position.
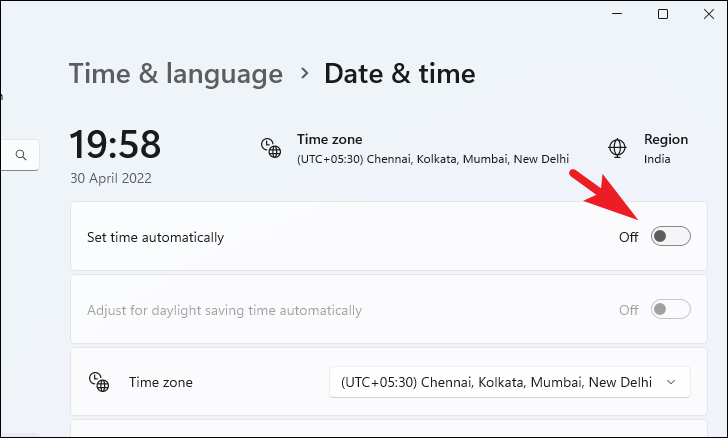
Once turned off, locate the ‘Set the date and time manually’ tile and click on the ‘Change’ button present on the far right edge of the tile to set the date and time manually. This will bring a separate overlay window on your screen.
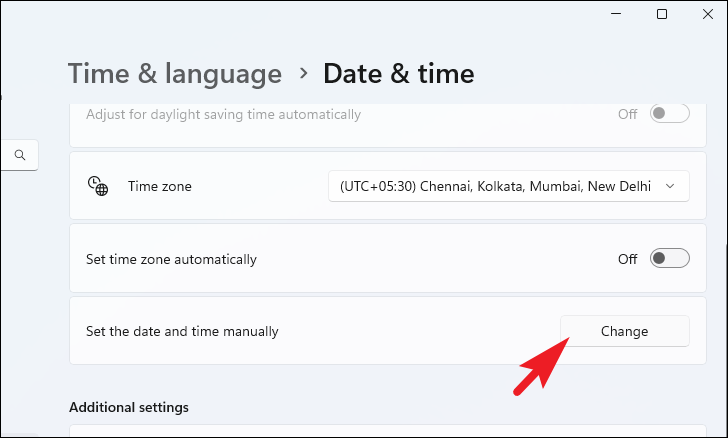
Now, set any random date before 30th October 2021, however, you can leave the time as is if you wish so. Once you have set the date, click on the ‘Change’ button present in the bottom section of the overlay window.

Now, launch the Snipping Tool by searching for it from the Start Menu. If it works correctly, head back to the ‘Date & time’ settings window and turn back on the automatic time by clicking on the toggle switch you turned off earlier in this guide.
Method 8: Access Snipping Tool from Older Version of Windows
If you have upgraded your Windows version on the same computer, Windows would have automatically created a folder comprising copies of programs that were installed on the previous version for your access, should you ever need them. Moreover, the folder is located right in your Windows Installer drive, and hence, should not be a big hassle for you to access the app from the directory.
To head to the directory, first, either double-click on the ‘This PC’ icon present on the Desktop of your PC. Otherwise, press the Windows+E keys together on your keyboard to open the File Explorer window.

Then, from the File Explorer window, either navigate to the below-mentioned directory or copy+paste the below address in the address bar present on the topmost section of the window and hit Enter to proceed.
Note: Do not forget to change the <username> placeholder in the address to your exact username on your PC.
C:\Windows.old\Users\<username>\AppData\Local\Microsoft\WindowsApps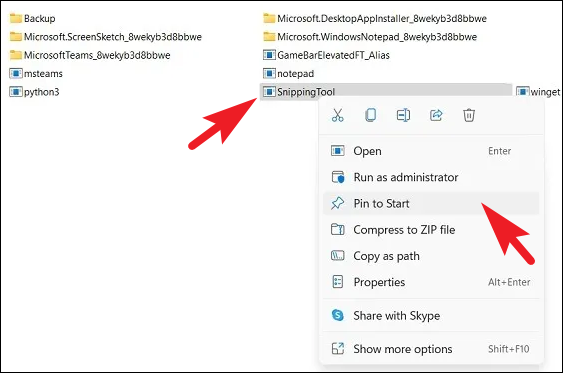
Then, locate the file named ‘Snipping Tool’ in the directory and double-click on it to open the Snipping Tool on your PC. You can also pin the file to your taskbar by dragging the icon and dropping it onto the taskbar.
Conclusion
The Snipping Tool is a handy built-in feature in Windows 11 that allows users to capture screenshots quickly. However, if you encounter any issues while using it, don’t panic! There are various ways to fix the problem, such as updating your operating system, restarting the tool, and adjusting your display settings. By following the steps outlined in this article, you can easily resolve the Snipping Tool not working issue and continue taking screenshots without interruption. Remember to always keep your computer updated and maintain good hardware and software health.


