Servant of the Lake: Full Walkthrough With Every Puzzle Solution
Every scenario across all three days at the Vanderboom estate, with exact codes, item locations, and puzzle answers.
Every scenario across all three days at the Vanderboom estate, with exact codes, item locations, and puzzle answers.
by AllThingsHow Staff
Servant of the Lake drops you at the Vanderboom estate as a weekend servant, and almost nothing you are asked to do is simple. Each scenario locks you in a room with a chain of small tasks and one or two puzzles that gate your progress. The route below moves straight through the story from the carriage to the final coach ride, giving you the codes, item locations, and puzzle answers you need to finish. The point-and-click adventure is available on Steam, iOS, and Android.
Quick answer: Complete each day’s scenarios in order, solve every gating puzzle with the exact solutions listed here, and finish by setting the cellar clocks and handing the baby to the coachman in The Departure. Optional achievement actions are skippable and can be replayed after the credits.
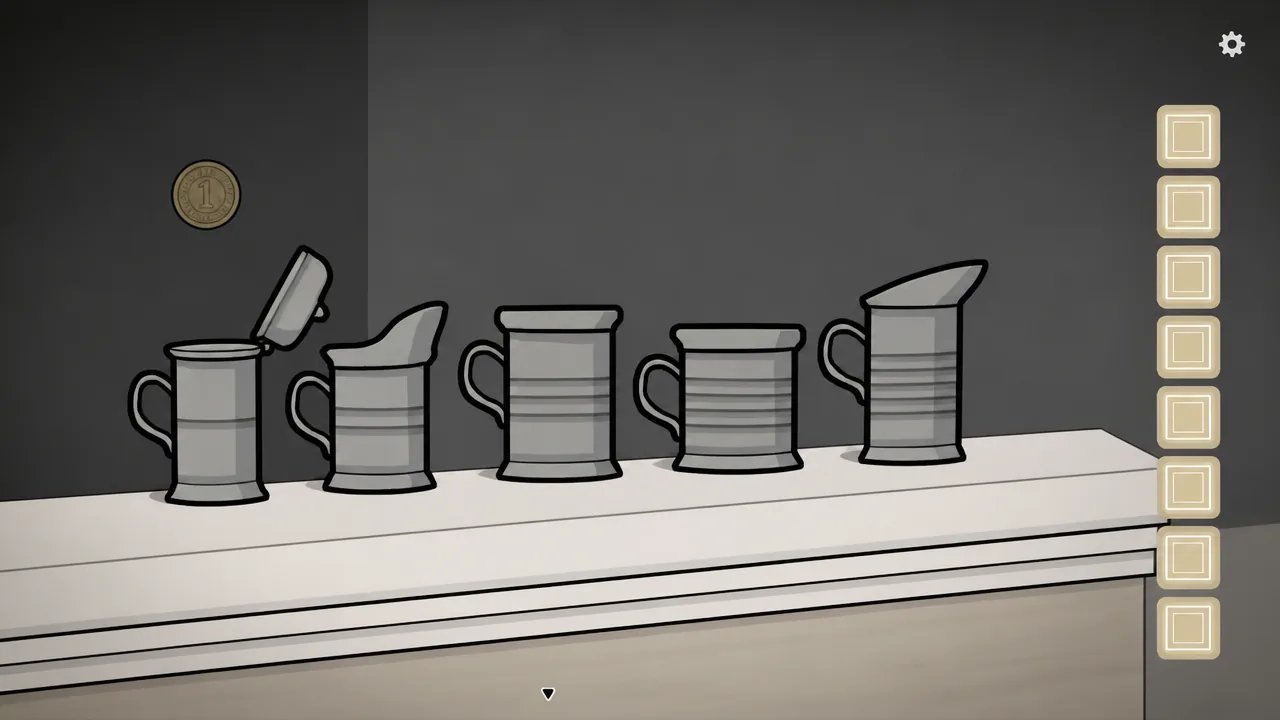
Open the window to the right of the door and drag both cups into the row. Order them by the number of lines on each, from one line on the left to five lines on the right. Take the coin that appears above the one-line cup.
Order the cups by their line count, one through five.
Use the iron bar on the loose board beneath the planter, pry it off, and take the key. Use the key on the front door, then click the doorknob to enter.
Talk to the maid until she asks you to sign the contract, and take the crow feather. Dip the feather in the inkwell on the small table, sign your name, then take the journal from the maid and open it to finish.
Enter the servant’s room on the left. Read the note for Aldous’ favorite breakfast, then take the oats from the table and the wood from the chair. Open the stove and load the wood.
Go to the hallway with the maid and take the bottle of milk from the crate. Head to the area outside Aldous’ room, take the small pot from the shelf, then slide the bottom doors of the shelf and collect the dead mouse.
Back in the servant’s room, light the wood with the matches, set the small pot on the stove, and add the oats and milk. Collect the porridge when it is ready, then enter Aldous’ room, which is now open.
Take the clock hand from the toy soldier on the dresser, then click the soldier to memorize its exercise pattern. Attach the clock hand and set the time to 7 o’clock to wake Aldous.
Open the second and third drawers for a spoon and one slipper, take the other slipper from the floor, then open the puzzle box. Slide each colored tile into the ring, rotate the empty slot to its target, and drop it into place, repeating for all four tiles to get the razor.
Shave Aldous with the razor and collect the earlobe from his shoulder. Open the window above the dresser, feed the earlobe to the crow, and take the key from its nest.
Give Aldous the bowl, add the porridge, then the berries. Watch which holes the bug enters, block them with berries, and squash it when it stops. Feed him with the spoon.
Move Aldous through the exercise the soldier showed: left, right, down, right, right, down. Dress him with the clothes and slippers, then click the window and the distant carriage to finish.
Take the candle from the servant’s room, then talk to the maid in the hallway. Use your cloth to clean debris in three spots: in front of the mouse shelf, in the entryway where you signed, and by the chair in the servant’s room.
Get the feather duster from the maid and clean all three portraits, two in the sitting room and one in the entryway. The cleaned paintings move, revealing a code from how many times each figure gestures.
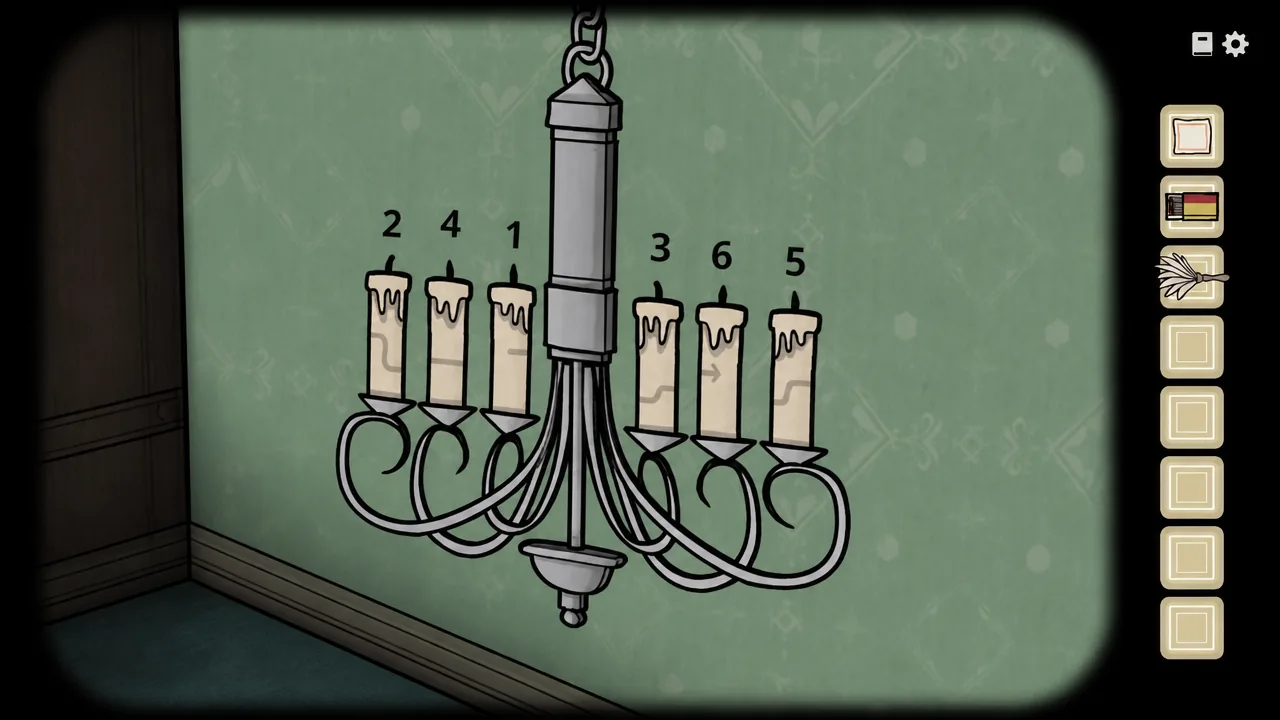
At the entryway chandelier, insert all three candles and read the lines on them. Light them in the order that forms one continuous path, then return to the maid to finish.
Light the candles so their lines join into one unbroken path.
Click the rocks and log to start the cockroach puzzle. Guide each roach into the hole with the white rock, keeping them away from the screen edge. Use the reset arrow if one gets stuck, then collect the stone tablet that appears.
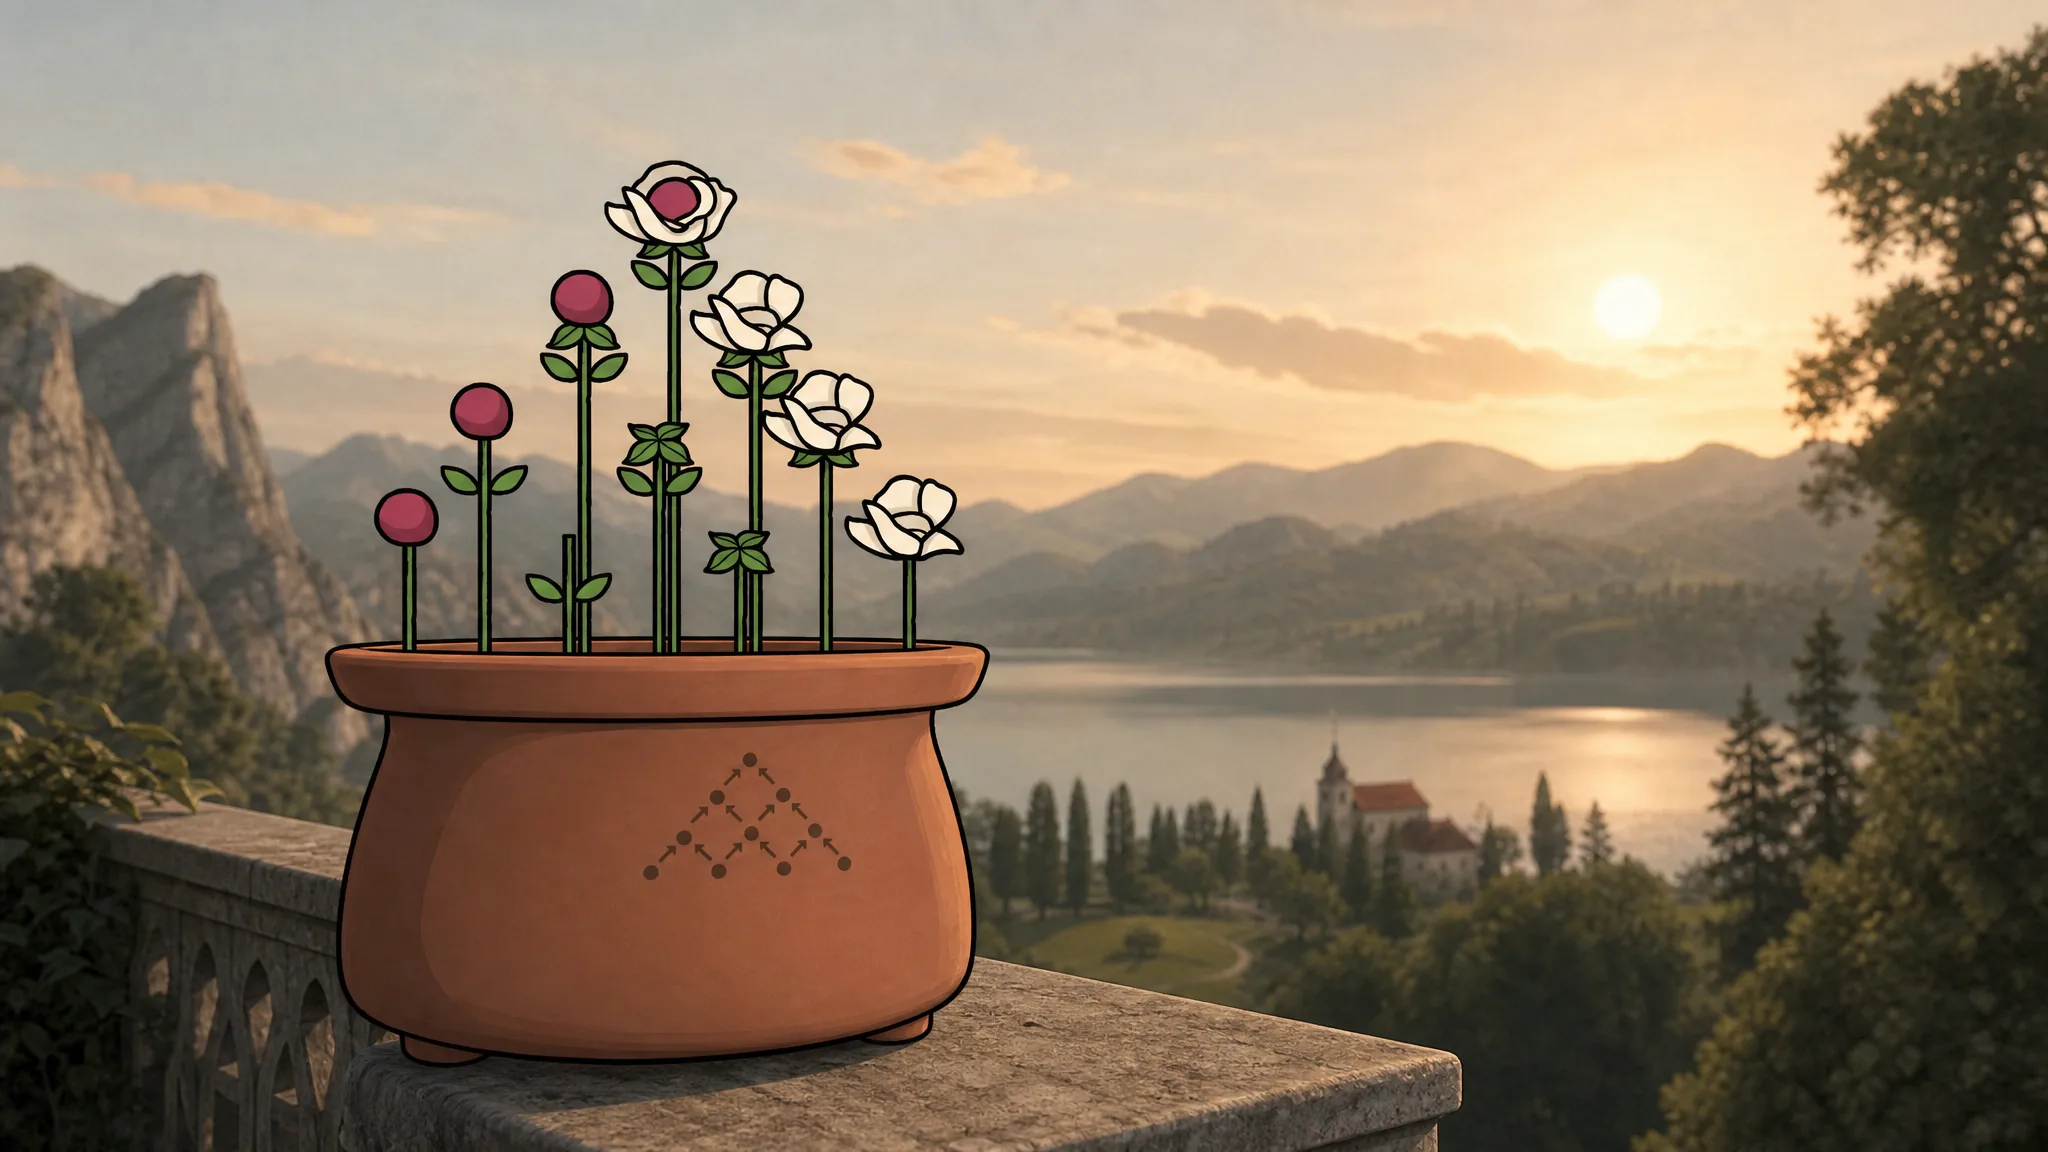
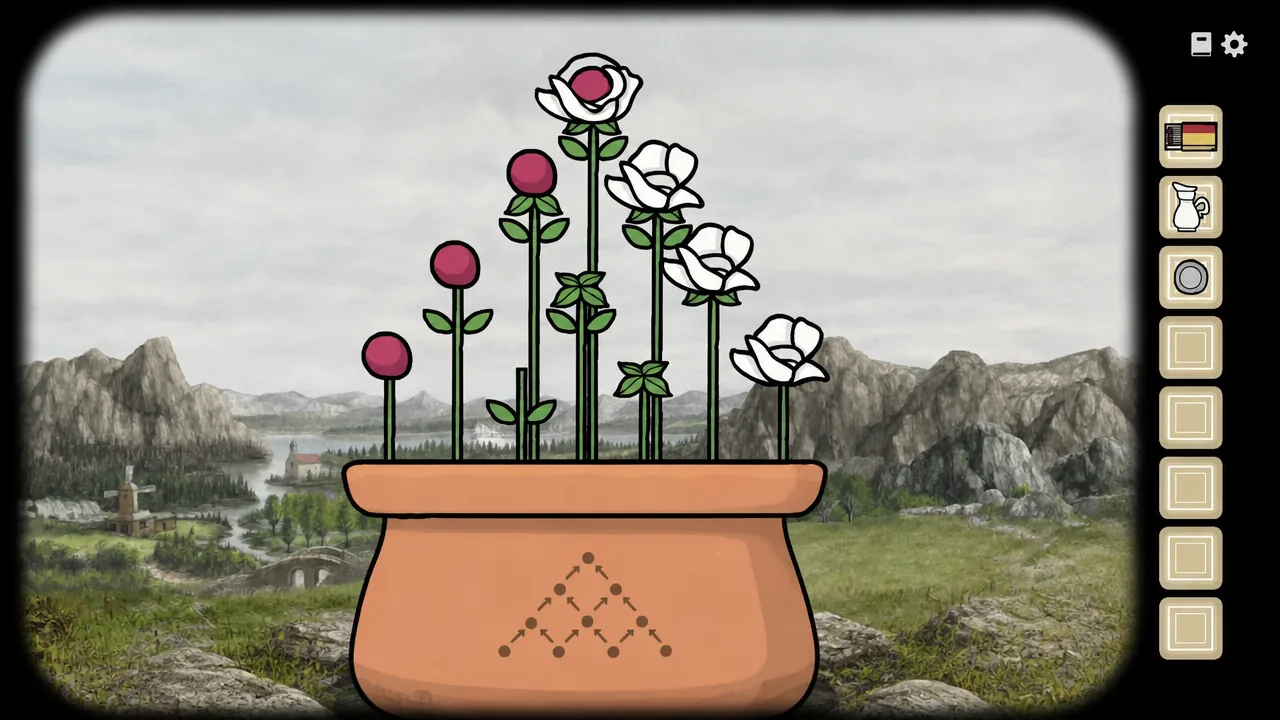
Open the mailbox with the small key and read the letter, taking the second stone tablet. Arrange the flowers in the pot to match the correct growth order and collect the third tablet plus the flowers.
Line up the flowers from bud to bloom by watching the leaf positions.
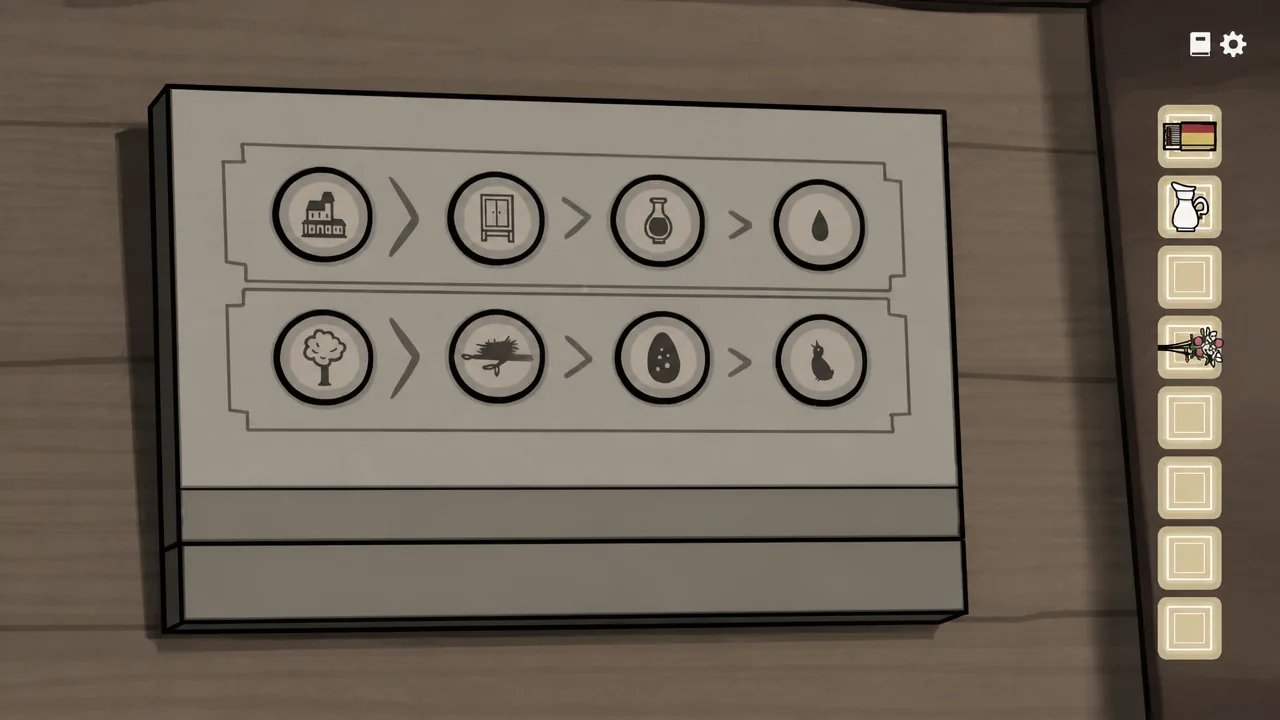
Insert all three tablets into the puzzle box by the columns and set them to tree, nest, egg, bird on one row and house, wardrobe, vial, drop on the other. Take the flag.
Arrange the tablets as tree-nest-egg-bird and house-wardrobe-vial-drop.
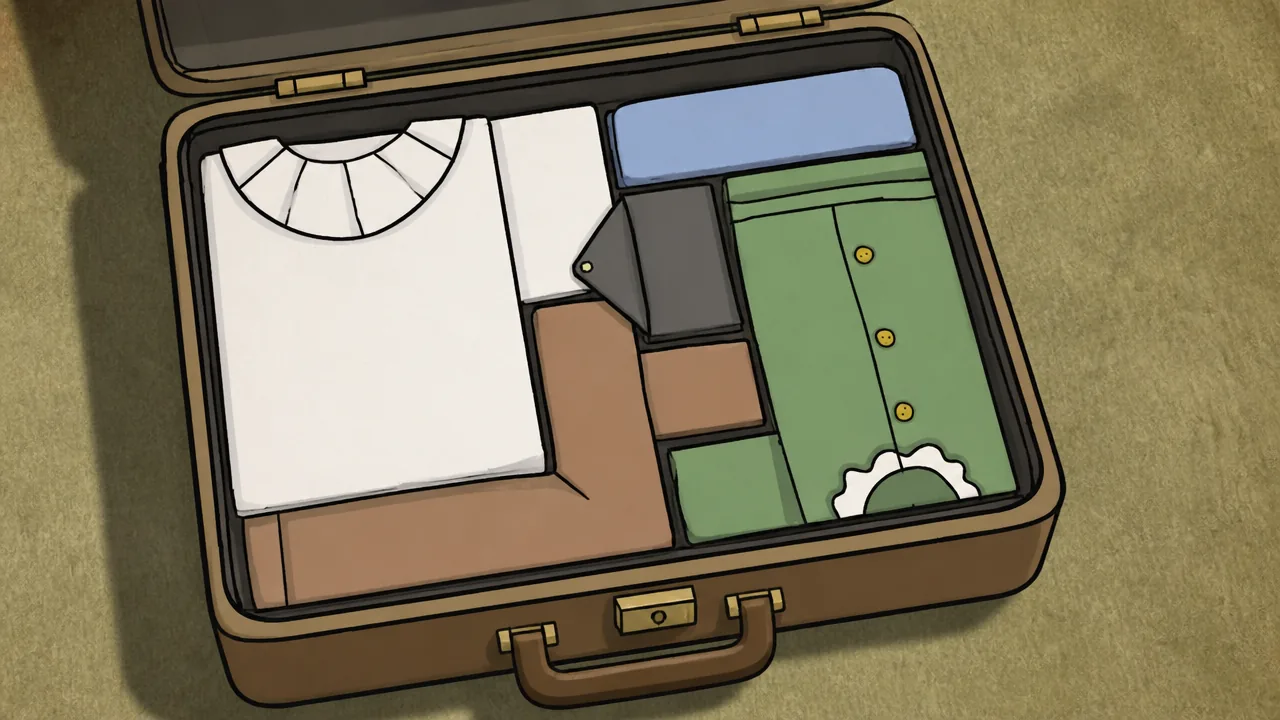
Open the basket and move it to read the code behind the baby, 374. Enter that into the suitcase’s right lock, then arrange the clothes so nothing overlaps to open the wallet. Give the coin to the coachman and the bill to the horse.
Fit the clothes together with no overlap to reach the wallet.
Click the cat in the entryway repeatedly until it coughs up sticky substance, and collect it. In the servant’s room, take sugar from the maid, tea from the table, and the kettle of hot water from the stove.
Grab the tea cup from the shelf near Aldous’ room. Give it to Alexandra in the hallway and add tea, milk, and hot water. She drops the cup, so reassemble the pieces and glue them with the sticky substance.
Hand back the repaired cup, add tea, milk, and hot water again, then add two shakes of sugar. Enter the living room through the left door of the hallway.
Take the glass from the china cabinet’s top shelf. Open the box on the same shelf by rotating the squares to match the date on the note, then take the champagne. Give Aldous the glass and fill it.
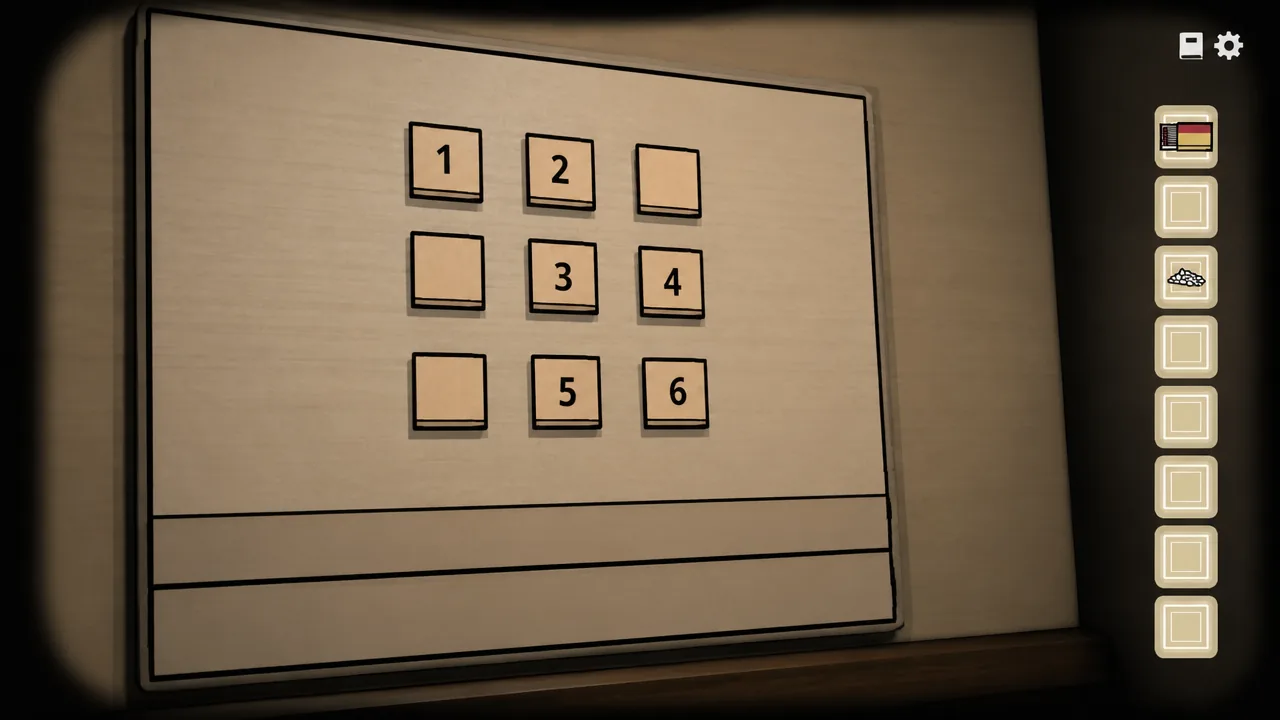
Open the left window to let William in and seat him, then give him the champagne. Align the broken bottle to read the second box’s code, top-left, top-middle, middle, middle-right, bottom-middle, bottom-right, and take the cigar.
The button box order runs top-left through bottom-right.
Give William the cigar, light it, and click his mouth until he eats it. Put out the fire using the teeth controls, where the left and right teeth steer the saliva and the middle tooth releases it, then take the spoon.
Collect the fly eggs. Put wood from under the window into the fireplace and light it. Click the painting above the fireplace in the order timepiece, book, elixir, fish to get the fish, then grill it on the fire.
Place the grilled fish on the right table, add the fly eggs, and serve the three fish-on-toast pieces to each character. Tap Aldous’ glass with the spoon to start his speech.
When the baby cries, follow Alexandra’s cues by clicking the baby’s eye, raising the moon, clicking the baby’s body, the woman’s ring, her pendant, her mouth, the cloud, and finally the woman’s eye. Return to Aldous, then wake William by clicking what his eye points to (up is hat, down is tie, right is ear), and return to Aldous to finish.
Day 1: The Night Watch
Patrol the house and ring the maid’s bell when you spot an abnormality, or blow out one candle when everything looks normal. Blow out all three candles to finish. The abnormalities are listed below.
Aldous’ door is open.
The door at the top of the sitting room stairs is open.
The man in the painting at the top of the stairs is low.
The cat is missing from the sitting room chair.
The woman in the painting at the bottom of the stairs has a black face.
After the candles are out, talk to William in the hallway for the walking stick, then use it on the ceiling outside Aldous’ room to reach the attic.
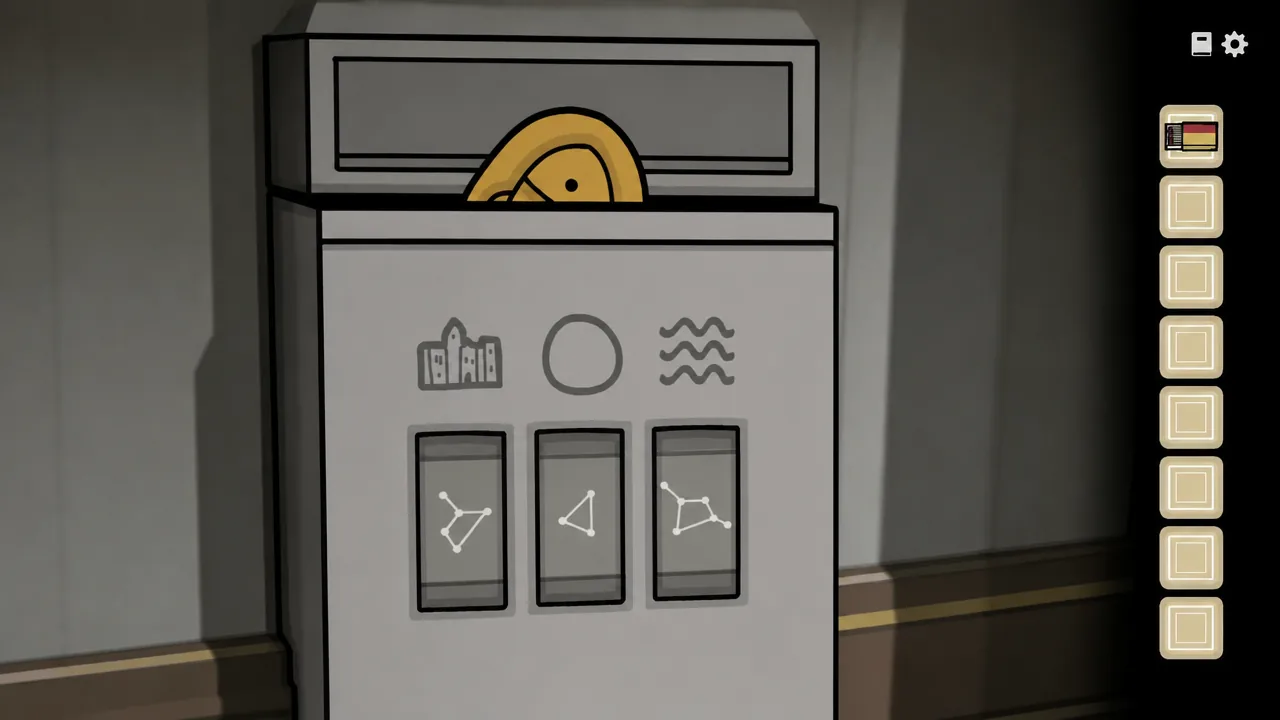
Take the rung and small statue from the dresser drawers. Open the window and move the clouds until the lake turns black, the moon turns red, or the house glows, then copy the visible constellation onto the puzzle box for another small statue.
Match the constellation revealed when the sky shifts.
Open the organizer on the table and fit every object perfectly, then collect the candle. Insert it into the lantern above the puzzle box and light it with the matches.
Slot every piece into the organizer to free the candle.
Take the statue on the ground to the left, then solve the figurine puzzle by placing pieces that match each line of the Vanderboom story onto its paper, ending with the woman and the square. Take the small key.
Open the purse by the dresser with the key for another statue. Insert all statues into the golden box and set them left to right as insect, bird, monkey, fish, goat. Take the special scroll and rung.
Talk to the maid, then go through the door at the top of the sitting room stairs. Click the windows in the house painting to light them and reveal each family member’s silhouette and pointing direction.
Aldous points right, Alexandra points up, and William points left. Read the numbers in those directions to get the code 315, then open the box in the servant’s room for coffee beans.
Grind the beans with the crank grinder, put the ground coffee into the pot on the stove, and fill Aldous’ cup in the hallway. Talk to the maid, then enter William’s room to finish.
Take the seed under the bird cage and plant it in the pot, then grab the spoon by William. Open the closet, take the hat, and check the pocket watch reading 9 o’clock. Set the grandfather clock to 9, open its body, and click the box.
Arrange the box to match the portrait above William: top-left gem, top-right pipe, bottom-left skull, bottom-middle sock, bottom-right chalice. Take the chalice, collect William’s drool, and pour coffee into his mouth.
Pour the drool on the seed, then take bird seed from the grown flower. Feed the bird, take the feather, and tickle William’s toes. Each toe twitches to point at the next toe you must tickle, until a small key drops.
Open the box with the key for eye drops and a knob. Use the drops to wake William and put the hat on him. Open the right window with the knob, collect rain in the chalice, and water the plant for more bird seed.
Feed the bird again for an egg, place it in William’s hand, and break it with the spoon. Put the special scroll on the table and rotate it into a fish shape.
Move the picture paper so William points at each image in this order: house, hill, door, pocket watches, book, bottle, silhouette with halo. Talk to William to finish.
Day 2: Cleaning the Floors
Take the scrubber from the case by the house painting and clean three floors, each with its own ordering rule.
Location
Cleaning order
Beneath the house painting
By number of dots, one through six
Servant’s room
By dot size, smallest to largest
By the balcony
By the direction the dots point
After cleaning, talk to the maid by the balcony, look through the bathroom keyhole, then step onto the balcony and click Aldous’ silhouette in the yard.
Take the rifle from Aldous, then the bullets from the tree stump, and rest the rifle on the stump. Load a bullet and click to fire, aiming by dragging around the scene.
Shoot the deer (scare William to make it appear), the pheasant in the right tree, the rabbit (shoot the rock right of the water first), the flying pigeon, and the boar peeking behind a tree left of the bridge.
Read the fallen note, then solve the meat puzzle by matching senses to numbers in the order sight, smell, touch, taste, hearing. The shack code is 91276.
Take the butcher knife and cloth from the shack. Give Aldous the knife and let him chop until blood covers his eyes, open his satchel for the silver timepiece, then clean his face with the cloth.
Collect dirty clothes from the guest room, the servant’s room (one on the table, three on the floor, plus the baby), and the entryway table. Give the baby to the maid for one more piece, making seven, then load them into the tub on the stove.
Take the tub upstairs to the balcony and hang the clothes on the line, ordered by stripe count from zero to six. Take the key from the left shirt’s pocket and open the bathroom door.
Fill the bath with the tub. Take the cookie from the bench, then solve the sliding symbol box to get soap. Work one symbol at a time, parking pieces in corners so you can push the target piece onto its matching space, then add the soap to the bath.
Remove Alexandra’s hat and take the hair pin, place the hat on the rack, and read the note inside. Solve the tile puzzle above the tub by clicking to form groups of four of the same type (plants, people, animals, body parts, furniture, objects) and take the scissors.
Cut the stitches on Alexandra’s back with the scissors and take the maggot. Lure the mouse from the hole under the bench with the cookie, kill it with the hair pin, insert the maggot, and take the bone comb.
Brush Alexandra’s hair with the comb and unbutton her dress. Solve each bubble puzzle by clicking the bubble whose dot chains the pops: right bubble first, then the top-left corner, then the bubble above the dotless one, then the bubble below the dotless one.
Use the scissors to take Alexandra’s pendant when she closes her eyes. Gather all the notes on the table under the window. The X marks show which digits to ignore, leaving the suitcase code 281, then press the button to its left.
Talk to William in the servant’s room and take the golden timepiece. Use each timepiece on its portrait (silver on Aldous, bronze on Alexandra, golden on William) to reveal the bottle symbols.
Lift the sitting room rug, enter the cellar, and place each bottle on its symbol: golden band on the s-like symbol, silver band on the triangle with a horizontal line, bronze band on the upside-down cross. Click the opened barrel to finish.
Day 2: Inspecting the Cellar
Three clocks must be read before you can set the statue clocks. Each gate opens when you take specific items from the case.
For the bird head clock, use the spade on the dirt, the magnet on the hole for a key, open the box for a torch, place it in the holder, and light it before following the path.
For the cube head clock, break the barrel with the sledgehammer, collect oil in the empty bottle, and use matches to blow the wall. In the next room, pour oil into the rock hole and drop a match to blow through.
Take the sledgehammer, hook, and weight to open the final gate. Hang the hook on the ceiling ring, add the weight, then hit the left pillar to form a bridge.
Place the timepieces on the three statues and set them to human head 5 o’clock, bird head 8 o’clock, cube head 10 o’clock. Pass through, collect the book, and give it to Aldous.
Talk to the maid, then give William the sledgehammer at the top of the sitting room stairs. Enter the statue room, take the pebble from the statue, and go through the left doorway.
Open the window and hit the cat’s tail with the pebble. Click the cat under the sitting room chair, then the cat behind the statue, then check on William through the hallway door.
Open the servant’s room stove to find the cat, talk to the maid, and read the note. In the statue room, click the painting in the order hat, rifle, bear, crow, then click the opening beneath it to finish.
Sort the symbol board by interacting with every object in the room, then follow the elixir recipe. Take the water bottle and empty bottle from the right crate.
Put five drops of water in the bird’s dish and click it for an egg. Open the floor box with the pattern left, left, right, right, left, right for matches, and enter 2451 below the juicer for three empty bottles.
Light the recipe candle. At the backroom device, fill one bottle with oil by pressing left twice and middle three times, then the top valve. Fill another with acid by pressing right four times and left once, then the top valve.
Put acid in Aldous’ cup and take the meat from his tongue. Juice the meat with four lever pulls for blood, water the plant with four water drops and one blood drop for a strange fruit, then juice the fruit with four pulls for juice.
At the recipe table, add the egg, one drop of juice, one drop of acid, one drop of oil, and three drops of blood. Take the elixir, pour it into Aldous’ glass, click the crow, and give Aldous the bottle.
Take sticky substance from the cat in the servant’s room and the statue head from the stove. Collect the chair part from the entryway table and another from the sitting room’s pink chair, then talk to the maid under the stairs.
Repair the servant’s room chair with sticky substance and the two chair parts, replace the stove cover, and fix the three family portraits. Put the balcony piece back on the sitting room balcony, talk to the maid, then enter the kitchen by the statue.
Take the wood from the floor and the knife from the maid. Open the oil cabinet and sort each vessel to a single color for a bottle of oil, then take the tomato. Cover all holes on the cake with toppings for a slice.
Take the onion, raw potatoes, and shrimp from the right cabinet. Cut the onion, tomato, and shrimp on the board. Open the window, talk to William, and take the mushroom.
Load wood into the stove and light it, bake the potatoes on top, and add oil, onion, tomato, shrimp, and mushroom to the pot. Ring the maid’s bell to summon Aldous.
The potatoes resemble Aldous’ face. Feed him the plain one first, watch how his face changes, and feed the matching potato each time until they are gone. Feed him the cake and take his spoon, then spoon the soup into his mouth.
Take the glass from the entryway table and the tie from the sitting room chair, then drop into the cellar. Take the second glass from the shelf, open the floor box by rotating squares to the note’s date, and take the wine.
Put both glasses on the maid’s tray and fill all three with wine. Take the hair ribbon from the hallway crate, then talk to Aldous outside his room to learn how to get the rifle.
In the statue room, click the painting, clicking the hat twice and the crow once, then take the rifle. Take the bow tie by the statue base and give both to Aldous.
Open the box upstairs for a necklace. Talk to William, retrieve the revolver by clicking the fifth stair in the sitting room, and give the revolver and tie to William.
On the house painting, move each family member to match the portrait positions: the right-most second-floor window and the two left windows on the first floor. Reveal each painting’s symbol and place the cellar bottles: bronze on the s symbol, silver on the spiral, golden on the triangle with a vertical line. Open the box for sacred cloth and sacred water.
Take the baby from Alexandra, place it in the basket, and add the sacred cloth and sacred water. Give the necklace and hair ribbon to Alexandra, then go to the dining room past the statue.
Fill Aldous’ glass with the red wine to start his speech. Take the appetizer plate and serve by the note’s rules: broccoli and ring on the left plate, ear and bread on the middle, fish head and bacon on the right. Fill all the wine glasses.
Start William’s song and click the notes into his wine glass, with single notes dropping straight down and double notes leaning toward the lowest note.
Serve the main course by the rules: broccoli and potato on the left, two chicken and carrot in the middle, and chicken with carrot, broccoli, and potato on the right. Mirror Alexandra on the harp, playing the opposite note to each of hers.
Serve dessert with two cheese on the left plate, the brown circle on the top plate, and three white on the right. Click Aldous to begin the speech, click William when Aldous looks at him, then cut the top-left rope with the floor knife to drop the chandelier.
Talk to Aldous and remove the fork from his shoulder. Talk to William until he asks you to give Aldous a drink, then remove the broken glass from Aldous’ shoulder.
Fill the broken glass under the water drop by the bars and give it to Aldous, then take the cloth. Roll up Aldous’ pant leg and click all three wounds to fill them.
Insert the cloth into the wound on William’s right side and use the fork to pull the meat from his left side. Give the meat to the cat behind the bars and take the hair pin.
Put the hair pin in the lock and rotate it until a screw vibrates, then hold it until it falls out. Repeat for all four screws and move the inner mechanism to open the gate.
Follow the path to the torch room, backtrack one room for the flint, and light the torch. Note the head marked three, collect the board to cross the gap, and note the cube marked five and the bird head marked eight.
At the statue room, set the left clock to 3 o’clock, the middle to 8 o’clock, and the right to 5 o’clock. Pass through, interact with the masked figure, and take the baby.
Give the baby to the coachman and get into the coach. The credits confirm you have completed Servant of the Lake.
Every scenario can be replayed from the menu after the credits, so any optional achievement action you skipped on the way through is still available. Those extra tasks are usually the opposite of what a scenario asks, and none of them are needed to reach this ending.