


Lazlo the Justiciar is the closest thing Mortal Shell 2 has to a walking furnace. He carries a huge health pool, a permanent damage reduction while his armor is on, and a shockwave ability that punishes anything standing next to him. The catch is that most of his best perks sit behind Tier 4 shell bonds, so a half-built Lazlo feels slow and a fully built one barely stops moving.
Quick answer: Equip the Axatana and the Caged Hystrix, run Vatra’s Seal, take Worthy Armor, Warmed Up, Incandescence, Temperament, Furnace, Inflamed and Rush, and slot crit Tarstones — Deadeye, Auspicious, Headman’s and Berserker’s — then keep the Heat Meter full at all times.
How Lazlo’s armor, Heat Meter, and Retribution work together
Lazlo has one active ability and one passive. Retribution heats his armor and releases a shockwave. Use it repeatedly and he hits Overheat, which fires a much stronger shockwave that applies Burn stacks, but temporarily switches his armor off. Fortified Plate is the passive, and it gives a flat 10% damage reduction for as long as that armor is on.
That trade-off is the whole build. Overheating is your biggest damage window, but it strips the defense you picked Lazlo for in the first place, and several of his strongest perks only apply while the Heat Meter is full. The perks below exist to shorten the gap: the armor comes off, you get a crit spike, the armor returns, and the Heat Meter refills on its own.
Shell bond perks to prioritize for Lazlo
Shell bonds are raised with Glimpse through the Shellkeeper in Marrow Keep. One Glimpse gets a shell to bond level 1 and unlocks its Tier 1 perks, while taking a shell from level 0 to level 4 costs 27 Glimpse in total. Since two of Lazlo’s best perks are Tier 4, he needs the full investment — and most players can only max around three shells in a single run, so commit before you start spending.
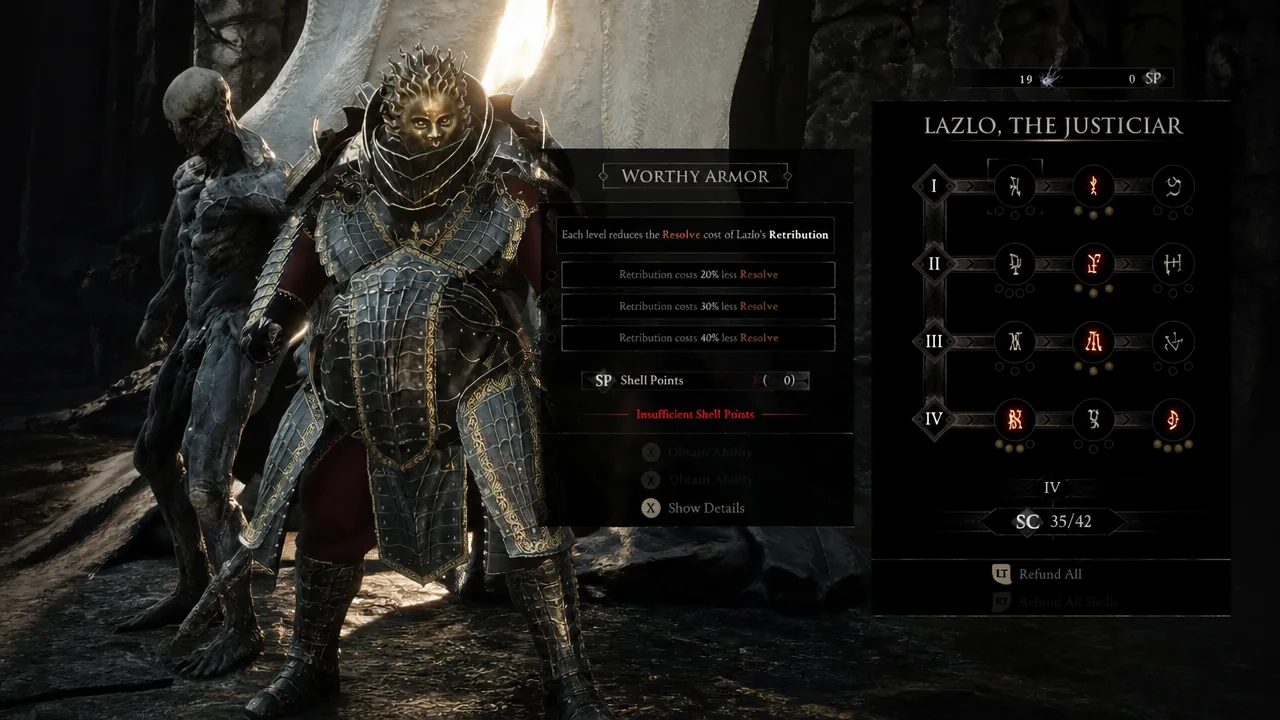
| Perk (Tier) | What it does |
|---|---|
| Worthy Armor (I) | Cuts Retribution’s Resolve cost by 20% / 30% / 40%. Level 2 is the practical breakpoint. |
| Warmed Up (I) | Scales with the Heat Meter: up to 30% more damage, up to 35% more Resolve from melee hits, and up to 10% extra damage reduction from armor. |
| Incandescence (II) | Refills 20% / 35% / 50% of the Heat Meter whenever the armor comes off cooldown. |
| Temperament (II) | Shockwaves deal 130% then 160% damage, then cover a much larger radius. Level 4 makes overheated shockwaves ignite the ground for 5 seconds. |
| Furnace (III) | While Heat is full: attackers take 2 Burn stacks, damage reduction goes up another 10%, and Lazlo gets a 50% chance to survive a fatal blow. |
| Inflamed (IV) | Heat no longer drains over time. Overheated shockwaves stop consuming Resolve and apply 10 Burn stacks, have a 30% chance not to disable the armor, and cure all negative conditions. |
| Rush (IV) | When the armor goes on cooldown, Lazlo gains 10 then 20 Warp stacks, plus +15% and eventually +20% critical hit chance. |
Inflamed level 1 is the single most important pick here. Once the Heat Meter stops draining, Warmed Up and Furnace are effectively always active, which is what turns Lazlo from a slow bruiser into something that can sit in front of a boss and trade.
Note: If you find yourself overheating constantly and hating the downtime, Adaptation in Tier 2 shaves 2, 3, or 4 seconds off the armor cooldown. Shell points can be reset, so you are free to respec if the loop is not clicking.
Best weapon and sidearm for Lazlo
The Axatana is the pick. It functions as both an axe and a katana, so you can switch between reach and speed without swapping loadouts, and its light attack strings pair perfectly with the crit chance Rush hands you. A single combo landing two or three critical hits does more work than any heavy attack.
If you would rather play at a slower cadence, the Veteran’s Battle Axe is the alternative. Its heavy attack sweeps a 180-degree arc, which is genuinely useful in the game’s dungeons where enemies come at you in packs rather than one at a time.
For the sidearm, take the Caged Hystrix. It has one of the biggest ammo pools in the game, so you can keep firing during the moments Lazlo’s armor is down and you would rather not be in melee range. Remember that firing costs Resolve, and melee hits are what refill it.
Tarstones for crit damage and Burn
Lazlo already handles defense through his armor and perks, so the Tarstone slots go entirely toward damage. Stack critical chance and critical damage first, then add Burn to overlap with what Furnace and Inflamed are already applying.
| Tarstone | Type | Effect |
|---|---|---|
| Deadeye Stone | Support | Raises both critical chance and critical damage |
| Auspicious Stone | Support | Raises critical chance |
| Headman’s Stone | Support | Raises critical damage |
| Berserker’s Stone | Support | More damage while at low health |
| Grudge Stone | Combat | Guarantees a critical hit after a set number of strikes |
| Duality Stone | Combat | Makes your weapon’s light attack combo hit twice |
| Splitting Stone | Combat | Makes your sidearm fire multiple projectiles |
| Voltaic Stone | Infusion | Infuses your weapon with Lightning for 30 Resolve |
| Emberseed Stone | Infusion | Infuses your sidearm with Burn for 20 Resolve |
| Lost Clotstone | Ability | Spin in place and attack for 70 Resolve |
Duality Stone deserves special mention with the Axatana. Doubling the light attack combo means every extra hit is another roll against your inflated crit chance, which is where the bulk of this build’s damage comes from.
Why Vatra’s Seal is the right Seal here
Vatra’s Seal is the hardening Seal. It turns your body to stone and nullifies the next incoming attack, and a perfectly timed harden also deals break damage. That fits the way Lazlo already plays: you are standing your ground rather than rolling away, and hardening lets you eat a hit you would otherwise have to respect, then punish it.
It matters most against mid and late-game bosses, where getting a Retribution off means surviving a swing first. The break damage from a clean harden also feeds into the posture-breaking side of combat, opening enemies up for critical strikes.
How to confirm the build is working
Once Inflamed is unlocked, the Heat Meter should stay where you left it instead of ticking down between fights. That is your confirmation that Warmed Up’s damage bonus and Furnace’s extra damage reduction are permanently online rather than flickering on and off mid-combat.
In a fight, the loop should read like this: overheat, watch the armor drop and the crit spike from Rush kick in, keep swinging with the Axatana, then see Incandescence dump Heat back into the meter the moment the armor returns. If the meter is refilling to roughly half on its own, Incandescence is at level 3.
Two things commonly break the loop. Overheating on cooldown means your armor is off far more often than it is on, which costs you Fortified Plate and the entire Furnace package — space out Retribution rather than firing it the instant Resolve allows. And if Furnace never seems to trigger, check the Heat Meter, since all three of its levels require it to be completely full.
Also worth knowing: if your health empties, the Harbinger is severed from Lazlo and you fight on without his abilities. Keep hitting enemies to refill the shell meter and you can slip back into Lazlo at low health, though he will be fragile until you rest.
Lazlo is found in the Royal Crypt of Mammon in the southwest of the map, at the end of the torch-lit path past the crypt’s boss, and you claim him by playing through his memory. He arrives late enough that you will have a decent Glimpse stockpile by then — which is exactly what this setup needs, because Lazlo without his Tier 4 perks is a completely different, and much worse, shell.





