

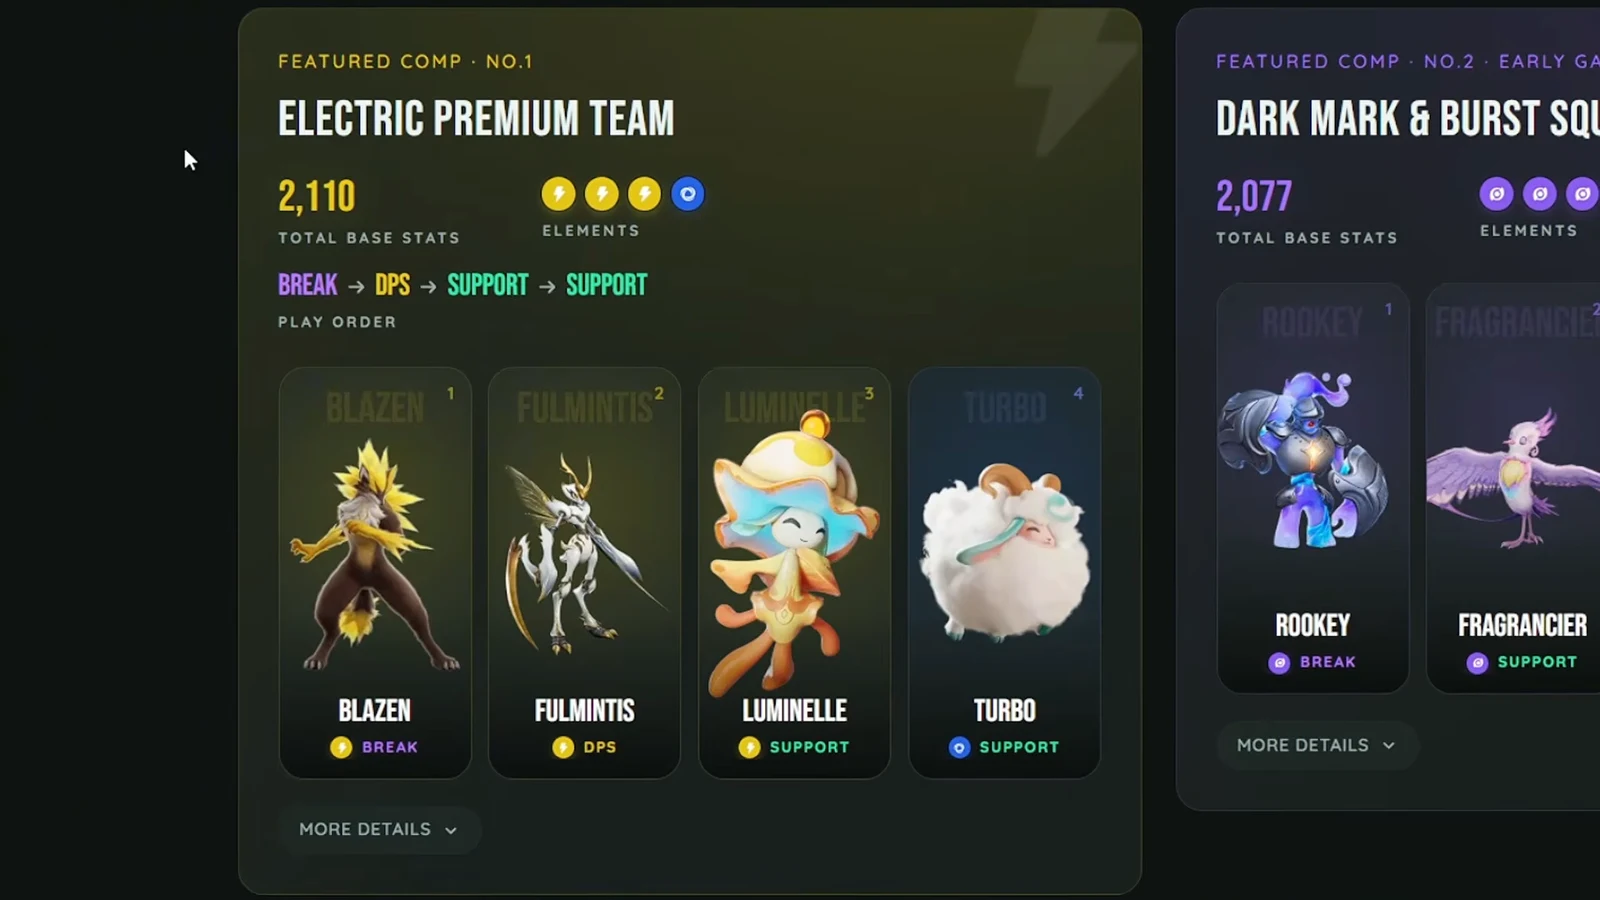
A strong roster is not the same thing as a strong squad in Aniimo. You get four field slots, and the fights that actually threaten you are decided by whether those four slots cover the jobs the game asks for — cracking an enemy’s Break bar, dumping damage into the opening, keeping energy flowing, and putting health back on the team when something lands. Stack four damage dealers and you will watch a boss shrug off every hit it was supposed to take.
Quick answer: Cover all four jobs before you chase element matching. One Break unit opens the fight, your DPS spends the stagger window, and a Support or Regen plus a Heal keeps the rotation alive.
How Aniimo roles fit together in a four-slot team
Every Aniimo is tagged with a combat role, and those tags are the shortest route to a working team. They are not interchangeable: a Regen unit refills energy, which is a different problem from losing health.
| Role | What it does in a fight |
|---|---|
 Break Break | Drains the enemy’s Break bar and opens the damage window |
| DPS | Carries the damage, especially during the stagger |
| Support | Buffs allies, shreds resistances, applies debuffs |
| Regen | Restores energy and keeps skills available |
 Heal Heal | Puts health back on the team |
Break is the mechanic everything else revolves around. You pressure the bar, it gives way, and the enemy becomes vulnerable for a stretch — that is when your carry’s expensive skills are worth casting. Break also improves your odds when you are trying to catch something, so a reliable breaker earns its slot outside boss fights too.

Every Aniimo 1.0 team composition and what it is for
| Team | Lineup | Best for |
|---|---|---|
| Electric Premium | Blazen, Fulmintis, Luminelle, Turbo | Fast, aggressive clears |
| Dark Mark and Burst | Rookey, Fragrancier, Stellarys, Witchin | Early-game Dark damage |
| Dark One-Shot | Dreaple, Fragrancier, Inferlupa, Pawney | One huge burst window |
| Full Lightning Burst | Fenmane, Luminelle, Dazmand, Glacy | Lightning with a healer |
| Triple Fire Detonation | Infergon, Flamerion, Magmarex, Glacy | Balanced Fire squad |
| Magma Stack Engine | Magmarex, Flamerion, Somniwing, Glacy | Surviving long fights |
| Shield and Flame Opener | Helmut, Scorchhowl, Glacy, Somniwing | Defensive Fire play |
| Thornblade Crit | Thornblade, Melloblum, Somniwing, Glameep | General progression |
| Blossom Clone Army | Irisalis, Rookey, Glacy, Somniwing | Irisalis carry builds |
| Black Hole Execution | Pawney, Rookey, Witchin, Gracewing | Safe Dark execution |
Glacy, Somniwing and Rookey show up across half this list. If you are deciding what to level first, those three slot into the most compositions.
Burst teams: Break first, then one big damage window
These squads all follow the same shape. Something opens the Break bar, a support layers buffs or resistance shred on top, and the carry spends everything before the window closes. They end fights quickly and they punish sloppy dodging, because most of them give up a healing slot to do it.
Electric Premium Team
Blazen starts the fight on the Break bar, Luminelle layers on Lightning buffs, and Fulmintis walks in to spend the opening. Turbo handles energy and Wind utility so the rotation never stalls. There is no healer here at all, which is the whole trade — you are betting that the enemy dies before your mistakes add up.
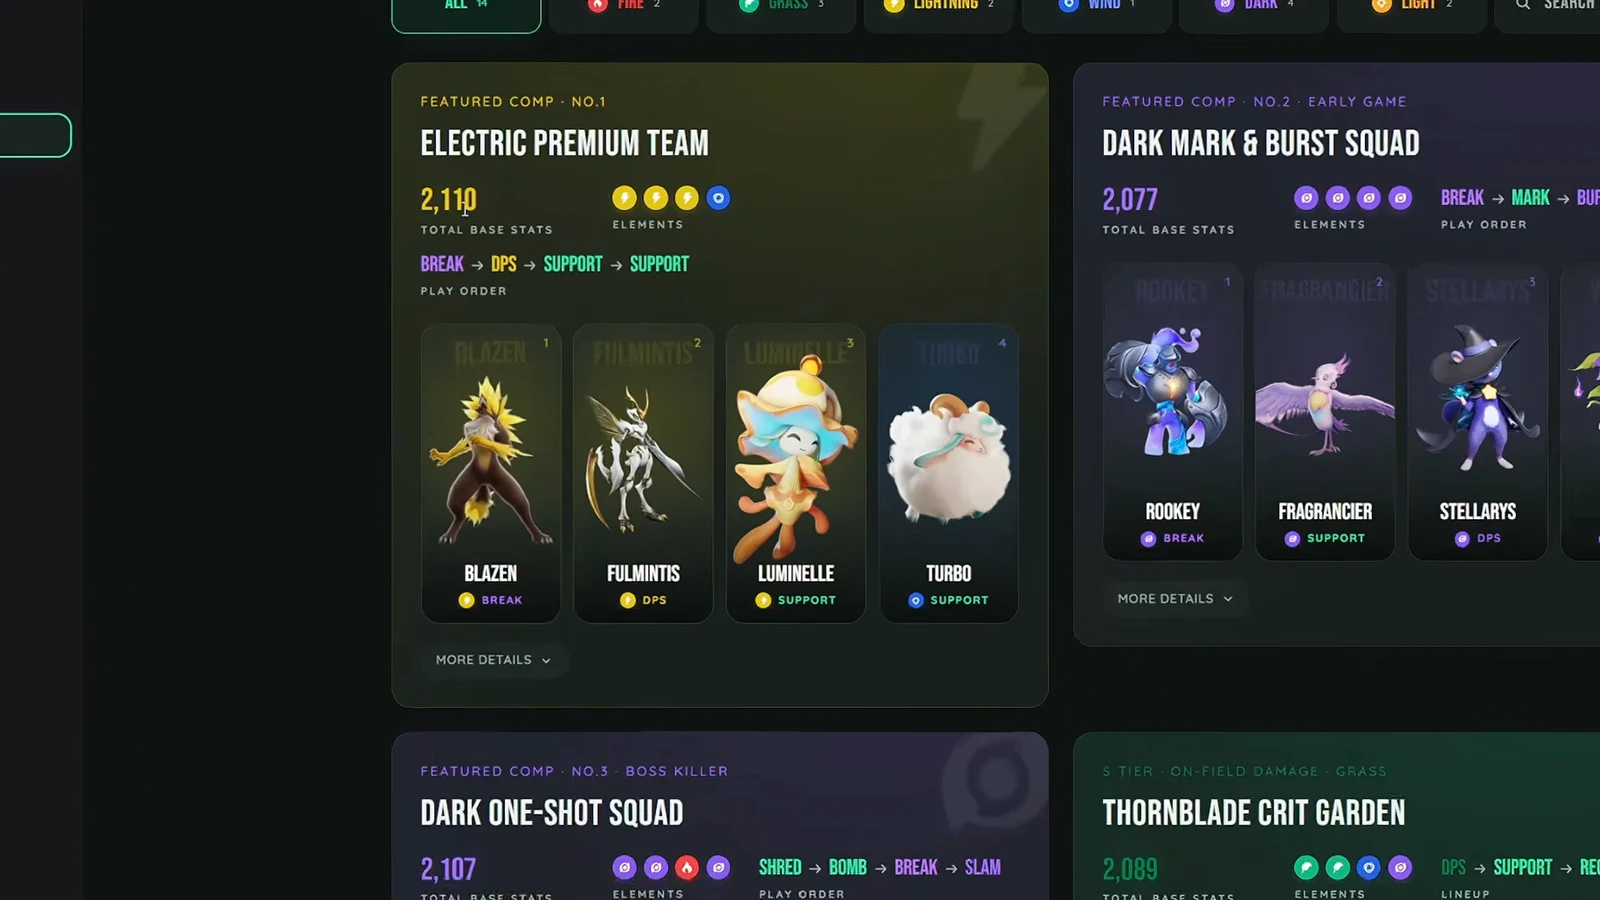
Dark Mark and Burst Team
This is the friendlier Dark option and the easiest of the burst teams to assemble early. Rookey builds Break pressure, Fragrancier raises the team’s Dark damage, and Stellarys converts that setup into a heavy hit — its ultimate, Comet Aureus, lands at 166 power. Witchin covers Regen, so unlike the Lightning build above you are not running on fumes.
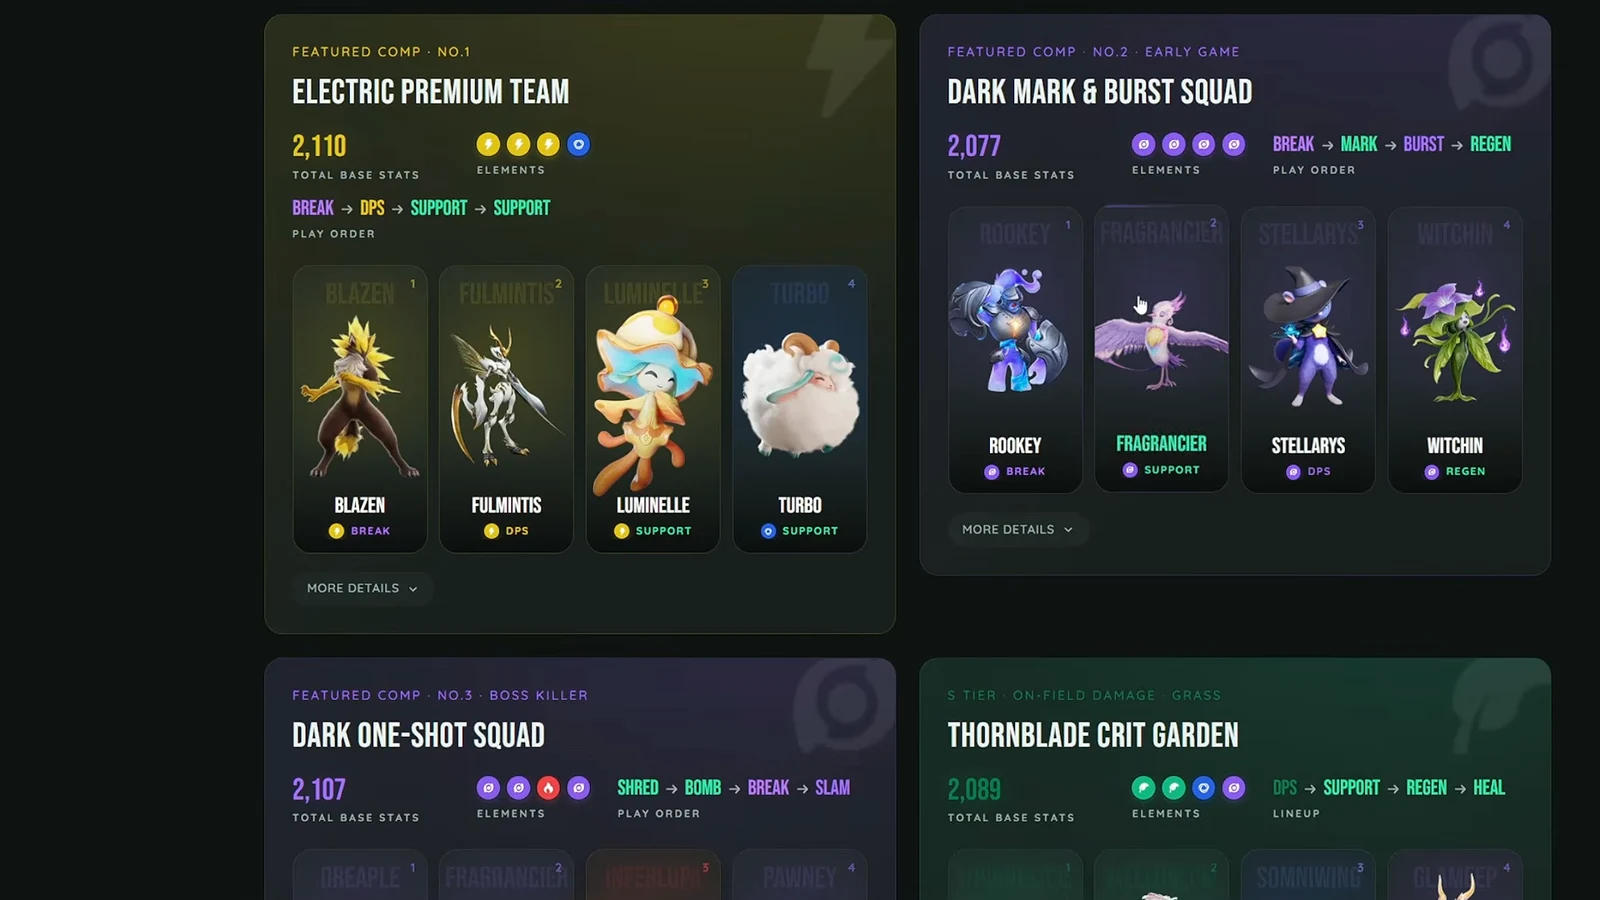
Dark One-Shot Team
Two supports, one breaker, one finisher. Dreaple opens with debuffs and cuts the target’s Dark resistance, Fragrancier amplifies the damage on top of that, and Inferlupa forces the Break window with Unbroken Flameruff Spirit — a stacking effect that improves how efficiently the whole team chews through the bar. Pawney arrives last and swings for the kill. It is a setup team, not a damage-over-time team, and if the burst misses you are waiting on a full rebuild.
Full Lightning Burst Team
The same Lightning plan with a safety net. Fenmane carries, Luminelle and Dazmand double up on Lightning support, and Glacy takes the fourth slot as a dedicated healer instead of another buff. You lose some speed compared to the Electric Premium build and gain the ability to survive a mistake, which is usually the better deal in unfamiliar content.
Sustain teams for long fights
When a fight runs long, the limiting factor stops being damage and starts being energy and health. These three compositions spend slots on staying power instead of a second attacker.
Triple Fire Detonation Team
Magmarex opens the Break bar, Infergon handles Fire damage once the window is live, Flamerion feeds energy back, and Glacy covers healing. Three Fire units without giving up the defensive tools, which is a rare balance. Flamerion is well suited to that recovery slot with 115 EP regen, the highest of the Fire units you are likely to be running.
Magma Stack Engine
This one drops the dedicated carry entirely. Magmarex controls the fight through Break, Flamerion and Somniwing double up on energy recovery, and Glacy provides bigger heals on demand. Damage output is clearly lower, so expect slower kills. In exchange you get layered sustain that is very hard to break down, which makes it a reasonable choice for content that keeps killing you.
Shield and Flame Opener Team
Helmut opens defensively and creates the window, then Scorchhowl does the work. Somniwing handles recovery between exchanges and Glacy tops the team up after heavy hits. Scorchhowl is a straightforward carry to pilot — 119 attack and a 170-power Falling Star to spend once the enemy is staggered.
Teams built around a single carry
The remaining three compositions exist to keep one specific Aniimo on the field and doing its thing. The other three slots are scaffolding.
Thornblade Crit Team
Thornblade takes the carry seat with 121 attack and Elegant Waltz at 172 power, while Melloblum supports, Somniwing covers energy, and Glameep heals. Three layers of support behind one Grass attacker makes this the most forgiving build on the list, and the one worth defaulting to for general progression.

Blossom Clone Army
Built entirely to let Irisalis run its clone mechanics for as long as possible. Rookey handles Break, Glacy covers emergencies, and Somniwing keeps energy topped up so the clones keep multiplying. This is a specialist setup — you build it because you already want Irisalis as your main carry, not the other way round.
Black Hole Execution Team
Pawney gets the same treatment as Irisalis. Rookey creates the opening, Witchin handles Regen between attacks, and Gracewing covers healing with Help! Gracewing! as a 150-power emergency assist. It is the survivable way to run a Dark execution carry, and a much steadier option than the Dark One-Shot build if you would rather not gamble a whole fight on one window.
Base stats for the Aniimo that anchor these teams
| Aniimo | Element | HP | Attack |
|---|---|---|---|
 Stellarys Stellarys | Dark | 95 | 125 |
 Thornblade Thornblade | Grass | 96 | 121 |
 Scorchhowl Scorchhowl | Fire | 95 | 119 |
 Flamerion Flamerion | Fire | 80 | 113 |
 Fragrancier Fragrancier | Dark | 84 | 111 |
 Gracewing Gracewing | Wind | 110 | 98 |
 Somniwing Somniwing | Grass, Wind | 111 | 92 |
 Inferlupa Inferlupa | Dark, Fire | 95 | 89 |
Attack tells you who should be holding the carry slot and not much else. Inferlupa sits near the bottom of that column and is still one of the strongest openers in the game, because its value is in Break efficiency and a 194-power ultimate rather than raw numbers. Likewise, Gracewing and Somniwing are there for their durability and their team effects, not their hits.
Where these team members come from
Most of the units above are final forms, so you are usually catching an earlier stage and evolving it rather than finding the finished article in the wild.
| Aniimo | Evolves from | Habitat |
|---|---|---|
| Gracewing | Flutternym | Catch Flutternym in Nimbus Fields, The Mistwoods, Blitzwood or Sea of Flowers |
| Stellarys | Celestis | Forest of Falling Stars (Lv. 20–25) |
| Thornblade | Budsquire | Sea of Flowers (Lv. 19–28) |
| Fragrancier | Dewy | Sea of Flowers (Lv. 19–28) |
| Scorchhowl | Flameruff | Beast Fang Ridge (Lv. 30–35) |
| Flamerion | Sparki | Beast Fang Ridge (Lv. 30–35) |
| Inferlupa | Flameruff | Evolve from the Emberpup line |
Gracewing has the one hard requirement worth planning around. Flutternym needs to reach Aniimo level 21 and consume a Gust Stone x1 to evolve, so pick up the stone before you start pushing levels into it. Note that Flameruff branches — the same creature becomes either Scorchhowl or Inferlupa, so decide whether you want a Fire carry or a Dark and Fire breaker before you commit that evolution.
None of these lineups is meant to be the one team you take everywhere. Swapping the fourth slot — dropping a second support for a healer, or a Regen unit for another breaker — is usually enough to adapt a working core to a fight that is giving you trouble. You will know a composition is doing its job when the enemy’s Break bar gives way early enough that your carry’s biggest skill lands inside the stagger rather than after it.





