The last chapter of Part III in Fire Emblem: Fortune’s Weave, the Sixth Section “To the Edge of Twilight,” uses your whole army at once. You get 84 turns to “Defeat the guardians of the gate,” and the game expects a full roster spread across five squads instead of one carry team.
Quick answer: Build five squads led by Theodora, Cai, Leda, Dietrich, and Talimun, with 25 units deployed in total. Give each squad healers, mages, physical damage, and a tank.
Your roster count sits on the squad screen. If it reads below 25 when the final section opens, fill the gaps from your bench before you commit to the gate assault.
Part III squad rules that shape every build
Each squad holds up to eight units, and you can run five squads at once by the end of Part III. Five squads of eight would be 40 slots, so the 25-unit requirement leaves room to carry backups. The builds below fill four squads completely and give Talimun’s squad a smaller five-unit core.
- Aim for two healers or support units, two magic attackers, two physical attackers, and two tanks per full squad.
- Put at least one Physic user in every squad.
- Keep each Flame Lord in a different squad. Their map abilities only work for the squad they travel with.
- Each Divine Class can only be held by one character at a time, so The Trident, The Cavalier, The Apsara, The Avatar, and The Blade each go to a single unit.
Seraphim is worth packing on more than one unit. Part III has a lot of heavily armored and undead enemies, and the spell handles both.
Theodora’s squad: The Trident and armor breakers
| Unit | Class | Key gear | Key skills |
|---|---|---|---|
| Theodora | The Trident | Mahadu’s Spear+4, Da Mina Spear+3 | Crescendo, Seraphim |
| Sofia | Wiseman | Healing Staff, Nosferatu | Distant Healing+, Barrier, Aura |
| Troy | War Monk | Gauntlets, Zerberus+3 | Modified Weapon+ |
| Lilian | Bow Knight | Longbow | Marksmanship, Steady Shot+, Crescendo |
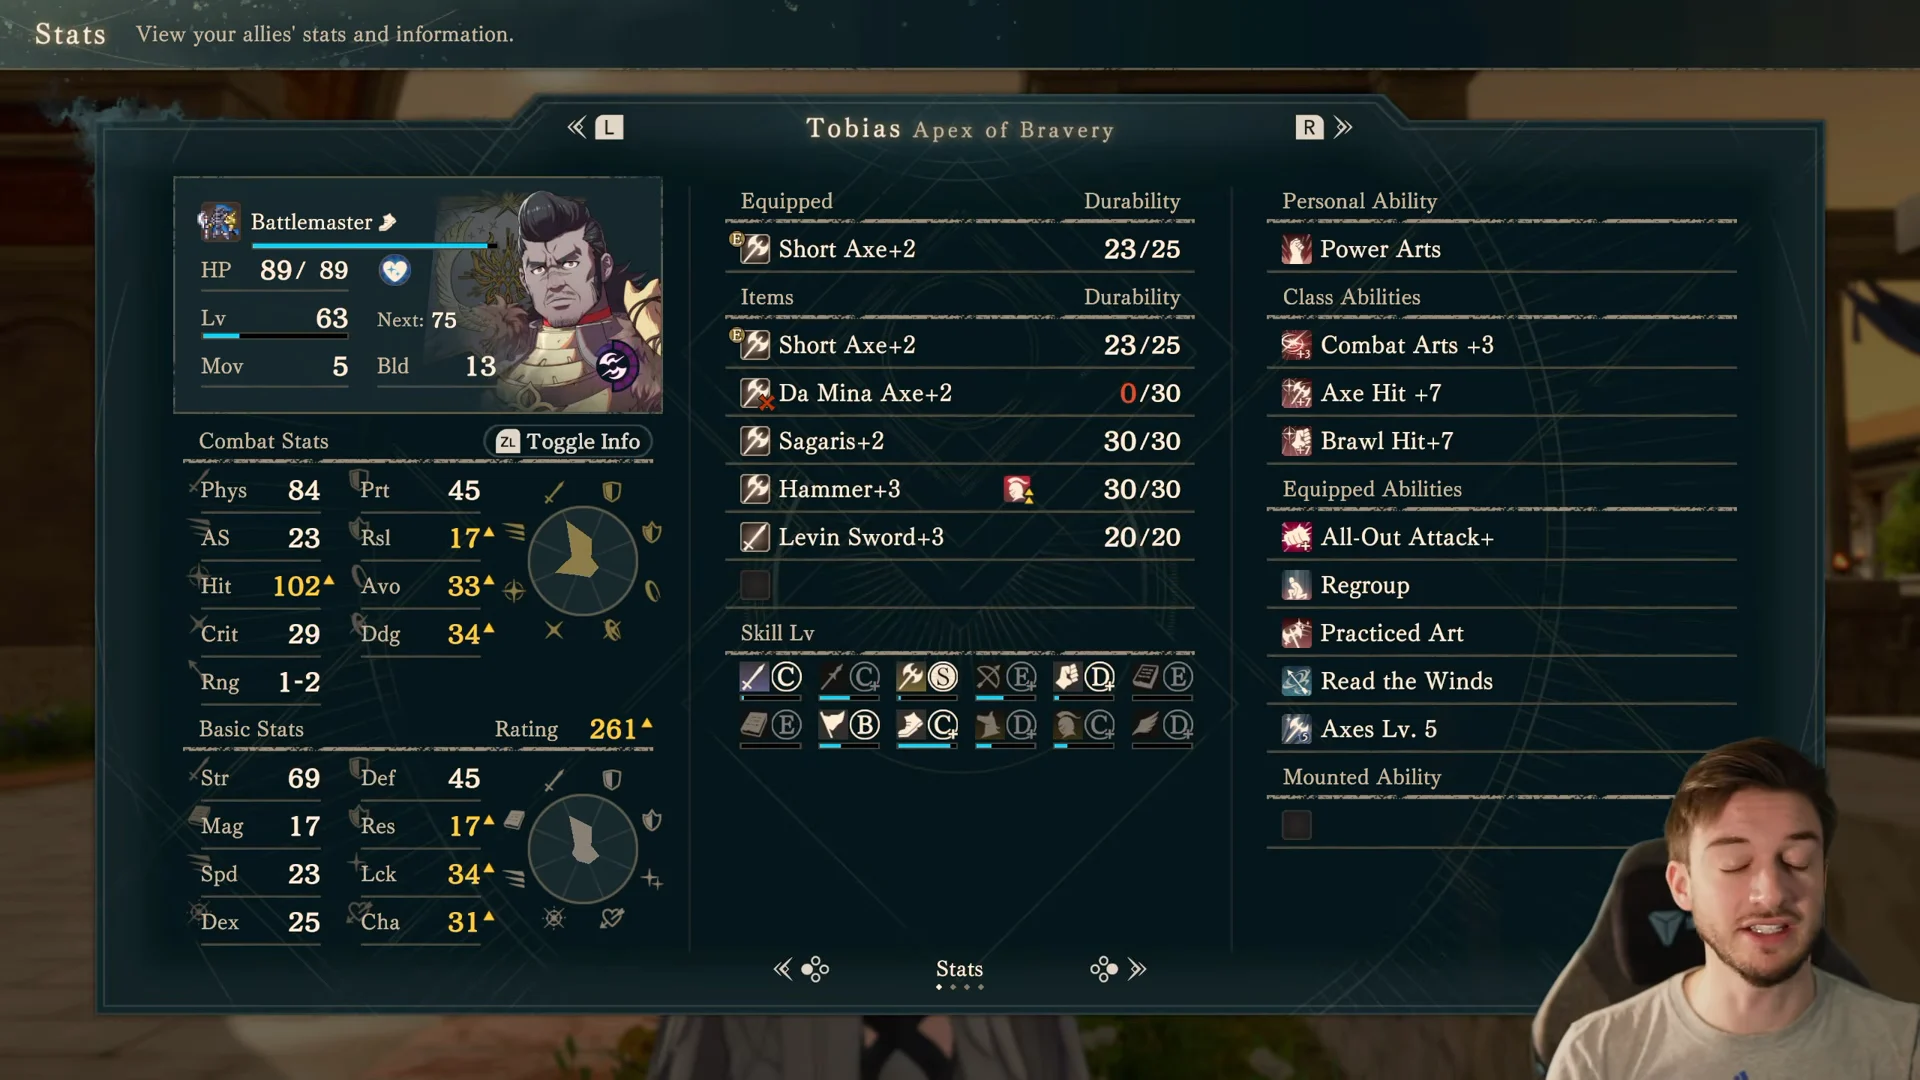
| Tobias | Battlemaster | Da Mina Axe+2, Sagaris+2, Hammer+3 | Practiced Art, All-Out Attack+ |
| Bonaventure | Druid | Magic Staff, Death Γ | Additional Intel+, Sage Advice |
| Anatolia | Druid | Salamander+5, Sword of Judgment | Meridian Expansion |
| Alexandra | Celestial Trooper | Levin Sword+3, Ridersbane+3 | Flitting Flier |
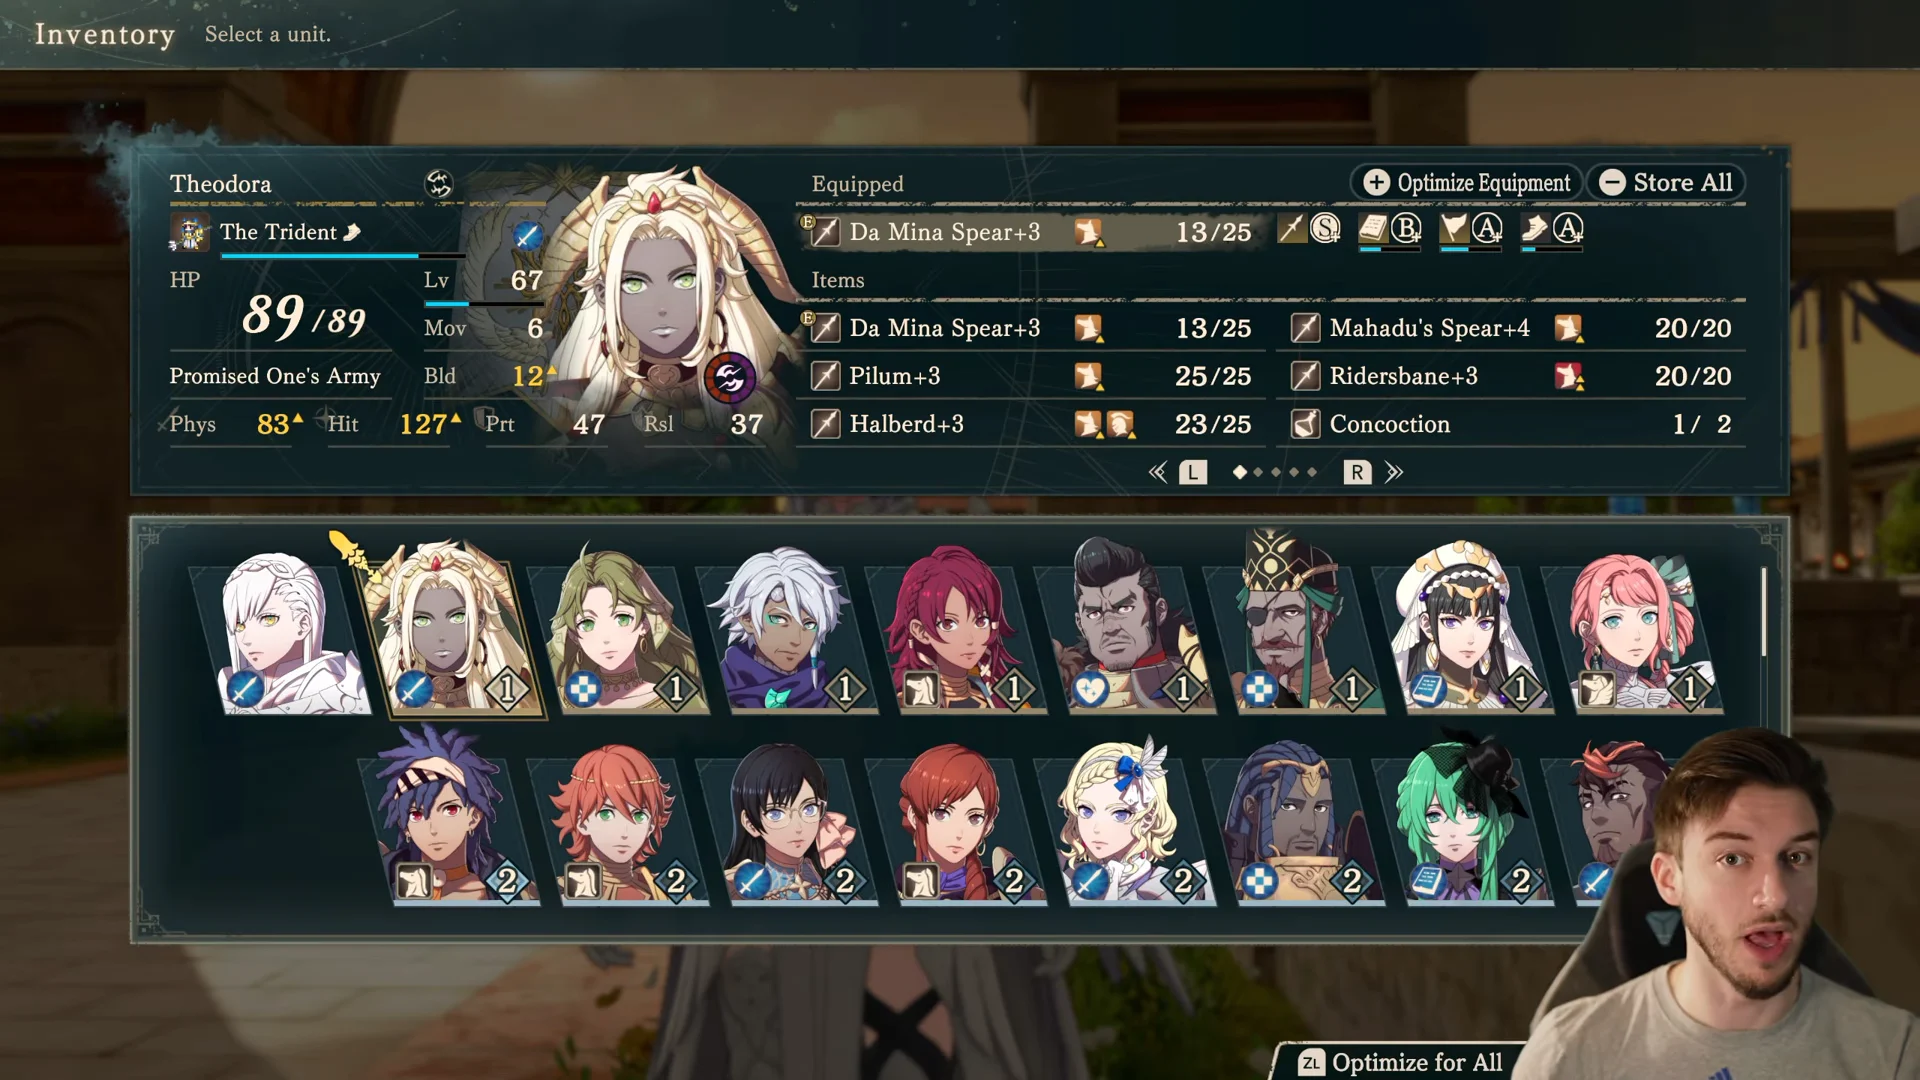
Theodora gets to The Trident through Soldier, Armored Knight, Guardian, and Sentinel. Her lance kit also includes Pilum+3, Halberd+3, and Ridersbane+3, which covers ranged chip damage and cavalry. Crescendo and Seraphim give her an answer to the armored and undead enemies that crowd Part III.
Sofia works as a dedicated Wiseman healer. Distant Healing+ stretches her staff range, and Healing Staff plus Healing Knowledge push up how much each heal restores. Troy plays as an evasive War Monk tank, and Zerberus+3 combined with Modified Weapon+ does triple damage to flying units.
Lilian uses a longbow to hit from far enough away that enemies cannot counter. Tobias is the physical burst unit. All-Out Attack+ multiplies combat art damage by 1.5, and Hammer+3 handles heavy armor.
Bonaventure is a crit-focused Druid with Death Γ, and Sage Advice raises the dexterity of adjacent allies. Anatolia is the second Druid, using Salamander+5, Dragon Strike Blaze Arts, and high-tier black magic. Alexandra is the flier, and Flitting Flier gives her the mobility to reach isolated targets.
Cai’s squad: The Cavalier, archers, and armor walls
| Unit | Class | Key gear | Key skills |
|---|---|---|---|
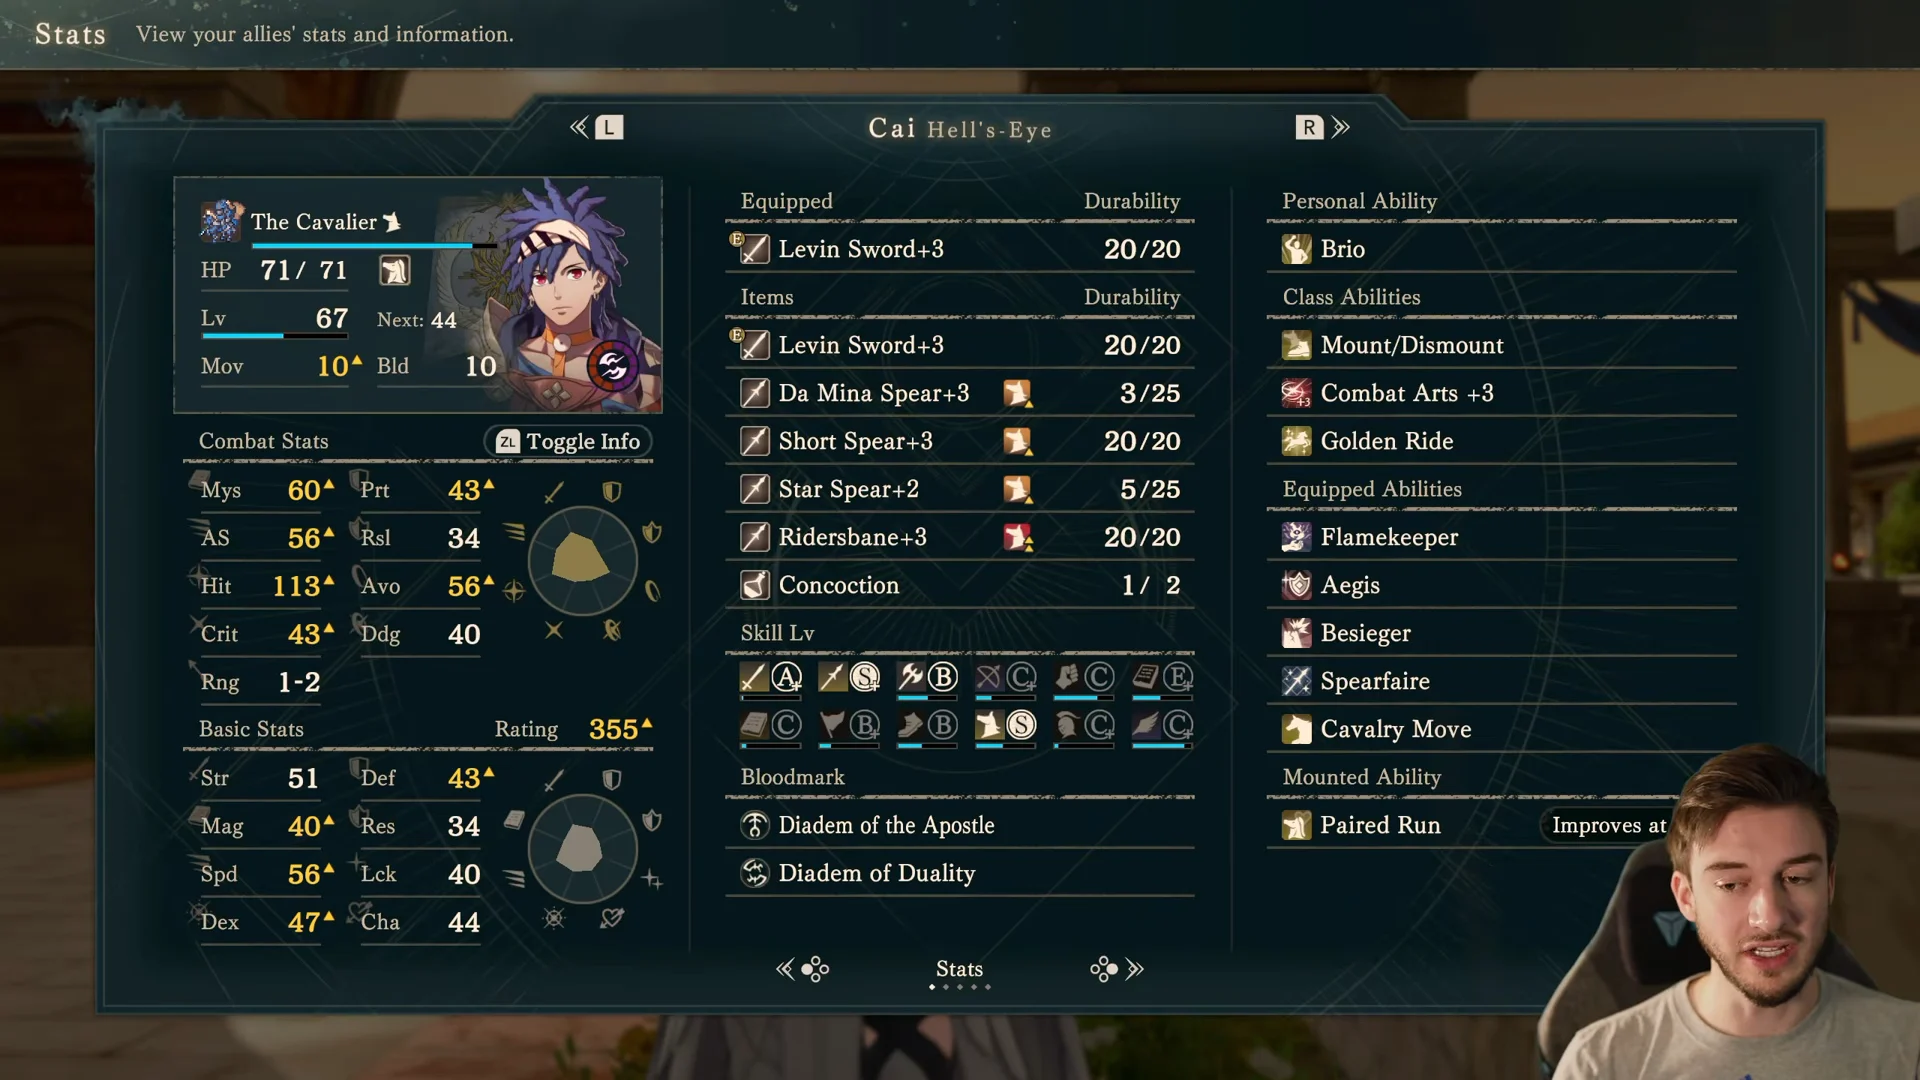
| Cai | The Cavalier | Star Spear+2 | Flamekeeper, Cavalry Move |
| Peter | Bow Knight | Da Mina Bow+2 | Steady Aim, Vanguard, Correct for Drift+ |
| Tialla | Wiseman / Dancer | Physic, Seraphim | Tactician’s Wit, Tactician’s Insight+ |
| Ultand | Valkyrium / Guardian | Mire B | Patch Up, Pray for Safety+ |
| Catania | Sentinel | Da Mina Spear+3 | Punishing Squall, Wind My Friend+ |
| Centurio | Castle Knight | — | Sturdy Corundum, Focused Counter, Heavy Break+, Absolute Defense |
| Ninae | Sentinel | Ridersbane+3, Physic | Spirits’ Voices, Spirits’ Guidance+ |
| Guzran | Castle Knight | — | Hot Headed, Top Form+, Armored Move+2 |
Cai runs as a high-movement Cavalier. Cavalry Move gets him across rough terrain, and Flamekeeper protects him and nearby allies from Underworld Flames.
Peter is the long-range Bow Knight, built around accuracy with Steady Aim and Correct for Drift+. Tialla and Ultand make up the support line, with Tialla’s Physic and Seraphim on one side and Ultand’s Patch Up, Pray for Safety+, and Mire B on the other.
Catania and Ninae are both Sentinels, but they do different jobs. Catania focuses on damage through Punishing Squall, while Ninae carries Physic and Ridersbane+3 for extra healing and anti-cavalry coverage. Centurio and Guzran are the two Castle Knight tanks. Centurio leans on counters and damage reduction, and Guzran gets more movement out of Armored Move+2.
Leda’s squad: The Apsara dancing for an Avatar nuker
| Unit | Class | Key gear | Key skills |
|---|---|---|---|
| Leda | The Apsara | Levin Sword+3 | Improviso, songs during Overblaze |
| Sirocco | The Avatar | Excalibur | Goddess’s Favor, Fortify, Wind’s Caprice+ |
| Mu | Battlemaster | Qiankun Circles+2, Smyrnos’ Channels+3 | Warrior’s Blood+, Practiced Art |
| Hong Hua | Druid | Salamander+3, Thoron | Zhu Ming, Amplify Magic+ |
| Olympia | Valkyrium | Berserk | Competitive Zeal, Ardent Nosferatu+ |
| Buccar | Castle Knight | — | Guardian’s Duty, Armored Move+, Great Counter |
| Lysander | Great Knight | Cleansing Blade+3 | Vendetta, Racing Attack, Accelerate+ |
| Seteth | Bau Lord | Da Mina Spear+2 | Ready for Battle |
Leda mostly exists to refresh the squad’s hardest hitters, Sirocco in particular. As The Apsara she can also fight, because Improviso lets her attack after using Blaze Arts during Overblaze, and her songs buff the rest of the squad.
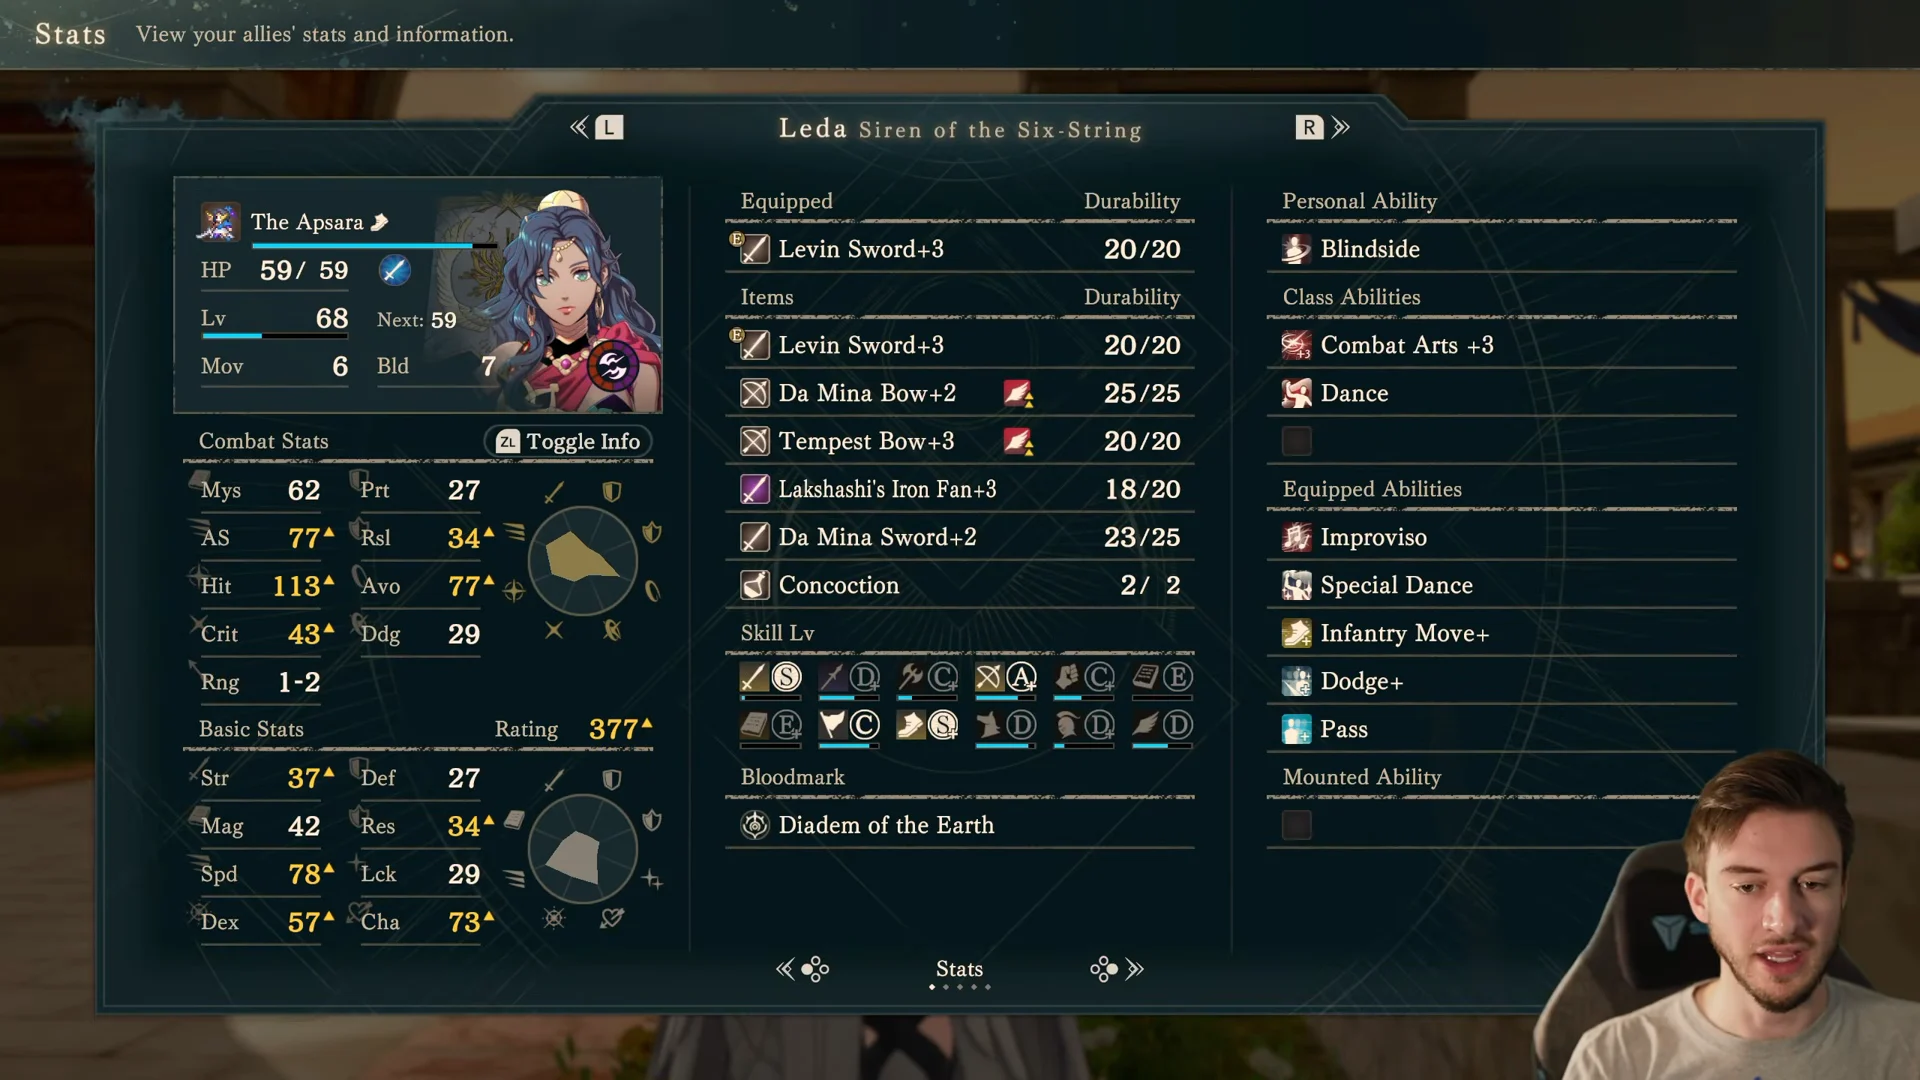
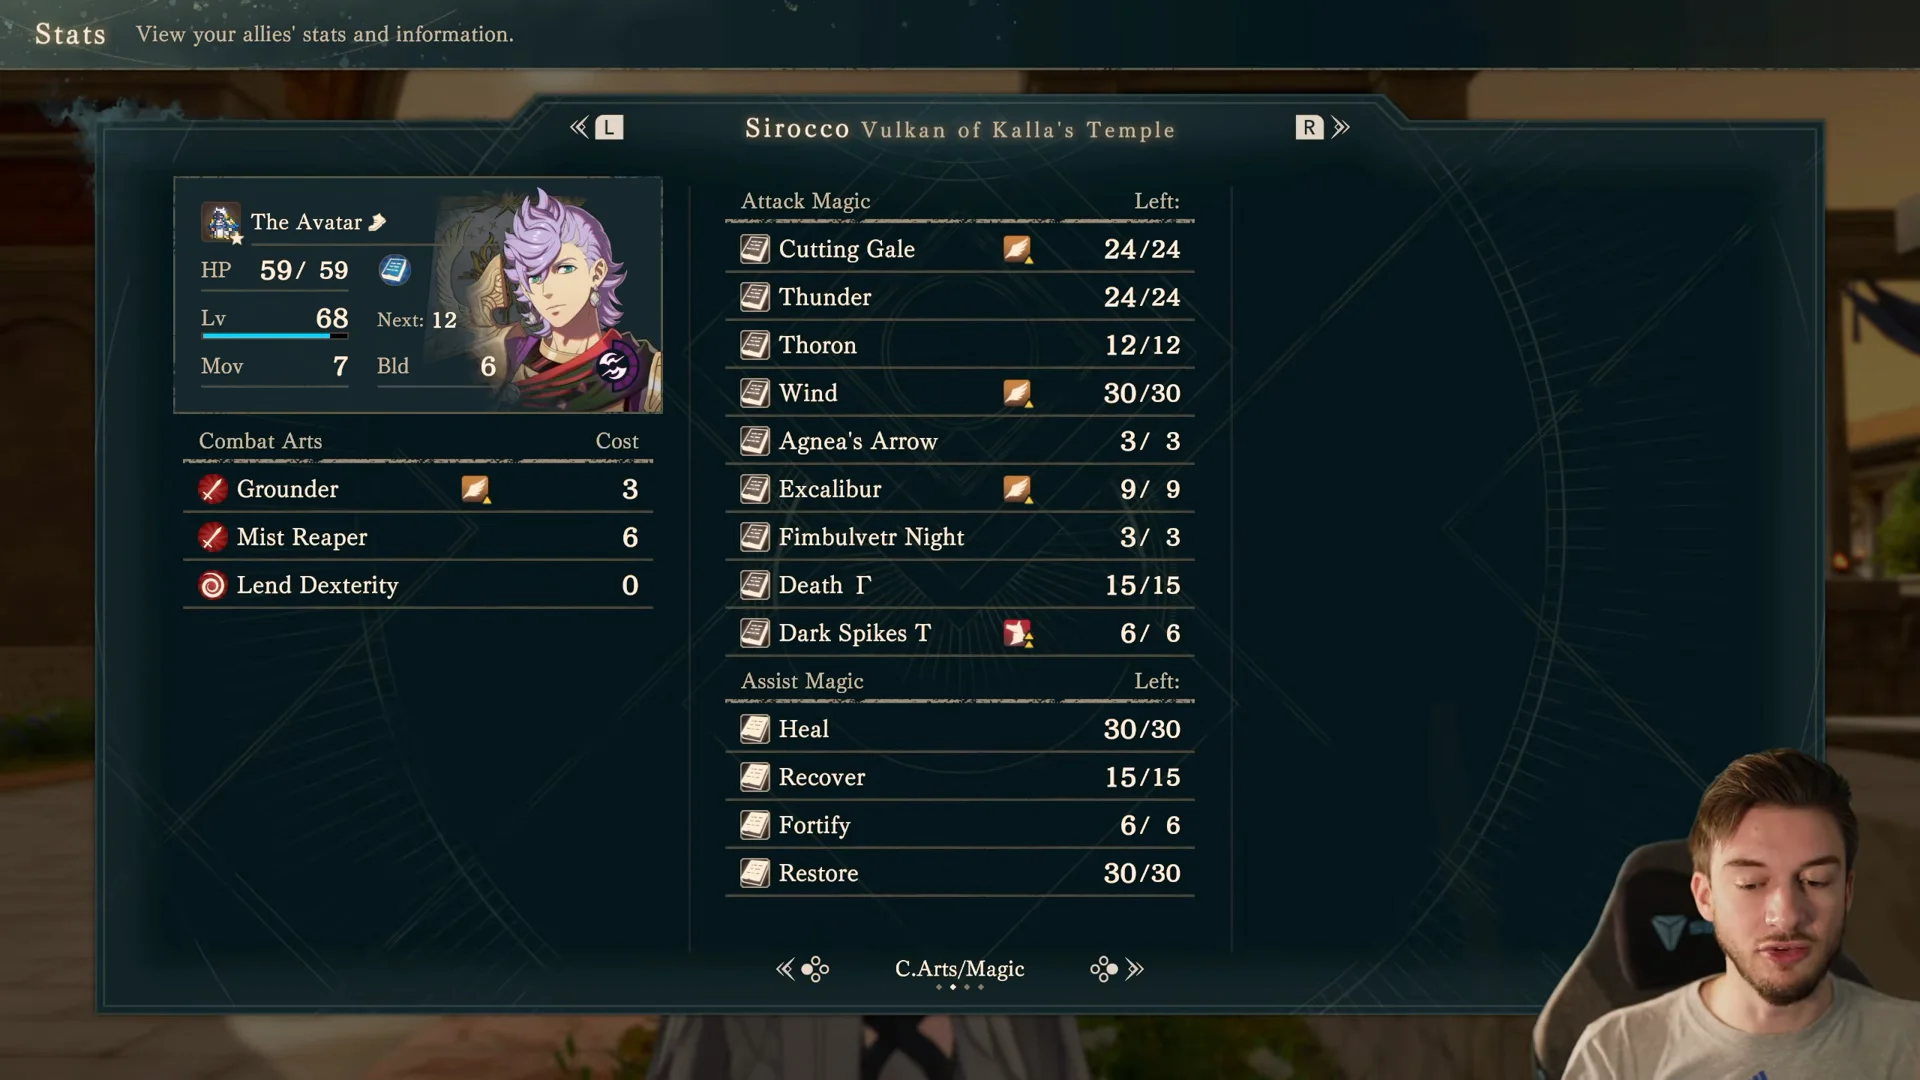
Sirocco as The Avatar reaches 68 Magic and very high evasion. Wind’s Caprice+ can add +30 Avoid in combat, Goddess’s Favor restores HP after each fight, and Excalibur plus Fortify cover both damage and healing.
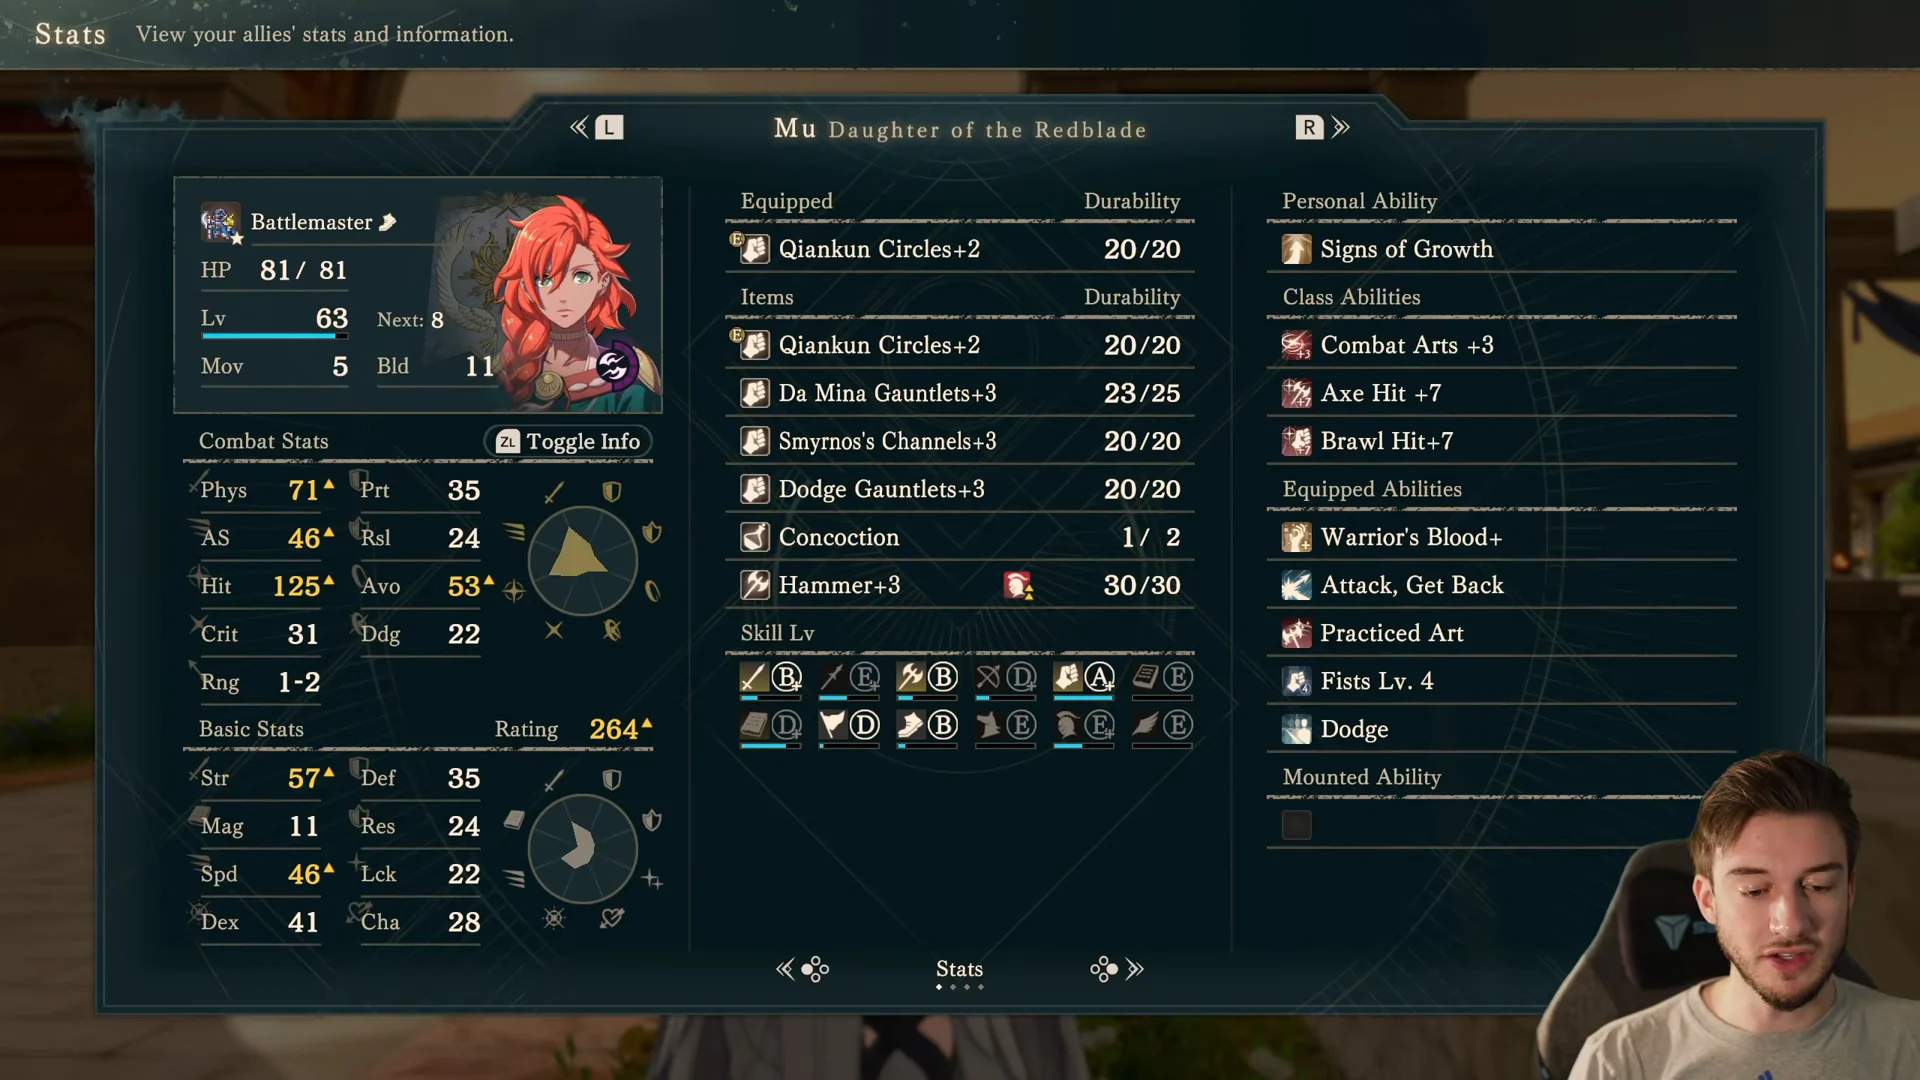
Mu is a gauntlet brawler in the Battlemaster class. Warrior’s Blood+ adds stat bonuses based on her weapon type, and Practiced Art supports her combat arts.
Hong Hua fills the second black magic slot with Thoron, Salamander+3, and Amplify Magic+. Olympia is the white magic specialist, and she also deals damage through Competitive Zeal and Ardent Nosferatu+, which heals her as she hits. Buccar is the Castle Knight wall, built on Guardian’s Duty and Great Counter.
Lysander brings cavalry pressure with Racing Attack and Accelerate+. Seteth is a Bau Lord flier who uses Ready for Battle and a Da Mina Spear+2 to reach targets across the map.
Dietrich’s squad: The Blade and debuff casters
| Unit | Class | Key gear | Key skills |
|---|---|---|---|
| Dietrich | The Blade | Levin Sword+3, Answerer Huang | Ravaging Arts, Ever Vigilant, In Shadow |
| Orchel | Wiseman | Aura, Starlight | Solid and Sturdy, Predictive Sense, Harmonic Soul+, Self Repair |
| Fabio | Druid | Luna Λ | Dark Calling, Dark Secrets+, Counter Mages |
| Esmeralda | Castle Knight / Dragoon | Grasitha+3 | Brawn, Throwing Arm+, Leave No Dust |
| Noctula | War Monk | Gauntlets | Warrior’s Clarity, Attack Basics, Close Quarters |
| Mikaela | Celestial Trooper | Da Mina Spear+1 | Veteran’s Mettle, Redblade’s Will+ |
| Halvin | Charioteer | Bow | Adaptability, Halt Advance+, Crescendo |
| Bertrand | Battlemaster | Axe | Ruler’s Awakening, Underworld Madness, Requiem Style, Sen No Sen |
Dietrich carries the squad through dodging and critical hits. In Shadow and Ever Vigilant keep him alive at the front, while Ravaging Arts and his Answerer Huang turn first strikes into kills.
Orchel is a Wiseman who mostly takes care of himself. Solid and Sturdy adds +5 Defense, and Self Repair plus Harmonic Soul+ restore his HP automatically, so his Aura and Starlight casts can go toward enemies instead of his own healing. Fabio is the debuffer, using Dark Calling, Dark Secrets+, and Luna Λ, with Counter Mages for punishing enemy casters.
Esmeralda splits between Castle Knight and Dragoon, throwing Grasitha+3 with Brawn and Throwing Arm+. Noctula is a War Monk striker who works in close range. Mikaela covers the air as a Celestial Trooper. Halvin is a mobile Charioteer archer, and Bertrand rounds out the squad as a Battlemaster axe user.
Talimun’s squad: curses, archers, and storage access
| Unit | Class | Key gear | Key skills |
|---|---|---|---|
| Talimun | Druid | Collapsing Curse, Def/Res Curse | Cannon-ing Flair, Winds of Victory |
| Yang Jie | Wiseman | Nosferatu | Monkly Havoc, Robust Health+ |
| Ursula | Bow Adept | Longbow loadout | Management Skills, Seize the Chance+ |
| Inyoni | Bow Adept | Azaga’s Bow | Heavy-Bow User, Bow Hit +15, Pierce+ |
| Dante | Ovate | Thunder | Stage Directions, Dramatic Effect+ |
Talimun is a Swashbuckler-style Druid who weakens enemies before the rest of the squad attacks. Collapsing Curse and Def/Res Curse lower enemy defenses, which helps the archers and casters behind him. Yang Jie heals from the Wiseman class and uses Nosferatu to stay healthy.
Ursula stands out for Management Skills, which gives her convoy access during combat from as far as two spaces away, letting nearby allies change weapons and items mid-mission. Inyoni fills the sniper role, pairing Heavy-Bow User and Pierce+ with Azaga’s Bow. Dante aids allies in range with Stage Directions and Dramatic Effect+, while contributing Thunder damage.
Goliath, Aswan, and Tahonia are the most useful backups for filling Talimun’s squad or replacing anyone you have not recruited.
Deploying the five squads at the gates
When you attack the gates, move your attacking squads in together instead of spreading them thin across the map. Keep one squad back at Dagsion to block enemies heading toward the city. A good patrol route runs between Alcinoeus Span and Enceladus Bridge.
Units that are not assigned to a squad stay in Dagsion and earn experience and class experience at the end of every map turn. Benching your backups there keeps them ready to step in if a squad needs a replacement.
You know the setup is ready when all five squads show full role coverage on the squad screen, each one has a Physic user, and the total deployed count reaches 25. From there, the final section comes down to holding Dagsion while the other four squads take down the gate guardians before the 84-turn limit runs out.