
Webex has made holding video meetings really easy, even with a free account. You can have secure group meetings in just one go, and enjoy a lot of other features like screen sharing, polls, virtual background, etc., as well.
But if you’re experiencing troubles with the audio, anything else an app offers doesn’t mean much. In most meetings, when others can’t hear you, there’s no point to even be in the meeting. But fortunately, there are a few fixes you can try to get out of this sticky situation.
Webex doesn’t have access to the Microphone
All apps on your computer need permission to access the microphone. If Webex does not have access to the microphone, there would be no sound in the meeting; it’s as simple as that.
Open the Windows settings and click on the ‘Privacy’ option to open the privacy settings.
Scroll down on the navigation menu on the left, and select ‘Microphone’ from under the App Permissions category.
Then, check whether the microphone access for the device is on. If it says off, click on the ‘Change’ button and click the toggle to turn it on.
Regardless of whether the setting was off or on, scroll down and make sure that the toggle for ‘Allow Apps to access your Microphone’ is on. If it isn’t, click in it to change its position.
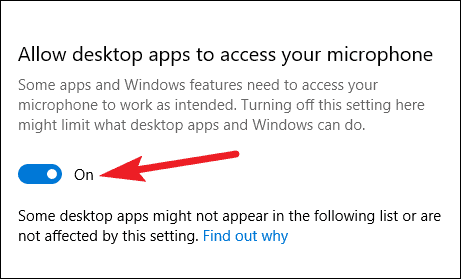
Now, scroll down further and go to the ‘Allow Desktop Apps to access your Microphone’ setting. As Webex is a desktop app and not a Microsoft Store app, this setting needs to be on as well for it to able to access the microphone. Click on the toggle to change it to on if it wasn’t.
The Webex Web App Does Not Have Permission
If you’re using the Webex web app from the browser instead of the desktop app, you need to verify additional permission. All the above permissions will allow your browser to access the microphone, but the website for Webex also needs explicit permission.
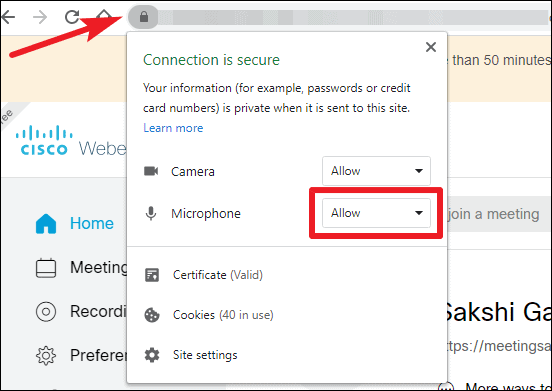
After opening your Webex meeting space on the browser, click on the ‘lock’ icon on the left of the address bar. Then ensure that the setting for ‘Microphone’ says ‘Allow’. If it doesn’t, expand the drop-down menu and select ‘Allow’ from it.
Now, if either of these permissions were not enabled, you’ve found your culprit. The microphone should start working after this. If they were already on, the problem might be something else. Try one of the other fixes until you find the one that solves the problem.
Check your Webex Preferences
It’s possible that you have the wrong microphone selected in your Webex settings. Maybe you used another microphone last time, and it’s still selected, or worse, it is your default microphone at the moment. You need to verify that that’s not the case.
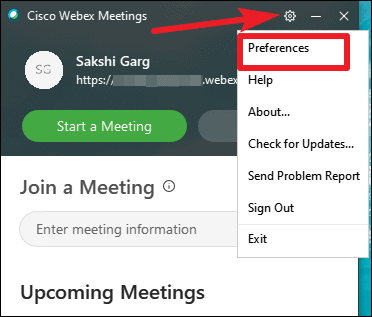
Click on the ‘Settings’ icon (the gear) on the Title Bar of the Webex app. Then, select ‘Preferences’ from the menu.
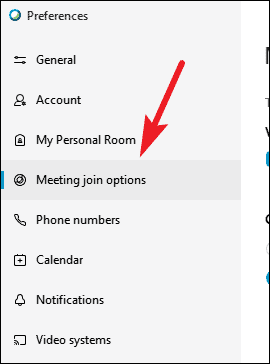
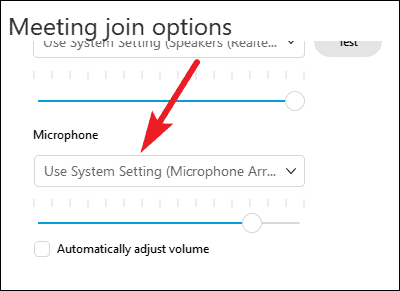
Webex settings will open. Go to ‘Meeting Join Options’ from the navigation menu on the left.
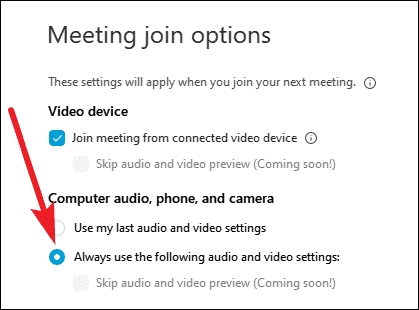
If you have the ‘Always use the following audio and video settings’, go to the ‘Microphone’ option, and check that the desired microphone is the one selected.
If the setting ‘Use my last audio and video’ is selected, then change it to ‘Always use the following audio and video settings’ and configure the camera and microphone settings to use the devices you desire.
Try Automatic Volume Adjustment
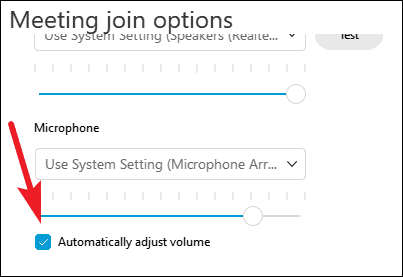
A lot of Webex users have been facing audio issues in the meetings. For a lot of users, a simple setting solved the problem. It could be the answer to your woes too. Go to ‘Meeting Join Options’ from the Webex settings.
Make sure that the ‘Always Use the audio and video settings’ option is selected. Then, go to ‘Microphone’ and under the microphone settings, select the checkbox for ‘Automatically Adjust Volume’ and click on the ‘Apply’ button. Check whether the issue was resolved.
Update the Drivers
The problem with the microphone could have been due to outdated drivers. Although Windows updates the drivers automatically, there’s always a possibility that it missed a crucial update. Manually updating the driver would fix that issue.
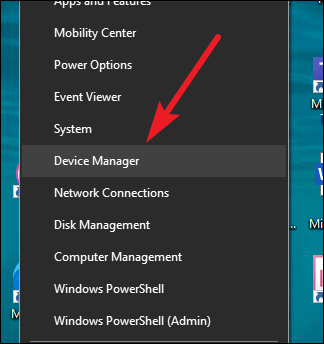
Right-click on the Start Menu button, and select ‘Device Manager’ from the context menu.
From the list of the drivers, find the ‘Audio inputs and outputs’ option, and click on the downward arrow next to it to expand the devices.

Then, go to your microphone on this list and right-click on it. Now select ‘Update driver’ from the menu.
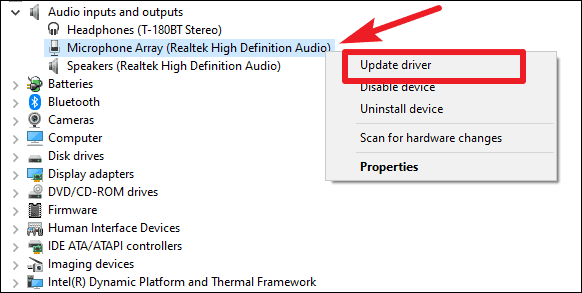
A window will open when you click the option to update the drivers. Select the ‘Search automatically for updated driver software’ option on the window. The device manager will search for driver updates and will install them if it finds any.
Troubleshoot the Microphone
If no solution has worked for you till now, maybe the problem is with the microphone itself. Running the troubleshooter will help you find if there’s indeed something wrong with the microphone.
Open the Windows settings, and click on the option for ‘System’ settings.
Now, go to ‘Sound’ settings from the navigation menu on the left.
Under the Input devices, go to ‘Microphone’, and make sure the correct microphone is selected. Then, click on the ‘Troubleshoot’ button to run the troubleshooter.
Windows will start troubleshooting the microphone. And if it finds a problem, it won’t just show it to you; it’ll also guide you on how you can solve the issue. After solving the issue, see if the microphone starts working in the meeting.
A working microphone is a huge part of a remote meeting. Without a microphone, it can get really frustrating really quickly when you can’t voice your opinions and offer your input. Luckily, there are quite a number of fixes you can try to help you on your quest.
But if nothing helps you, you should consider contacting the Webex support. Although before that, be sure to test your microphone in some other app and be sure that the issue is with the Webex meeting site and not the microphone itself. And if the latter turns out to be the case, a tour to the hardware shop is recommended.


