Tunnels are the NVA’s answer to American helicopters in Hell Let Loose: Vietnam. They cost nothing to place, they let your team cross the map without exposing anyone to fire, and a well-linked chain can move soldiers across roughly 1,600 meters. The catch is that almost none of the team can touch them.
Quick answer: Play as an NVA Squad Leader or Commander, equip your field pad, hold right-click (L2/LT on console) to open the build wheel, select Tunnel, then hold left-click (R2/RT) to place it. No supplies are needed, and you get a five-minute personal cooldown afterward.
Who can build tunnels in Hell Let Loose: Vietnam
Two conditions have to be true before the tunnel option even shows up on your build wheel. You need to be fighting for the North Vietnamese Army, and you need to be holding a leadership slot. Riflemen, medics, engineers, and every other role can use a finished tunnel, but they cannot place, link, or remove one.
| Requirement | Detail |
|---|---|
| Faction | NVA only — US Armed Forces cannot build tunnels |
| Role | Squad Leader or Commander |
| Supplies | None required |
| Sector | Friendly, neutral, or unlocked enemy territory |
How to place a tunnel
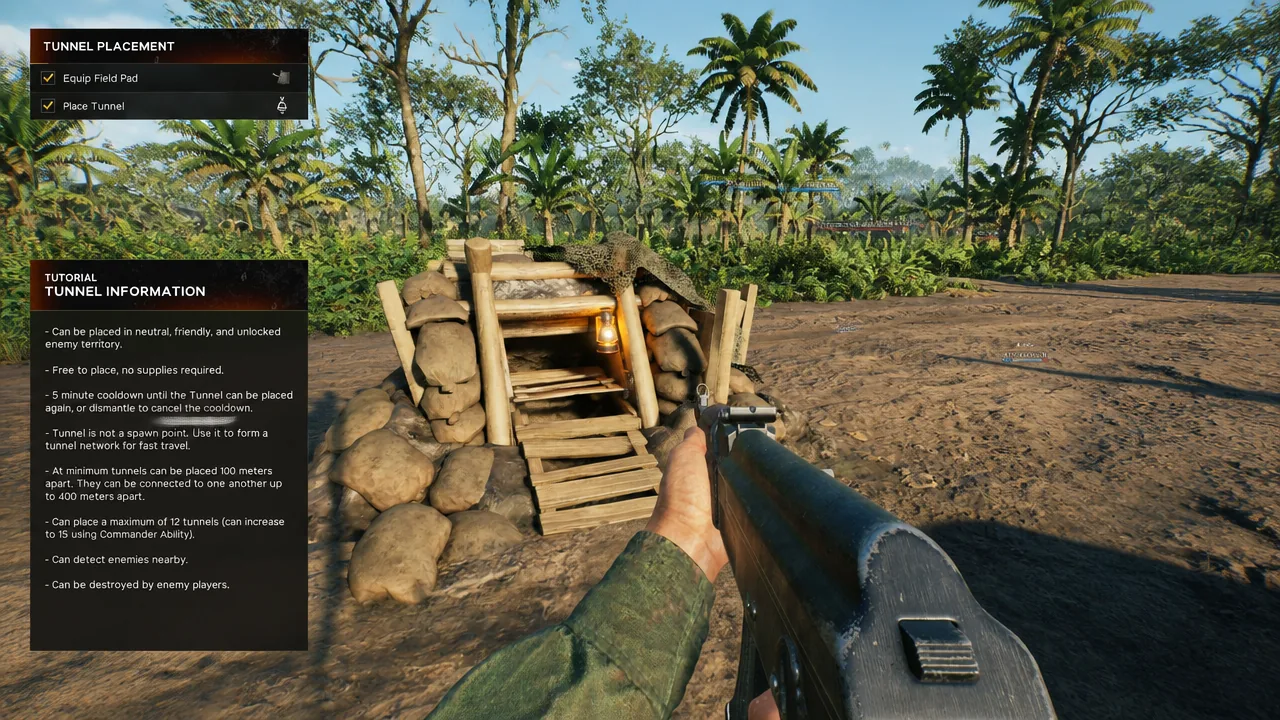
Note: pick your spot with cover in mind. Enemy players can dismantle and destroy an entrance they find, so an exit sitting in open grass rarely lasts long. On the plus side, tunnel nodes mark nearby enemies on the map, which lets you spot anyone camping an exit before your squad pops out of it.
Tunnel limits, cooldown, and sector rules
Free construction does not mean unlimited construction. The team shares a hard tunnel cap, and every leader carries their own timer between placements.
| Rule | Value |
|---|---|
| Tunnels per map | 12 by default, up to 15 with a Commander ability active |
| Build cooldown | 5 minutes, applied per player |
| Cooldown reset | Dismantle the tunnel you just built to place again |
| Blocked sectors | Locked enemy territory |
| Sector capture | Enemy capture of a neutral sector instantly destroys tunnels and links inside it |
The cooldown is individual, not team-wide. If you place the first tunnel of the match, every other Squad Leader who hasn’t built yet can still drop theirs immediately. Coordinating over comms is how a team gets a network up fast instead of one leader burning five minutes at a time.
Losing a sector wipes tunnels there the same way it wipes garrisons and outposts. That ground is not off-limits afterward, though. Once it counts as unlocked enemy territory, you can move back in and rebuild.
How to connect tunnels and garrisons
A lone tunnel does nothing. Value comes from the links between nodes, and linking is another leader-only action.
Distance and shape both matter. Two connected points must sit between 100 and 400 meters apart, and a single route tops out at four nodes, counting the tunnel you started from. Garrisons also cannot be wired straight into each other, so there has to be at least one tunnel sitting between them.
| Network rule | Limit |
|---|---|
| Minimum link distance | 100 meters |
| Maximum link distance | 400 meters |
| Nodes per route | 4, including the selected tunnel |
| Garrison to garrison | Not allowed — one or two tunnels must sit between them |
Stretching every link to the full 400 meters gets your team the furthest, but it costs time. Deeper, longer routes play a longer entry animation, so a tightly packed chain near a contested point often moves people faster than a sprawling one.
How to travel through a tunnel
Once a tunnel or garrison is attached to something, walking up to it shows an “Enter” prompt. Hold the interact button and a map opens listing valid destinations. Pick one, select Travel, and an animation plays before you appear at the far end.
That prompt is your confirmation the network is live. No prompt means the node you are standing at is not connected to anything yet. There is no cap on how many times you can use tunnels, though the game will not let you bounce back and forth repeatedly.
One thing tunnels are not is a respawn point. After you die you cannot deploy directly into a tunnel. Spawn at a garrison that is connected to the network instead, then travel from there.
Why a tunnel will not build or disappears
- You are not in a leadership role. Only Squad Leaders and the Commander see the tunnel option.
- You are standing in locked enemy territory, where placement is blocked outright.
- Your personal five-minute cooldown is still running from your last placement.
- The team has hit the 12-tunnel cap, or 15 if the Commander ability is active.
- The sector flipped to the enemy, which deletes tunnels and their connections there instantly.
- An enemy player found the entrance and dismantled it.
The tunnel system rewards leaders who plan a few minutes ahead rather than dropping entrances wherever they happen to be standing. Keep entrances under cover, space links close enough that transit stays quick, and make sure at least one garrison feeds into the chain so respawning players can actually reach it.