
Microsoft Word’s built-in grammar and style tools can flag everything from basic spelling mistakes to advanced stylistic issues. However, the default settings may not always fit your writing needs or regional conventions, leading to distracting prompts or missed corrections. Customizing these settings lets you focus on the rules and refinements that matter most for your documents, whether you’re writing a research paper, business proposal, or creative work.
Configuring Grammar and Style Settings in Microsoft Word (Windows and Mac)
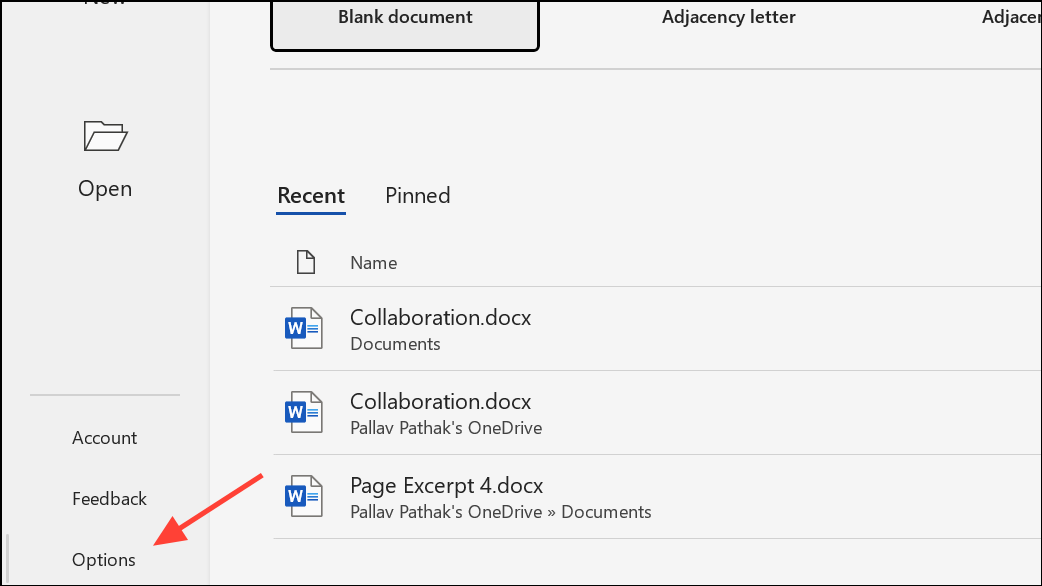
Step 1: Open Microsoft Word and load any document. Access the settings by clicking the File tab in the upper left corner, then select Options from the sidebar. This opens the Word Options dialog box.
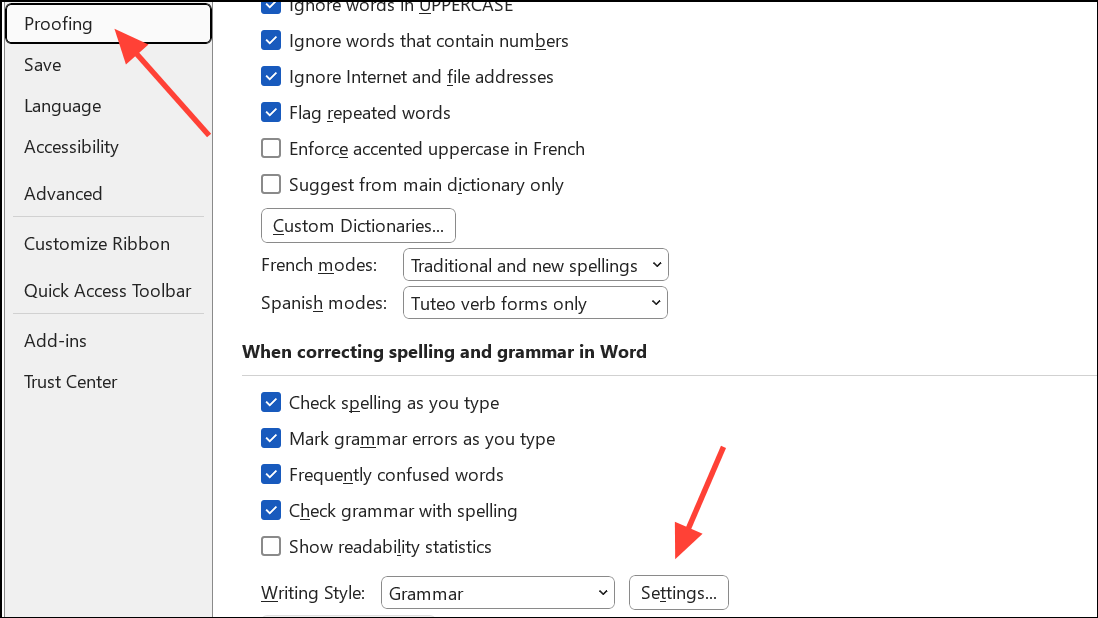
Step 2: In the Word Options window, choose Proofing from the left-hand menu. Scroll to the section labeled “When correcting spelling and grammar in Word.” Here, click the Settings button next to “Writing Style.”
Step 3: A new dialog appears with a list of grammar and style rules. You can switch the Writing Style dropdown between Grammar and Grammar & Refinements. The latter option adds checks for clarity, conciseness, formality, and more.

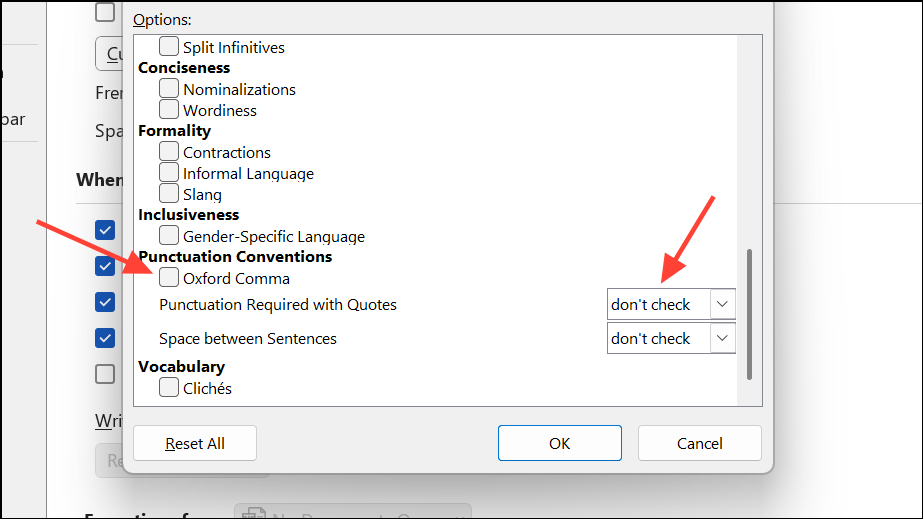
Step 4: Review the available options, which include rules for passive voice, wordiness, punctuation, capitalization, cliches, and more. Check the boxes for issues you want Word to flag, and clear boxes for rules you wish to ignore. For example, if you regularly write in UK English and don’t want a comma after “e.g.” or “i.e.”, locate the relevant rule (such as “Commas required after introductory phrases”) and uncheck it.
Step 5: For advanced punctuation preferences, such as placement of punctuation with quotation marks or the number of spaces between sentences, adjust the corresponding dropdown menus. On Mac, these options are grouped under “Require.” On Windows, they appear within the list under “Punctuation Conventions.”
Step 6: Click OK to save your changes in the Grammar Settings dialog, then click OK again in the Word Options window. Your preferences now apply to all new and existing documents you edit in Word.
Customizing these settings reduces time spent dismissing unwanted suggestions and ensures that Word checks only for issues that match your writing style and audience.
Fine-Tuning Grammar Checks with Microsoft Editor
Microsoft Editor, integrated into Word for Microsoft 365, provides a more granular approach to grammar and style. You can access it if you're running the 365 version of Word. Editor runs in the background, marking issues with colored underlines—red for spelling, blue for grammar, and purple for stylistic refinements.
Step 1: On the Home tab, click Editor to open the Editor pane. Alternatively, press F7 to launch it directly.
Step 2: In the Editor pane, you’ll see categories such as Spelling, Grammar, and Refinements (which includes clarity, conciseness, and formality). Click on a category to review suggestions specific to that issue. Use the navigation arrows to move through each flagged item.
Step 3: To tailor what Editor checks, look for the Corrections section and select Grammar or another category. Click the ellipsis (…) for more options, then choose Customize suggestions. Here, you can enable or disable specific grammar and style checks, aligning Editor’s behavior with your needs.
Step 4: If you encounter an underlined word or phrase in your document, right-click it to see suggested corrections, ignore the suggestion, or access more options such as “Don’t check for this issue.” For accessibility, you can also have Editor read the suggestion aloud.
Editor’s customizations persist across all documents, allowing you to maintain consistency in your writing standards.
Changing Proofing Language and Multilingual Checks
Word can check grammar and spelling in multiple languages, which is useful for multilingual documents or regional preferences.
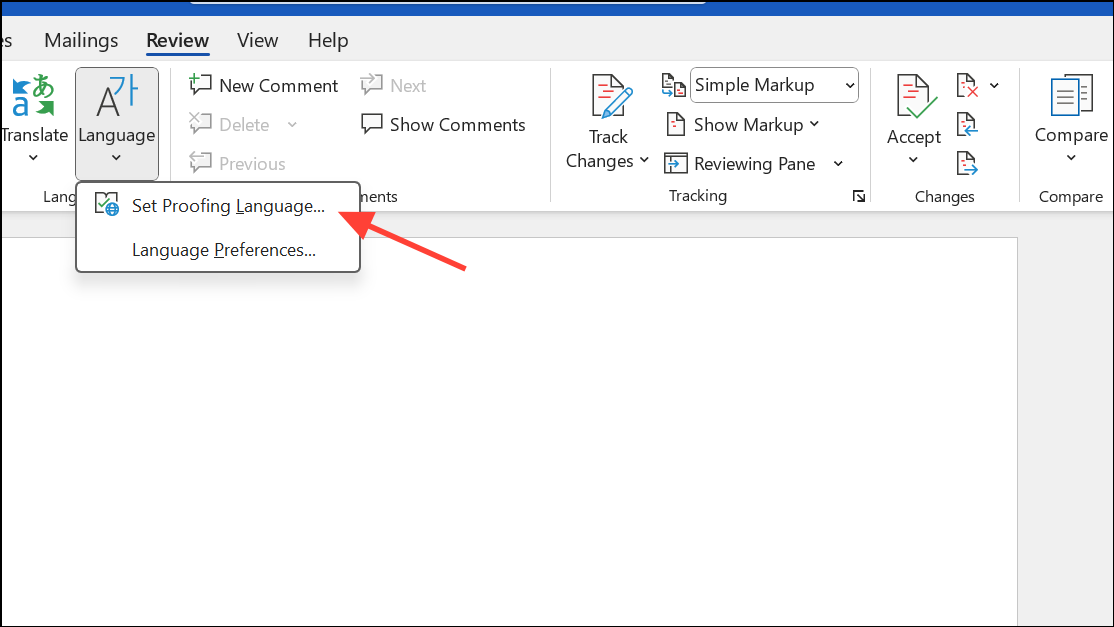
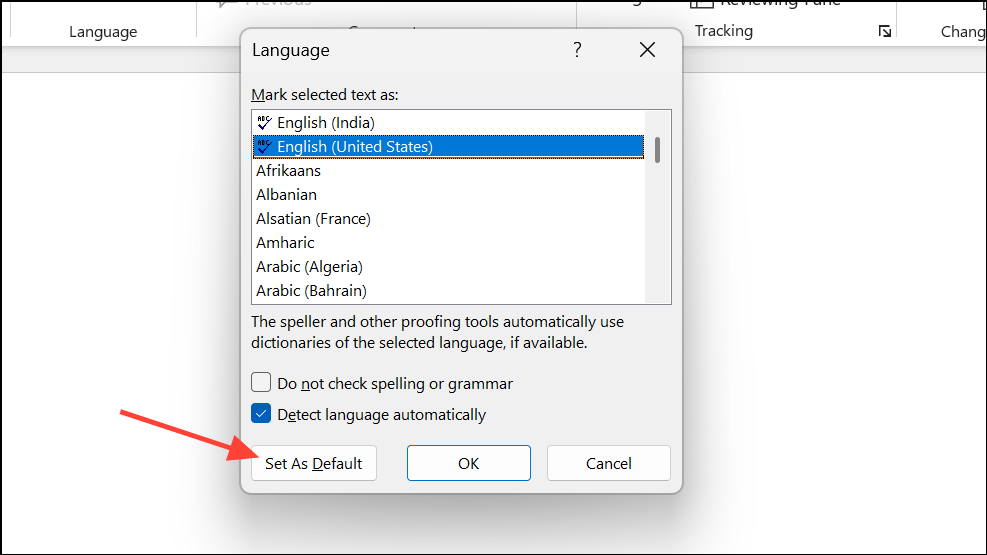
Step 1: Select the text you want to check in a different language. Go to the Review tab, then choose Language > Set Proofing Language.
Step 2: In the dialog box, select your desired language (for example, “English (United Kingdom)” for UK spelling and grammar rules) and click Set As Default if you want this to apply to all future documents.
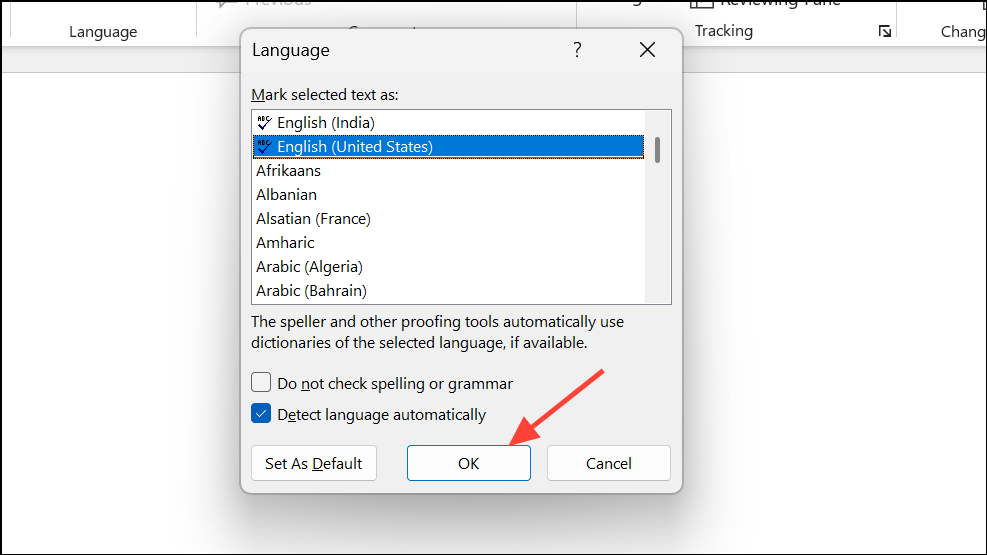
Step 3: Click OK to apply the language setting. Editor and the built-in proofing tools will now check for issues according to the selected language’s conventions.
For existing documents, select all text before changing the proofing language to ensure consistent checking throughout the file.
Turning On or Off Automatic Spelling and Grammar Checking
Word can automatically check spelling and grammar as you type, but you may want to toggle these options based on your workflow.
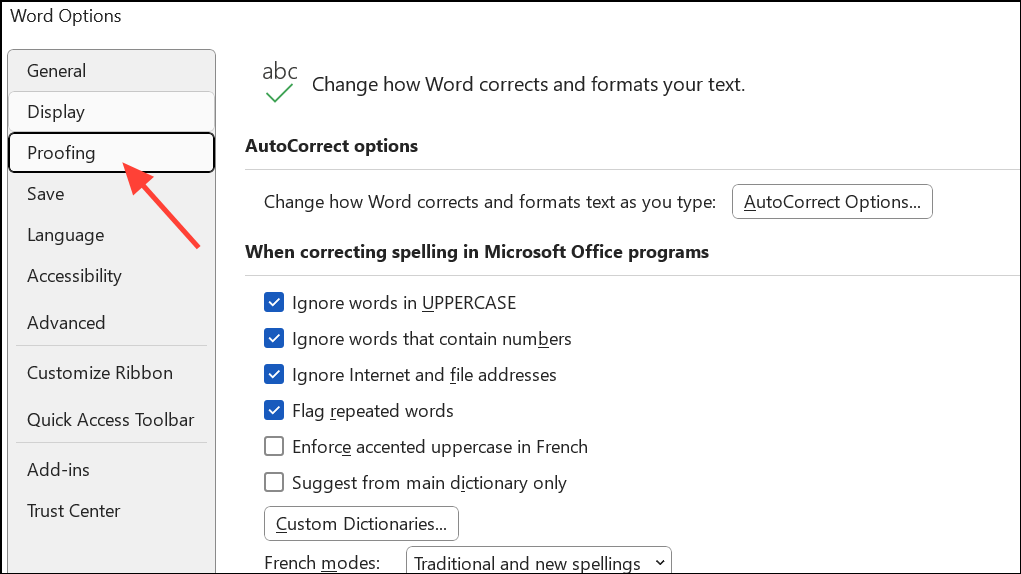
Step 1: On Windows, go to File > Options > Proofing. On Mac, select Word > Preferences > Spelling & Grammar.
Step 2: Check or clear the boxes labeled Check spelling as you type and Mark grammar errors as you type. Close the dialog to save your preference.
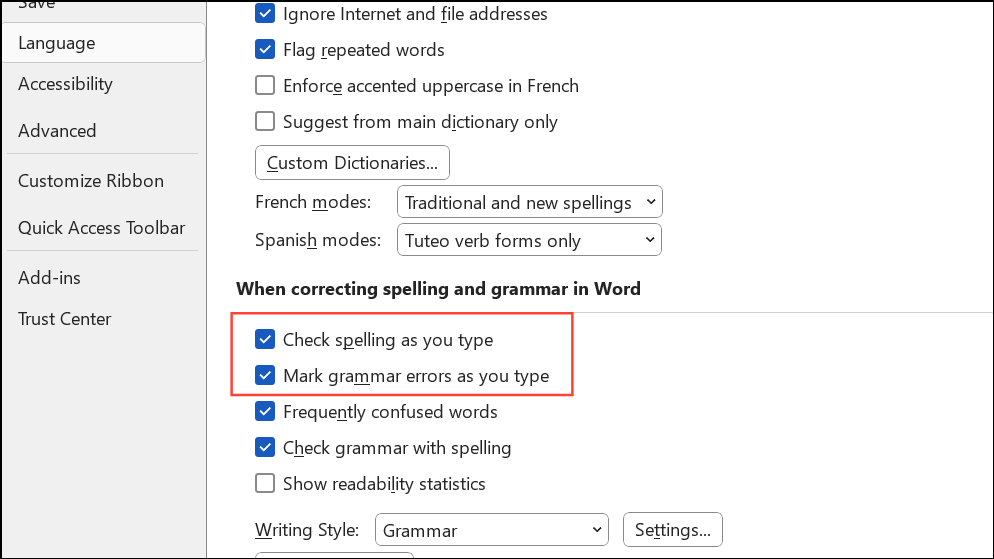
Disabling these options removes real-time underlines, while enabling them flags issues immediately as you write.
Running a Manual Spelling and Grammar Check
For a comprehensive review, you can run a manual spelling and grammar check on your entire document.
Step 1: Click the Review tab and select Spelling & Grammar.

Step 2: Word will display each issue it finds in sequence. You can type corrections, pick from suggested words, or choose Ignore Once or Ignore All to skip errors. For spelling, use Add to include a word in your custom dictionary. For grammar, you can skip to the next sentence if needed.
Step 3: When the check is complete, Word notifies you. Click OK to exit and return to your document.
Resetting Ignored Words and Grammar in Older Versions
If you are using an older version of Microsoft Word, you can use the Tools menu to review certain issues that you might have earlier told Word to ignore.
Step 1: Open your document and select Tools > Spelling and Grammar > Reset Ignored Words and Grammar.
Step 2: Confirm the warning prompt to proceed. This will clear ignored issues only for the open document.
Step 3: Re-run the spelling and grammar check to see previously ignored errors flagged again.
Customizing grammar and style settings in Microsoft Word creates a more focused editing environment and saves time during the writing process. Adjust these options as your needs change to keep your documents clear and consistent.