
Excel’s power lies in its ability to perform a vast array of calculations, from simple arithmetic to complex data analysis. To utilize this power effectively, it’s essential to understand how to create and work with formulas.
A formula in Excel is an expression that calculates values using constants, cell references, or other formulas. While often used interchangeably with functions, formulas are expressions you create, whereas functions are predefined calculations built into Excel. A formula typically consists of operators and operands, while a function includes a function name and arguments.
This guide covers how to write, edit, and copy formulas using constants, operators, cell references, and the point-and-click method.
Basics of Excel Formulas
Formulas in Excel can range from simple calculations to complex expressions involving multiple operations. No matter how complex, a formula always starts with an equal sign (=) and returns a result, even if that result is an error.
Components of a Formula
An Excel formula can contain any of the following elements:
- Mathematical operators: Symbols like
+for addition or*for multiplication. - Constants: Numeric values, dates, or text entered directly into the formula.
- Cell references: Addresses of cells or ranges, such as
A1orA1:B2. - Functions: Built-in formulas like
SUMorPRODUCTthat perform specific calculations.
Types of Operators in Excel
Operators in Excel dictate how the components of a formula are calculated. There are four main types:
Arithmetic Operators
These operators perform basic mathematical operations:
- Addition:
+ - Subtraction:
- - Multiplication:
* - Division:
/ - Percentage:
% - Exponentiation:
^
Comparison Operators
Comparison operators compare two values and return a logical value of TRUE or FALSE:
- Equal to:
= - Greater than:
> - Less than:
< - Greater than or equal to:
>= - Less than or equal to:
<= - Not equal to:
<>
Text Concatenation Operator
This operator combines multiple text strings into one:
- Concatenation:
&
Reference Operators
Reference operators combine ranges of cells for calculations:
- Range operator:
:Creates a reference to all cells between two cell references, including the two cells. - Union operator:
,Combines multiple cell references into one reference.
Understanding Cell References
Cell references allow you to use data from other cells in your formulas. There are two types of cell references:
- Relative references: Adjust when you copy a formula to another cell. Example:
B1. - Absolute references: Remain constant, even when the formula is copied elsewhere. Indicated by dollar signs (
$). Example:$B$1.
Creating a Simple Formula Using Constants and Operators
To perform basic calculations without referencing other cells, you can include constants and operators directly in a formula.
Select the cell where you want the result to appear. Type an equal sign (=) to start the formula. For example, to add 23 and 5, type =23+5 and press Enter.

Modifying a Formula
To edit an existing formula, select the cell containing the formula and click on the formula bar at the top of the spreadsheet. Make your changes directly in the formula bar or by double-clicking the cell. For instance, to change the operation from addition to subtraction, replace the + with a - and press Enter.

Creating Formulas with Cell References
Using cell references in formulas allows your calculations to update automatically when the referenced values change. To create such a formula, start by typing an equal sign (=), then enter the cell references separated by operators. For example, to add values from cells A1 and B1, type =A1+B1 and press Enter.
As you enter each cell reference, Excel highlights the corresponding cell, helping you verify that you’re referencing the correct data.
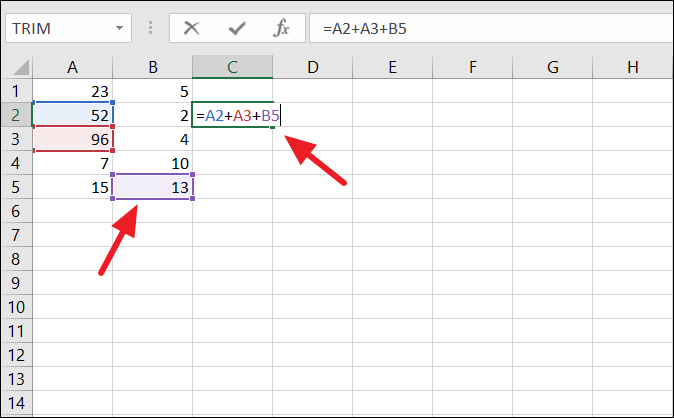
You can include multiple cell references and operators in a single formula for more complex calculations.

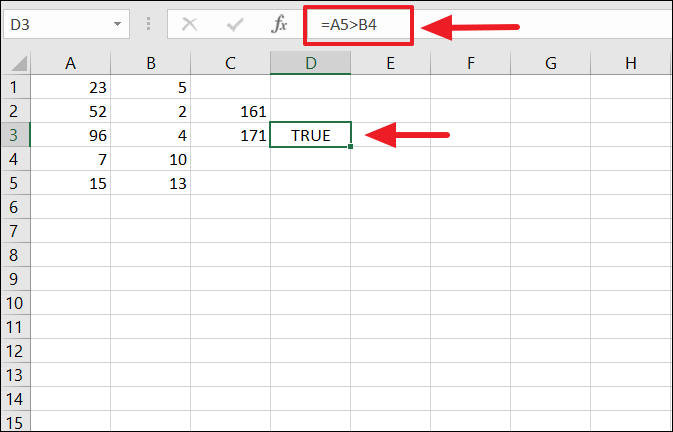
Using the Point-and-Click Method to Create Formulas
The point-and-click method simplifies formula creation by allowing you to select cells directly instead of typing their references. This method reduces errors and speeds up the process.
Select the cell where you want the formula result. Type the equal sign (=), then click on the first cell you want to include in your formula. Type the desired operator, and then click on the next cell. Repeat for additional cells and operators as needed. Press Enter to complete the formula.
For example, to compare the values in cells A5 and B4, select the result cell and type =. Click on cell A5, type the comparison operator (e.g., >), and then click on cell B4. Press Enter to see the result, which will be either TRUE or FALSE depending on the comparison.

The cells included in your formula will be highlighted, helping you confirm the correct references.
If the condition is met, Excel returns TRUE as shown below.
Operator Precedence in Excel Formulas
When a formula includes multiple operators, Excel follows a specific order of operations to determine the result. Understanding this precedence is crucial for building accurate formulas.
The order of operations in Excel is as follows:
- Parentheses:
() - Exponents:
^ - Multiplication and Division:
*and/ - Addition and Subtraction:
+and-
If a formula has operators with the same precedence level, Excel evaluates them from left to right.
Consider the following example of a complex formula:
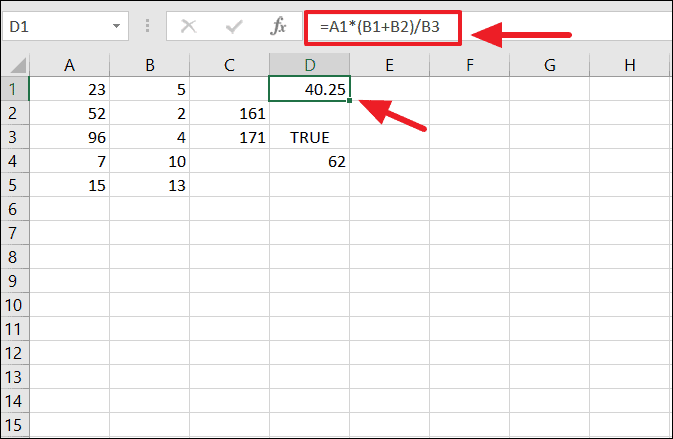
In this formula, Excel first calculates the expression within the parentheses (B1+B2). It then multiplies the result by the value in A1 and finally divides that product by the value in B3.
Mastering formulas in Excel enhances your ability to analyze data efficiently and accurately. By understanding how to use operators, cell references, and Excel’s order of operations, you can create dynamic spreadsheets that adapt to your data and provide valuable insights.


