The feature to record meetings is a cult favorite when it comes to users of the virtual meeting setup. Being able to record the meeting is highly beneficial in an assortment of situations. Whether you’re doing it for yourself to refer back to it or for someone who couldn’t attend, recording a meeting in Zoom is super easy.
Based on your account type, you can save recordings either on the cloud or locally. But what about once you’ve recorded a meeting. Apart from sharing the recordings directly, is it possible to first edit them? Sometimes a recording has bits you’d like to trim, like those first few awkward minutes where you’re waiting for everyone to arrive. Other times a recording is too long, and you only need to share small parts of it. There are plenty of situations where you could do with some editing.
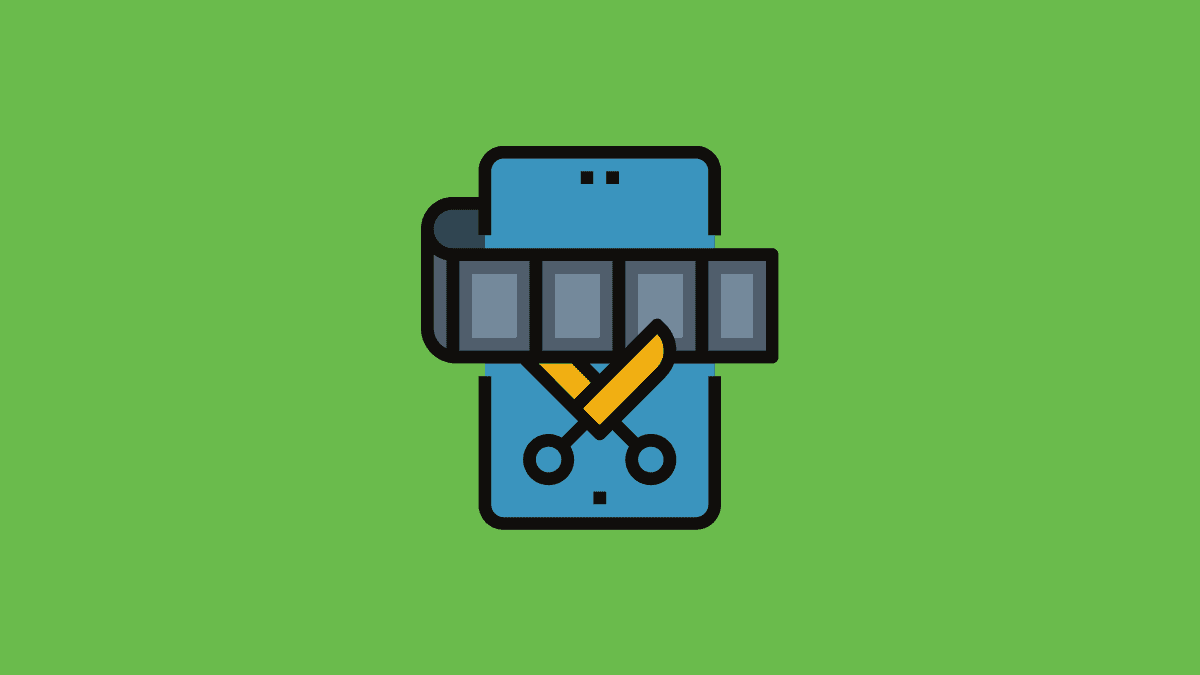
Can you Edit Zoom Recordings?
Although Zoom does not offer any tools to edit recordings from within the app, you can still edit them. All Zoom recordings, local as well as cloud, are saved as high-quality files with formats MP4 (for audio and video) and M4A (for audio files).
These are common file formats you can edit in any video editing software. You can optimize the recording for a third-party video editor for the best results for both cloud and local recordings. Zoom says optimizing a recording ensures its compatibility with video editing software.
Note: This option only optimizes your future meeting recordings. Any previous recordings aren’t affected. So, it’s best to apply these settings before your meeting.
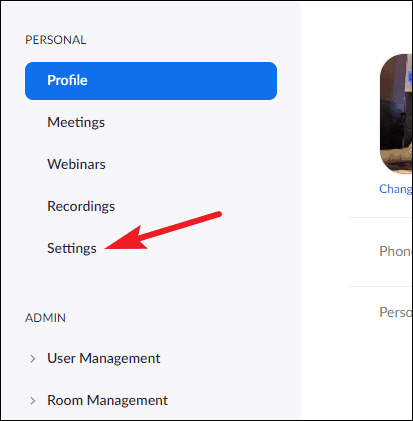
For the cloud recordings, go to zoom.us and log in to your account. Then, go to ‘Settings’ from the navigation menu on the left.
Go to the ‘Recording’ tab in the settings.

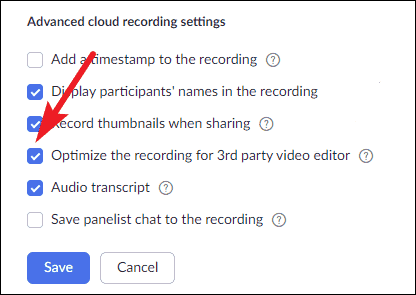
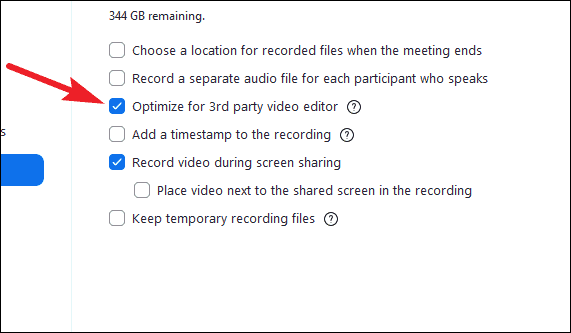
Under Advanced cloud recording settings, check the option for ‘Optimize the recording for 3rd party video editor’ and click ‘Save’.
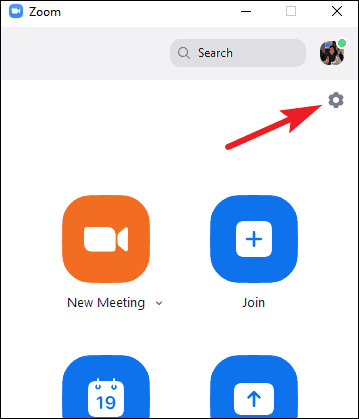
For local recordings, open the Zoom desktop client and go to ‘Settings’.
Then, go to ‘Recording’ from the navigation menu on the left.
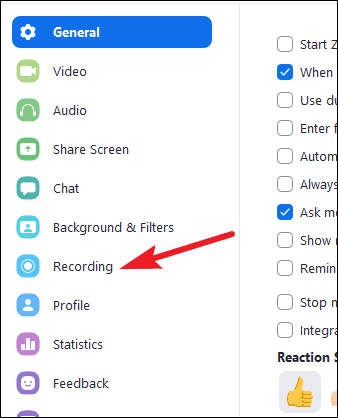
Check the option for ‘Optimize for 3rd party video editor.
What is Playback Range in Zoom Cloud Recordings
Some of you might be wondering what’s that scissor-like icon that looks an awful lot like an editing tool when viewing Cloud recordings in Zoom if it’s not for video editing? Zoom does have an option to trim the recordings, but it doesn’t exactly edit them.
The trim option is known as ‘Playback Range’ for video recordings. Using this option, you can temporarily trim the beginning and end of a Zoom Recording before sharing it with others.
There are two things to note here. First, it can only trim the beginning and end of a recording and no other parts. Second, the trim is temporary. You cannot permanently edit a recording using this feature. But the plus-side is, you won’t lose any of the original content.
What it does in actuality is only trim the video for viewing. When you share the recording with others, the video will automatically play in the range you set, leaving out the parts you trimmed. But those parts aren’t gone.
If someone downloads the video, they’ll see the whole video instead. It also doesn’t work on all devices. So even if someone is only viewing the video from an incompatible device/ browser, they’ll still see the complete video. The list of incompatible devices/ browsers includes Internet Explorer, Safari, and mobile devices.
But it could still be useful in certain scenarios. When the only motive behind your editing is to clean the recording to remove unnecessary parts that don’t waste the viewers’ time, using Playback Range can be the perfect option.
Note: Playback Range option is only available for Cloud Recordings.
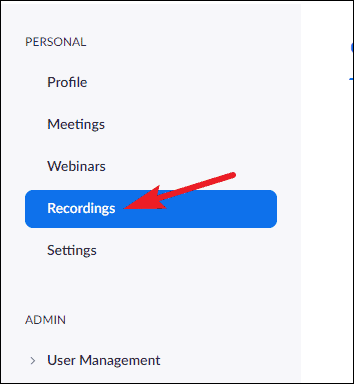
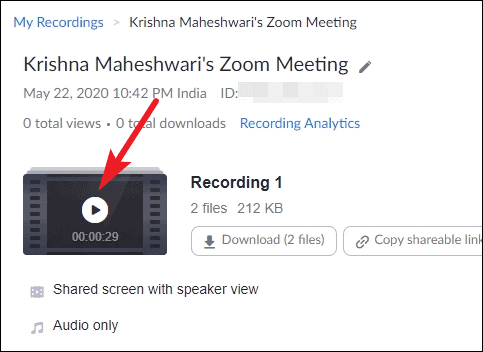
To view a Cloud Recording, go to zoom.us and log in to your account. Then, go to ‘Recordings’ from the navigation menu on the left.
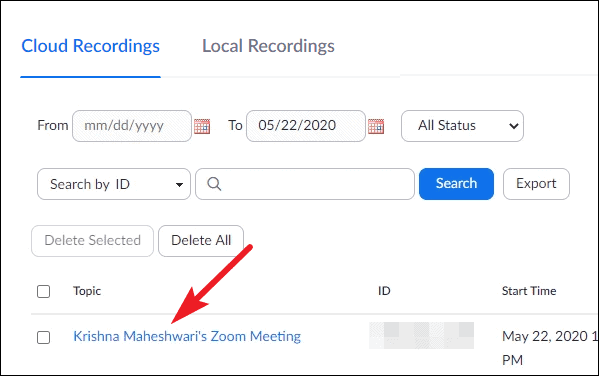
The tab for Cloud Recordings will open. Click the meeting topic for which you want to view the recording.
Then, click the play button on the meeting thumbnail.
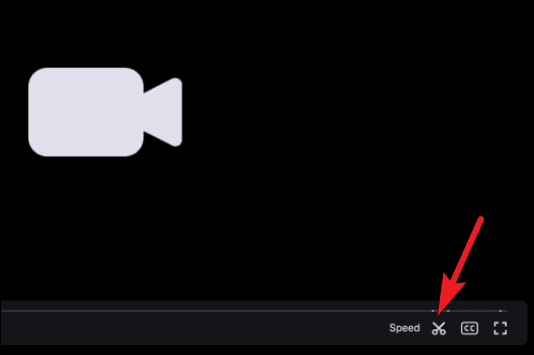
The recording will open in a separate tab. Click the ‘Playback Range’ option (Scissor icon) on the right corner of the playback options.
Now, drag the sliders to desired start and end position. The selected playback range will appear in blue. Then, click ‘Save’.
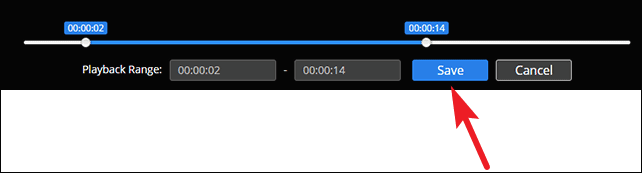
Now when you share the recording, people will only see the video within the playback range.
Editing a Zoom Recording
To truly edit a Zoom recording, whether it’s saved on your computer or Zoom cloud, you need to use third-party video editing software. But no worries, you don’t need any fancy equipment or software here.
There are plenty of software you can use to edit a Zoom Recording. If you’re on a Mac, there isn’t a better choice than iMovie. For other systems, you could also use ScreenFlow, Camtasia, or any of the video solutions in Adobe Creative Cloud, to name a few. The gist being, no matter what system you’re on, you’d have plenty of options to choose from.
One of the most accessible choices, which also doesn’t require any downloads, has to be YouTube. YouTube has its own video editor that virtually anyone can use. All you need is a Google account, which almost everyone already owns.
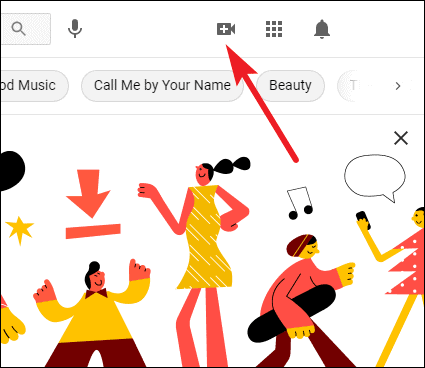
Go to youtube.com and click the ‘Create’ button towards the top-right of the screen.
Then, select the ‘Upload Video’ option. Don’t worry, you won’t be uploading the video to the public.

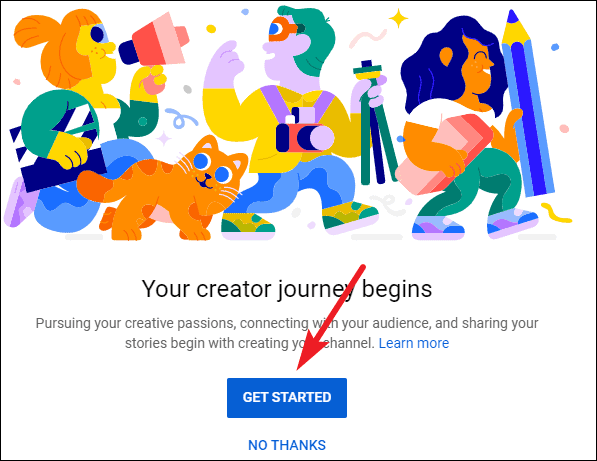
If you’re uploading for the first time, click the ‘Get Started’ button. Then follow the instructions on the screen to set up your channel.
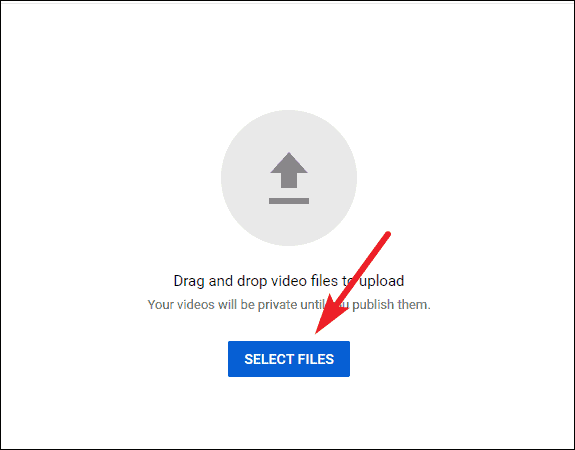
Now, click the ‘Select File’ button to upload the Zoom recording. Whether you recorded locally or on the cloud, you need to upload the video from your computer for the YouTube editor. For a cloud video, download it from the Zoom web portal. For a locally recorded video, just locate the recording on your computer.
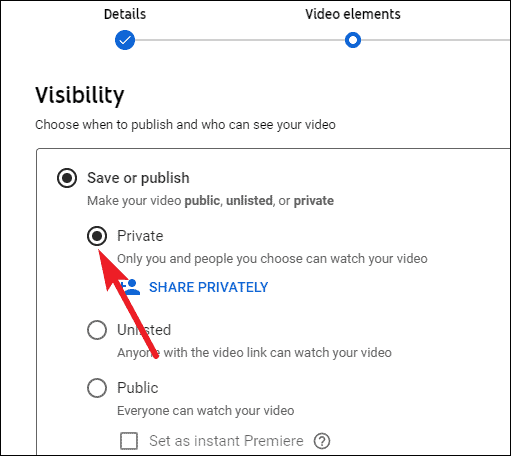
A publishing window for YouTube will appear. As we have no intention of actually publishing it, you don’t need to go over any details. Keep clicking the ‘Next’ button until you reach the last step, i.e., ‘Visibility’.

Then, under ‘Save or Publish’, select the option ‘Private’. This is crucial unless you want to make the video visible to everyone.
Click the ‘Save’ button.

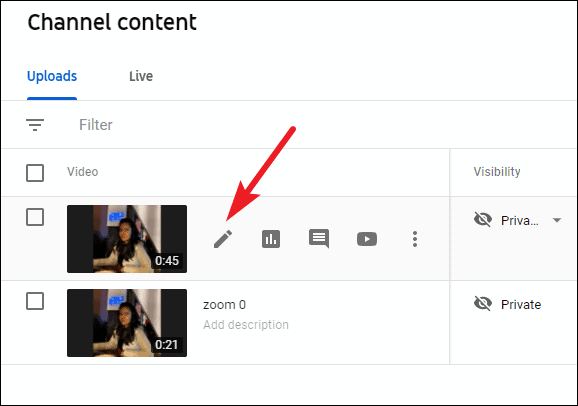
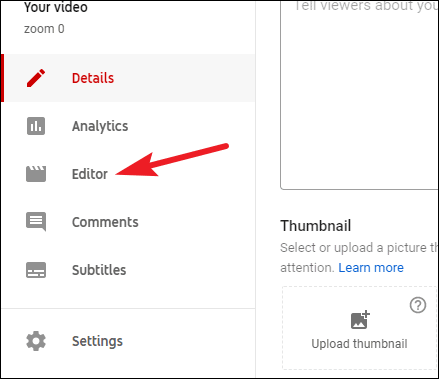
The video will appear on the Channel content page. Hover over it to reveal more options and then click the ‘Details’ button.
Video details will open in the YouTube studio. Go to the navigation menu on the left and click ‘Editor’.
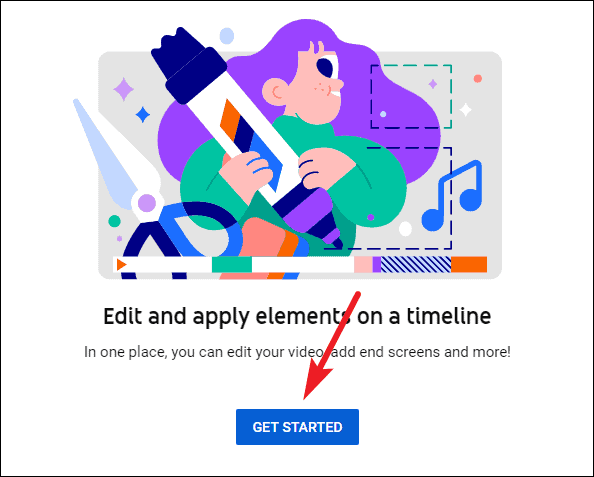
An introduction screen will appear if you’re using the Editor for the first time. Click the ‘Get Started’ button.
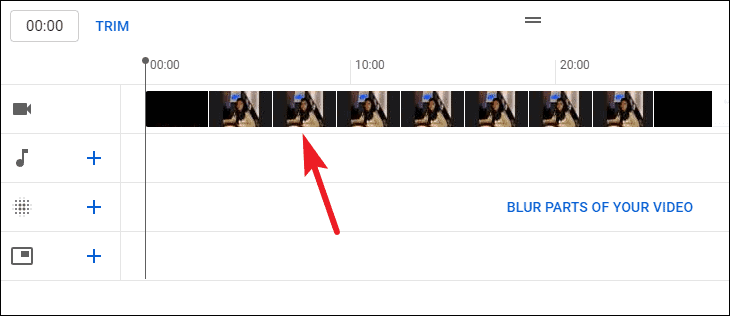
Your video will appear on the editing screen. Edit it using the various options available. You can trim it, split it into parts, blur parts, and more.
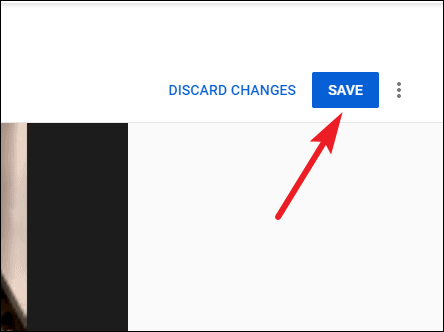
Click the ‘Save’ button towards the top right corner once you’re done. It takes some time to process the changes. Once the changes are applied, you can download the video and share it further.
Recordings are an inherent part of the virtual meeting life. But you don’t have to share the raw recordings with people when you don’t want to. Edit your Zoom recordings however you see them fir before sharing.


