
Multi-core CPUs have become the standard for modern processors, allowing them to efficiently handle multiple tasks simultaneously. Having multiple cores allows the CPU to work on different tasks simultaneously, increasing speed and performance.
Even with the latest processors packing higher frequencies and multiple cores, some demanding tasks can still push a system to its limits. That’s because not every core might not always be activated.
This guide will walk you through the simple steps of enabling all cores in Windows 11, allowing you to unleash the full power of your CPU.
Why Enable All CPU Cores?
Processor cores are separate processing units of processing power within a computer’s central processing unit (CPU). Each core has its own dedicated hardware and memory, enabling it to handle computing tasks independently. The more cores a CPU has, the more tasks it can handle simultaneously, leading to improved overall performance.
Just like your brain has multiple regions that can work together, the CPU also has multiple cores that can handle different tasks simultaneously. These cores are like small processing units that work independently, allowing the CPU to handle more demanding apps and multitasking more efficiently.
For instance, if you’re editing a video while simultaneously browsing the web and chatting with friends, a CPU with multiple cores can handle all these tasks smoothly, without one task interfering with the others.
Windows automatically manages the available CPU cores, using them only when necessary to boost performance. However, you can manually enable all or some of the cores if you feel your computer is underperforming. By distributing the workload across multiple cores, you can potentially achieve better performance.
How to Check the Number of Cores on your PC
If you’re into gaming, heavy audio work, or video editing, it’s really helpful to know how many cores your processor has. It can come in handy when you’re troubleshooting problems, turning on all the cores, or just checking out how powerful your CPU is. You can also know the number of physical cores and the logical cores in Windows.
If you don’t know how many cores your processor has, follow these steps:
- Right-click on your taskbar or press the keyboard shortcut
Ctrl+Shift+Escto launch the Task Manager. - Now, click the ‘Performance’ tab and then select ‘CPU’ from the left-hand side of the window.
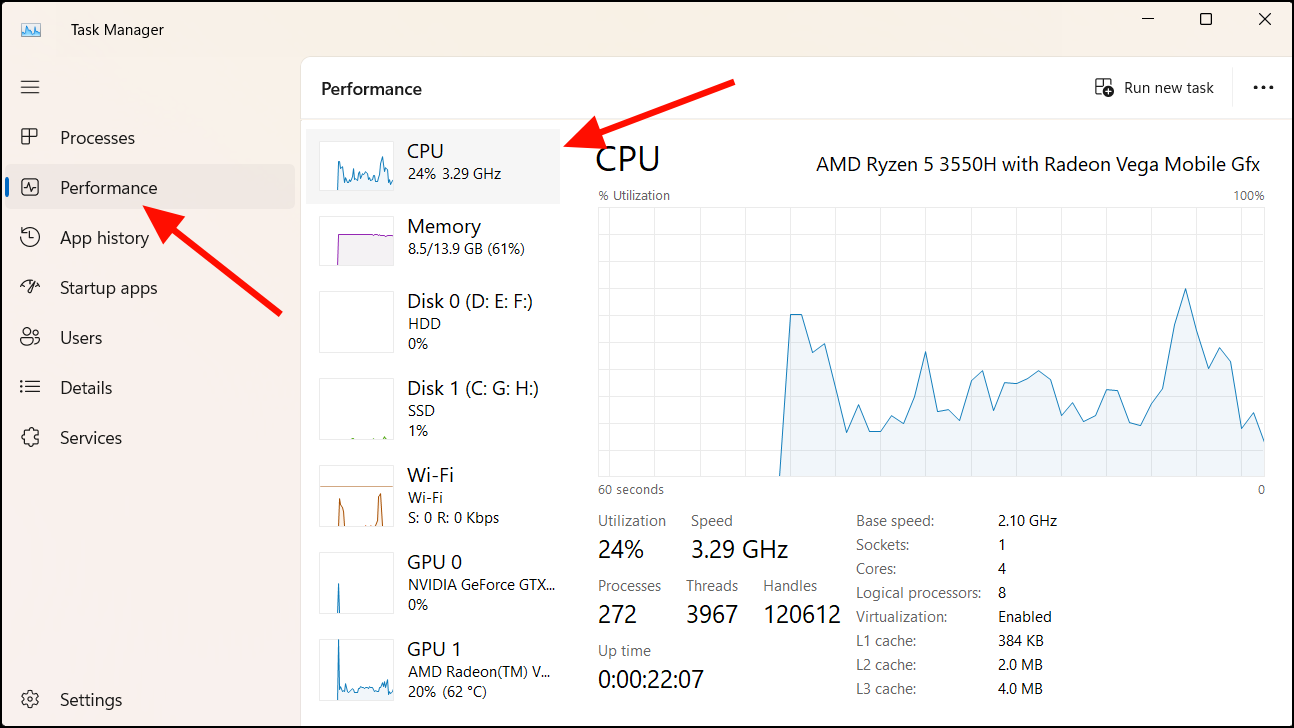
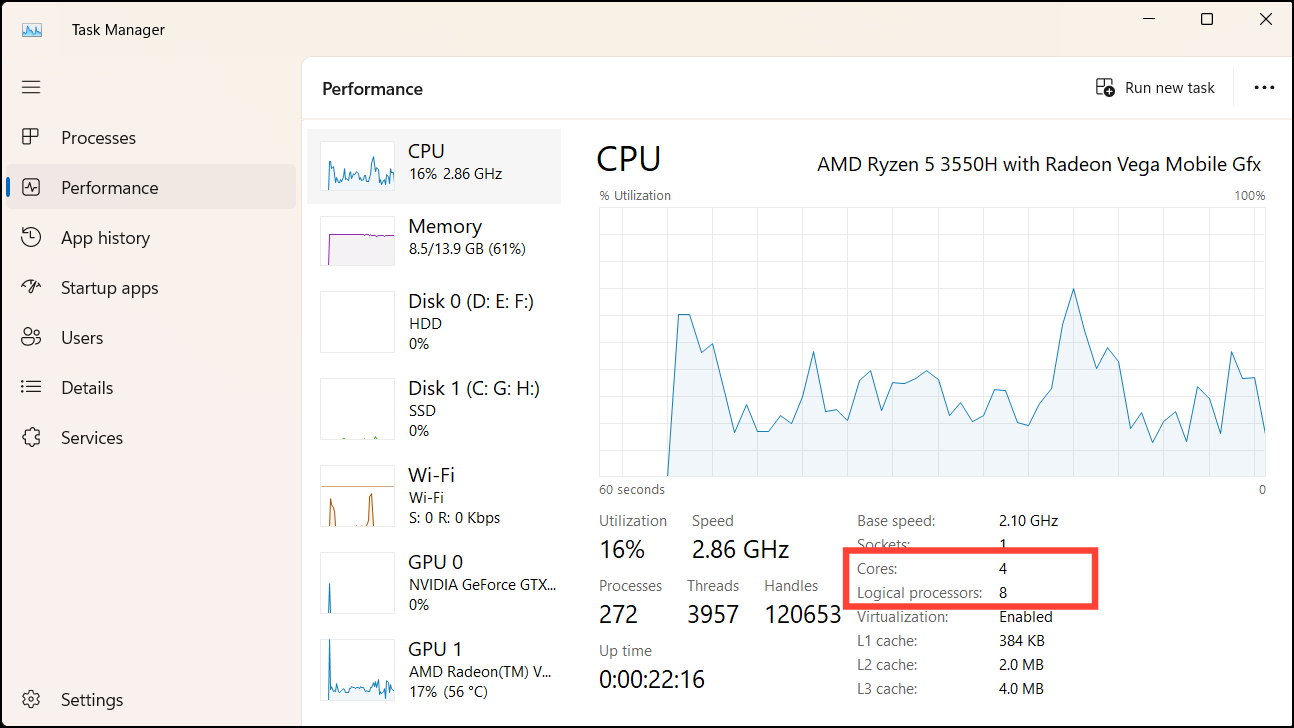
- Below the graph, you’ll find ‘Cores,’ which indicates the actual number of physical cores on your processor. Additionally, you’ll see ‘Logical processors,’ which represents the total number of processors (including HyperThreading) your system currently has.
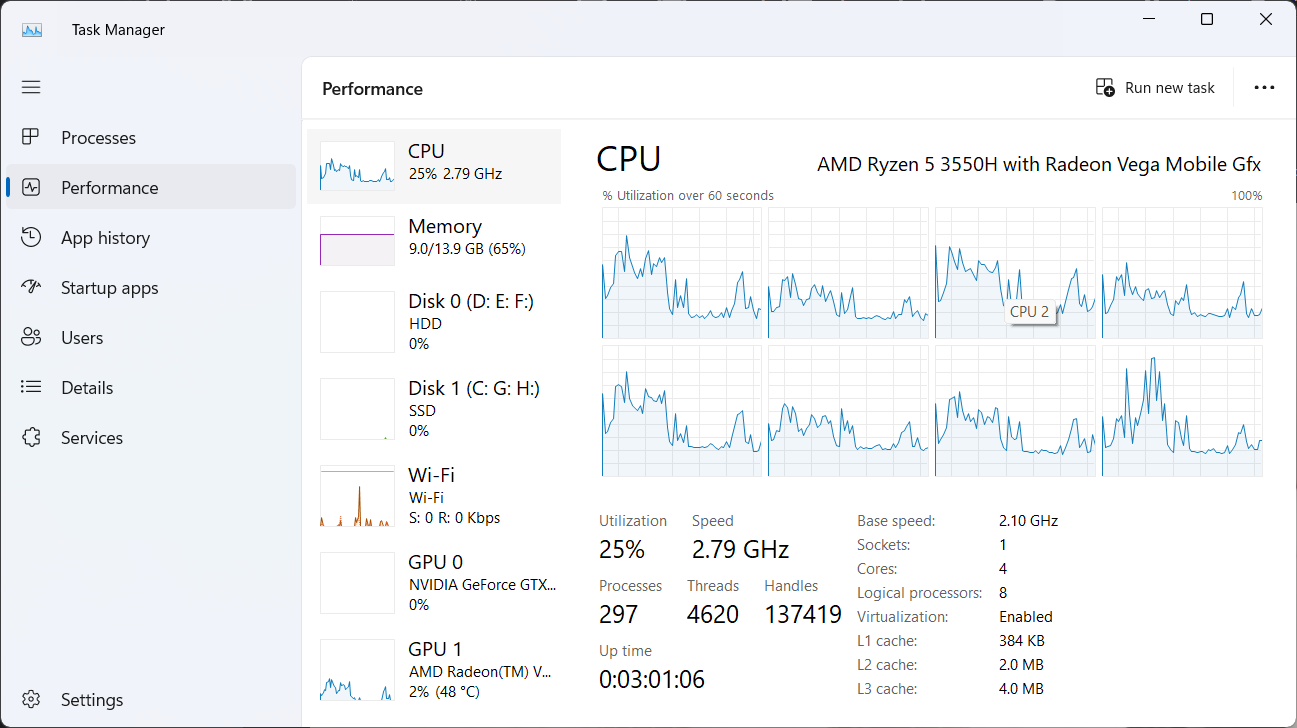
In addition to finding the number of cores, you can also gain insights into the performance of each logical CPU core in your PC. This can help you determine whether enabling all CPU cores is necessary for your needs.
To view performance graphs for all CPU cores, right-click on the CPU graph, expand ‘Change graph to,’ and select ‘Logical processors.’
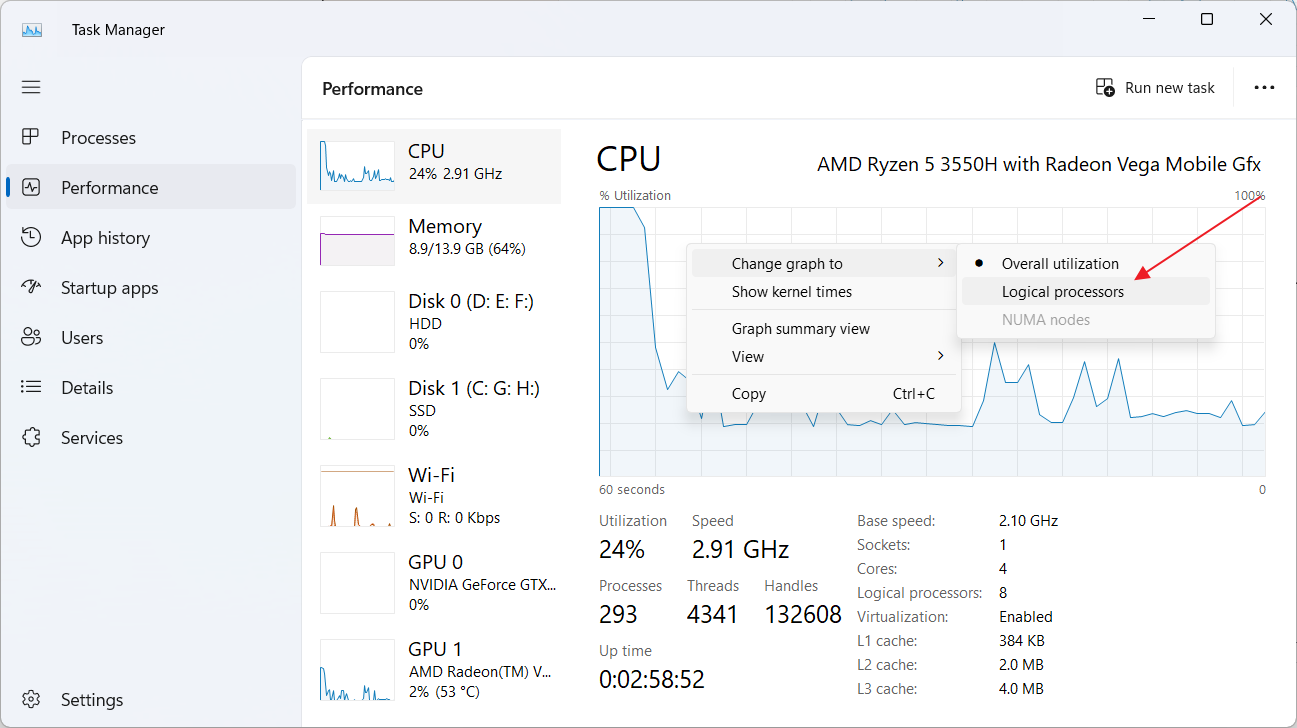
This will transform the graphical view within the Task Manager, providing smaller, individual graphs for each CPU core.
Verifing CPU Cores with CPU-Z
It’s always a good idea to double-check the number of cores your CPU has, especially if you want to confirm Task Manager’s accuracy. Here’s a simple way to do it:
- Download and install the CPU-Z app from the official website.
- Go to the ‘CPU’ tab.
- Look at the bottom right corner to see the number of cores and threads.

Enabling Multi-Core and HyperThreading in BIOS
Before managing CPU cores within Windows, you need to make sure that certain capabilities are activated in the BIOS. Two of the important BIOS settings to enable are – Multi-Core Support and HyperThreading.
Enable Multi-Core Support in BIOS
First, you need to turn on the Multi-Core support from the BIOS. To do that, follow these steps:
- Shut down your PC completely.
- Once it’s shut down, turn it back on. When the PC starts up, start pressing the BIOS entry key to access the BIOS settings, which is often one of the following:
F2,F10,Delete, orEsc. The specific key may be displayed on your screen during the boot process. - Once in BIOS, navigate to the CPU settings. The exact menu structure may vary, but it’s usually found under ‘Advanced Settings’, ‘Advanced Options’ or ‘Processor Configurations’.
- Next, find the ‘Active Processor Cores’ or ‘Mult-core Support’ settings. This setting may be under Advanced CPU Features or Core Technology.
- Change the value of the settings to ‘All’ or the maximum number of cores available.
After enabling the multi-core support, don’t exit the BIOS yet, you need to enable the HyperThreading as well.
Enable HyperThreading in BIOS
HyperThreading is a technology that divides each physical CPU core into multiple virtual or logical cores, allowing them to operate as independent processors. This means more tasks can be executed simultaneously, boosting overall processor performance. For example, enabling HyperThreading on a CPU with four physical cores would effectively double the number of logical cores to eight.
Find the ‘HyperThreading’ or ‘HyperThread Control’ setting and switch it to ‘Enabled’. This setting is typically found within the ‘Advanced Options’ or ‘Processor Configurations’ section. Then save the settings and exit the BIOS.
Enabling All CPU Cores using the System Configuration Tool
Windows offers a powerful built-in tool called System Configuration that allows you to manage your CPU’s active core count. This means you can decide how many cores your system should utilize for optimal performance.
To access the System Configuration tool, follow these simple steps:
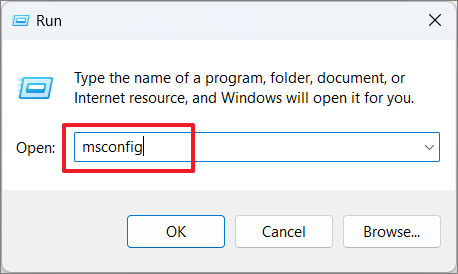
- Press the
Windows+Ron your keyboard to open the Run dialog box. Then, typemsconfiginto the Run box and click ‘OK’. This will launch the System Configuration window.
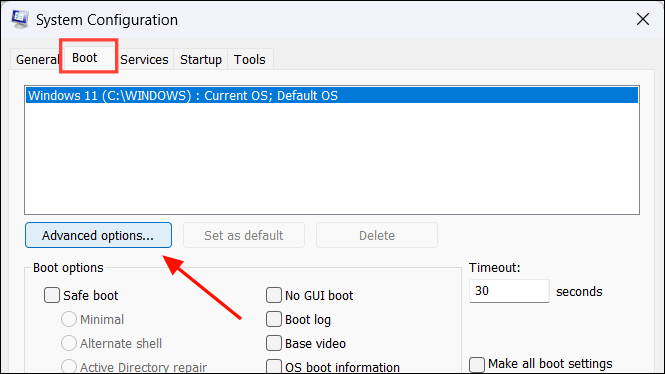
- In the System Configuration window, head to the ‘Boot’ tab and click on the ‘Advanced Options’ button. This will open another window.
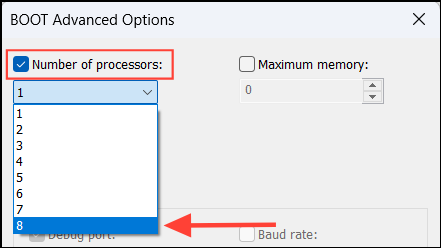
- Check the box next to the ‘Number of processors’ and then select the desired number of processors from the drop-down menu. For maximum performance, it’s recommended to use the maximum number of processors your CPU has.
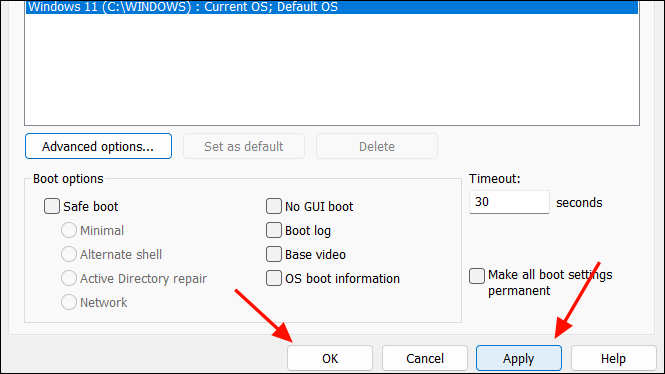
- Click ‘OK’.
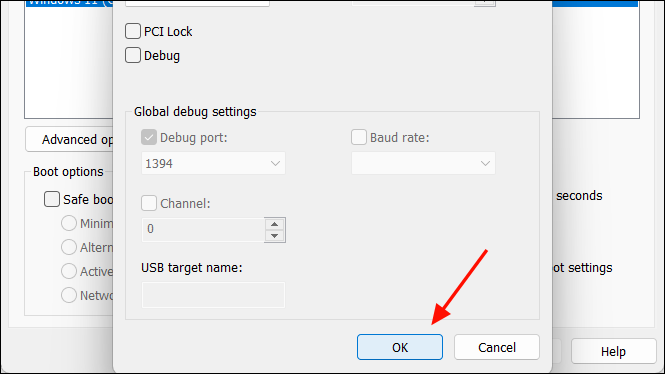
- After that, click ‘Apply’ and then ‘OK’ to apply the changes.
- Restart your computer for the changes to take effect.
By enabling all cores in your CPU, you can significantly enhance your system’s performance. This is because each core acts as an independent processing unit, capable of handling different tasks simultaneously. When all cores are enabled, your CPU can distribute tasks more effectively, leading to overall better system performance.