
When all options are greyed out in Disk Management on Windows 11, users lose the ability to format, extend, shrink, or assign drive letters to partitions. This problem blocks routine disk management tasks and can prevent external or internal drives from being set up for storage, backup, or other uses. The underlying causes range from disk protection settings to corrupted system files or hardware faults, and the right fix depends on identifying the root of the issue.
Use a Dedicated Partition Management Tool
Third-party partition managers provide a direct workaround when Disk Management is unresponsive. Tools like MiniTool Partition Wizard, EaseUS Partition Master, or AOMEI Partition Assistant can perform most disk operations that Windows’ built-in utility cannot, especially when options are unavailable due to protection flags or unsupported partition layouts.
Step 1: Download and install a reputable partition management tool such as MiniTool Partition Wizard or EaseUS Partition Master from their official websites. These programs are available in free versions for personal use.
Step 2: Open the partition manager. Locate the problematic drive or partition in the program’s main interface. Select the operation you want to perform, such as formatting, extending, or assigning a drive letter.
Step 3: Follow the on-screen prompts to execute the operation. Most partition tools require you to confirm changes before they are applied, reducing the risk of accidental data loss.
Step 4: Once the process completes, close the partition manager and check if the drive now appears correctly in Windows Explorer.
Using these tools bypasses many of the limitations and bugs present in Windows Disk Management, offering a streamlined way to regain control over your storage devices.
Run DiskPart Commands in Command Prompt
DiskPart is a command-line utility built into Windows that can manage partitions when the graphical interface fails. This method is especially useful if the drive is stuck in a protected state or if the partition table is corrupted.
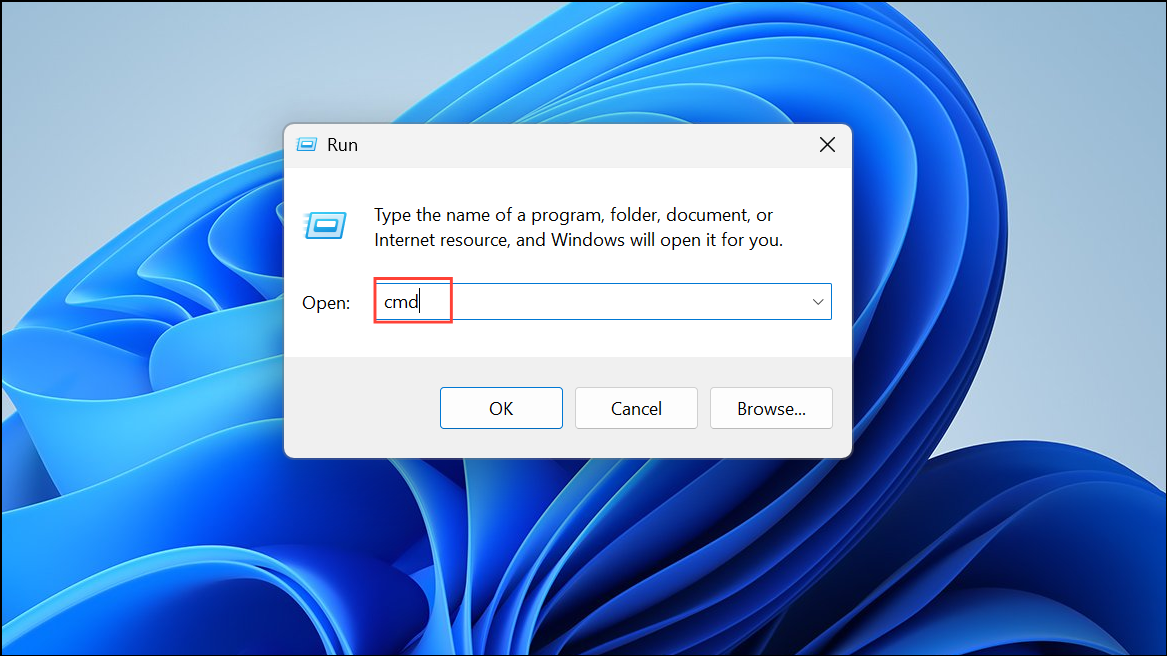
Step 1: Press Win + R to open the Run dialog, then type cmd and press Ctrl + Shift + Enter to launch Command Prompt as administrator.
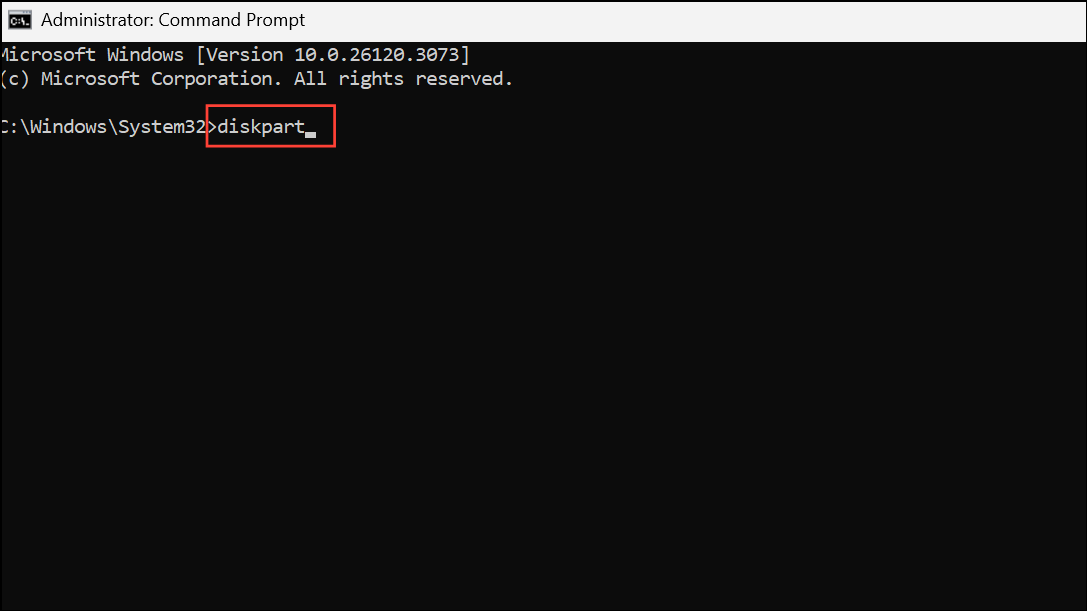
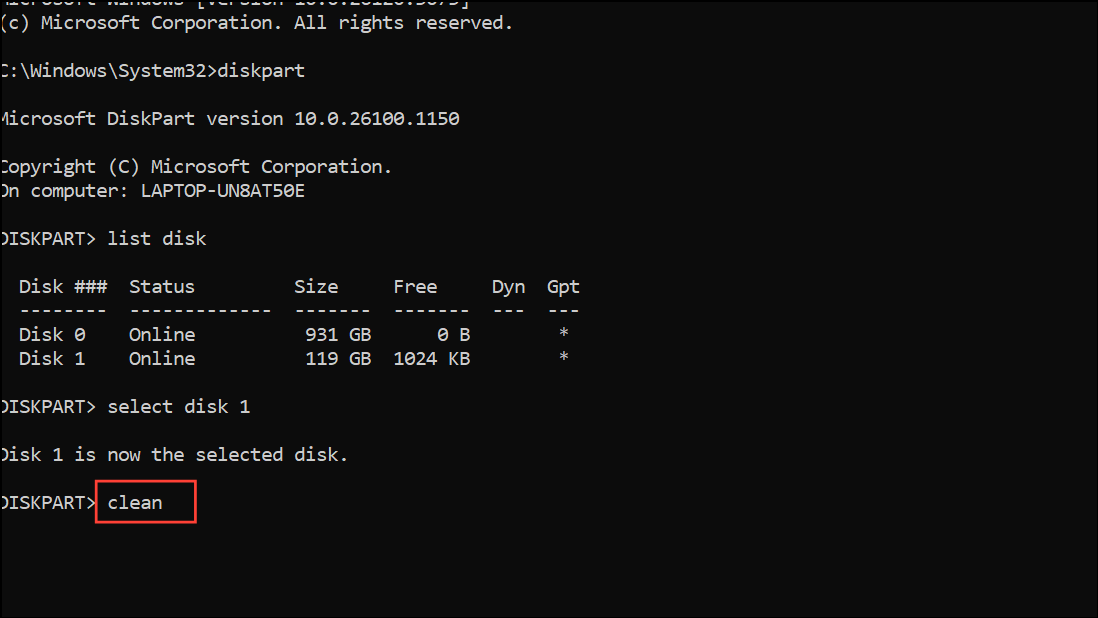
Step 2: In the Command Prompt window, type diskpart and press Enter. Wait for the DiskPart prompt to appear.
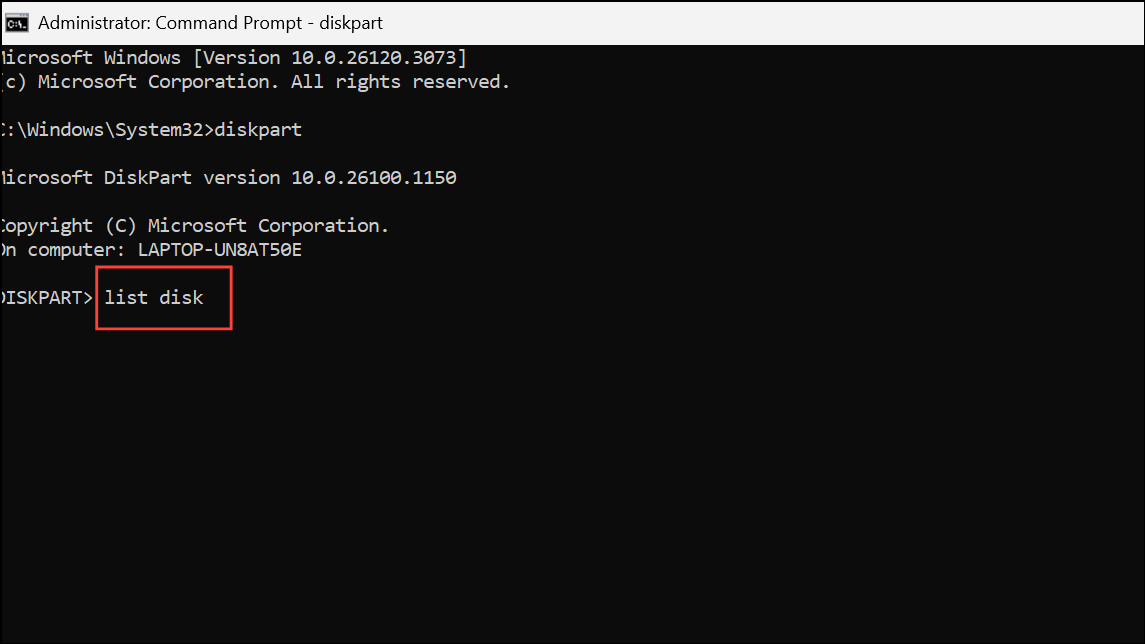
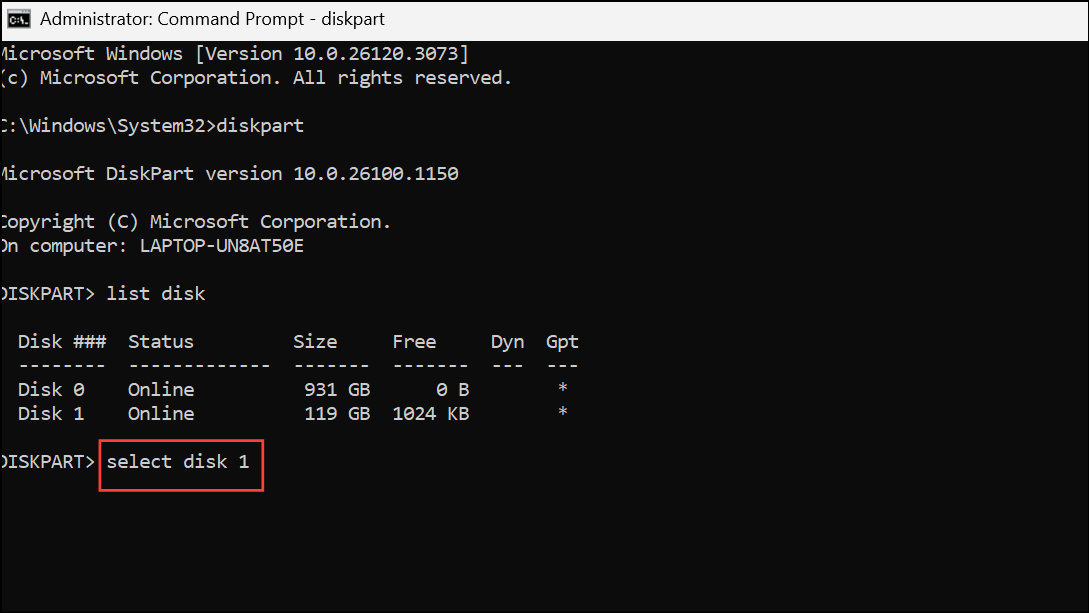
Step 3: List all disks connected to your system with list disk. Identify the disk number for the problematic drive.
Step 4: Select the disk by typing select disk X (replace X with the correct disk number) and press Enter.
Step 5: If the issue is a GPT Protective Partition, clear the disk using clean (warning: this deletes all data on the disk), then convert it to MBR if needed with convert mbr.
Step 6: To create a new partition, type create partition primary, then format it with format fs=ntfs quick and assign a drive letter using assign letter=X (replace X with your preferred letter).
DiskPart provides low-level access to disk configuration and can resolve issues that the Disk Management GUI cannot, but use caution—these commands can permanently erase data if used incorrectly.
Repair System Files with SFC and DISM
Corrupted or missing system files can cause Disk Management to malfunction, resulting in greyed out options. Running system file checks repairs these files and restores normal disk management functionality.
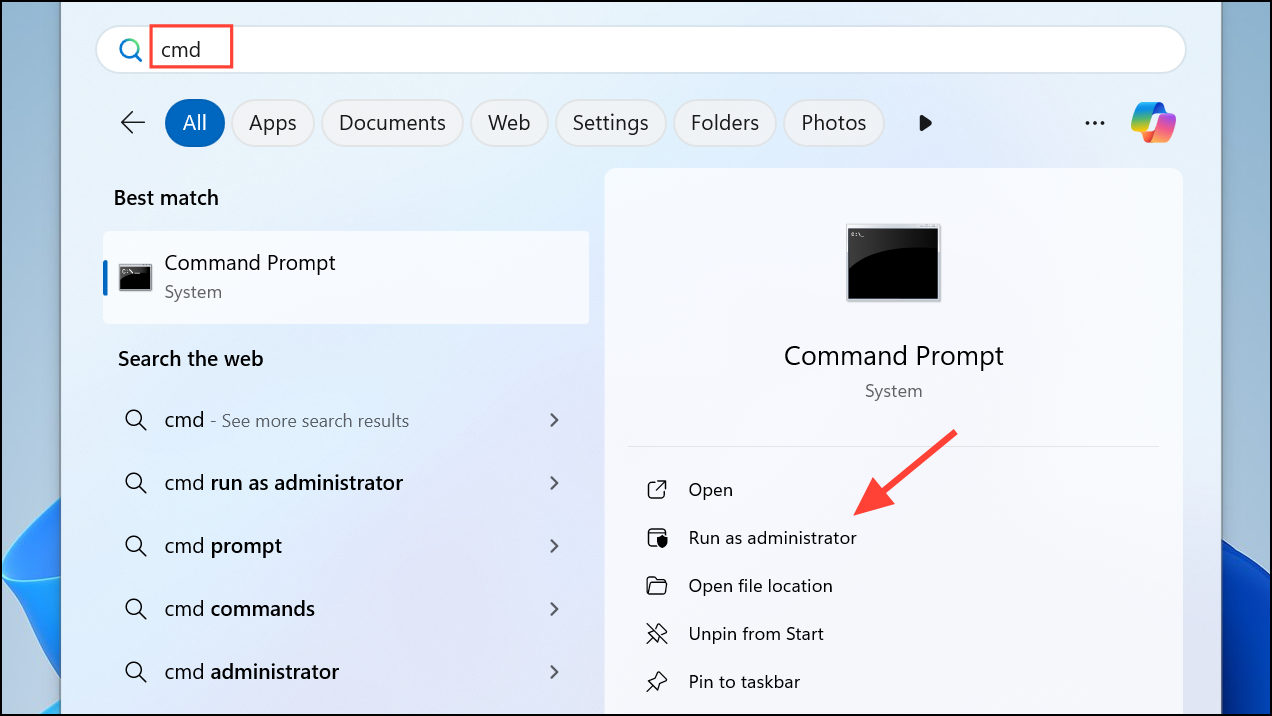
Step 1: Open Command Prompt as administrator by pressing Win + S, searching for cmd, right-clicking Command Prompt, and selecting Run as administrator.
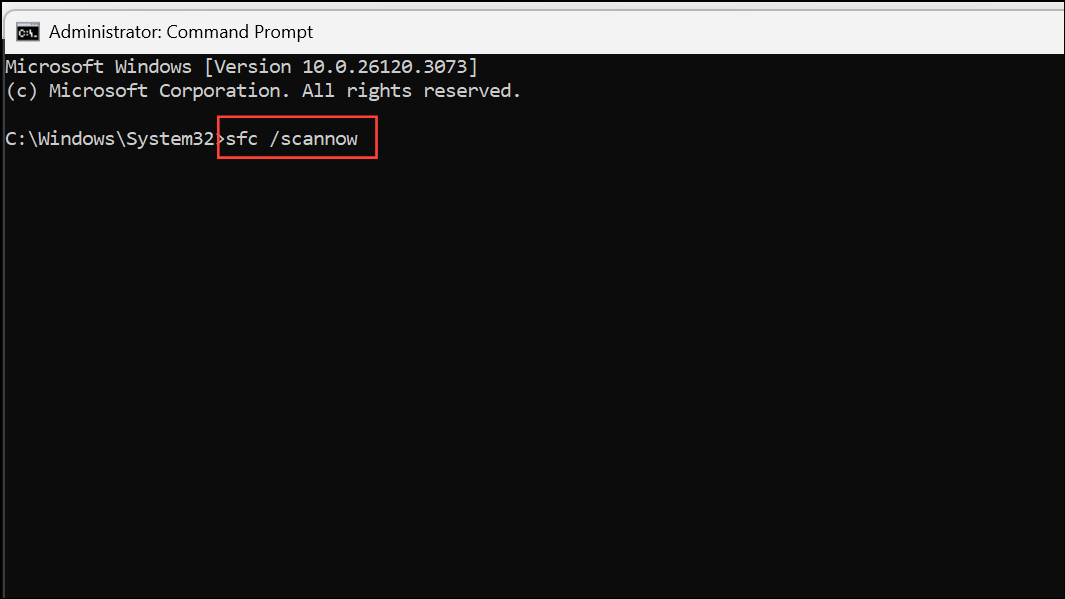
Step 2: Type sfc /scannow and press Enter. Wait for the scan to complete. This process checks for and repairs corrupted Windows system files.
Step 3: If SFC does not resolve the issue, run the following DISM commands, one at a time:
DISM.exe /Online /Cleanup-image /Scanhealth
DISM.exe /Online /Cleanup-image /Restorehealth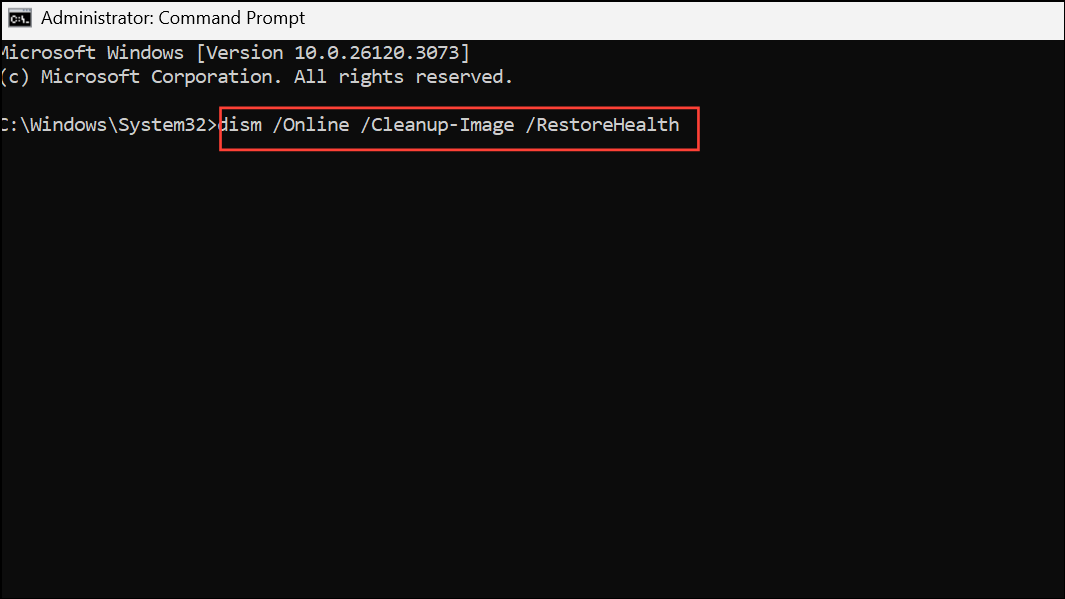
Step 4: Restart your computer after the scans are complete, then check Disk Management again.
System file repairs often restore missing disk management features without requiring a full system reset.
Check for Write Protection and Remove It
Drives that are write-protected cannot be modified in Disk Management, resulting in all options being greyed out. Write protection can be set physically on some drives or by software flags.
Step 1: Open Command Prompt as administrator and start DiskPart as described above.
Step 2: Type list disk and locate the affected disk.
Step 3: Select the disk with select disk X (replace X with the disk number).
Step 4: Remove write protection by entering attributes disk clear readonly and pressing Enter.
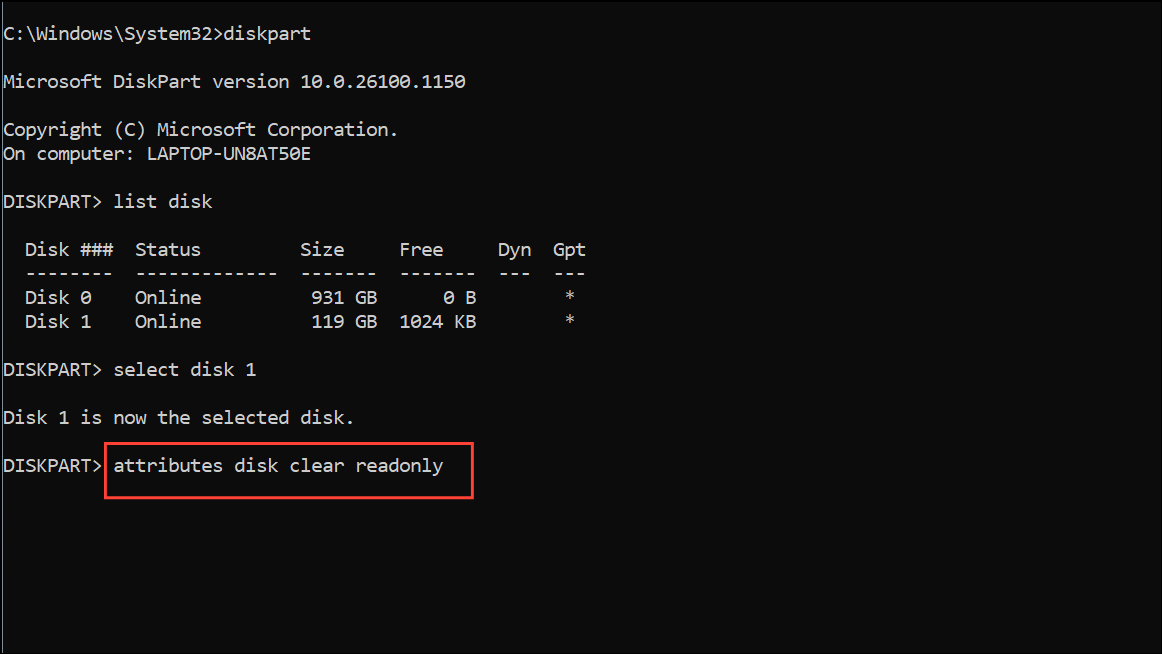
Step 5: Close Command Prompt and check if options in Disk Management are now available.
If the disk has a physical write-protect switch, ensure it is set to allow writing.
Scan for Disk Errors with CHKDSK
Disk errors or bad sectors may prevent Disk Management from accessing or modifying a drive. Running CHKDSK helps identify and fix these errors.
Step 1: Open Command Prompt as administrator.
Step 2: Type chkdsk X: /f /r (replace X with the drive letter of the affected disk) and press Enter.
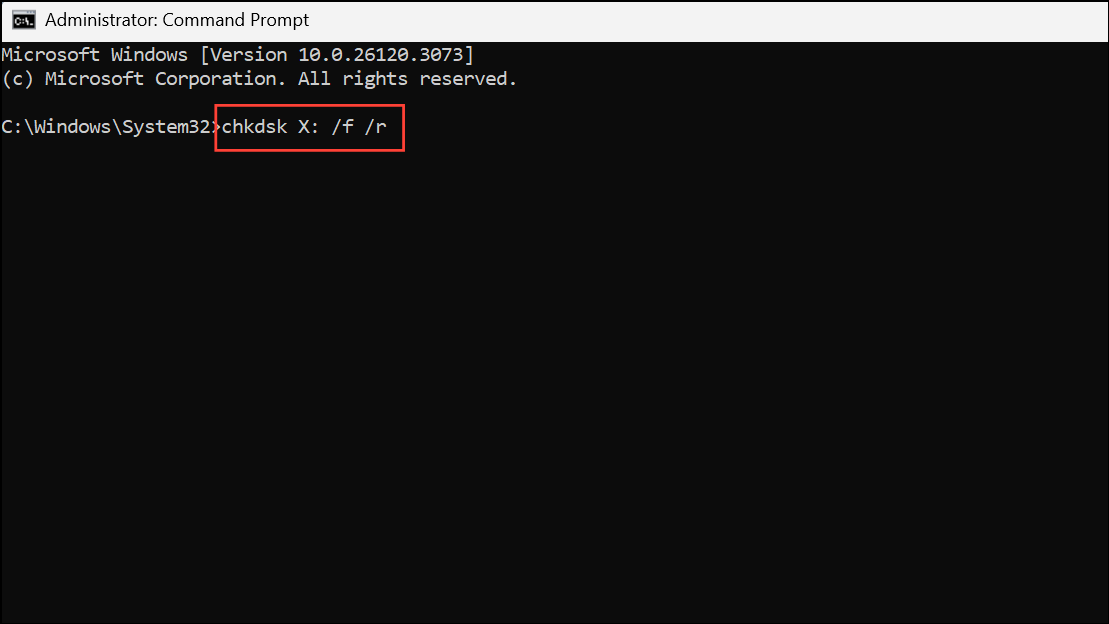
Step 3: If prompted to schedule the check on the next restart, type Y and reboot your computer.
Step 4: After the scan and repair process, re-open Disk Management to see if the problem is resolved.
CHKDSK repairs logical file system errors and attempts to recover readable information from bad sectors, which can restore disk accessibility.
Scan for Malware or Viruses
Malware infections can interfere with system utilities, including Disk Management. Running a full system scan eliminates malicious software that could be blocking disk operations.
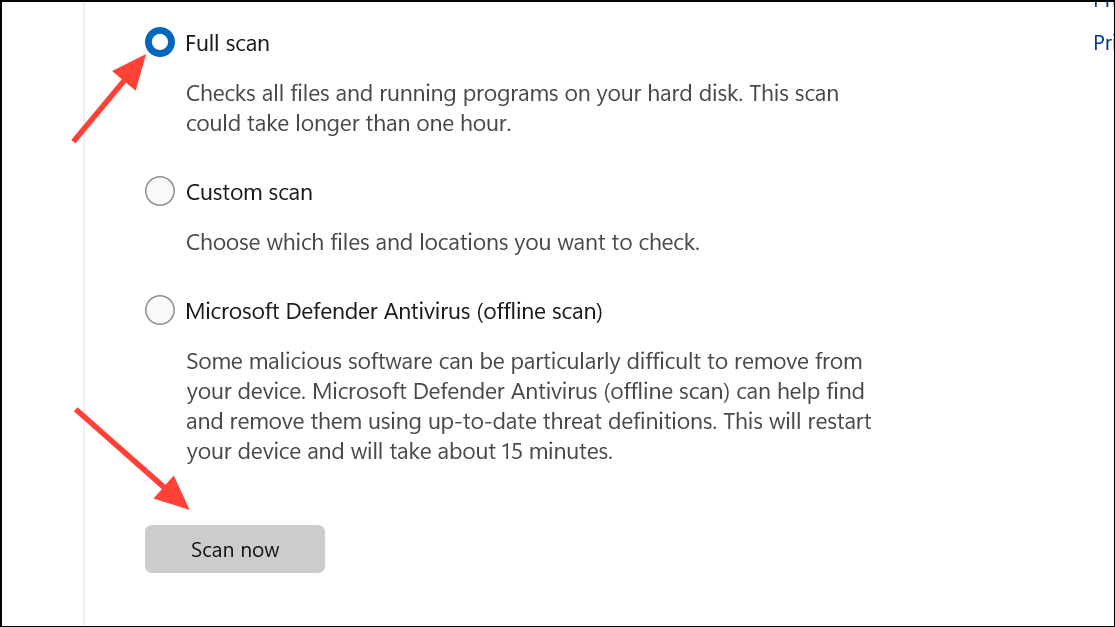
Step 1: Open Windows Security by searching for Windows Security in the Start menu.
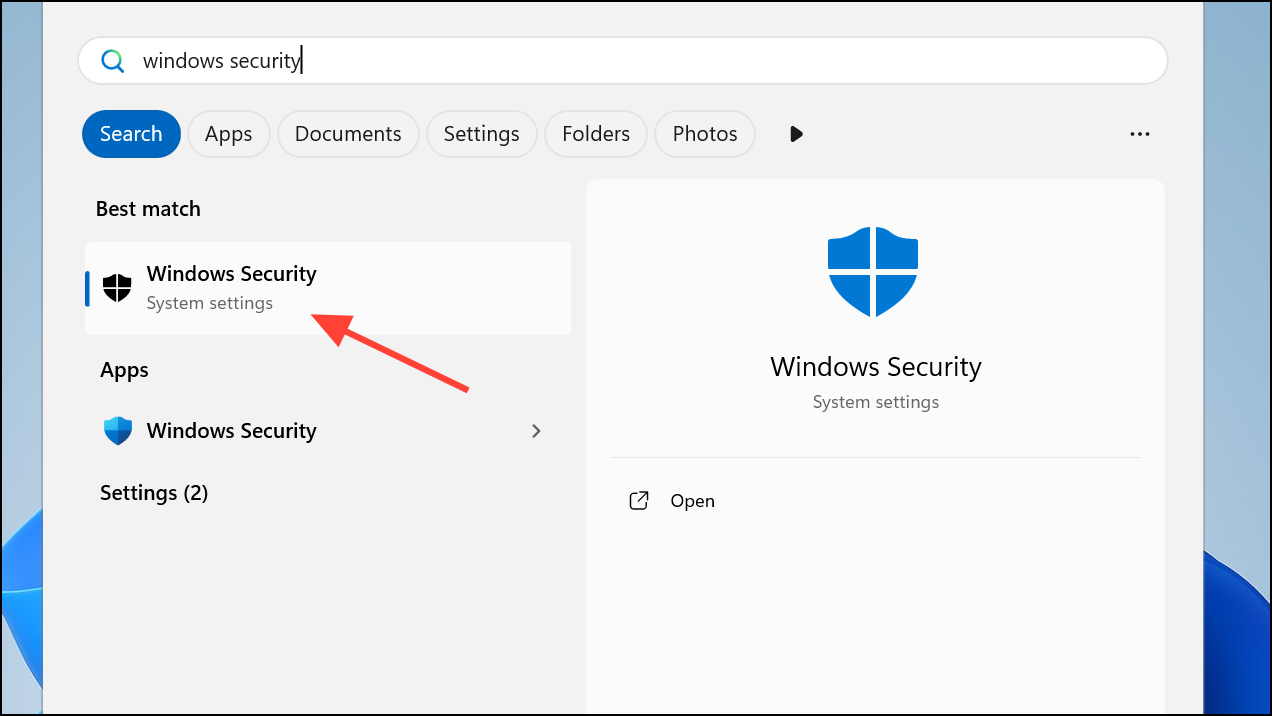
Step 2: Click Virus & threat protection, then select Scan options.
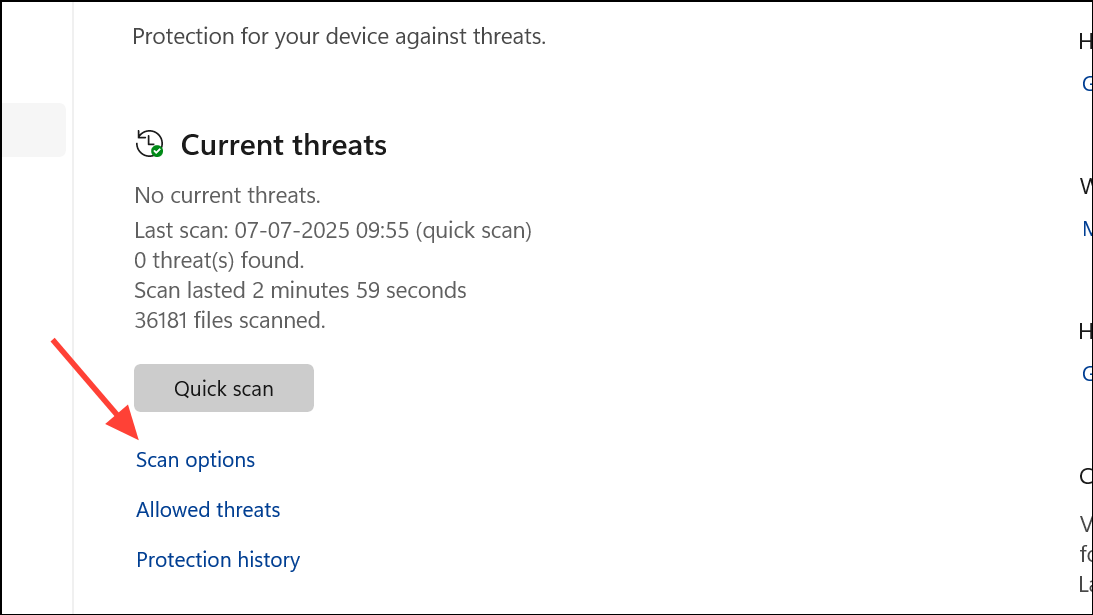
Step 3: Choose Full scan and click Scan now. Wait for the scan to complete and follow any prompts to remove detected threats.
After removing malware, restart your computer and check Disk Management for restored functionality.
Reset Windows 11 as a Last Resort
If all other methods fail, resetting Windows 11 can resolve persistent system-level problems that prevent Disk Management from working. This process reinstalls Windows while giving you the option to keep or remove personal files.
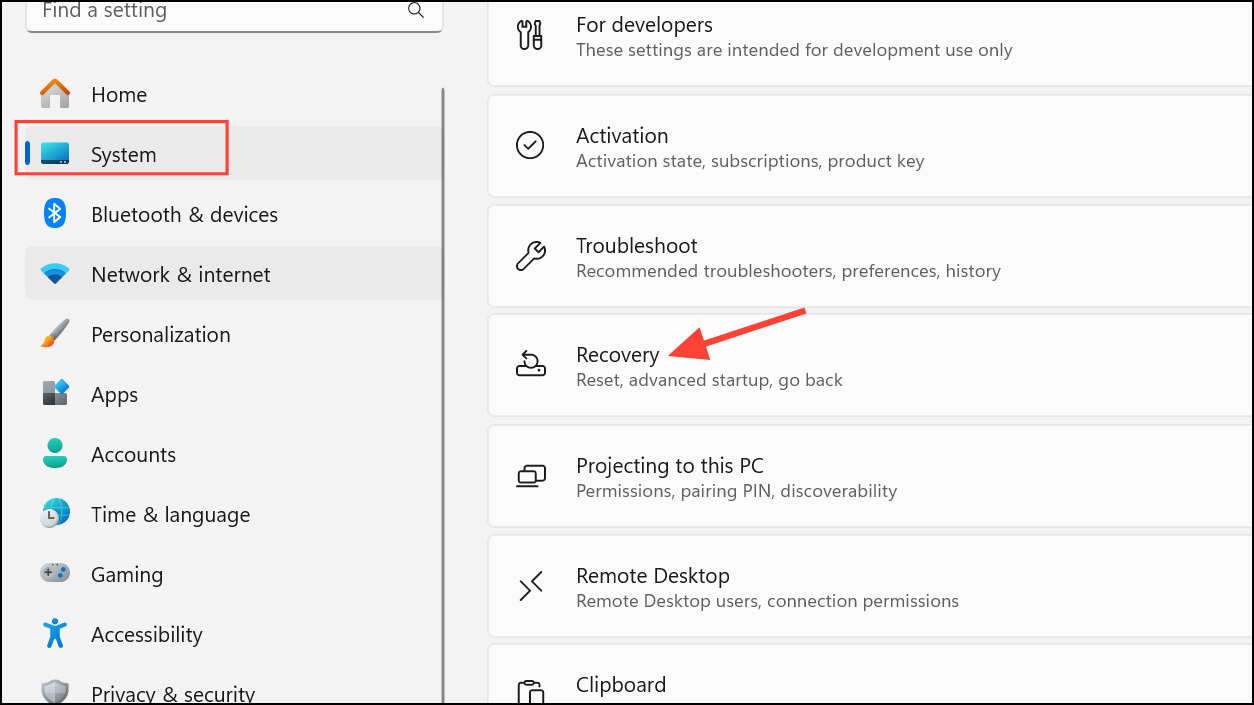
Step 1: Open Settings and go to System > Recovery.
Step 2: Under Recovery options, find Reset PC and click Get started.
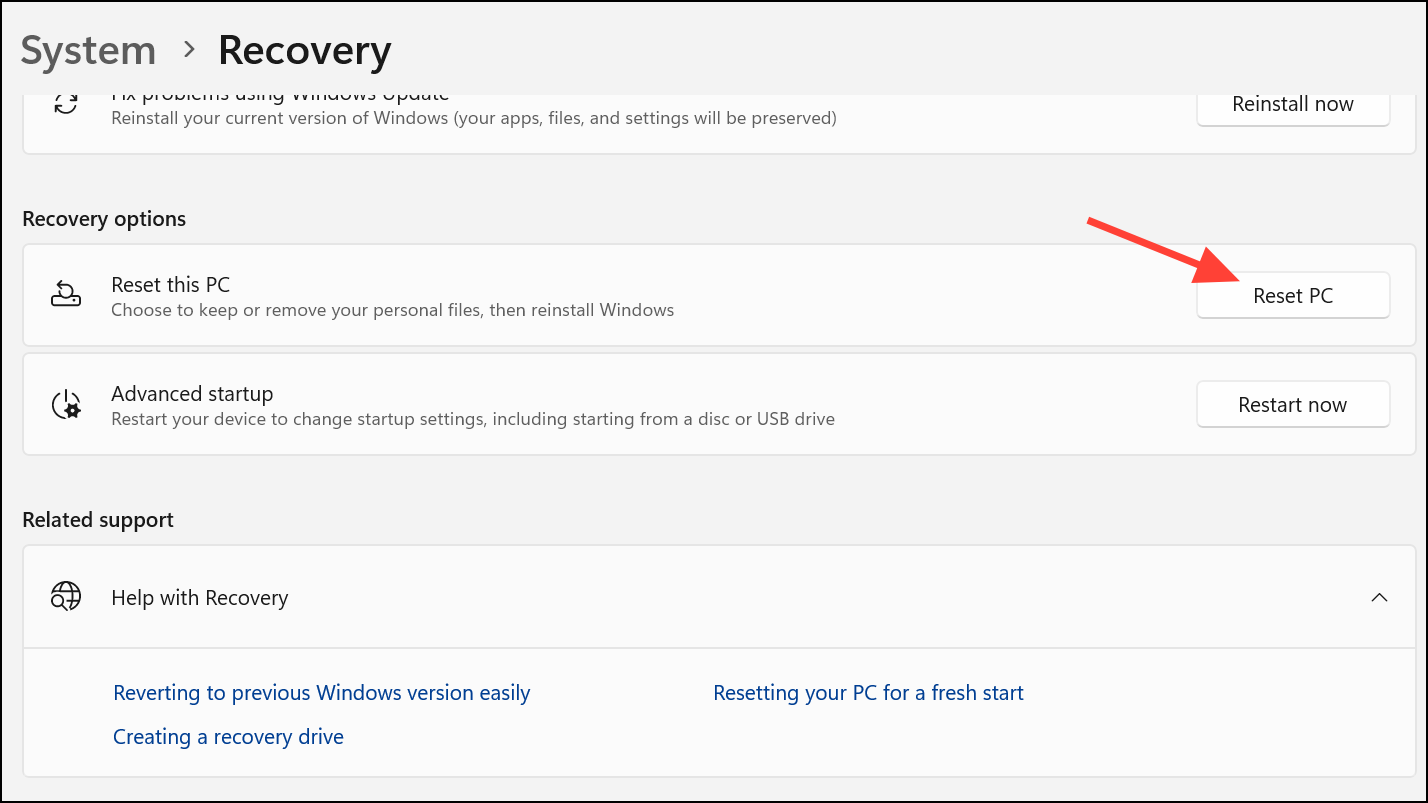
Step 3: Choose whether to keep your files or remove everything, then follow the on-screen instructions to complete the reset process.
Resetting Windows can correct deep-seated corruption but should be used only after backing up important data and exhausting other troubleshooting steps.
Restoring full access to disk management options on Windows 11 can usually be accomplished with targeted troubleshooting or by using dedicated partition tools. After resolving the issue, regularly back up your data and monitor disk health to avoid similar problems in the future.