
Excel workbooks with thousands of formulas or macros can push CPU usage to 100%, causing freezes, slow responses, or even complete system lockups. This issue frequently surfaces when copying, pasting, filtering, or recalculating data in large files. Addressing the root cause—inefficient formulas, excessive recalculations, or problematic macros—restores normal performance and prevents Excel from monopolizing system resources.
Optimize Workbook Structure and Replace Inefficient Formulas
Step 1: Identify formulas that perform repetitive calculations across large data ranges, such as SUMIF, COUNTIF, or volatile functions like NOW, TODAY, and INDIRECT. These formulas force Excel to recalculate every affected cell whenever any change is made, consuming significant CPU resources.
Step 2: Replace repetitive formulas with Pivot Tables or Power Query whenever possible. Pivot Tables summarize data efficiently without recalculating every cell, while Power Query can preprocess and transform data before it enters the worksheet. For example, instead of using thousands of SUMIF formulas across a 7,000-row table, create a Pivot Table to perform the same aggregation in seconds.
Step 3: Remove unnecessary or outdated formulas from your workbook. Select unused columns or rows, right-click, and choose Delete to reduce the calculation area. Double-check the scroll bars; if they extend far beyond your data, extra blank cells may be included in recalculations.
Step 4: For complex workbooks with interlinked sheets and data sources, consider moving heavy data processing to a database or specialized tool. Large, formula-heavy Excel files may be better managed with SQL databases, which are designed to handle big data sets and can export summarized results back into Excel.
Adjust Excel Calculation Settings
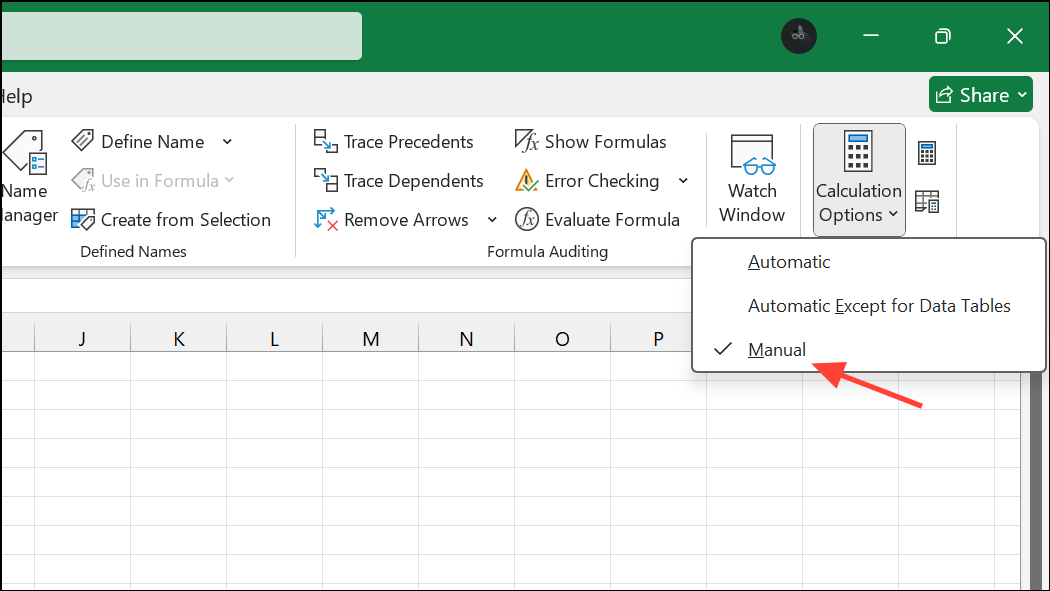
Step 1: Switch Excel’s calculation mode from Automatic to Manual. Go to Formulas > Calculation Options > Manual. This prevents Excel from recalculating the entire workbook every time you make a change. To refresh calculations manually, press F9 when needed.
Step 2: After switching to Manual, test actions like sorting or filtering data. If performance improves, the issue was likely caused by excessive recalculation. Remember to recalculate manually when you want updated results.
Review and Optimize Macros and VBA Code
Step 1: If your workbook uses macros, check for inefficient or looping code. Macros that repeatedly process large data ranges, or that fail to release objects or userforms, can leave Excel running at high CPU even when idle.
Step 2: Unload all userforms at every exit point in your VBA code. Set all object variables to Nothing when finished using them. This releases memory and reduces lingering background processing.
Step 3: If macros have been edited extensively, consider exporting all code modules, deleting them from the workbook, and then re-importing clean copies. This can resolve corruption or inefficiencies that accumulate over time.
Step 4: If CPU usage remains high after a macro runs, try selecting a different worksheet and cell at the end of your macro. This can trigger Excel to complete any pending processing and return CPU usage to normal.
Check Excel Version and System Architecture
Step 1: Confirm you are using the 64-bit version of Excel if your files are large or your system has more than 4GB RAM. The 32-bit version of Excel cannot use more than 4GB of memory, regardless of how much is installed, which can cause performance bottlenecks.
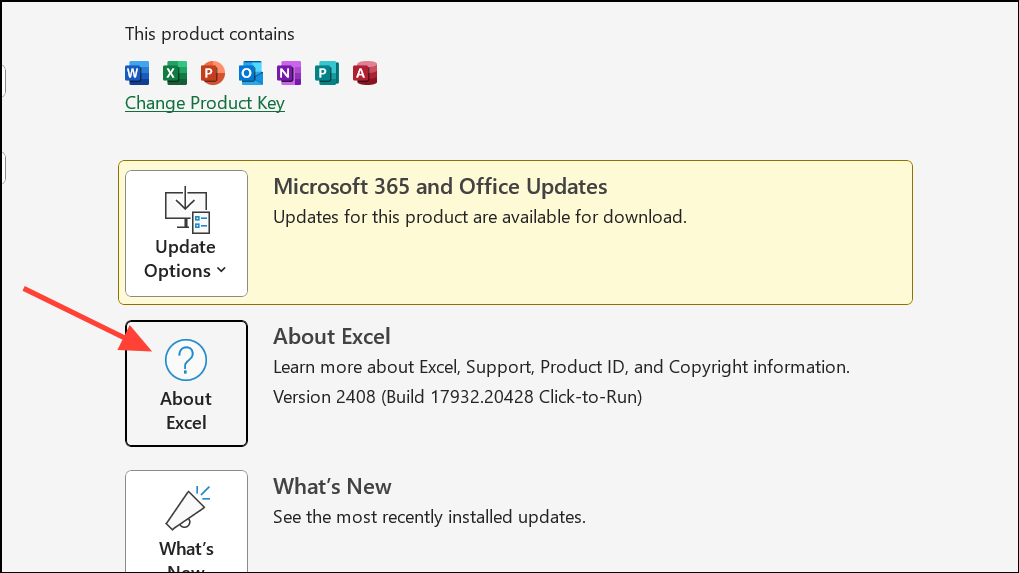
Step 2: To check your version, open Excel and go to File > Account > About Excel. If you are on 32-bit and do not depend on legacy add-ins, consider reinstalling Office as 64-bit.
Update Excel and Repair Installation
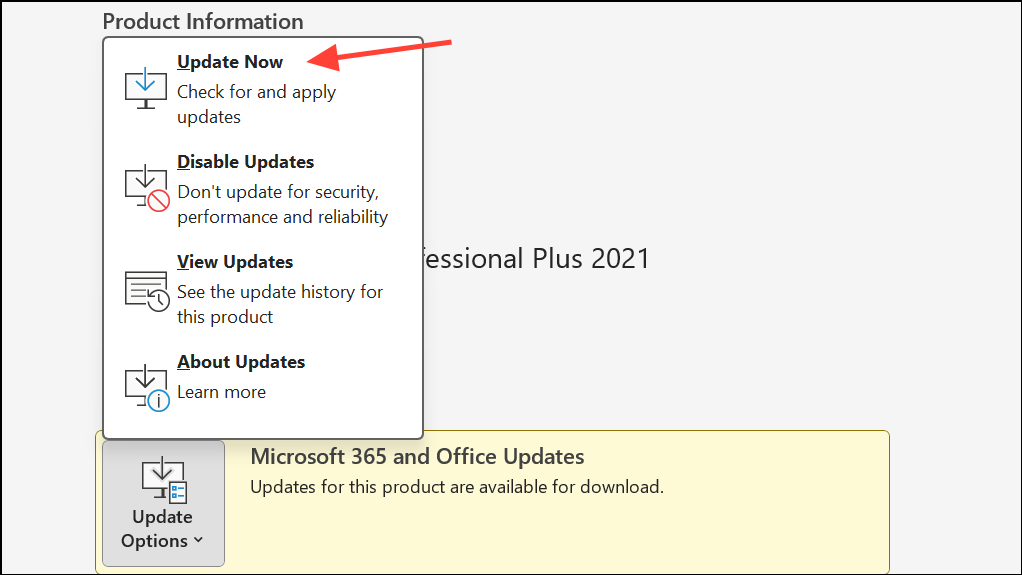
Step 1: Ensure Excel and all Office applications are updated to the latest version. Updates often include performance improvements and bug fixes. Go to File > Account > Update Options and select Update Now.
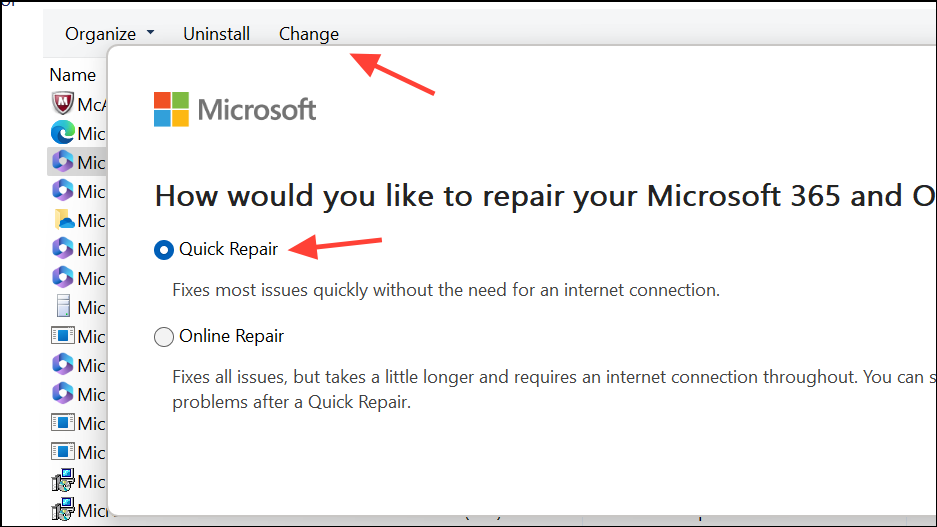
Step 2: If problems persist, repair your Office installation. Open Control Panel > Programs > Programs and Features, select Microsoft Office, and choose Change > Quick Repair or Online Repair.
Move Files to Local Storage and Check for Corruption
Step 1: Save your Excel file to your local drive instead of a network location, cloud folder, or synced service like OneDrive or Dropbox. Network latency or sync conflicts can slow down file operations and increase CPU usage.
Step 2: If a specific file always causes high CPU usage, it may be corrupted. Make a backup, then open the file and save it as an OpenDocument Spreadsheet (.ods). Close Excel, reopen the .ods file, and save it back as an .xlsx file. This process can remove corruption and restore normal performance, though some formatting may be lost.
Tweak Excel and System Settings
Step 1: Turn off hardware graphics acceleration. Go to File > Options > Advanced > Display and check Disable hardware graphics acceleration. This reduces graphical load and can prevent freezes on some systems.
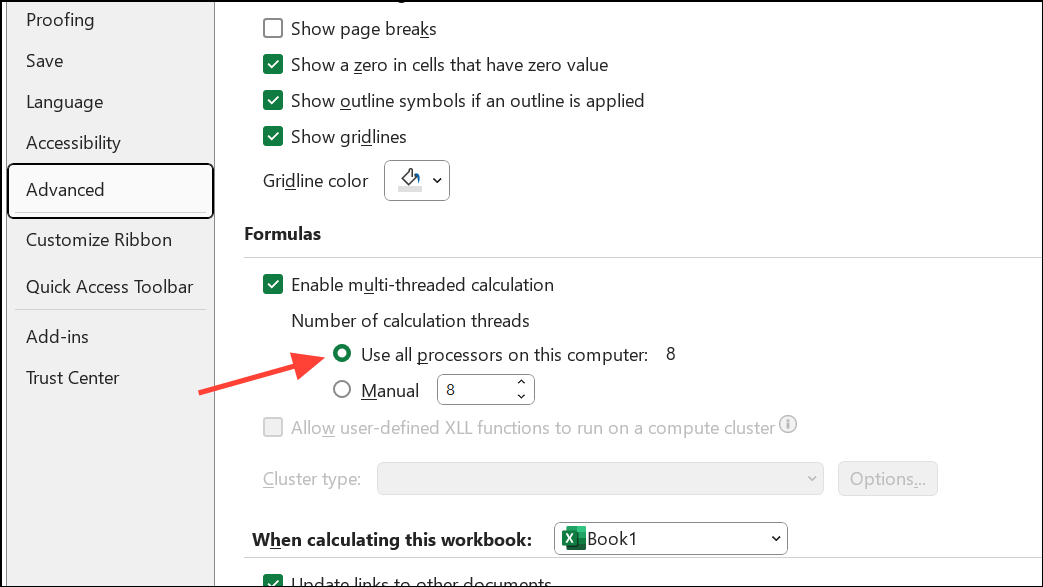
Step 2: Enable multi-threaded calculation in Excel. Navigate to File > Options > Advanced > Formulas and set Enable multi-threaded calculation to use all available processors. This allows Excel to split calculations across CPU cores, speeding up processing for large files.
Step 3: Remove unused or unreachable printers from your system and ensure your default printer is connected and working. Excel sometimes interacts with printer drivers during certain operations, and broken printer setups can cause unexpected slowdowns.
Streamlining formulas, switching to efficient tools like Pivot Tables, and adjusting calculation settings can dramatically reduce Excel’s CPU usage, restoring quick and responsive spreadsheet performance. Regularly update your Office installation and keep your files organized locally to minimize future slowdowns.