Word’s Spell check is a built-in feature that can help you detect spelling mistakes and grammatical errors while you’re typing. If the tool finds any mistakes or errors in your document, it will underline the errors with different colors, like red for spelling errors, green for grammar errors, and blue for contextual spelling errors.
However, sometimes, the Spell Check feature doesn’t work as expected in Word. Many users have complained that the tool is not flagging misspelled and missing words correctly or the program stopped working entirely.
If you are facing any issue with Word’s spelling and grammar-checking tool, there are several ways to fix it and we will go through each of them in this post.
Check the Language and Spell Check Options
If the Spell Check and auto-correct are not working for a specific document, the issue could be caused by language settings. So keep a check on the language settings options. When you type in a document, Microsoft Word auto-detects the language you are using and tries to auto-correct it. This feature may be useful in many cases, however, sometimes it may be the cause of why Spell Check is not working properly. Here’s how you can resolve this:
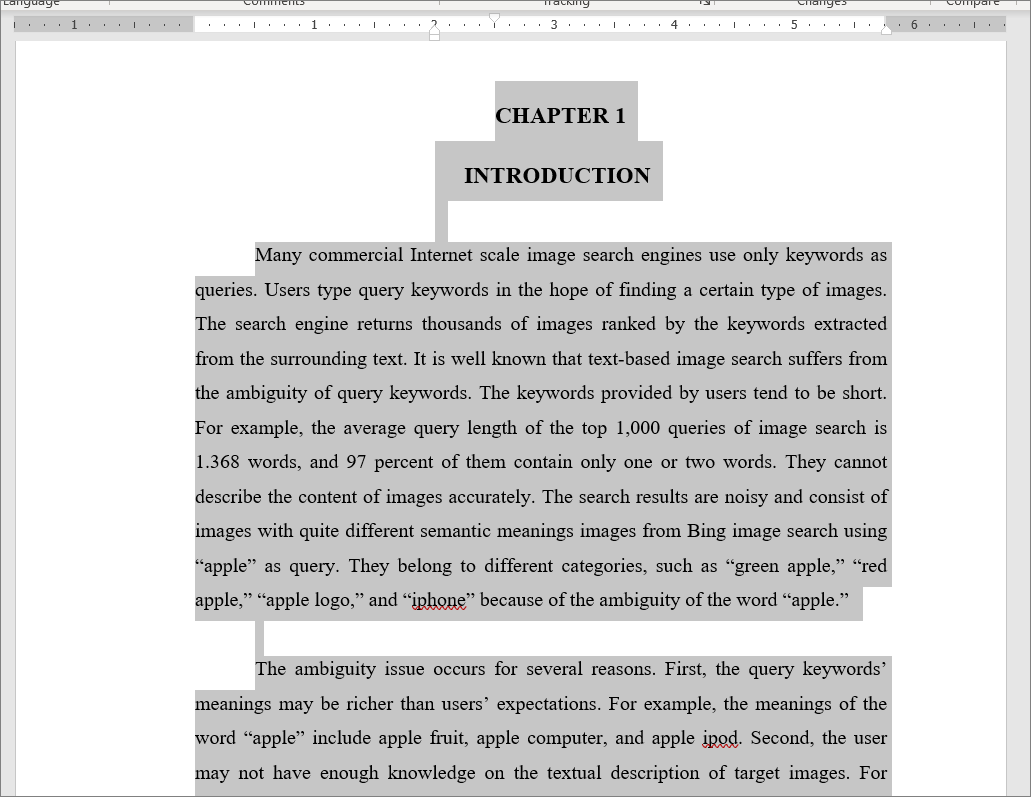
First, open the Word document where spell check is not working. Then, press Ctrl+A to select all the text in the document.
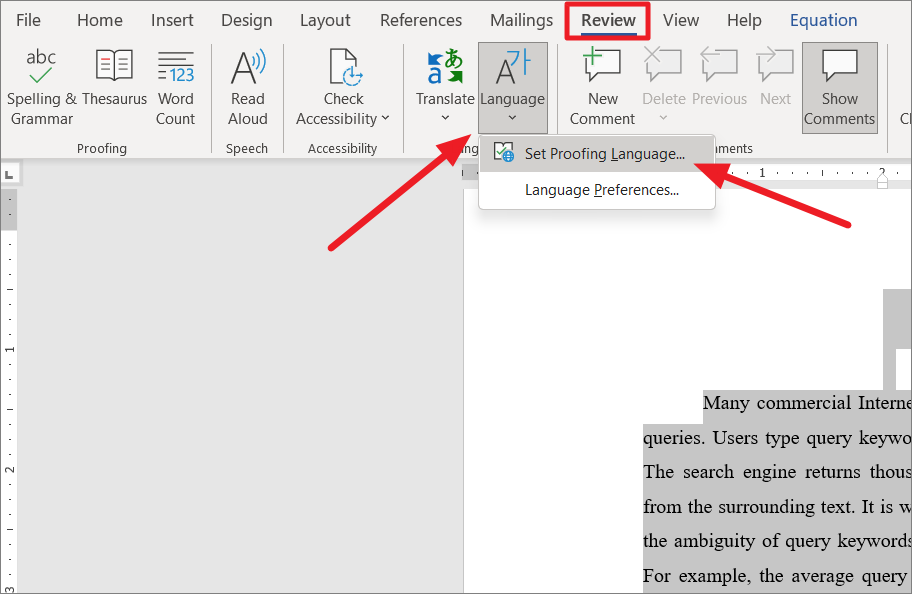
Next, go to the ‘Review’ tab, click the ‘Language’ button in the ribbon and select the ‘Set Proofing Language’ option.
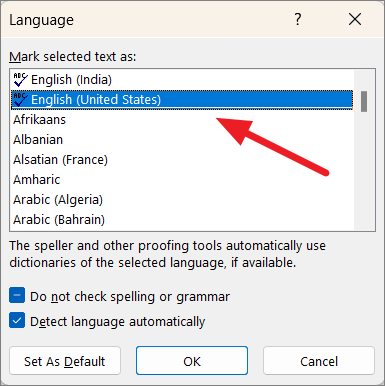
Here, first, make sure the correct language is selected for the text. For example, if the language is set as ‘Spanish’ but the document is in ‘English’, Word will highlight every English word as misspelled words. Also, if your language is set as English (United States) and you’re using British English (for example, if you use the word flavour instead of flavor), it will highlight it as an error.
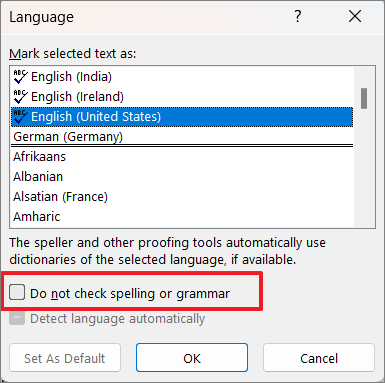
So, choose the correct language under the ‘Mark selected text as:’ section.
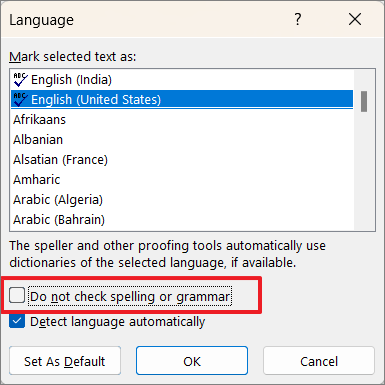
Then, verify that the ‘Do not check spelling or grammar’ option is unchecked. If not uncheck that checkbox.
You can also uncheck the ‘Detect language automatically’ option because the auto-language recognition can sometimes throw errors if you occasionally use some other language words (other than the set language).
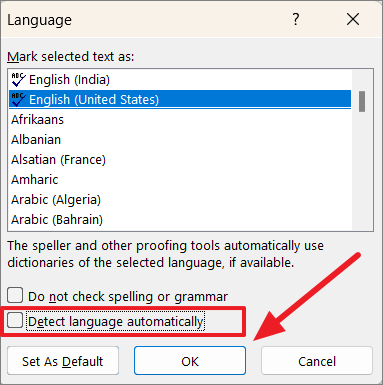
When you are done, click ‘OK’.
After doing the above steps, press the F7 key to run the spelling and grammar tool, and see if the problem is fixed. If not, try the next method.
Check for Proofing Exceptions
There’s another setting in Word that may prevent the spell checker from running properly. The proofing exception is a setting that can exempt certain documents from all proofing and spelling checks. Make sure this option is disabled for the proper functioning of the spell checker. To do this, follow these steps:
First, open Microsoft Word, or you can open any Word documents on the computer. After that, select all the content by pressing Ctrl+A, then go to the ‘Review’ tab and then click the ‘Language’ button. Then, click the ‘Language Preferences…’ option.
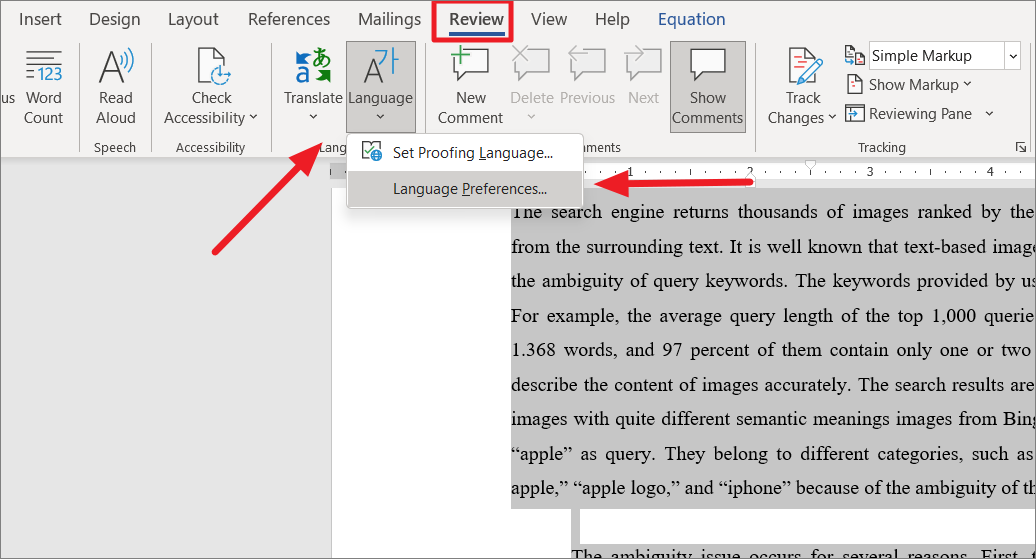
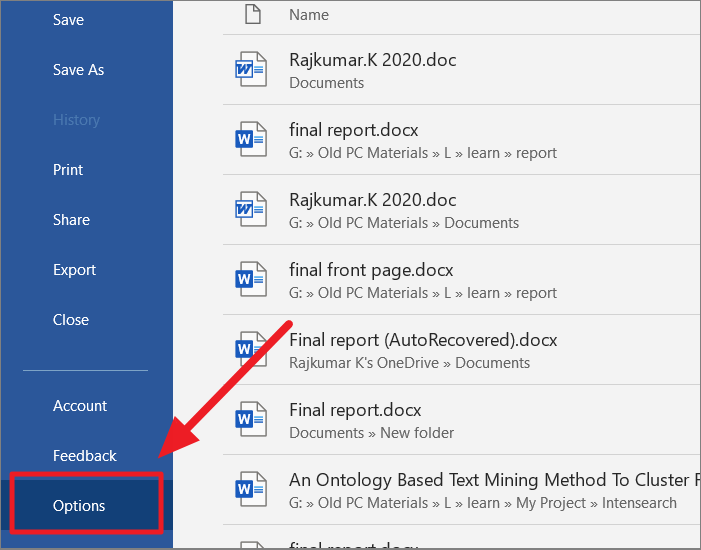
Alternatively, you can go to the ‘File’ tab from the Ribbon, then select ‘Options’ to open Word Options.
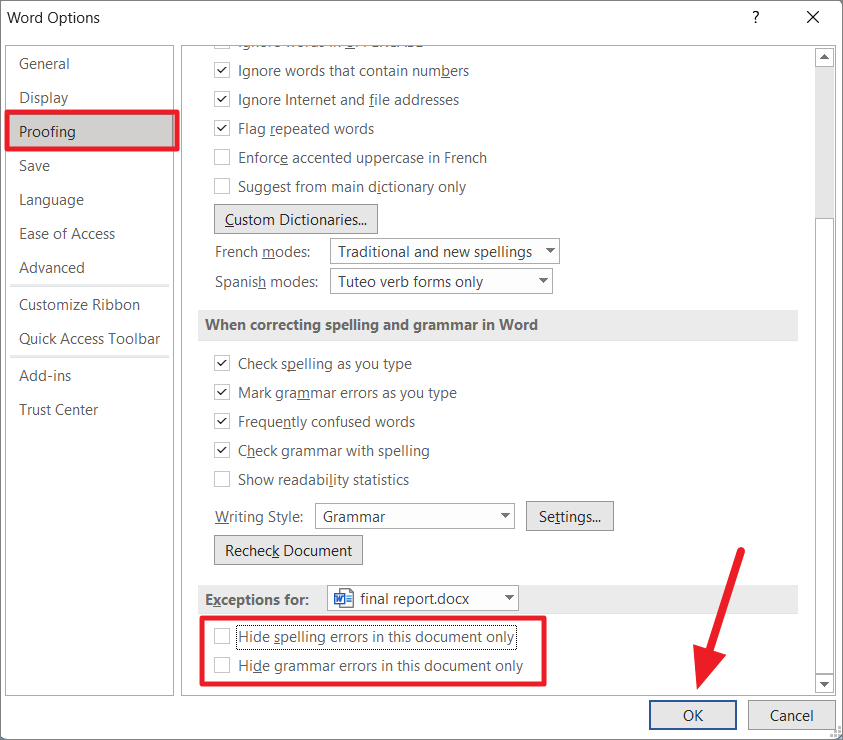
In the Word Options window, go to the ‘Proofing’ tab on the left panel. On the right-side panel, scroll down to the ‘Exceptions for’ section at the bottom. Then, make sure both ‘Hide spelling errors in this document only’ and ‘Hide grammar errors in this document only’ checkboxes are unchecked. Then, click ‘OK’ to save the settings.
Enable Check Spelling As You Type option
If the Spell Checking is not working in any document, then it might be due to the ‘Check spelling as you type’ setting (which checks the document in real-time for errors) is not turned on. Here is how you can turn it on:
Click the ‘File’ tab, select ‘Options’ in the right sidebar at the bottom of the menu.
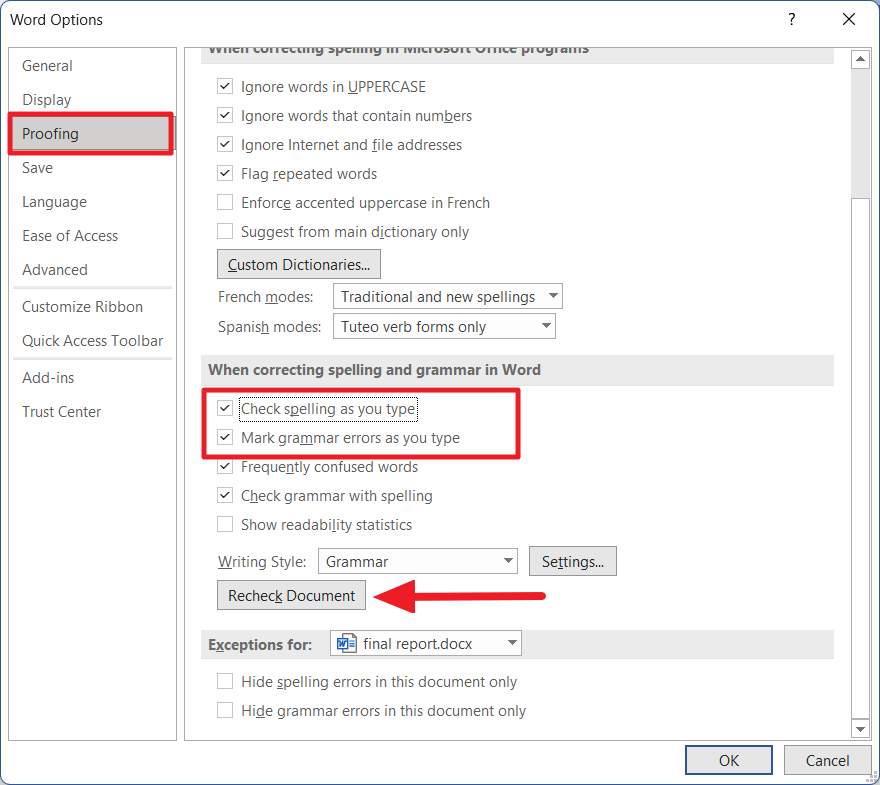
When the Word Options dialog opens up, click the ‘Proofing’ section. On the right-side panel, navigate to the ‘When correcting spelling and grammar in Word’ section. Then, make sure to select both ‘Check spelling as you type’ and the ‘Mark grammar errors as you type’ options under that section.
Then, click on the ‘Recheck Document’ button to recheck the document
Click ‘Yes’ to the confirmation box.

After that, click ‘OK’ to save the settings and check your document.
Start Microsoft Word in Safe Mode
If some add-in or other program interfering with Spell Checker functionality and causes it to malfunction, you can start Microsoft Word in safe mode (loads without any add-ins) and find out what is causing the issue. Here’s how you can do this:
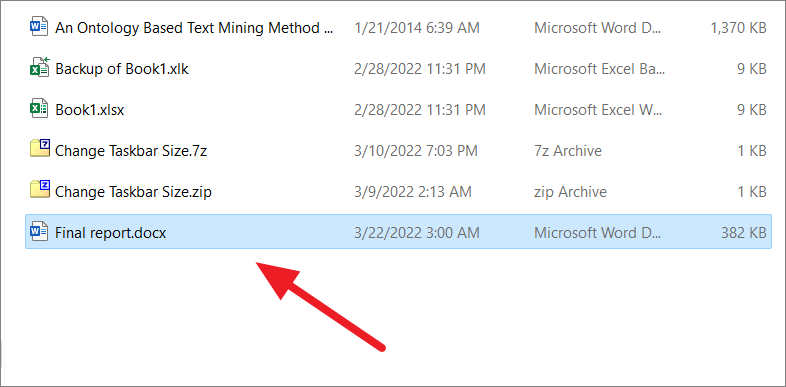
Press and hold the Ctrl key and then double-click on any Word document on your computer to open it.
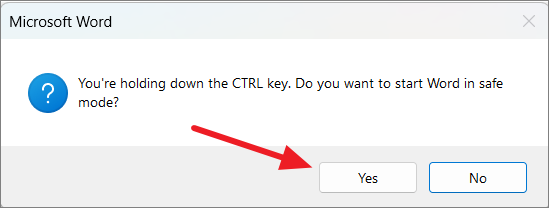
In the elevated window, click ‘Yes’.
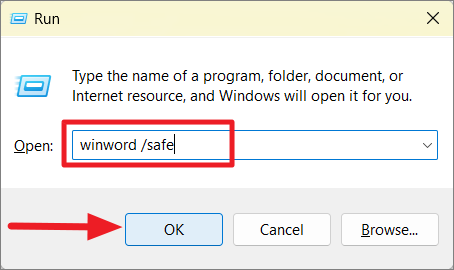
Alternatively, you can launch the Word program in safe mode using the Run command.
To do this first, open the Run command box with Ctrl+R shortcut keys. Then, type winword /safe in the Run command and press Enter or click ‘OK’.
This will open Word in the safe mode.
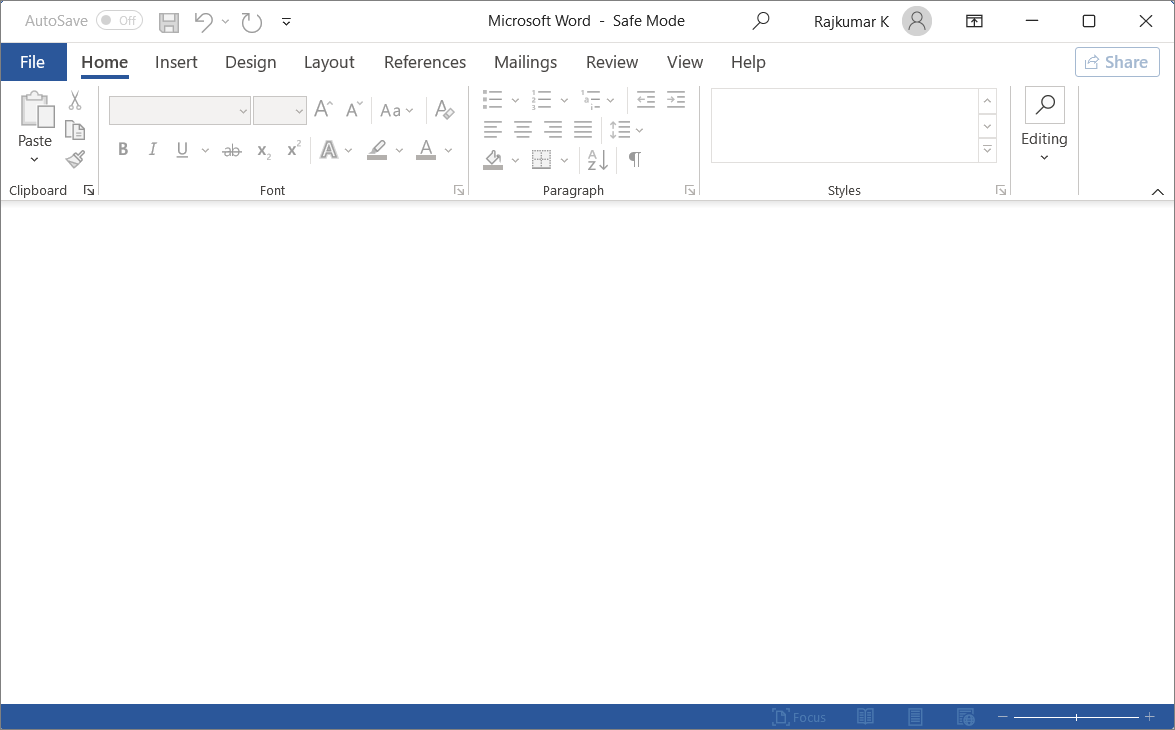
Now, click ‘File’ and select ‘New’ or press Ctrl+N to open a new black document. Then type some text and check if the spell check is working or not.
If the spell check is working on the safe mode, then the problem must be with one of the add-ins. Then, disable the unnecessary add-in that causes the problem.
Disable the Conflicting Add-ins in Word
In some cases, a third-party add-in could be malfunctioning or causing conflict with the spelling and grammar-checking tool. If the spell checker worked properly in safe mode with minimal functionality, then the problem might be with any of the installed add-ins. So you need to disable the third-party add-ins one by one to find which one is causing the conflict. Or you could disable them all and re-install them one by one to find the conflicting add-in. To disable add-ins, follow these instructions:
Open the ‘File’ tab and select ‘Options’ from the left-side panel.
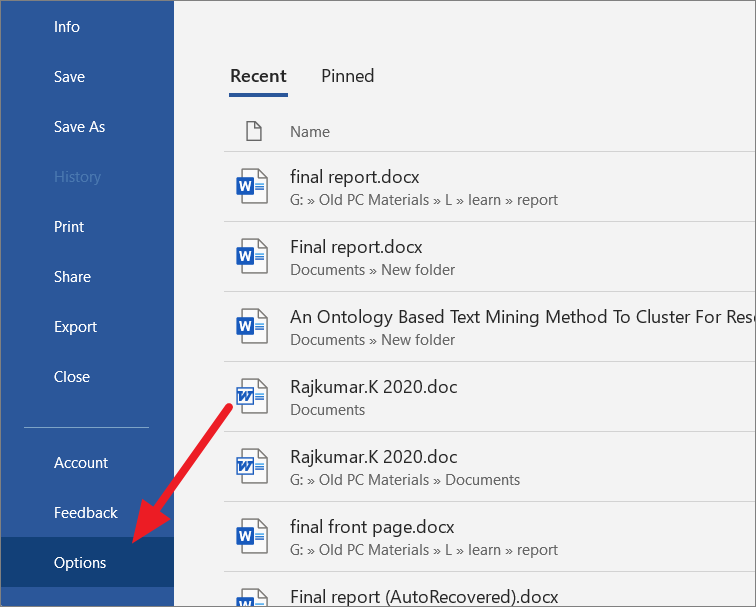
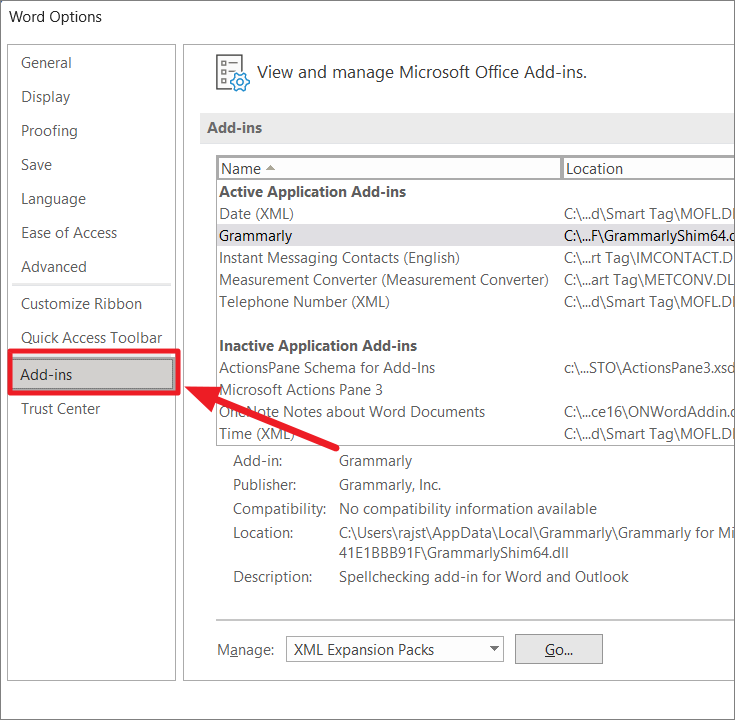
In Word Options, select ‘Add-ins’ on the left-hand pane.
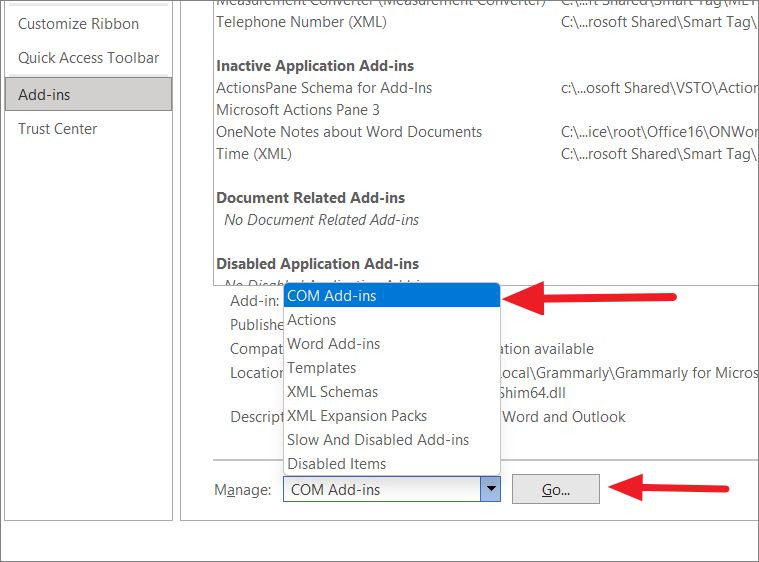
Next, at the bottom of the screen, select the ‘COM Add-ins’ option from the ‘Manage’ drop-down menu and click the ‘Go’ button.
In the COM Add-ins pop-up, simply uncheck the add-in that you think is causing the problem to disable it. If you want to uninstall the add-in, select the add-in and click ‘Remove’. Then, click ‘OK’ to close the dialog.
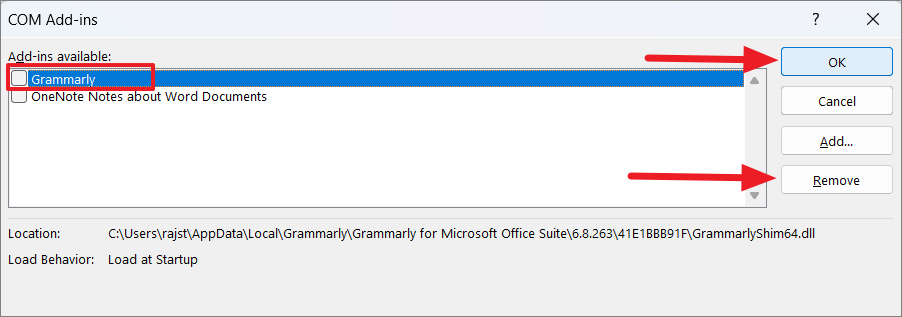
Sometimes all the add-ins will not appear in the COM Add-ins dialog box. If the installed add-in is not available in the COM Add-ins box, do this instead:
Go to the ‘Insert’ tab and click the ‘My Add-ins’ button in the Add-ins group.
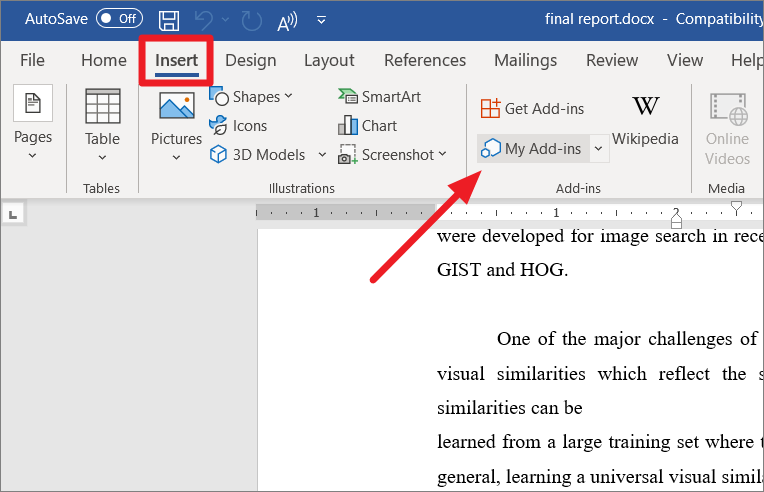
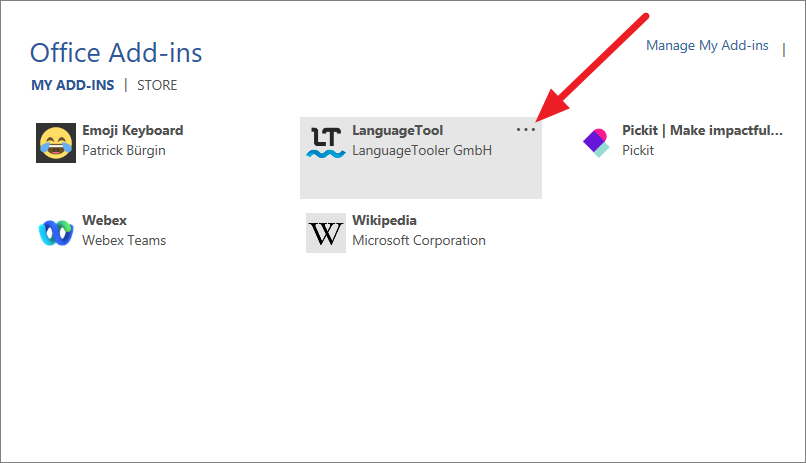
Under Office Add-ins, click the three-dots button (Options) next to the add-in you want to remove.
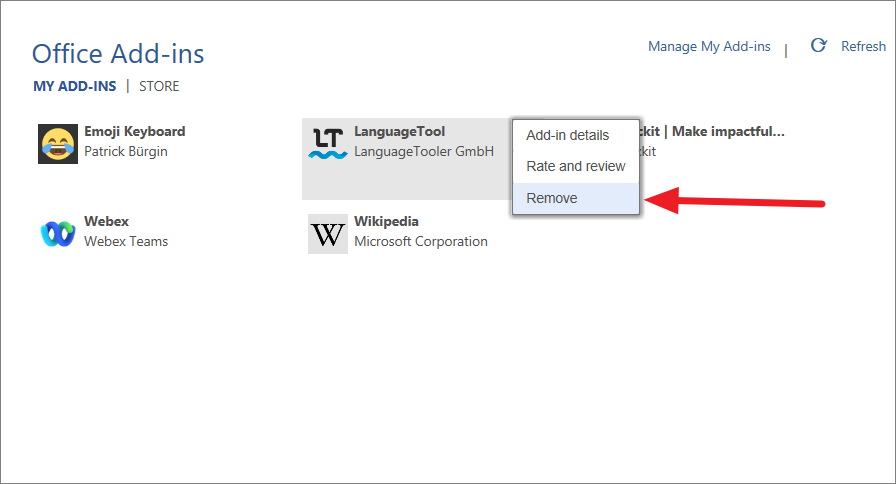
Then, click ‘Remove’ from the menu.
Now, check if the spell checker works or not.
Rename a Windows Registry Folder
Some users claim that renaming the Proofing tools folder in the Registry Editor to resolve the issue. Follow these instructions to rename the proofing folder:
First, completely close the Word program, then launch the Run command box by pressing Win+R. Type regedit to open Registry editor. And, if you see the User Account Control dialog box, click ‘Yes’.
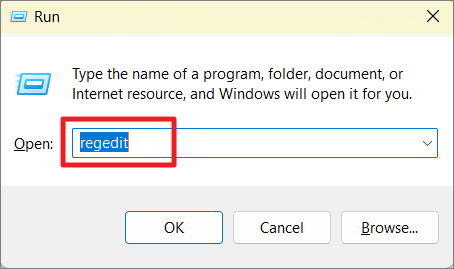
In the Windows Registry windows, navigate to the following path using the left pane or copy-paste the below path in the address bar:
HKEY_CURRENT_USER\Software\Microsoft\Shared Tools\Proofing Tools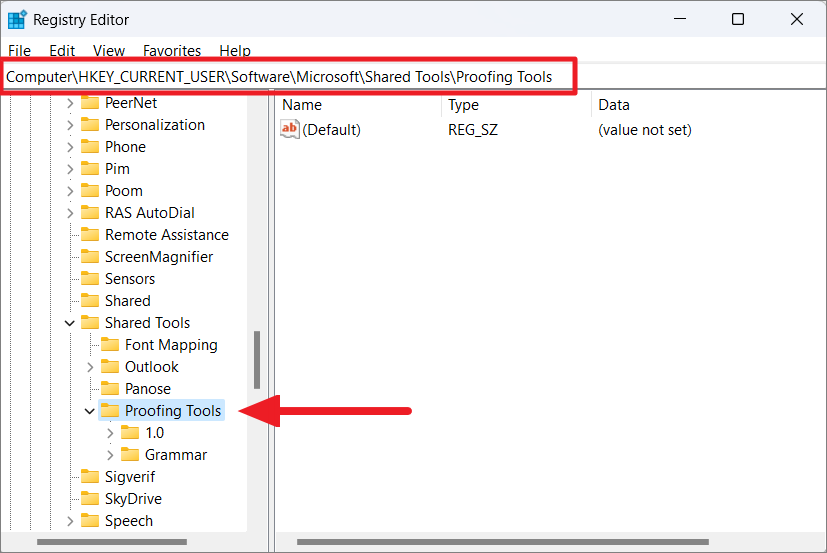
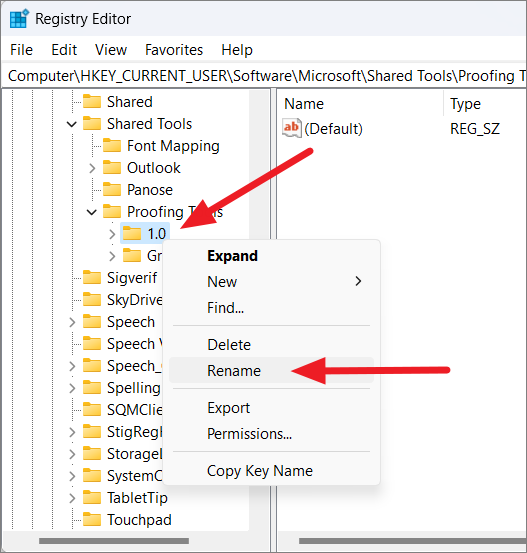
Under Proofing Tools, right-click on the ‘1.0’ folder and select the ‘Rename’ option from the context menu.
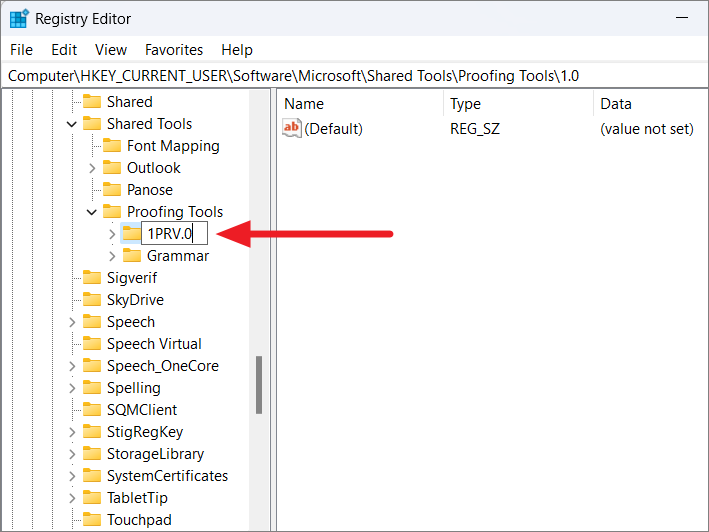
Rename the folder from ‘1.0’ to ‘1PRV.0’.
After that, close the Registry Editor and restart your PC to apply the changes. Now, relaunch Microsoft Word and recheck if the spell checker is working or not.
Rename Your Word Template
It is also possible that the spell checker is not working due to the corrupted global template. The Global Template is either the ‘normal.dot’ or ‘normal.dotm’ for Word 2007 and newer series respectively, which is usually located in the Microsoft Template folder. To resolve this issue, you need to rename the Global template file that will reset MS Word to the default settings. To do this, follow the below steps:
Open the Run command (Win+R), type the following, and press Enter:
%appdata%\Microsoft\TemplatesThis will open the Microsoft Word Templates folder where you can find the ‘normal.dot’ or ‘normal.dotm’ file depending on the Word version.
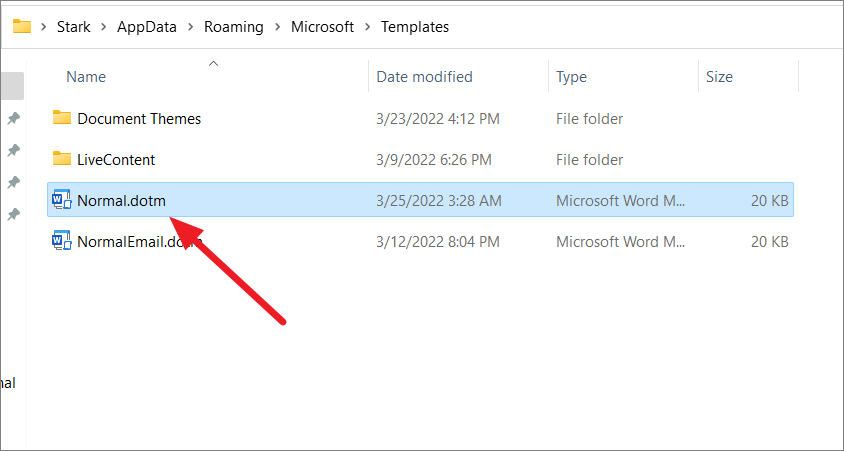
Now, right-click the file and select the ‘Rename’ icon or press F2.
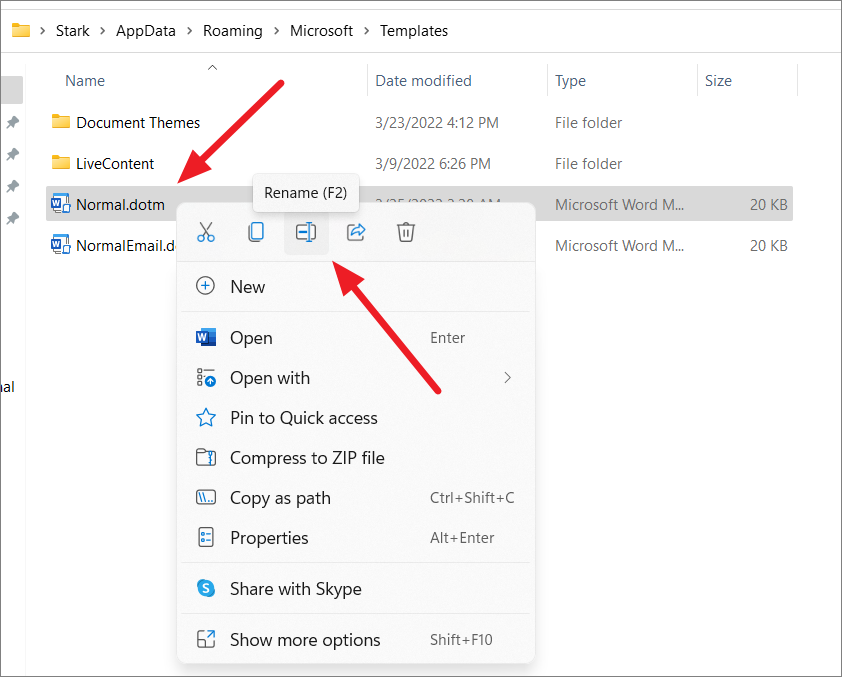
Then, rename the file from Normal.dotm to ‘Normal_old.dotm’.
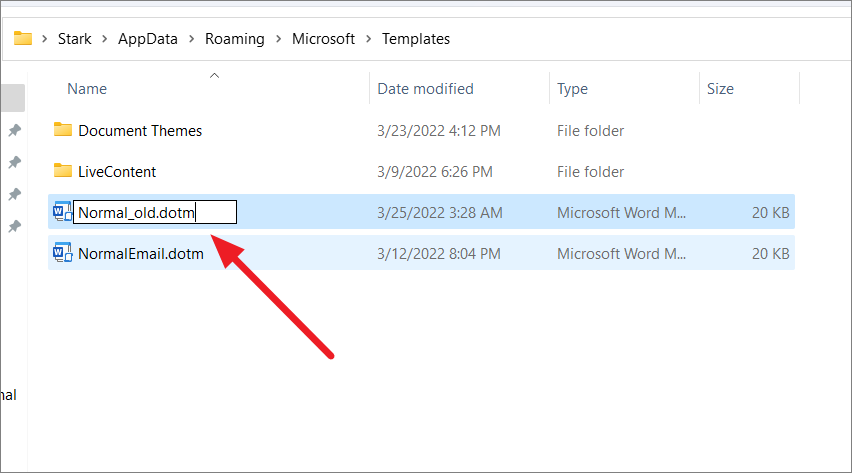
This will reset the Word settings to default and hopefully fix your problem.
Add Proofing Language
While you might be writing or editing a document in English, your preferred authoring and proofing language might be set to a foreign language (e.g German). If you accidentally set a different proofing language or uninstalled English from the list, then spell check might not work.
To fix this, open the ‘File’ menu and go to ‘Options’ in the backstage view. Next, go to the ‘Language’ section on the left and make sure that the correct language is installed and set as preferred under the ‘Office authoring languages and proofing’ section.
To set proofing language, select the language and click the ‘Set as Preferred’ button. In the below example, German is set as the preferred language.
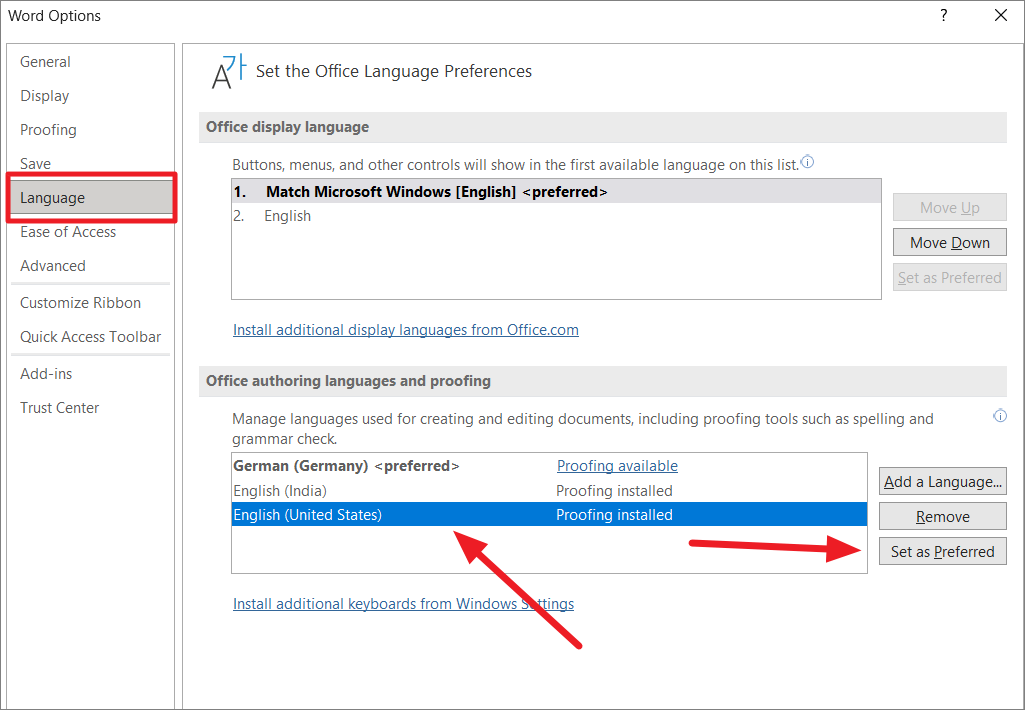
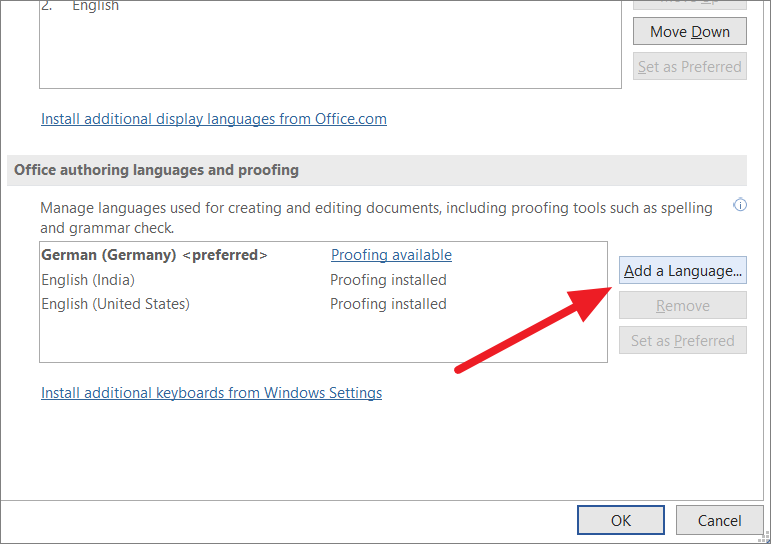
If your language is not available under the ‘Office authoring languages and proofing’ section, click the ‘Add a Language’ button to add a proofing language.
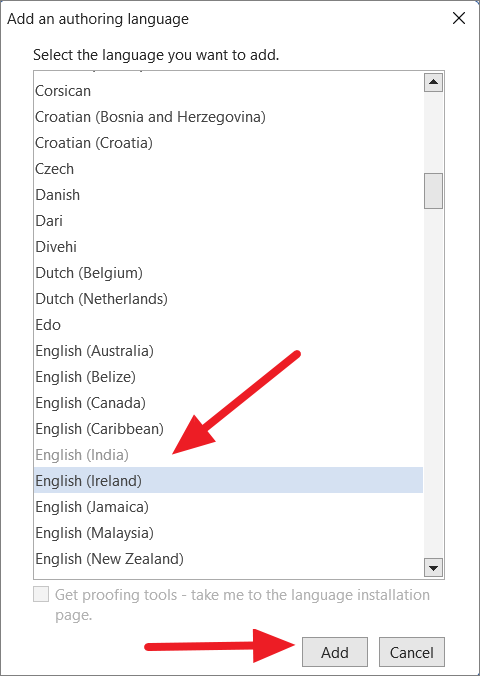
From the pop-up window, choose the language you want to add from the list and click the ‘Add’ button
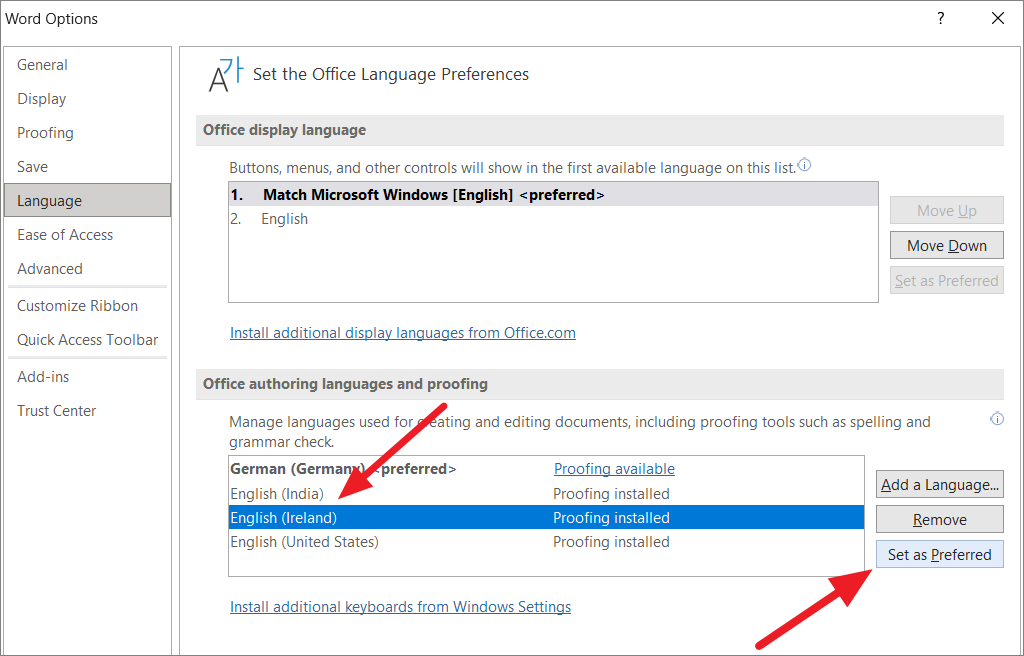
After that, select the language from the list and click ‘Set as preferred’.
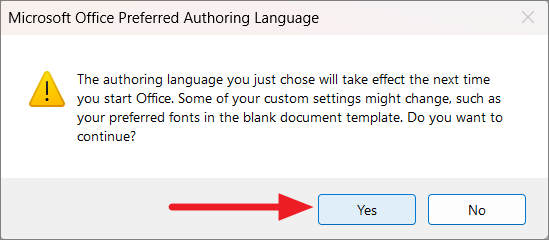
Then, click ‘Yes’ in the Microsoft Office Preferred Authoring Language pop-up box.
After selecting the preferred language, click ‘OK’ to close Word Options.
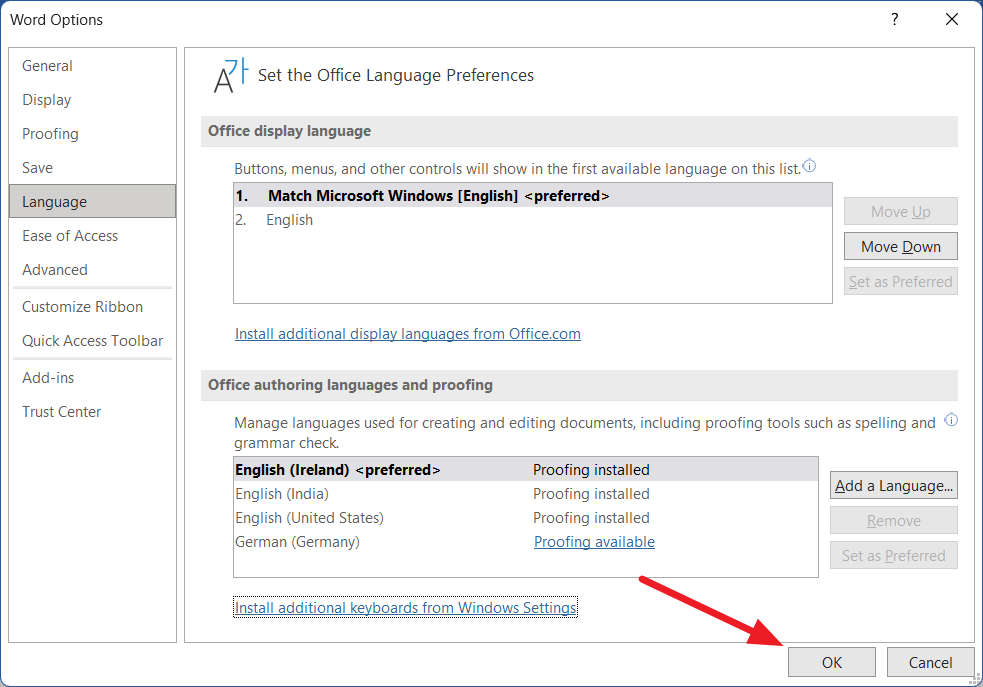
Now, check if the spelling and grammar tool is working or not.
Add to Custom Dictionary
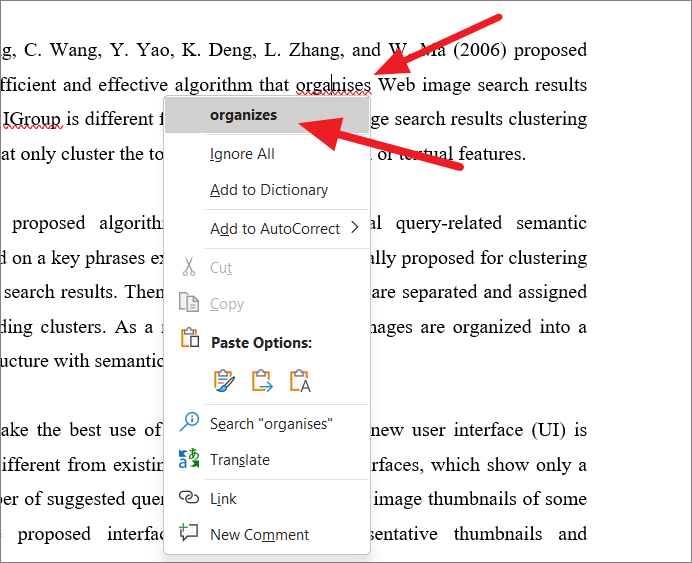
There are times when Word couldn’t recognize certain words such as slags, names, etc. And the program will struggle to detect spelling and grammar mistakes. In such cases, you can add your words to Word’s built-in dictionary and it will not show them as errors in this document and in all future documents.
To add a word to the dictionary, right-click on the word you want to add and select the ‘Add to Dictionary’ option in the context menu.
Check Document Style Settings
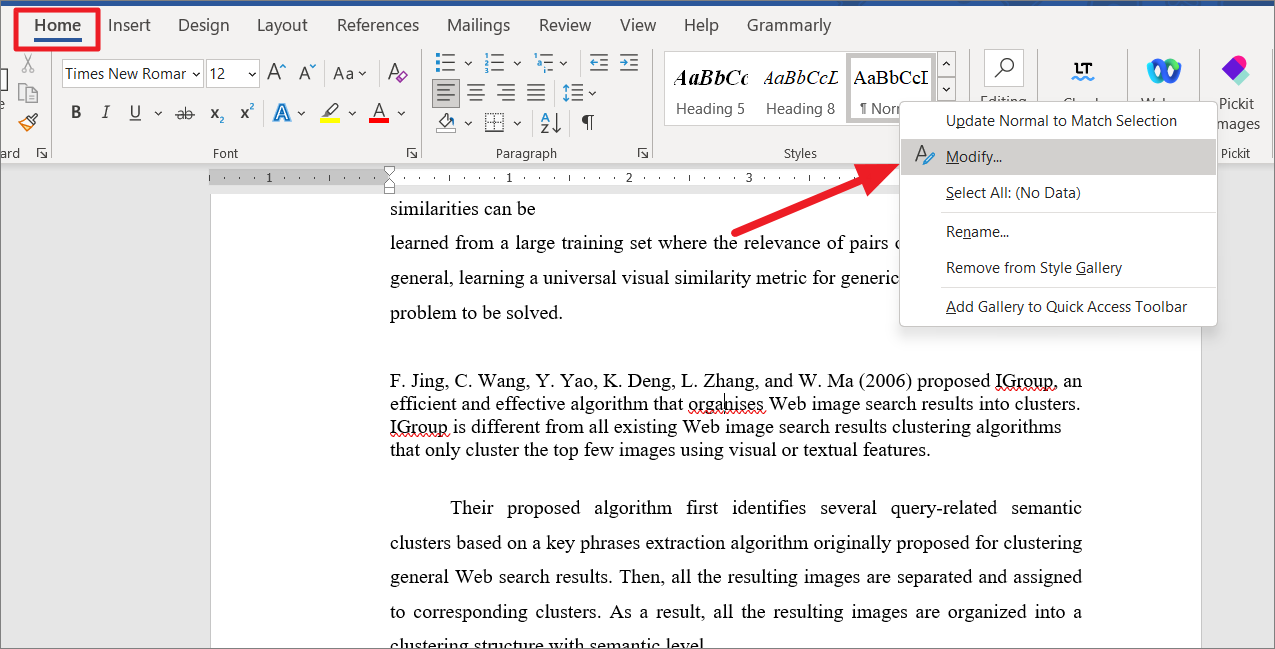
Word uses different language settings for each paragraph in your document. If you use a style that is formatted the wrong way, then each new paragraph will be formatted in a different language even if you set the entire document language to English. Consequently, Word may highlight the words in the new paragraph as spelling mistakes. To fix this, you must set the correct language in the Style.
On the ‘Home’ tab, head to the Styles section and then right-click on the chosen style and select ‘Modify’ from the context menu.
In the Modify Style dialog box, click the ‘Format’ button at the lower-left corner, and select ‘Language’ from the menu.
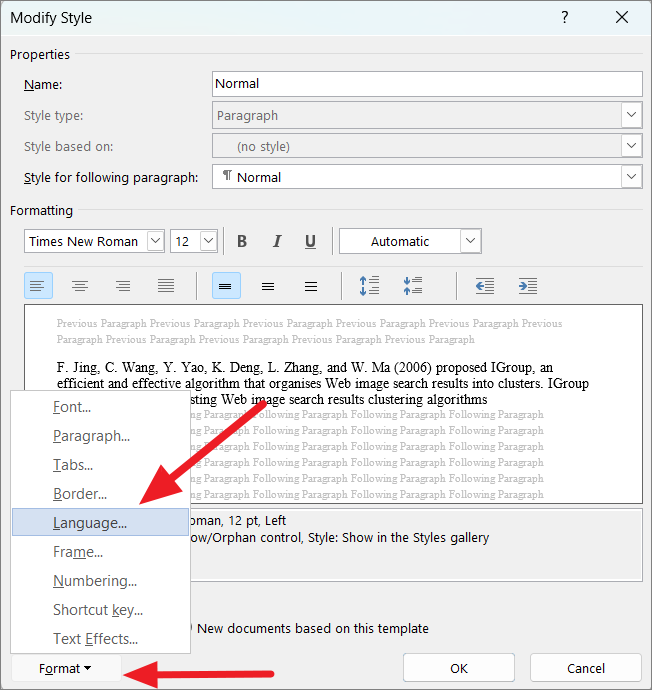
Then, select the correct language for the selected style and make sure the ‘Do not check spelling or grammar’ option is unchecked. Then, click ‘OK’.
Repair MS Office Application
The MS Word app could be corrupted or maybe a recent update damaged your software’s installation. Either way, damaged or corrupted MS Word application could also be another cause for spelling and grammar checking tool not working. So repairing the MS Office application on your computer might resolve your issue.
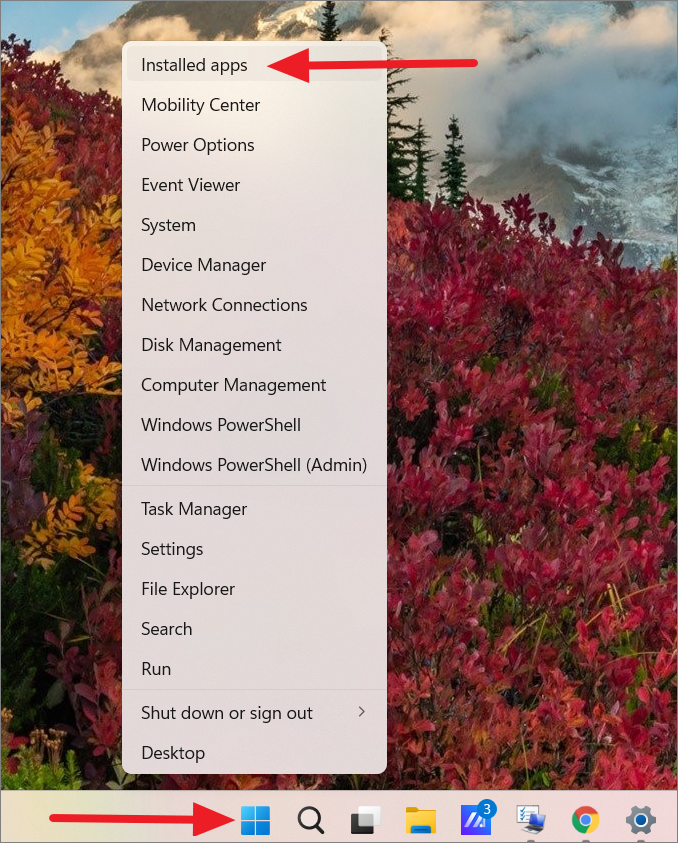
First, right-click on the Windows Start menu and select the ‘Installed apps’ option from the menu. or Go to Windows Settings (Win+I) and head to ‘Apps’ and then ‘Apps and features’.
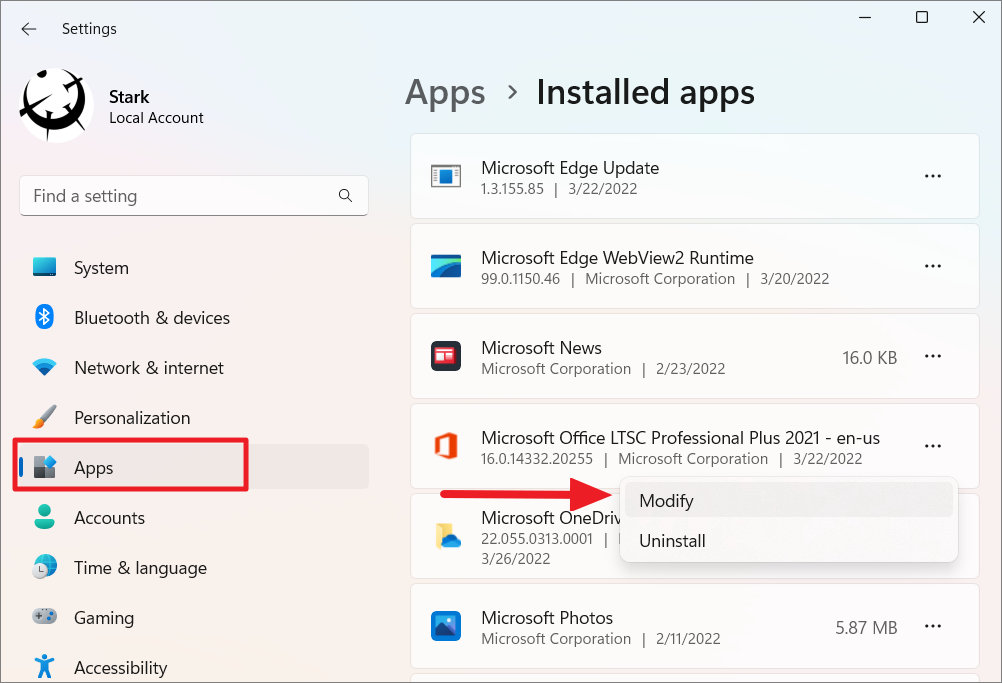
Under the list of installed apps, locate the Microsoft Office version you have installed. Then, click the three-dots button and select ‘Modify’.
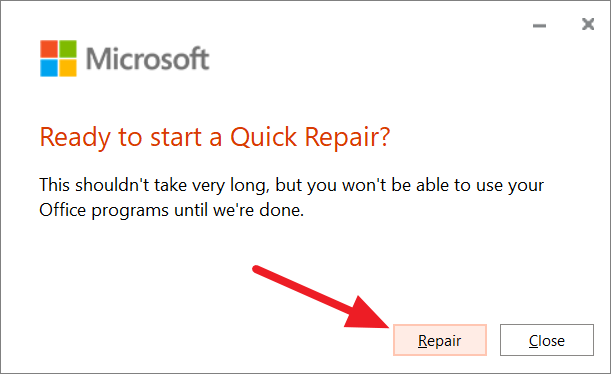
And, click ‘Yes’ to the User Account Control if prompted. In the Microsoft repair window, you will have two options. First, select the ‘Quick Repair’ option and click the ‘Repair’ button.
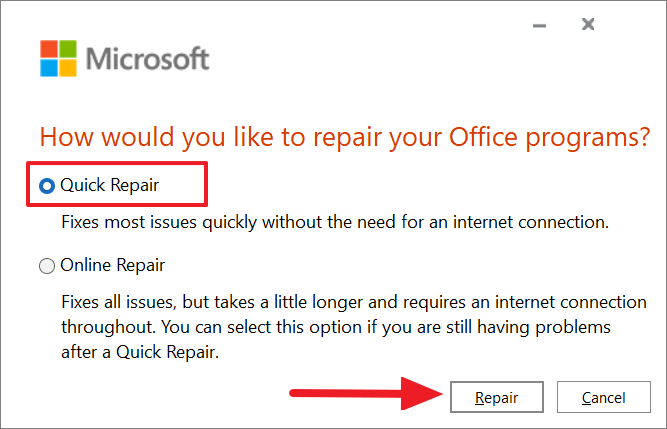
In the next dialog box, click the ‘Repair’ button again.
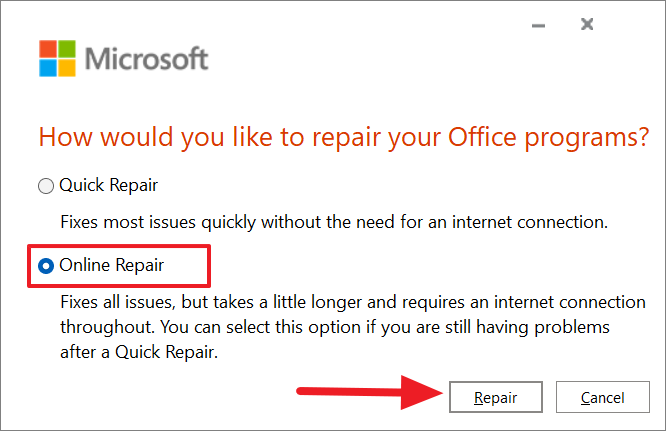
If the above option doesn’t fix the problem, select ‘Online Repair’ option and click the ‘Repair’ button.
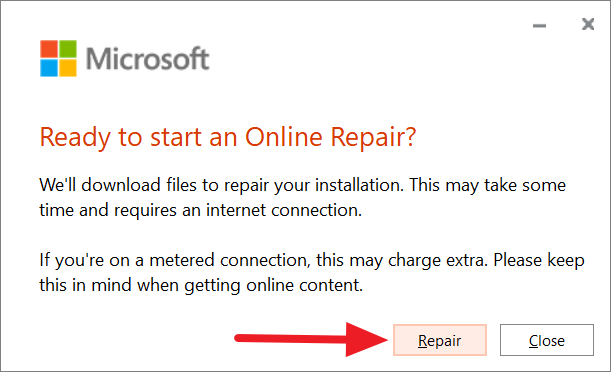
Then, click ‘Repair’ again.
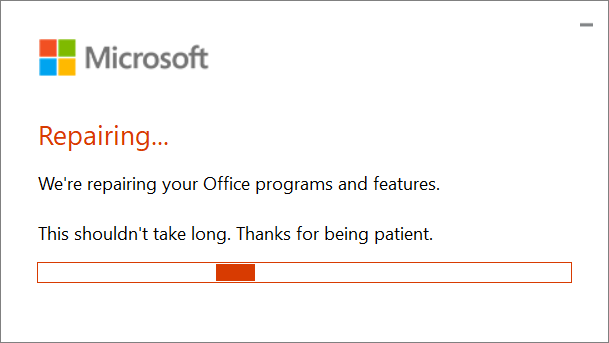
After the repair is finished, restart your device, and see if the issue is fixed or not.
Disable the Do Not Check Spelling Or Grammar option
Sometimes when you try to check the spelling, it will show you the “Text marked with ‘Do not check spelling or grammar’ was skipped” error message. Word usually shows this message when you use the ‘Do Not Check Spelling’ option in the language settings to ignore certain words from the spell checker. However, if this option is not configured right, Word will skip spell-checking for all the words in the document. Here’s how you can disable this option:
Open the Word document and highlight the paragraph or the specific word which is not being shown in the spell checker. Next, press the Shift+F1 shortcut keys.
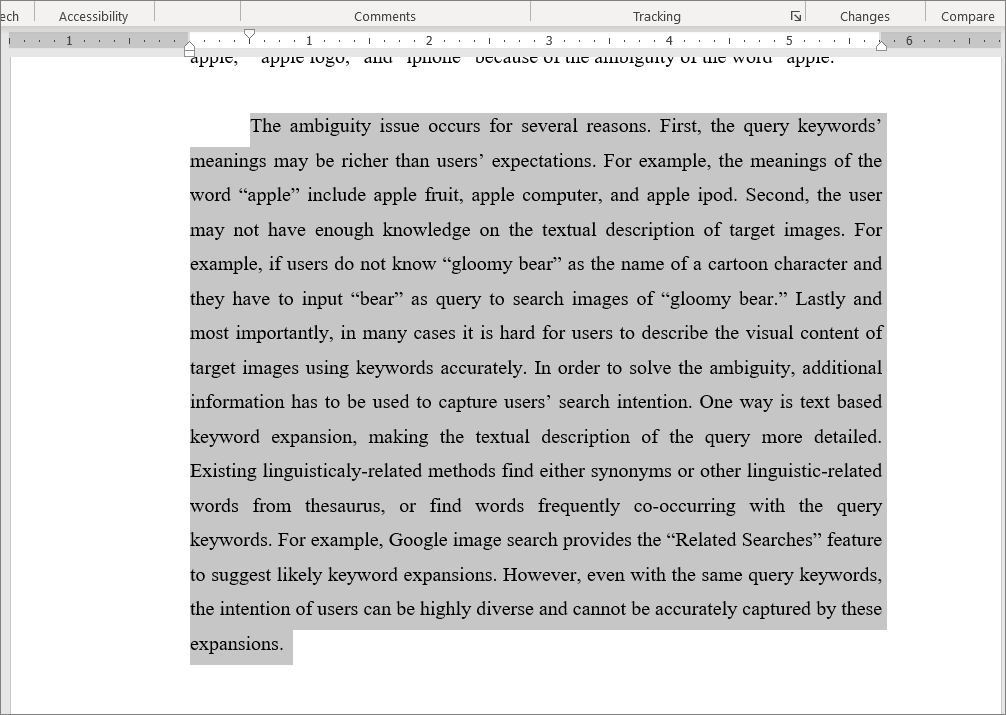
This will show you the Reveal Formatting pane on the right side of the Word window.
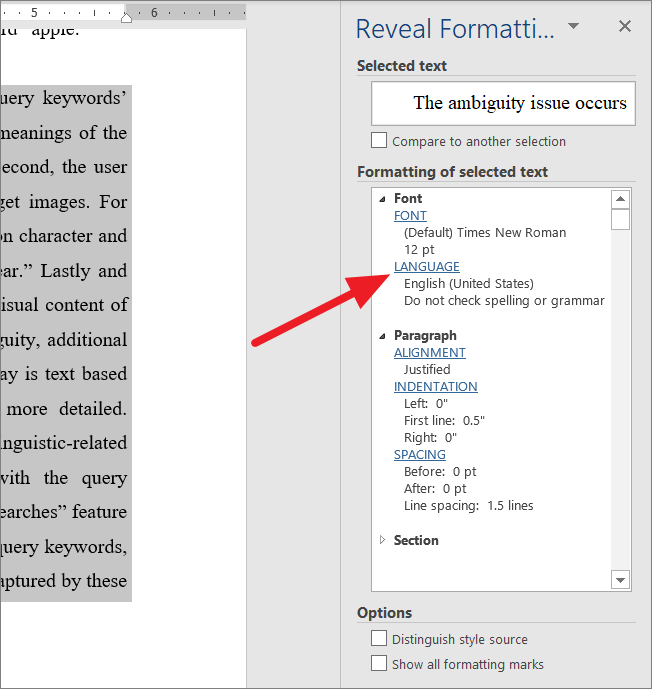
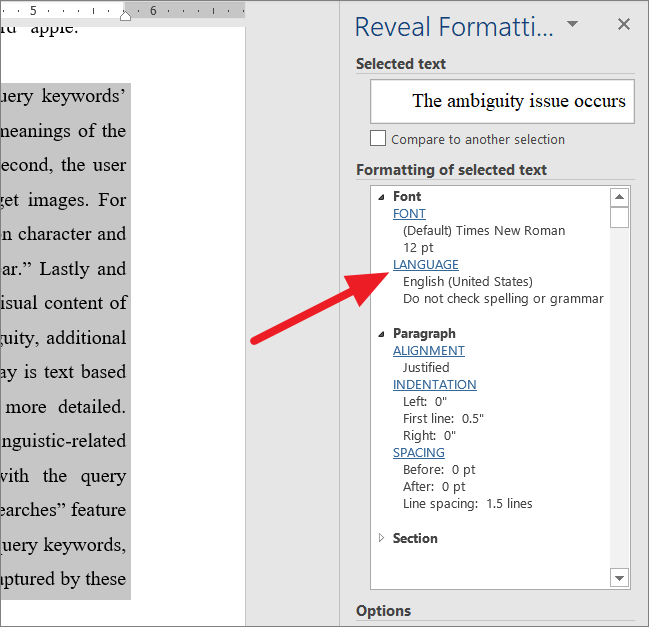
In the Reveal Formatting pane, click on the ‘Language’ option under the Formatting of the selected text box.
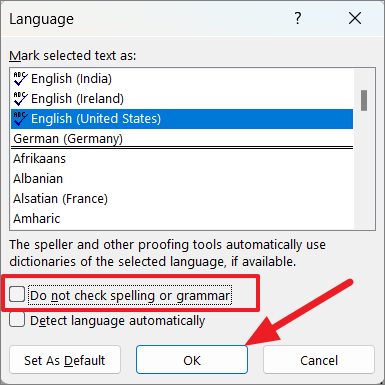
When the Language dialog box appears, make sure to uncheck the ‘Do not check spelling or grammar’ option. After that, click ‘OK’ and restart the Word program.
Use Grammarly Plug-in
If Word’s Spelling and Grammer tool is not working for you, you can use Grammarly plug-in as an alternative. Grammarly is a cloud-based typing assistant that helps you detect and fix spelling mistakes, imperfect grammar, and punctuation mistakes. Also, Grammarly integrates seamlessly with Microsoft Word and Outlook.
To download Grammarly for Word and Outlook, go to this website and click the ‘Get the add-in It’s free’ button. After downloading the add-in, install it.

Then, restart the Word app and you will see a new tab called ‘Grammarly’ in the ribbon.
Now, you can open any document and go to the ‘Grammarly’ tab and click the ‘Open Grammarly’.
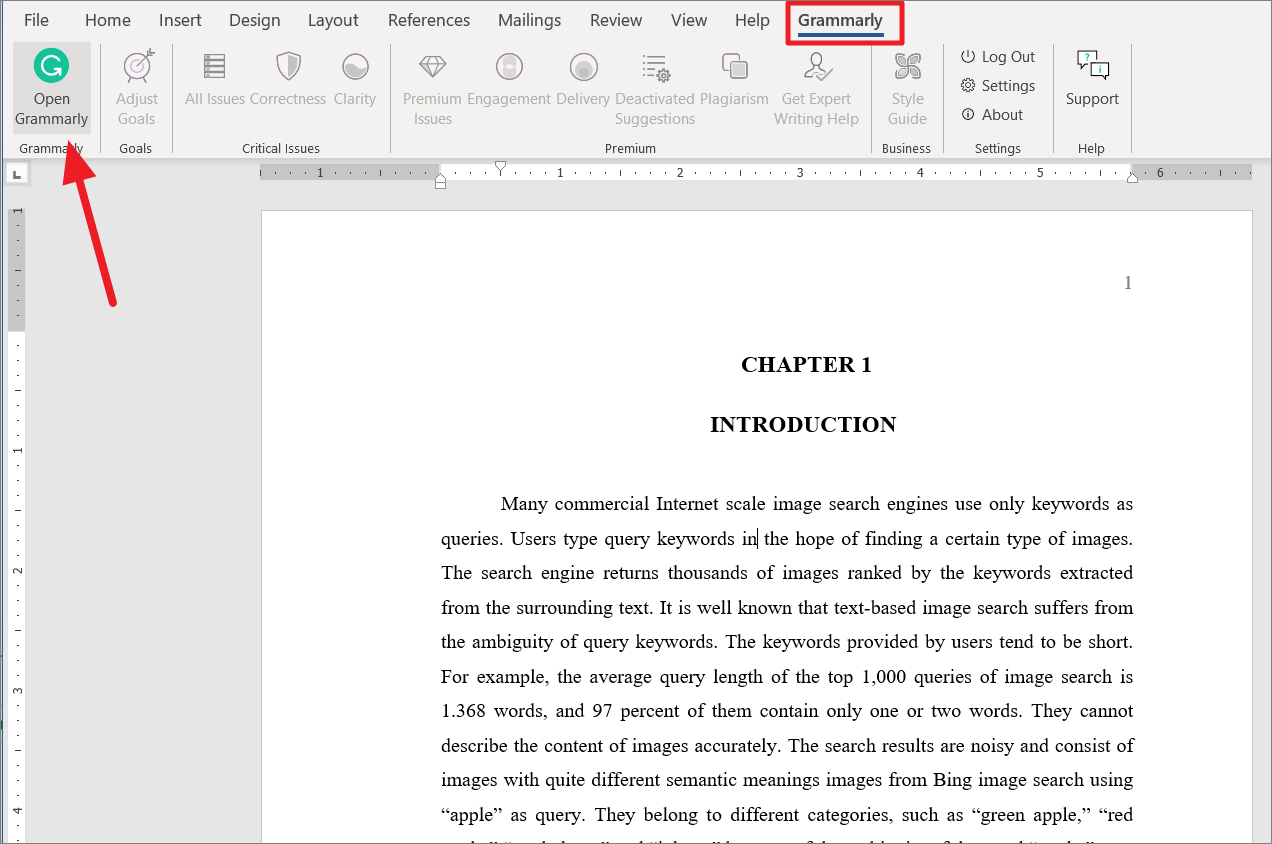
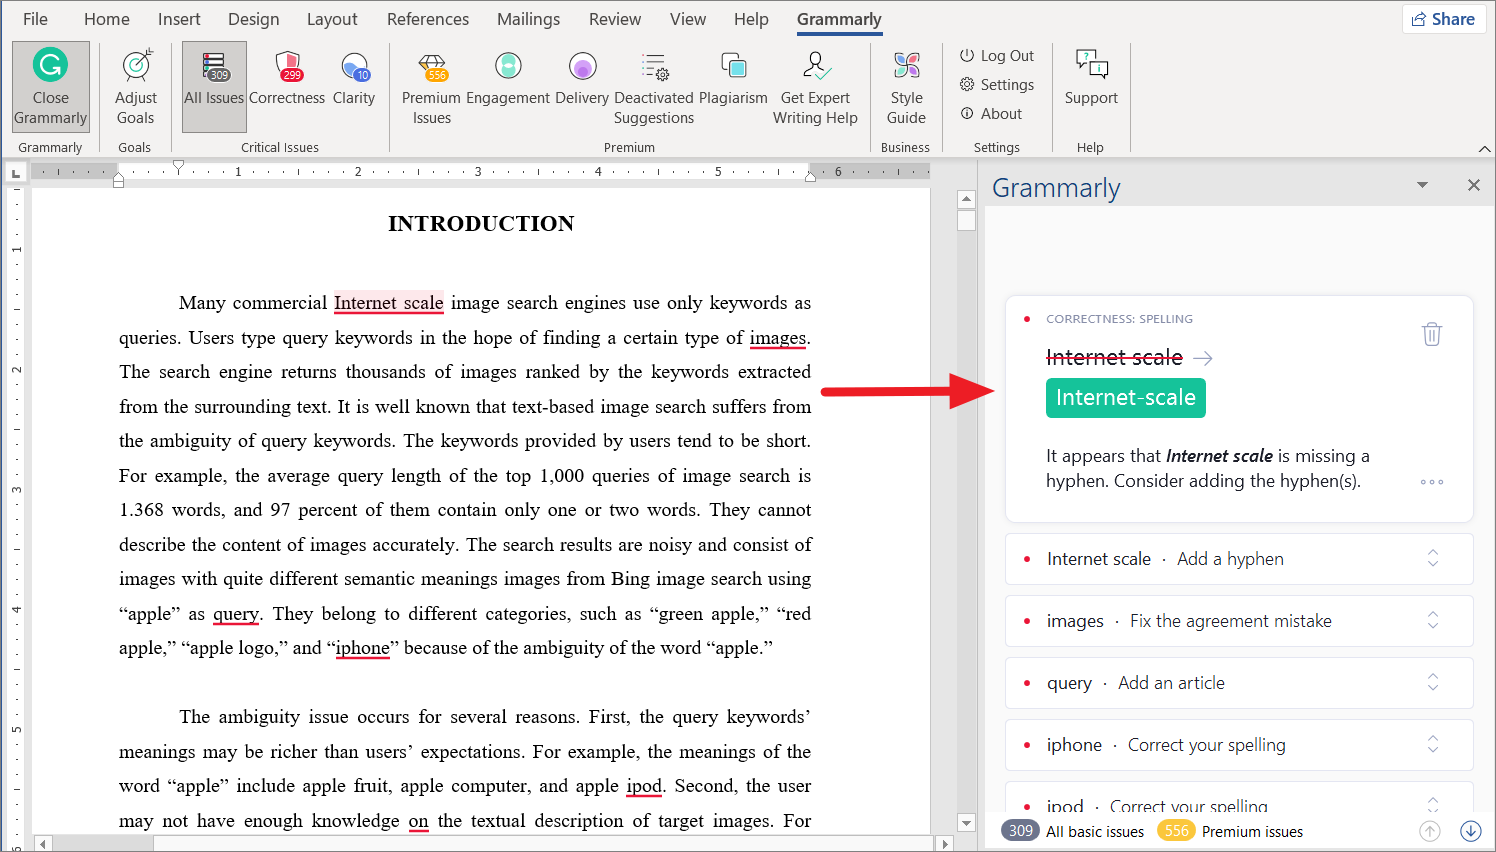
This will open the Grammarly pane on the right, where it will scan the document and show you suggestions to fix your spelling and grammar mistakes.
You can also use the Microsoft Word web app to quickly check the spelling of the document. If you have Microsoft 365 subscription, you can open the same document in the web app and quickly check for spelling and grammar mistakes online.
That’s it.


Member discussion