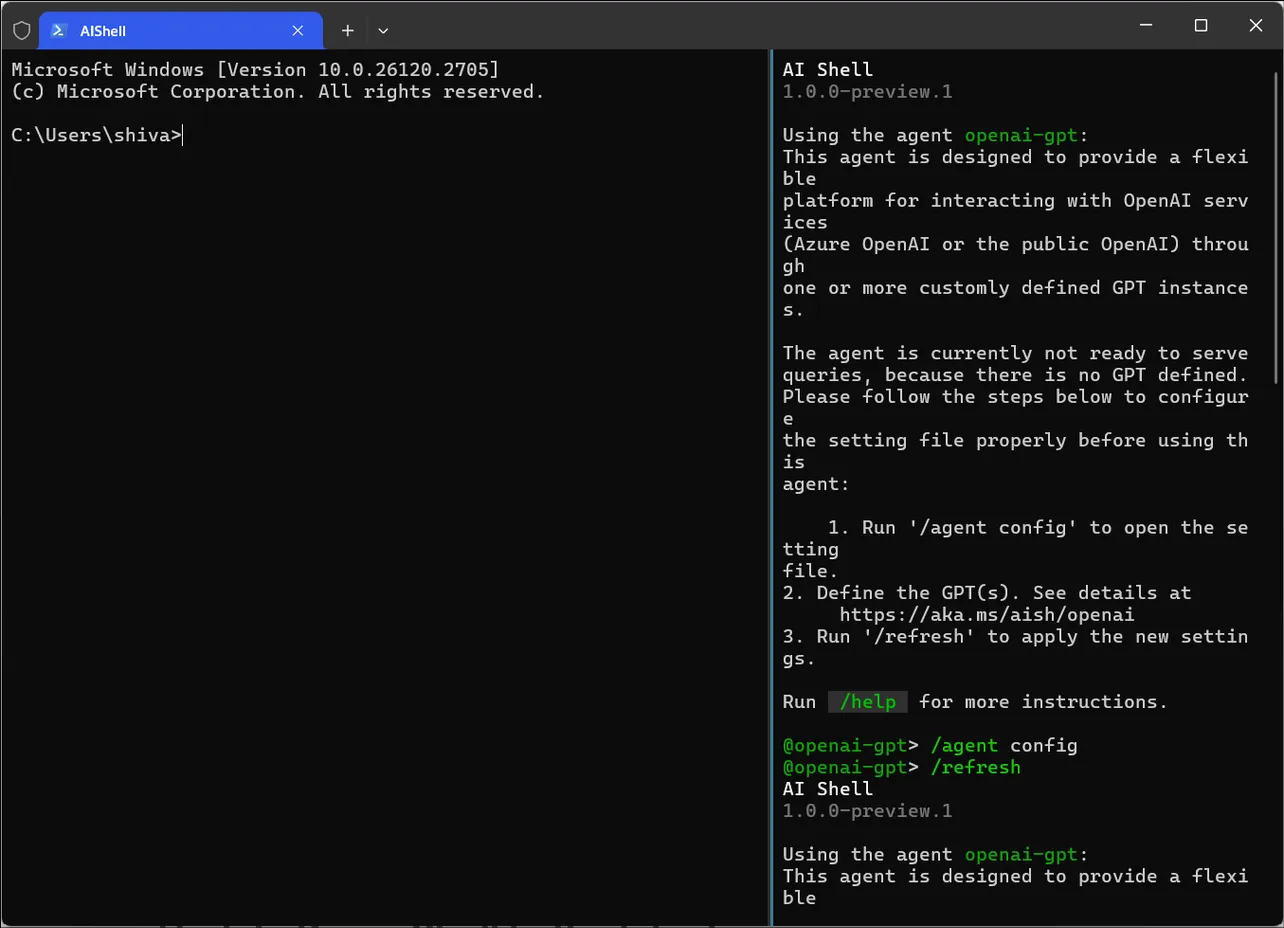
AI Shell is a tool designed to bring the power of artificial intelligence directly to your command-line interface. It allows you to interact with various AI models through a conversational interface, providing help with command syntax, error resolution, and even code generation. This article guides you through the installation and basic usage of AI Shell on Windows.
AI Shell provides two primary ways to install it: using a convenient installation script, or through manual installation. For most users, the installation script is the simplest route and is therefore the recommended approach.
Update PowerShell to the latest version
You need PowerShell version 7.4.6 or above to be able to install AI Shell. Below are the instructions to install and update PowerShell on your Windows 10 or Windows 11 PC.
Step 1: Press Win + X and select Windows PowerShell (Admin).
Step 2: Temporarily allow scripts to run by executing:
Set-ExecutionPolicy -Scope Process -ExecutionPolicy Bypass
Step 3: Run the following commands:
Invoke-RestMethod -Uri "https://aka.ms/install-powershell.ps1" -OutFile "install-powershell.ps1"
.\install-powershell.ps1
Step 4: Add PowerShell to the system PATH:
- Press
Win + R, typeSystemPropertiesAdvanced, and press Enter. - Click Environment Variables.
- In the "System variables" section, select Path and click Edit.
- Click New and add the following path:
C:\Users\<YourUsername>\AppData\Local\Microsoft\powershell
Replace <YourUsername> with your Windows username.
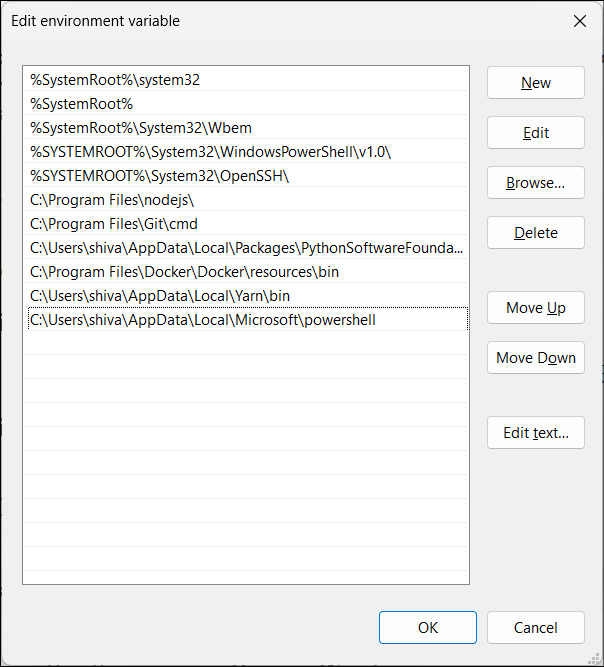
- Click OK to save changes and close all dialogs.
Step 5: After installation, open the new PowerShell version using:
pwsh
Step 6: Verify the installed version with:
$PSVersionTable
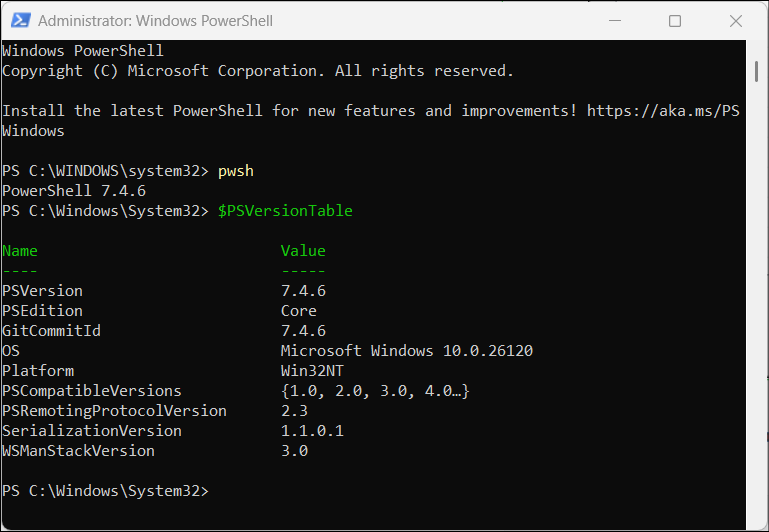
Step 7 (optional): Restore the default execution policy if needed:
Set-ExecutionPolicy -Scope Process -ExecutionPolicy Restricted
This process ensures PowerShell is updated to v7.4.6 or later and globally accessible.
Installing AI Shell using the installation Script
The installation script streamlines the process of installing both the AI Shell executable and the PowerShell module. This method automatically configures the necessary paths and installs the AI Shell module.
Step 1: Open Terminal as an administrator. You can do this by pressing the Win key, typing "Terminal," right-clicking on "Terminal," and selecting "Run as administrator".
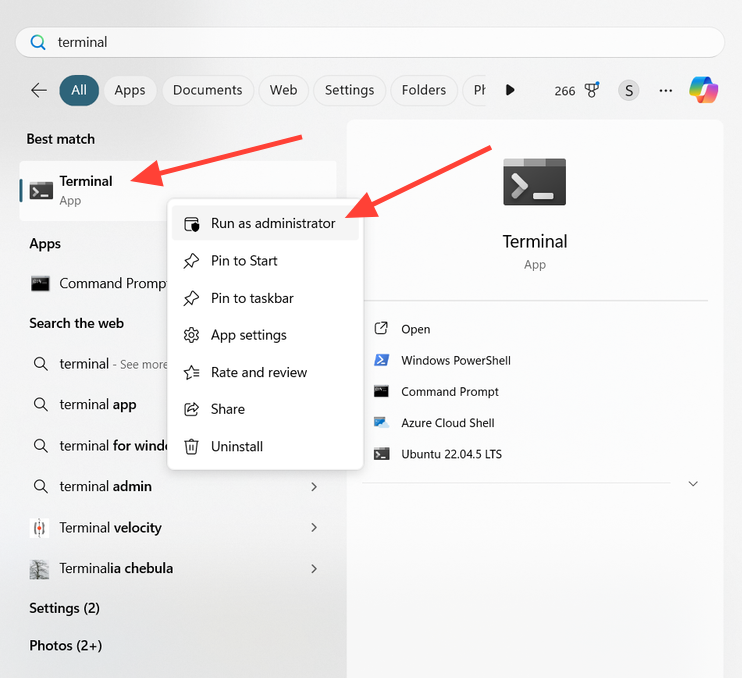
Step 2: If Terminal doesn't open with PowerShell by default, click on the drop-down menu icon in tabs bar and select "Windows PowerShell".
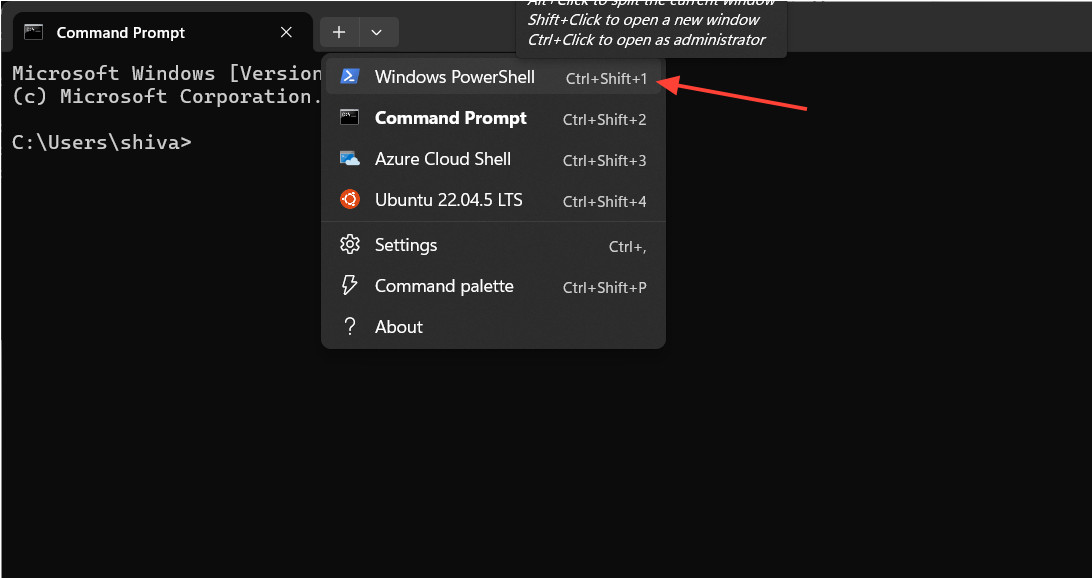
Step 3: Run the following command to use PowerShell v7.4.6 (or newer) that we installed above.
pwshStep 4: Execute the installation script. Copy and paste the following command into your PowerShell window and press Enter:
Invoke-Expression "& { $(Invoke-RestMethod 'https://aka.ms/install-aishell.ps1') }"This script downloads and installs aish.exe to $env:LOCALAPPDATA\Programs\AIShell, adds it to your PATH environment variable, and installs the AIShell module to your module path. This process will allow you to run the AI Shell from the command line or directly from PowerShell.
Step 5: After the installation completes, you can start AI Shell using the command Start-AIShell in your PowerShell window. This command will open a split pane in Windows Terminal, with AI Shell running in the right pane. You'll be prompted to choose an AI agent, the initial selection will be done through a prompt after you run Start-AIShell command.
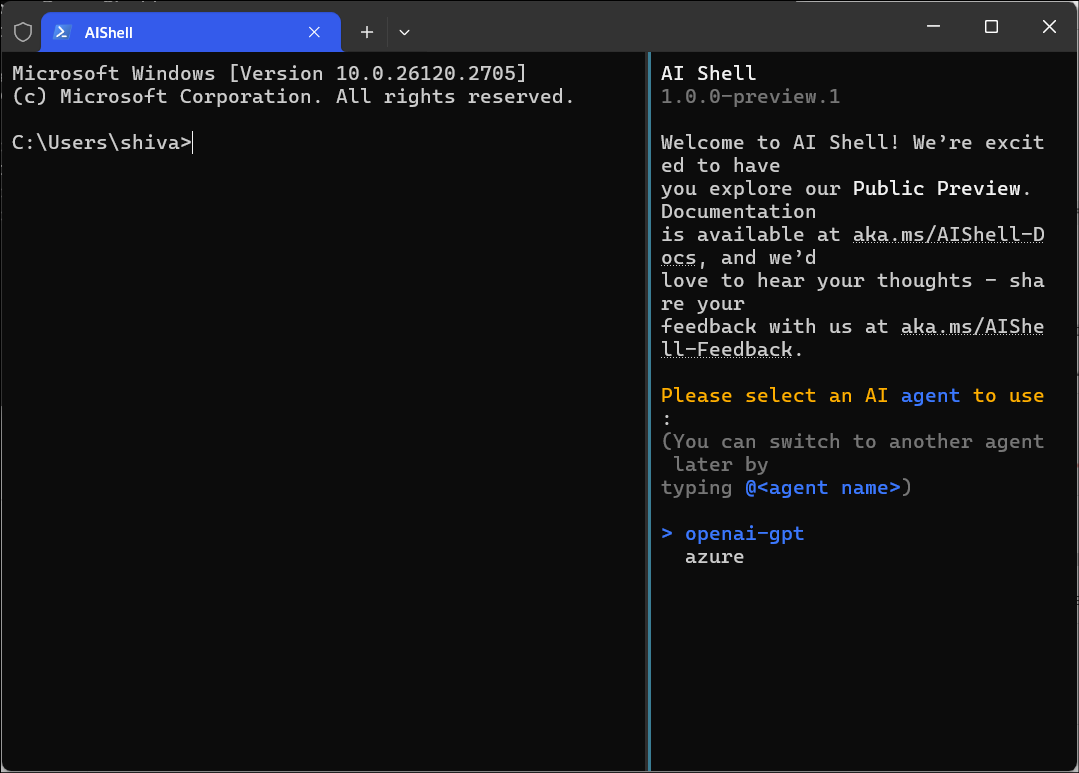
Manually installing AI Shell
If you cannot use the installation script or prefer manual control, you can follow these steps to install AI Shell. This method involves downloading the necessary files, extracting them, and adding their location to your system's PATH variable.
Step 1: Download the latest version of AI Shell for Windows. Visit the official source, download the appropriate ZIP file that matches your system architecture such as AIShell-1.0.0-preview.1-win-x64.zip.
Step 2: Extract the downloaded ZIP file to a suitable location on your system such as C:\AIShell. This folder will contain the aish.exe executable.
Step 3: Add the extracted folder to your system’s PATH environment variable. This allows you to run aish.exe from any command prompt.
To do this, search for "environment variables" in the Windows search bar, click "Edit the system environment variables," and then select "Environment Variables." Under "System variables," select "Path," click "Edit," click "New," and add the full path to the extracted folder (e.g., C:\AIShell), then save it.
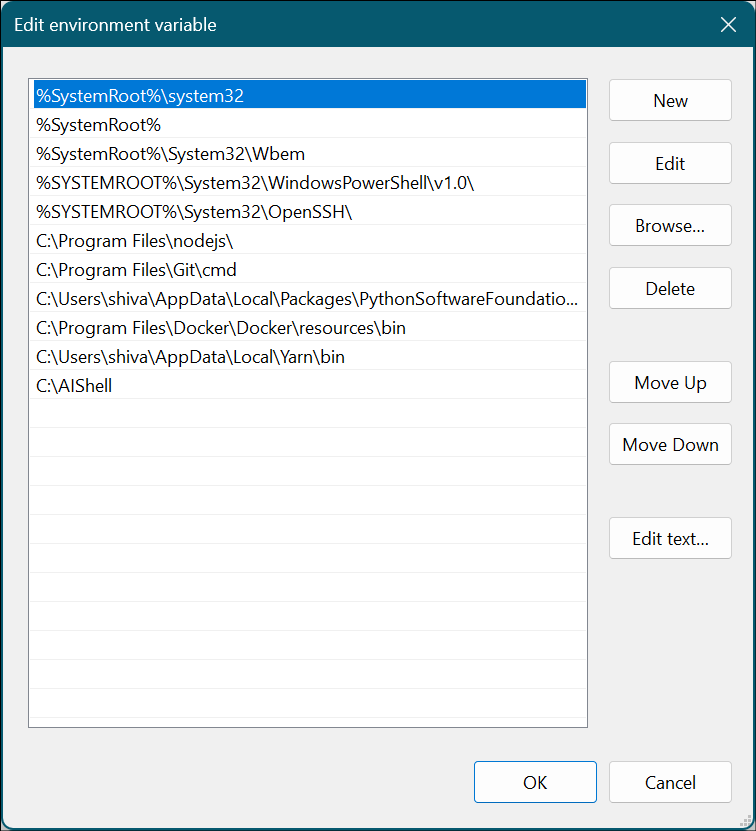
Step 4: Install the AIShell PowerShell module. Open Terminal as an administrator and run the following command in the Windows PowerShell tab in Terminal:
Install-PSResource -Name AIShellThis command downloads and installs the AI Shell module from the PowerShell Gallery, providing seamless integration with your PowerShell environment.
Configuring and Using AI Shell
Once AI Shell is installed, you'll need to configure the AI agent you want to use. By default, AI Shell offers two agents: Azure OpenAI Agent and Copilot in Azure. The Azure OpenAI agent requires additional configuration that involves providing your endpoint, API keys, and potentially a system prompt, which grounds the AI model for specific use cases. The Copilot in Azure agent is designed for Azure-specific tasks and requires you to be logged in to Azure.
Select an agent from the panel on the right to configure it.
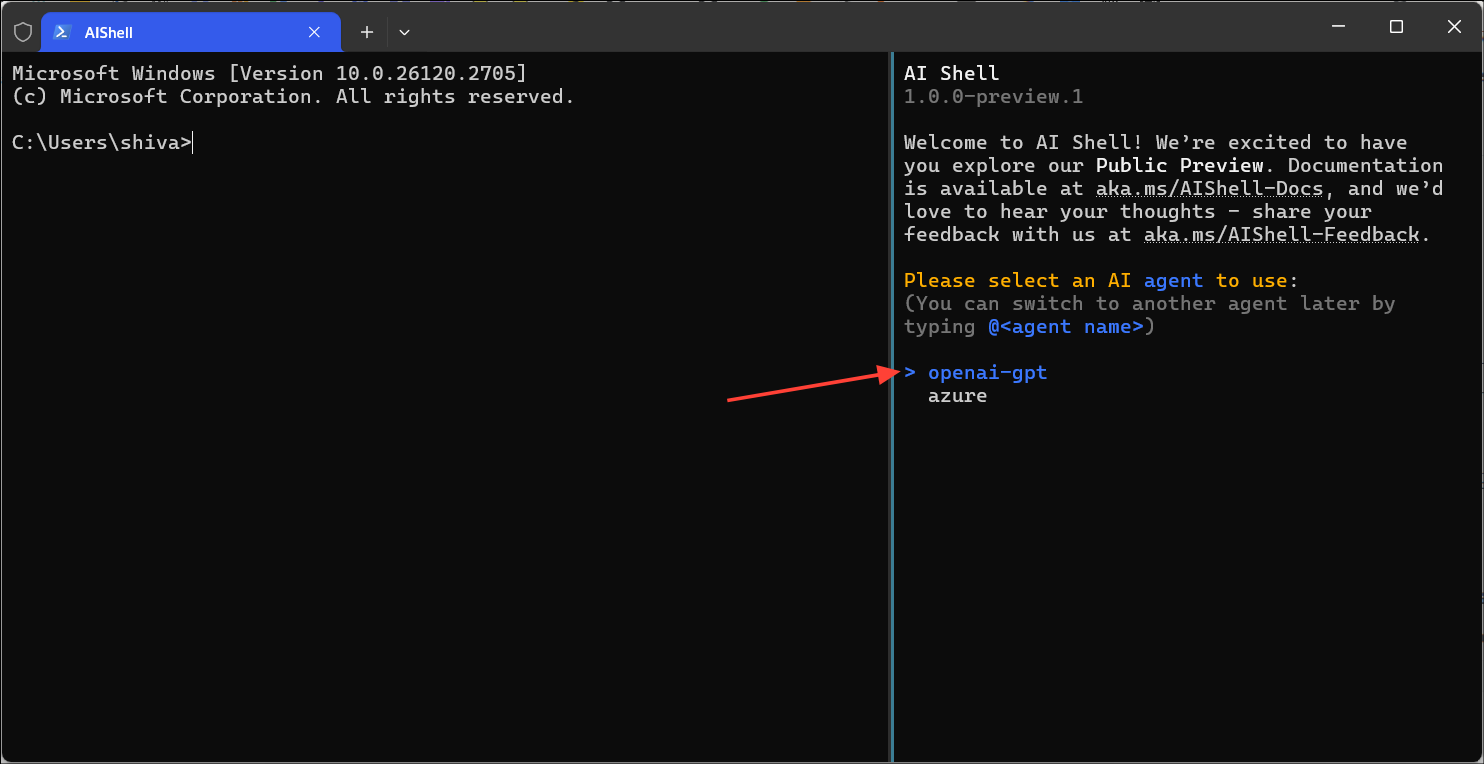
To configure an agent, run the command /agent config in the AI Shell pane.
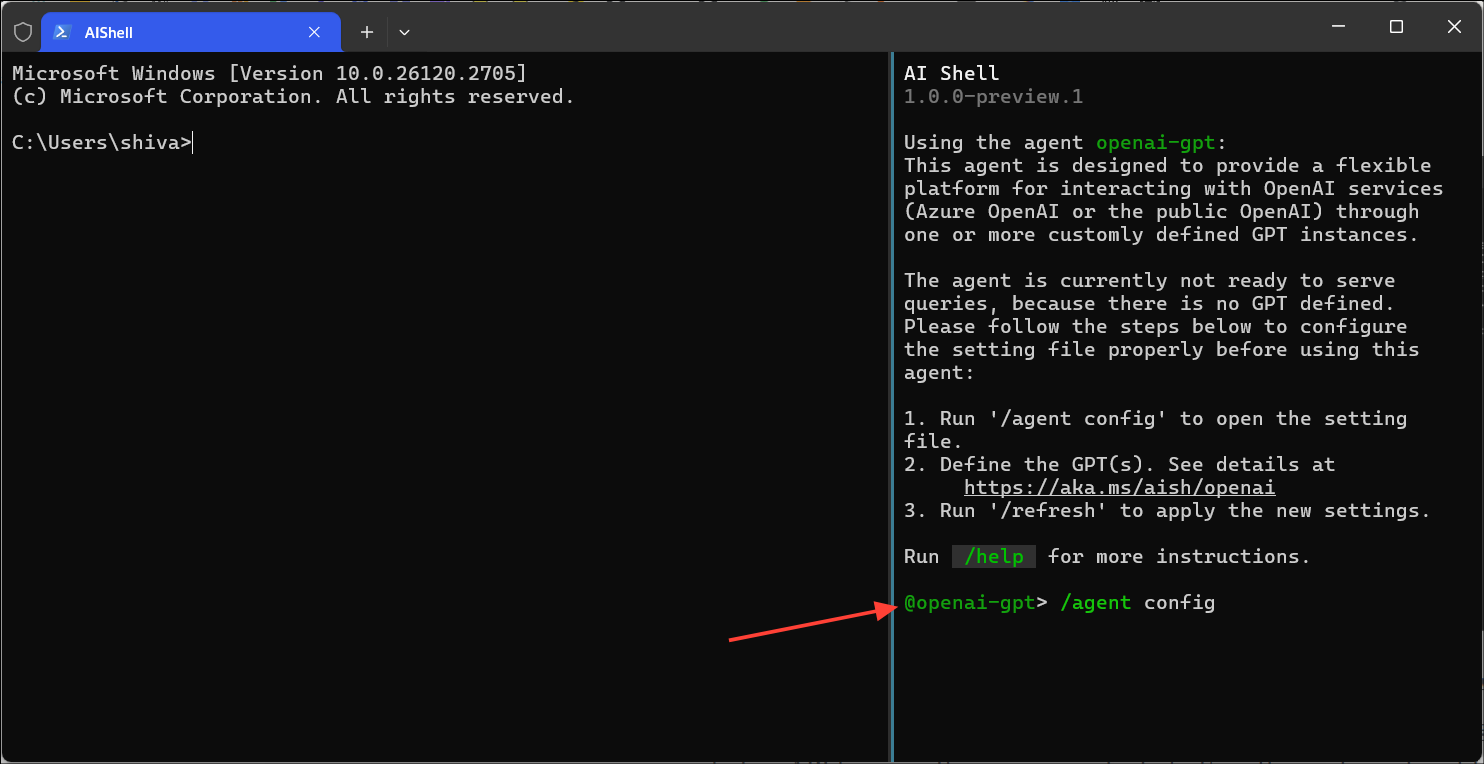
A JSON configuration file will open where you can add your settings, including API keys or other access credentials.
For example, if you're configuring the openai-gpt model, paste the contents from code block below into your config file, replace <your-openai-api-key-here> with your API key and save the configuration file:
{
  // Declare GPT instances.
  "GPTs": [
      /* --- uncomment the examples below and update as appropriate ---
      //
      // To use the Azure OpenAI service:
      // - Set `Endpoint` to the endpoint of your Azure OpenAI service,
      //     or the endpoint to the Azure API Management service if you are using it as a gateway.
      // - Set `Deployment` to the deployment name of your Azure OpenAI service.
      // - Set `ModelName` to the name of the model used for your deployment, e.g. "gpt-4-0613".
      // - Set `Key` to the access key of your Azure OpenAI service,
      //     or the key of the Azure API Management service if you are using it as a gateway.
      // For example:
      {
        "Name": "ps-az-gpt4",
        "Description": "A GPT instance with expertise in PowerShell scripting and command line utilities. Use gpt-4 running in Azure.",
        "Endpoint": "<insert your Azure OpenAI endpoint>",
        "Deployment": "<insert your deployment name>",
        "ModelName": "<insert the model name>",   // required field to infer properties of the service, such as token limit.
        "Key": "<insert your key>",
        "SystemPrompt": "1. You are a helpful and friendly assistant with expertise in PowerShell scripting and command line.\n2. Assume user is using the operating system `win` unless otherwise specified.\n3. Use the `code block` syntax in markdown to encapsulate any part in responses that is code, YAML, JSON or XML, but not table.\n4. When encapsulating command line code, use '```powershell' if it's PowerShell command; use '```sh' if it's non-PowerShell CLI command.\n5. When generating CLI commands, never ever break a command into multiple lines. Instead, always list all parameters and arguments of the command on the same line.\n6. Please keep the response concise but to the point. Do not overexplain."
      },

      // To use the public OpenAI service:
      // - Ignore the `Endpoint` and `Deployment` keys.
      // - Set `ModelName` to the name of the model to be used.
      // - Set `Key` to be the OpenAI access token.
      // For example:*/
      {
        "Name": "ps-gpt4o",
        "Description": "A GPT instance with expertise in PowerShell scripting and command line utilities. Use gpt-4o running in OpenAI.",
        "ModelName": "gpt-4o",
        "Key": "<your-openai-api-key-here>",
        "SystemPrompt": "1. You are a helpful and friendly assistant with expertise in PowerShell scripting and command line.\n2. Assume user is using the operating system `Windows 11` unless otherwise specified.\n3. Use the `code block` syntax in markdown to encapsulate any part in responses that is code, YAML, JSON or XML, but not table.\n4. When encapsulating command line code, use '```powershell' if it's PowerShell command; use '```sh' if it's non-PowerShell CLI command.\n5. When generating CLI commands, never ever break a command into multiple lines. Instead, always list all parameters and arguments of the command on the same line.\n6. Please keep the response concise but to the point. Do not overexplain."
      }

  ],

  // Specify the default GPT instance to use for user query.
  // For example: "ps-az-gpt4"
  "Active": null
}
Then, type /refresh in the AI Shell pane to apply the changes.
You can interact with AI Shell by typing questions or commands in the AI Shell pane. To direct a command to a specific agent, use the syntax @<agentName> followed by your query. For instance, @openai-gpt "How do I list files in a directory?" will send that question to the Azure OpenAI agent. The initial selection of the agent will be done by the prompt when you run the command Start-AIShell.

AI Shell offers several built-in commands and keyboard shortcuts to speed up your workflow:
- Use the
/code postcommand or theCtrl+d, Ctrl+dkeyboard shortcut to insert generated code into your PowerShell session. - Use the
/code copycommand orCtrl+d, Ctrl+cto copy generated code to the clipboard.Ctrl+<n>will copy the _n-th_ code snippet. - Use
Alt+RightArrowandAlt+LeftArrowto move your cursor between the AI Shell and PowerShell panes. - Use the
Resolve-Errorcmdlet to send error messages to the AI Shell for assistance. - Use the
Invoke-AIShellcmdlet to send queries to the currently selected agent in the open AI Shell window. This command also allows you to pass command output through the pipeline into the AI agent for more context. - Type
/helpto view a list of all available commands.
By using the /code post command, generated code from AI Shell can be easily posted into your PowerShell session. If you need to copy all or certain code snippets from the AI Shell for later use, the /code copy command is useful in copying generated code into the clipboard for later use.
If you encounter an error in your working terminal, you can use the Resolve-Error command to send that error to the AI Shell window for help.
AI Shell's Invoke-AIShell command allows you to send queries to the currently selected agent. This can be done either with or without code.
AI Shell can be installed using a simple script or manually, each method caters to different user preferences. The script is more user-friendly and automates several steps, making the overall process easier, while manual installation allows for more control over specific configurations. With its intuitive interface and robust set of commands, AI Shell is a great addition for anyone looking to boost their productivity.

