Remote meetings might not hold a candle to the physical meetings in a lot of areas, but there is particularly one domain where it dominates by a mile. The ease with which you can record remote meetings has no match. Microsoft Teams also lets the users record any meetings without any hassle.
Recording a meeting can come very handy. Whether you want to make sure that you don’t miss out on any important topics covered in the meeting, or you are recording for the sake of the people who couldn’t attend, or maybe you don’t want to repeat the same training materials in different meetings and would rather have people refer to the recording, there are countless situations where meeting recordings can be your savior. With this guide, you can make sure that you have all the basics down to a tee.
Who Can Record Meetings in Microsoft Teams
The option to record meetings is not available for Microsoft Teams Free users. Microsoft 365 Business subscribers can record a meeting. The meeting organizer as well as the person who wants to record should be Microsoft 365 Business subscribers. To record a meeting, you must have a recording license from your IT admin. Guests or people outside the organization cannot record the meeting either.
Additionally, you cannot start a new recording if someone else is already recording the meeting. So basically, only one recording can be active at a time in a meeting in Microsoft Teams. But as the recording is accessible by everyone in the meeting, it’s not really an issue.
How to Record a Meeting in Microsoft Teams
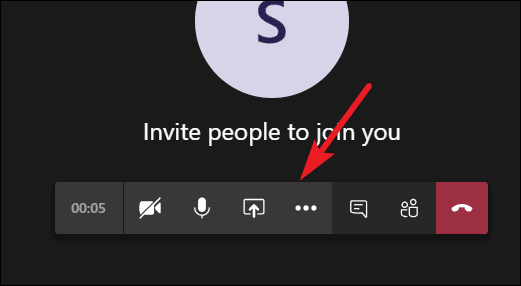
Any organization member can start a recording in a Microsoft Teams meeting. Click on the ‘More’ icon (three dots) on the meeting toolbar.
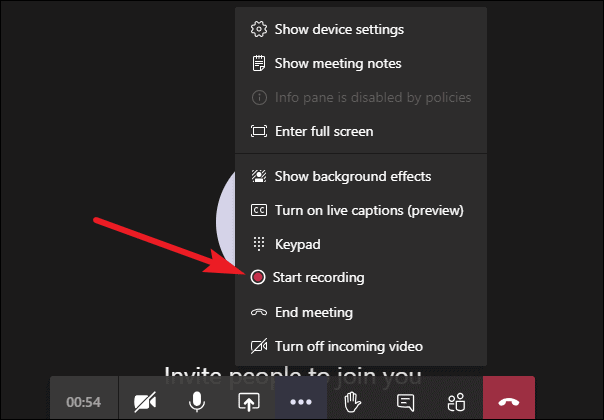
A context menu will appear. Select ‘Start Recording’ from the list of options.
Everyone in the meeting – whether they are on the desktop app, web app, mobile app, or they joined from the phone – will be notified that the meeting recording has started.
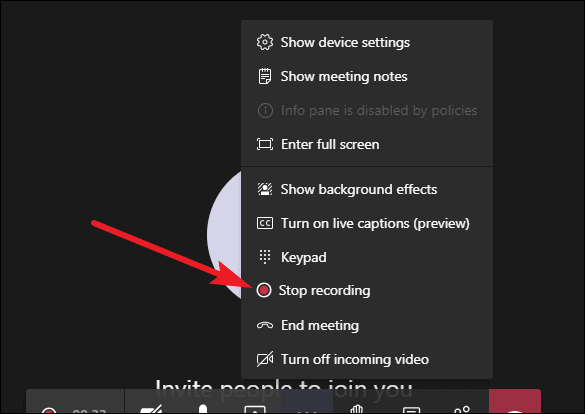
To stop a recording, again go to the ‘More’ option (three dots) on the meeting toolbar and click ‘Stop Recording’ from the menu.
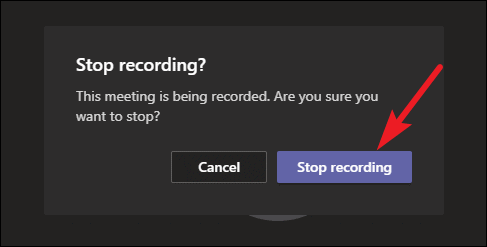
A confirmation dialog box will pop up on your screen. Click on the ‘Stop Recording’ option to confirm.
Note: Any meeting participant who is an organization member can stop a recording, regardless of whether they were the ones to start it or not. The meeting recording stops for everyone as it is essentially a shared recording.
The recording will stop, and it will take some time to process. Microsoft Teams saves the recordings in Microsoft Stream, you can view the recordings there. The person who started the recording also receives an email with the link to the recording. And the recording link is also available in the Meeting Chat (if it was a private meeting), or the Channel where it took place (for a channel meeting) from where all meeting participants can access it easily.
Recording a meeting with Microsoft Teams is quite straightforward. You can record any meeting and view it securely with Microsoft Stream. It records the meeting audio, video, and any screen sharing activity that was going on at the time. Currently, the meeting recordings in Microsoft Teams do not capture the Whiteboard and shared notes.