Apps or applications are great fun. They’re super useful in many ways and incredibly stimulating as well. But, all good things come to an end, and apps are no different. Users may grow out of them, grown tired of them, the app may stop functioning as well as it used to, or it may be causing havoc on the operating system.
There are many reasons why someone would want to uninstall an application and the mentioned situations are just a few on that expansive list. You can always uninstall your favorite application(s) only to reinstall them, and not necessarily throw them out. This guide will take you through the simple processes of uninstalling any application on your Windows 11 device.
Uninstalling Apps From the Start Menu
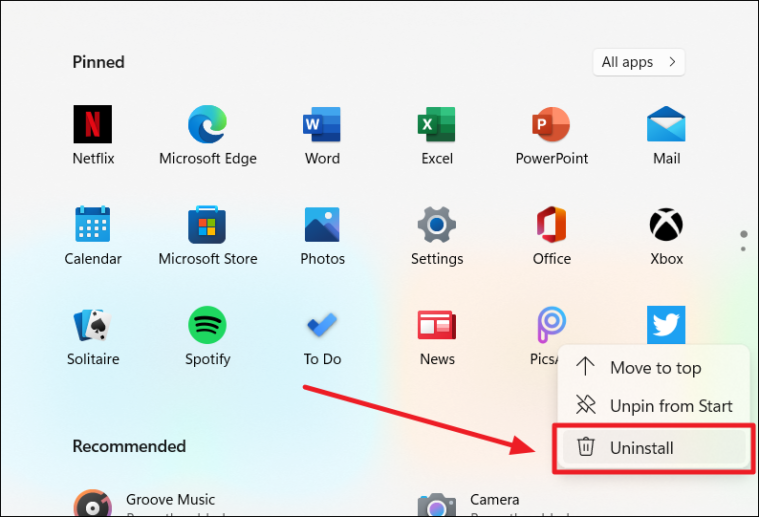
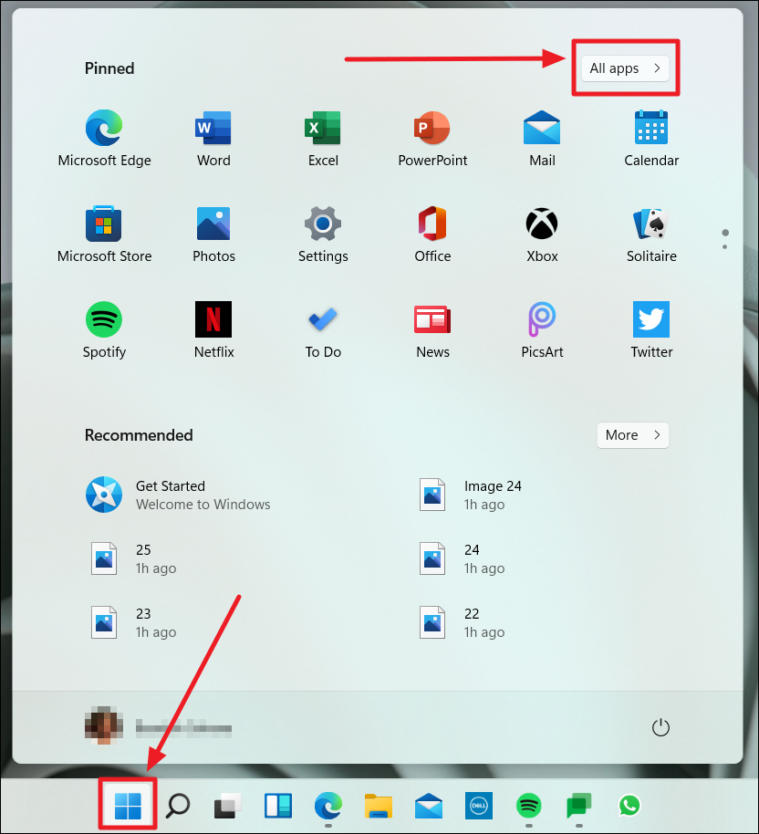
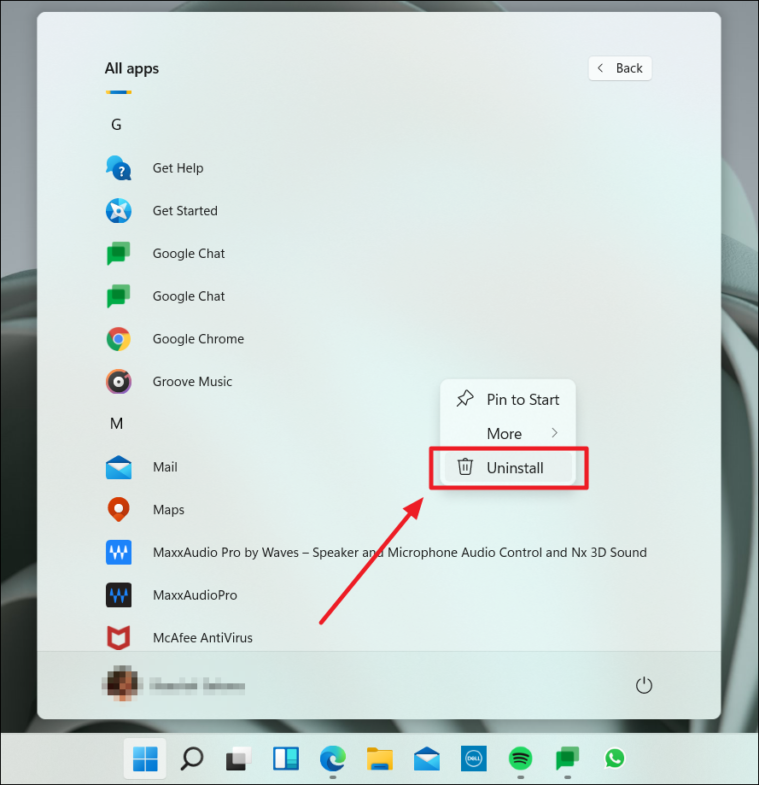
The Windows 11 ‘Start’ button looks a little different. You will see a couple of apps along with their icons on the ‘Start Menu’ once you click the Windows (Start) button from the taskbar. Navigate the app you wish to uninstall, right-click the app icon or two-finger tap it, and click on ‘Uninstall’ from the pop-up menu.
If you don’t find the required application in the group of Pinned apps, head onto the list of all apps by clicking the ‘All Apps’ button at the top-right corner of the Start Menu.
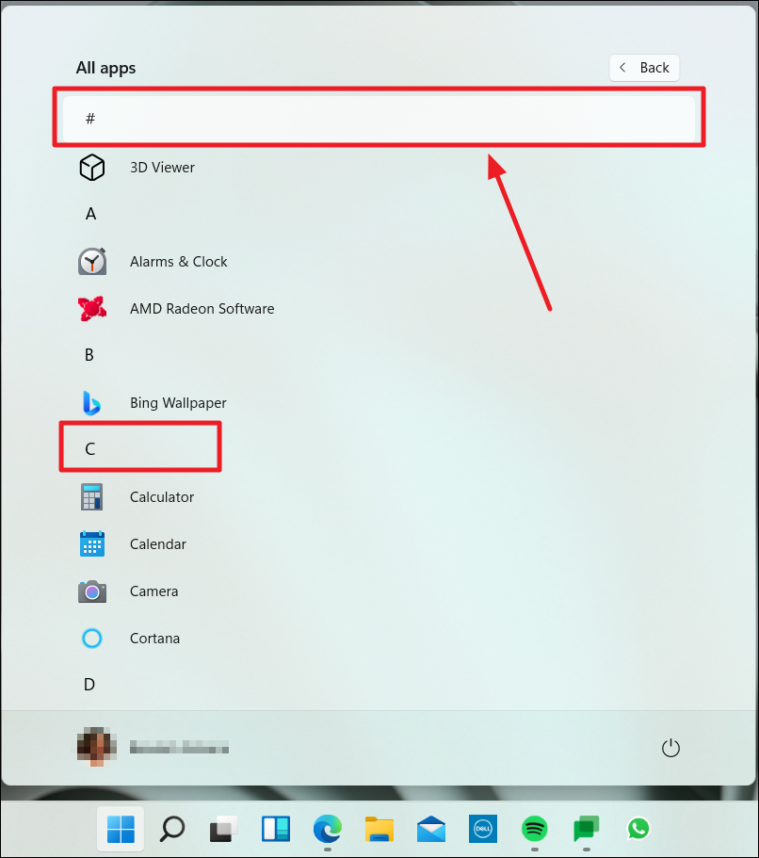
Scroll through your list of applications until you find the one you want to remove from your system. If scrolling through is a task, click the hashtag ‘#’ or the bold and uppercase alphabet at the start of any of the alphabetically categorized sections.
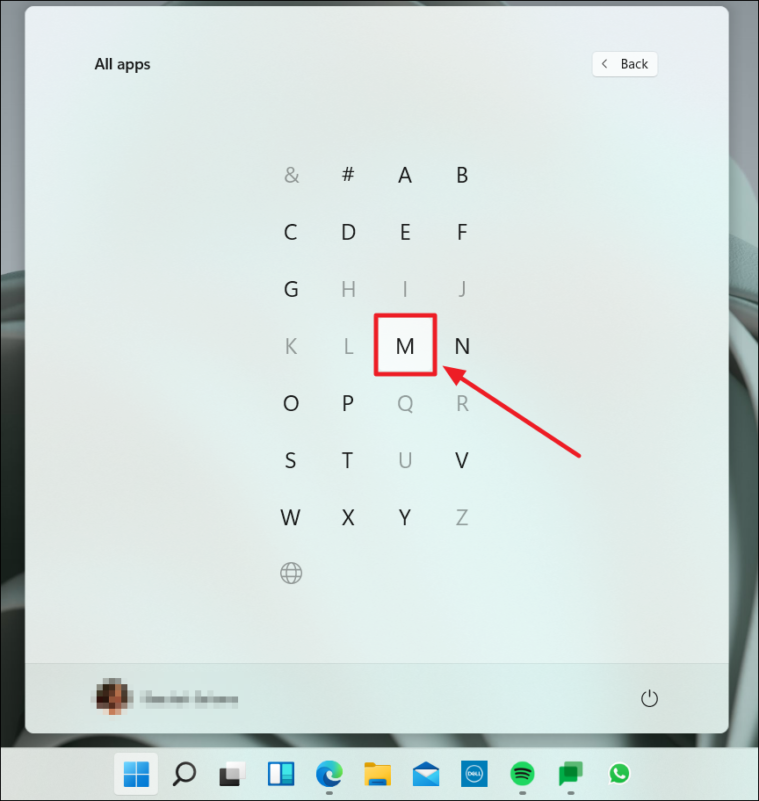
A set of the entire English alphabet along with a couple of symbols will appear in a vertically rectangular layout. Each alphabet represents the initial of the apps you have on your device.
If you don’t have an app that begins with a particular alphabet, then that letter will appear faded, while the rest appear bold and clickable. Click the letter that begins the name of the application you want to uninstall.
Once you finally reach the targeted application, right-click the app or tap the app with two fingers. Click ‘Uninstall’ in the pop-up menu that follows.
Hit the ‘Uninstall’ button in the prompt that appears next.
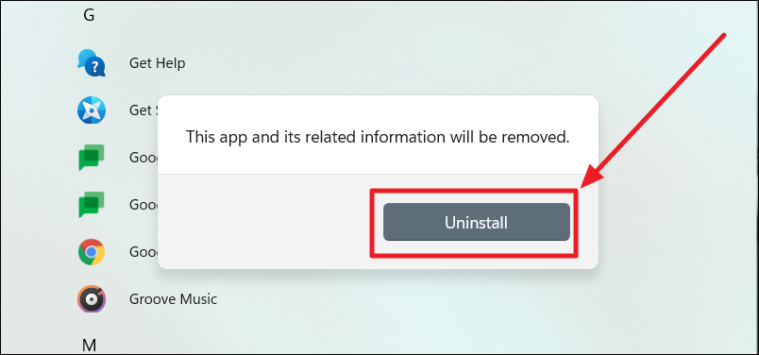
The chosen application and its related info are indeed out of your system.
Uninstalling Apps From Windows Search
Click the ‘Search’ button in the taskbar and enter the name of the app you want to uninstall in the search bar. Right-click the search result on the right (below ‘Best Match’) and select ‘Uninstall’ from the drop-down menu.
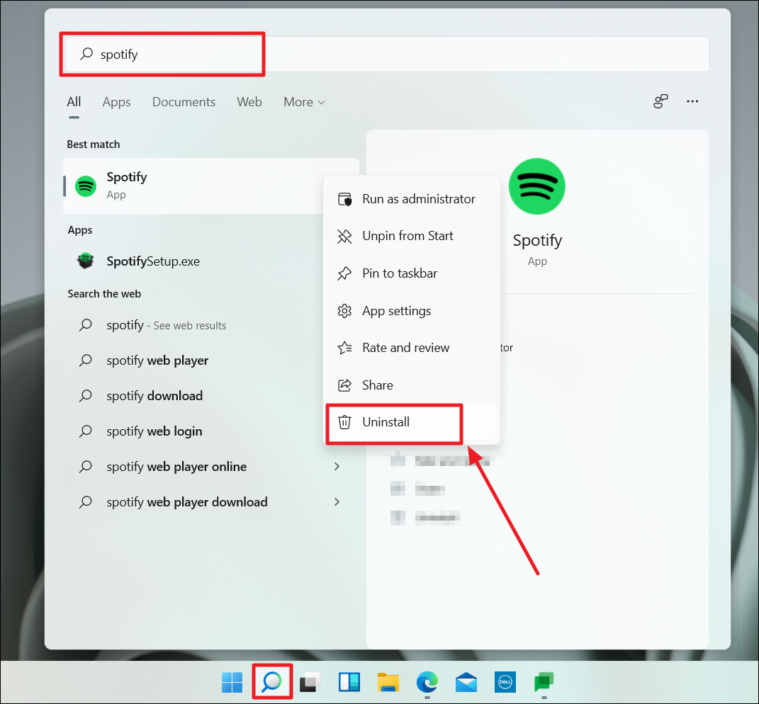
You can also uninstall the app from the app options on the right side of the search results.
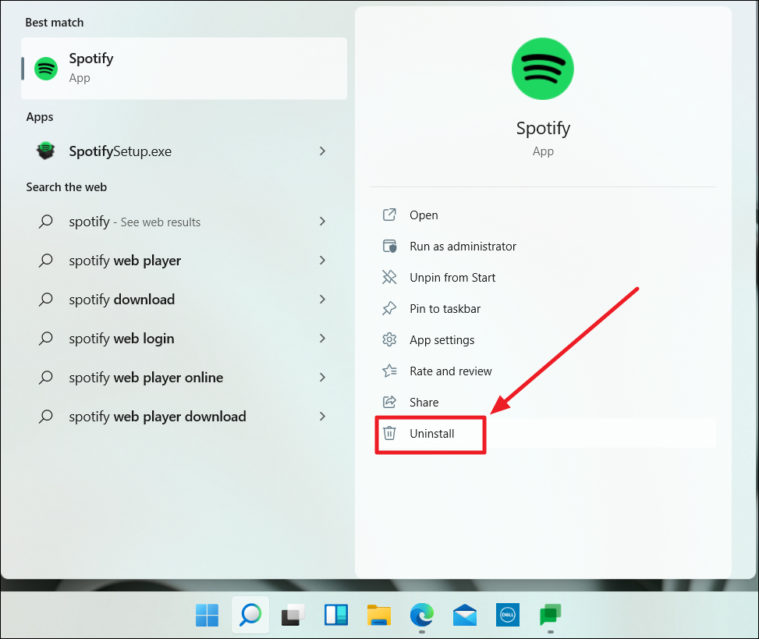
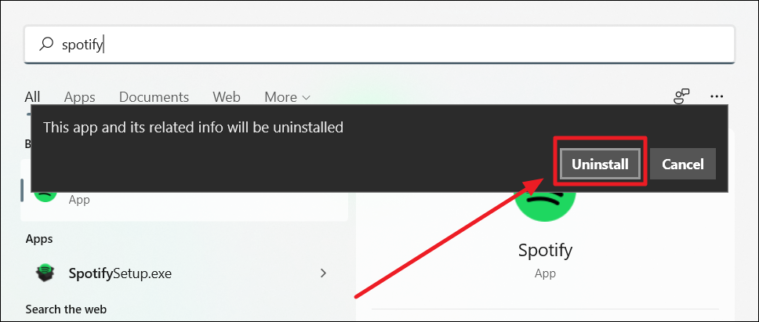
Select ‘Uninstall’ in the prompt that appears in both cases.
Deleting Apps That Don’t Uninstall Easily Using Registry Editor
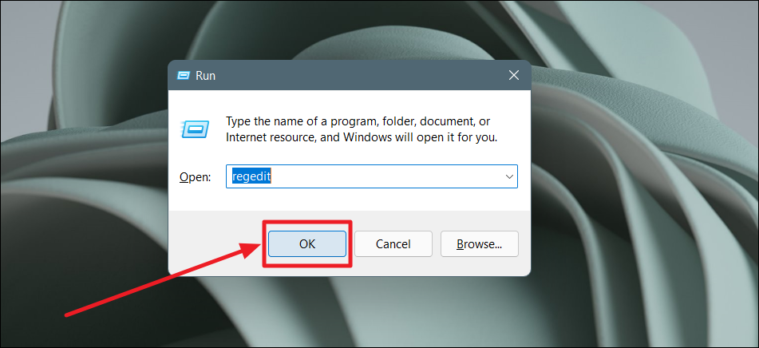
Hold down the Windows key and R, this will open the ‘Run’ application. In the ‘Run’ box, type in ‘regedit’ in the ‘Open’ box.
Hit ‘Yes’ in the prompt that appears next. This prompt basically asks you if you want the app (Run) to make changes to the system.
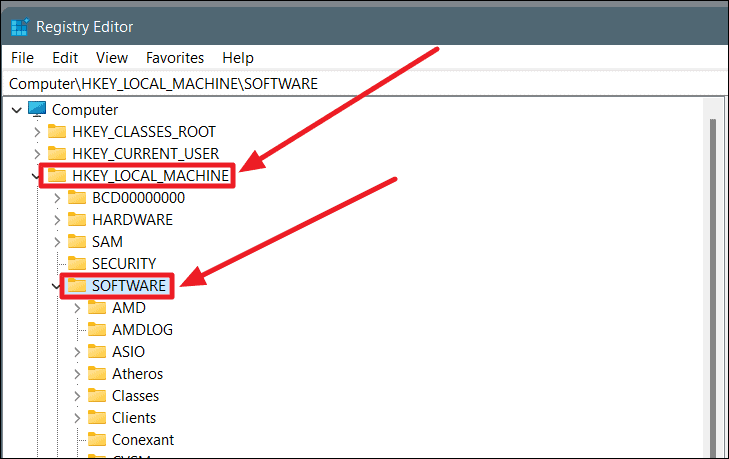
The Registry Editor page will open. On the left side are a couple of files, go through the following course – HKEY_LOCAL_MACHINE > SOFTWARE > MICROSOFT > WINDOWS > CURRENT VERSION, and then delete the applications you don’t want.
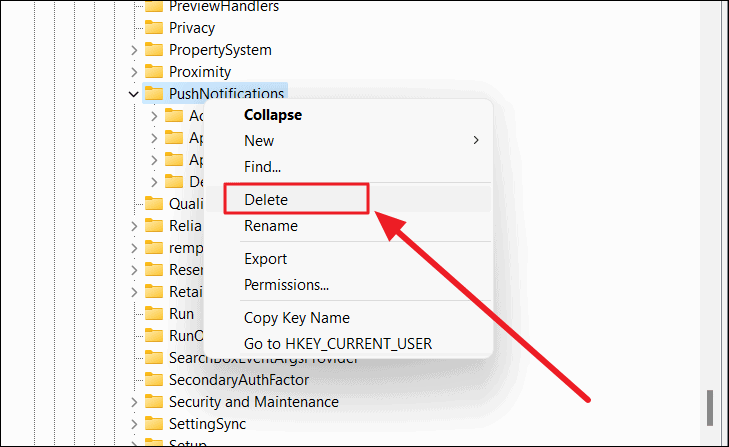
To delete, right-click the selected sub-key and click ‘Delete’ from the pop-up menu.
Click ‘Yes’ in the prompt.
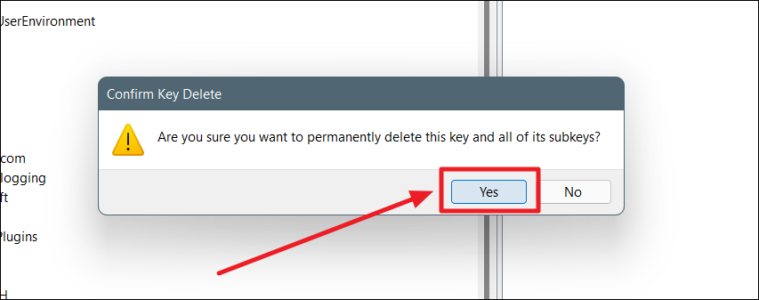
The selected file will now be deleted. But, keep in mind, the Registry Editor is not generally the first aid to the problem because opening this page and making changes in it is capable of causing system damage. So, this resolve is only for when everything else fails.
Uninstalling Apps From Windows Settings
Another way to uninstall external and built-in applications on your Windows 11 system is via App Settings.
Press the Windows key + X and choose ‘Settings’ from the pop-up menu. You can also open settings from the Pinned apps on the Start Menu.
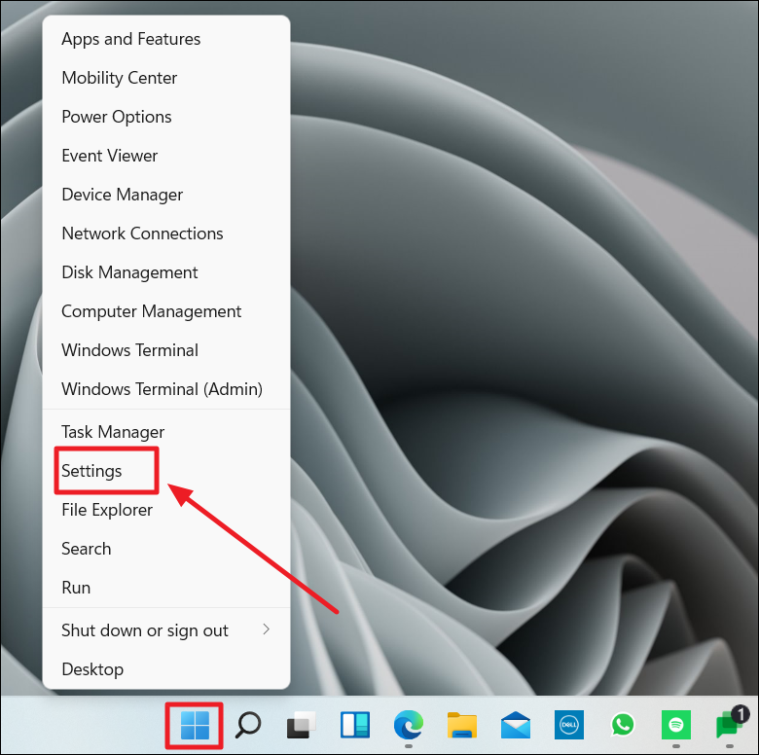
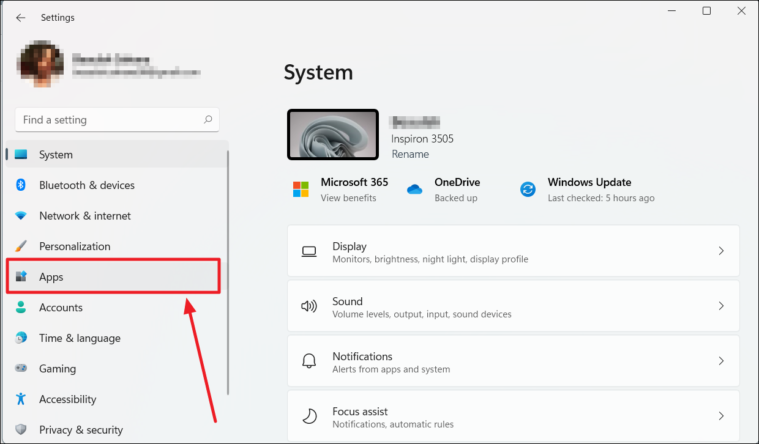
Choose ‘Apps’ from the left list of options on the System settings page.
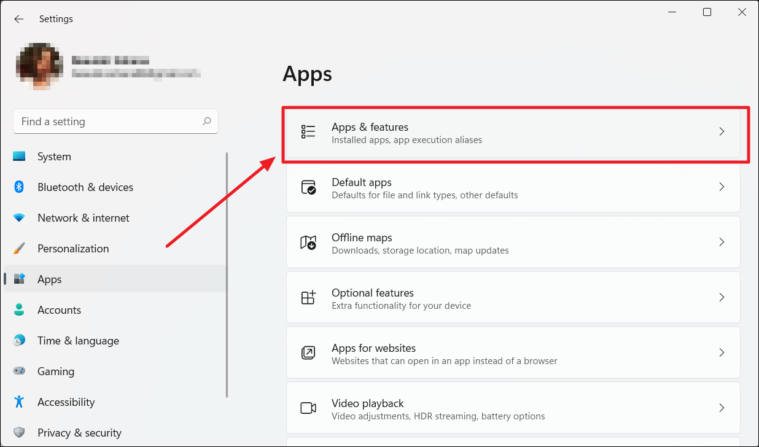
Select the Apps & Features, the first option on the ‘Apps’ settings page.
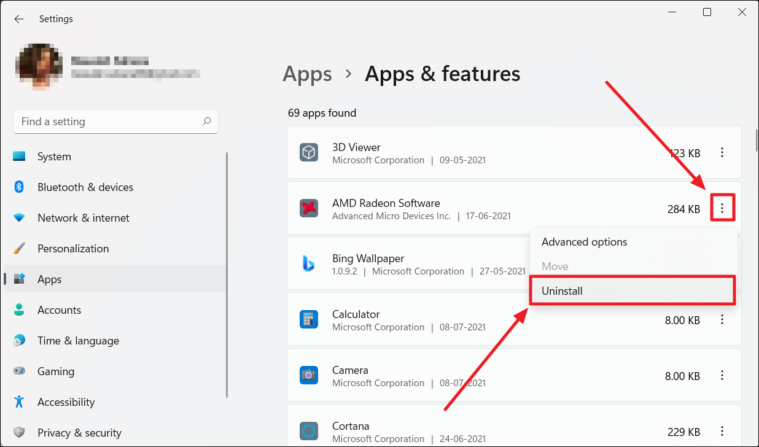
Scroll through the Apps and Features page to find all the installed apps on your device. Locate the application you wish to uninstall, and click the three-dotted vertical line on the right end of that particular app option. Select ‘Uninstall’ from the pop-up menu.
Click ‘Uninstall’ in the prompt that shows next, to complete the uninstallation process.
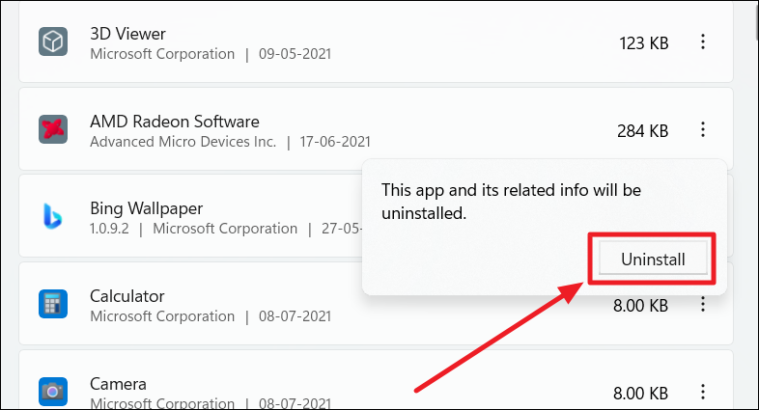
The chosen app is now uninstalled.
Note: Ensure to completely close the application before uninstalling it.
Uninstalling Apps From the Control Panel on Windows 11
If you come across stubborn apps that won’t budge, we always have the control panel to get rid of them.
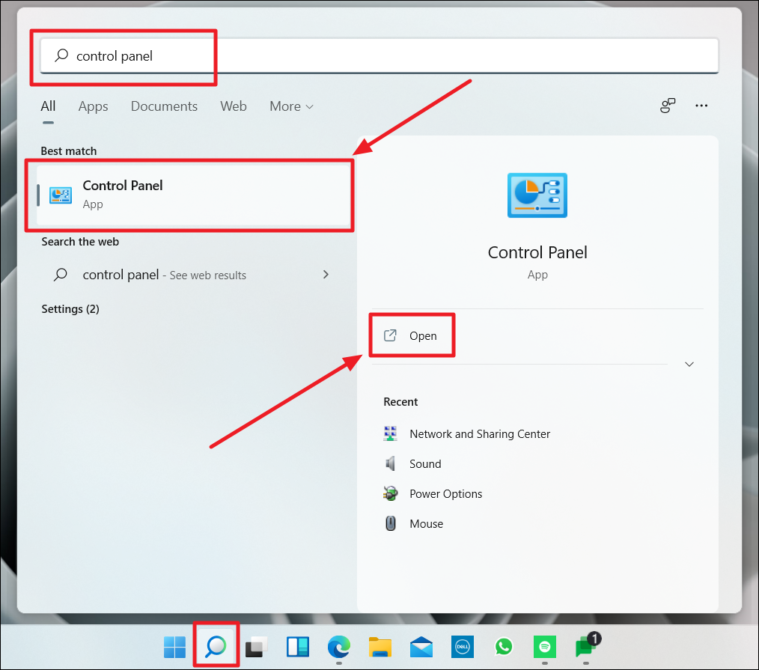
Click the ‘Search’ icon and search for the ‘Control Panel’ on the search bar. Launch the app either by clicking the app name below ‘Best Match’ or the ‘Open’ option under search results on the right.
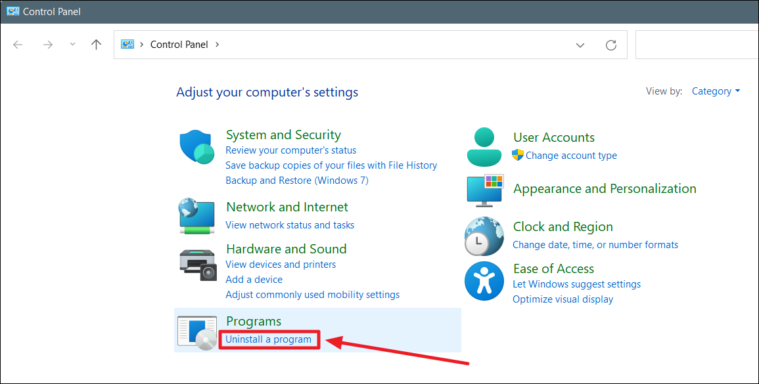
On the ‘Control Panel’ page, click the ‘Uninstall a program’ option below ‘Programs’. (You could also click on ‘Programs’, then on ‘Programs and Features’. Both paths reach the same destination; Programs and Features).
On the ‘Programs and Features’ page of the Control Panel, click on the application you wish to uninstall and select the ‘Uninstall’ button at the top of the list. All apps will be uninstalled with this button and not with individual pop-ups.
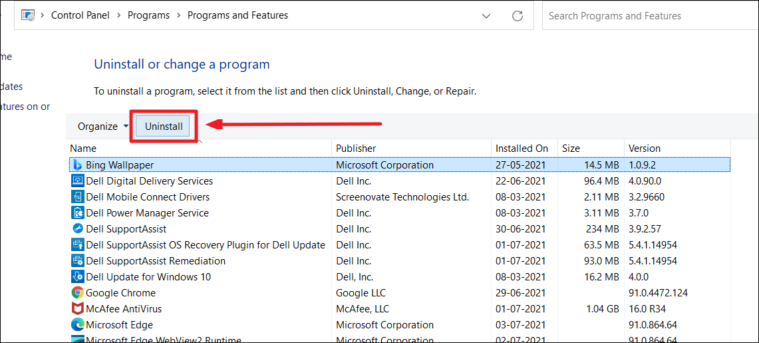
Externally added applications will instantly uninstall at this point. If the app you’re uninstalling is in-built, then you will receive a prompt. Click ‘Yes’.
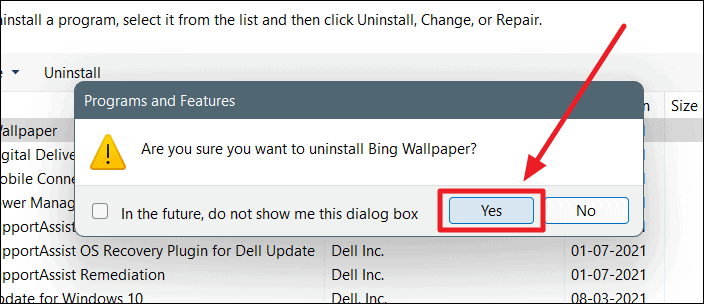
Depending on the level of impact the uninstallation may have on the system, you will receive another prompt, this time from the User Account Control. The message will read “Do you want to allow this app to make changes to your device“. Since ours is a journey towards uninstalling an in-built app, we’ll have to accept the changes that will have on the device. So, click ‘Yes’. The application will now be successfully uninstalled.
Uninstalling Built-In Apps on Windows 11 using Windows PowerShell
Generally, in-built applications are never recommended to be uninstalled as they may cause some damage to the system and it’s usually not something that’s sought-after. However, there are several reasons why someone would want to uninstall a built-in application. So, assuming the necessity to remove preinstalled apps is dire, here’s how you can uninstall them.
Note: Windows PowerShell does not allow uninstallation of preinstalled apps like Microsoft Edge, Cortana, File Explorer, and Contact Support.
Click the ‘Search’ button in the taskbar (or hold the Windows key + X and choose ‘Search’ from the pop-up menu). Type ‘Windows PowerShell’ in the search bar. To remove built-in apps with PowerShell, you will have to run this application as an Admin. Click ‘Run as Administrator’ below the search results on the right.
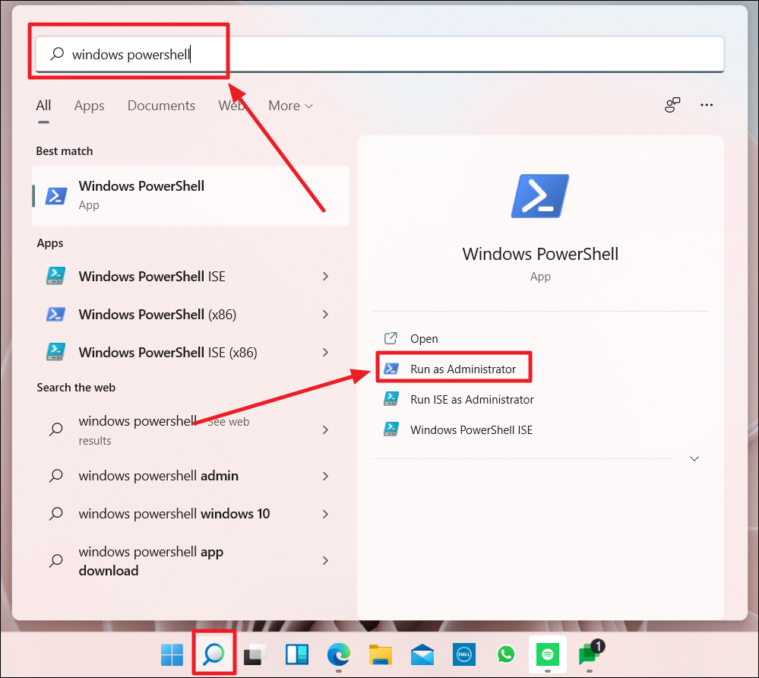
Next, you will receive a prompt confirming if you want the app (Windows PowerShell) to make changes to your system. Choose ‘Yes’.
Now, your Windows PowerShell admin page will open. Depending on the in-built app you wish to uninstall, copy-paste the appropriate command from the list below and press ‘Enter’ on the PowerShell page, once done.
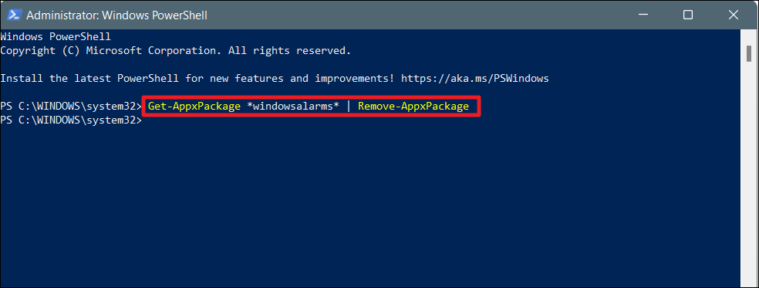
- 3D Builder – Get-AppxPackage *3dbuilder* | Remove-AppxPackage
- Alarms and Clocks – Get-AppxPackage *windowsalarms* | Remove-AppxPackage
- Calculator – Get-AppxPackage *windowscalculator* | Remove-AppxPackage
- Calendar – Get-AppxPackage *windowscommunicationsapps* | Remove-AppxPackage
- Camera – Get-AppxPackage *windowscamera* | Remove-AppxPackage
- Get Help – Get-AppxPackage *gethelp* | Remove-AppxPackage
- Get Started – Get-AppxPackage *getstarted* | Remove-AppxPackage
- Maps – Get-AppxPackage *windowsmaps* | Remove-AppxPackage
- Photos – Get-AppxPackage *photos* | Remove-AppxPackage
- Microsoft Store – Get-AppxPackage *windowsstore* | Remove-AppxPackage
Many pre-installed apps on Windows 11 can be uninstalled the normal way (check the previous section for reference) and wouldn’t require this procedure.
To uncover the list of full app names and the names of app packages on your system, use the following command: Get-AppxPackage | ft name, PackageFullName -AutoSize. This is useful for further insertion into the uninstallation command on PowerShell –Get-AppxPackage *appname* | Remove-AppxPackage
The command works in a jiffy and the selected application is uninstalled. If you don’t receive an uninstalling green indication, then the code or the app name you entered is incorrect.
Reinstalling Apps from Windows PowerShell
Now, if you want to reinstall the pre-installed apps that you uninstalled on Windows PowerShell, you can do it with a single command. This will bring back all the uninstalled applications. The reinstalled apps will appear with a ‘New’ label on the apps list until their opened.
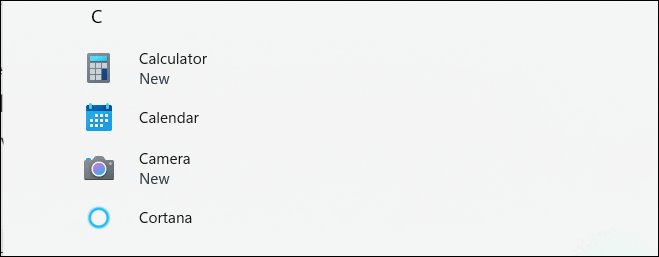
Here’s the magic command to bring back all the uninstalled built-in applications on your Windows 11 device.
Get-AppxPackage -AllUsers| Foreach {Add-AppxPackage -DisableDevelopmentMode -Register "$($_.InstallLocation)\AppXManifest.xml"}
Copy-paste this command and press ‘Enter’. The reinstalling process is comparatively lengthier. You may encounter numerous error messages on the Windows PowerShell page. But panic not. Give the process as much time as possible. Allow it to complete.
Wait until the list of commands come down to the Windows system command, then check if the previously uninstalled built-in applications are back on the apps list.
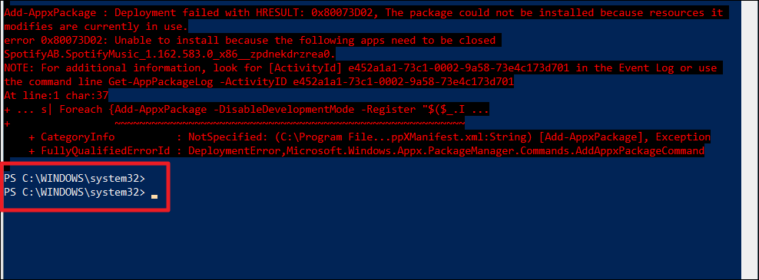
If the pre-installed apps aren’t reinstalled, restart the device, and then check if they are.
Unable to Uninstall Applications on Windows 11?
Sometimes, an application can’t be uninstalled because it’s running in the background. You can completely shut down the application, from the Task Manager.
Click the ‘Search’ button, and type ‘task manager’ in the search bar. Now, select the application name from the left search results, or click on ‘Open’ on the right side of the search results. You could also open the Task Manager by holding Ctrl + Shift + Esc.
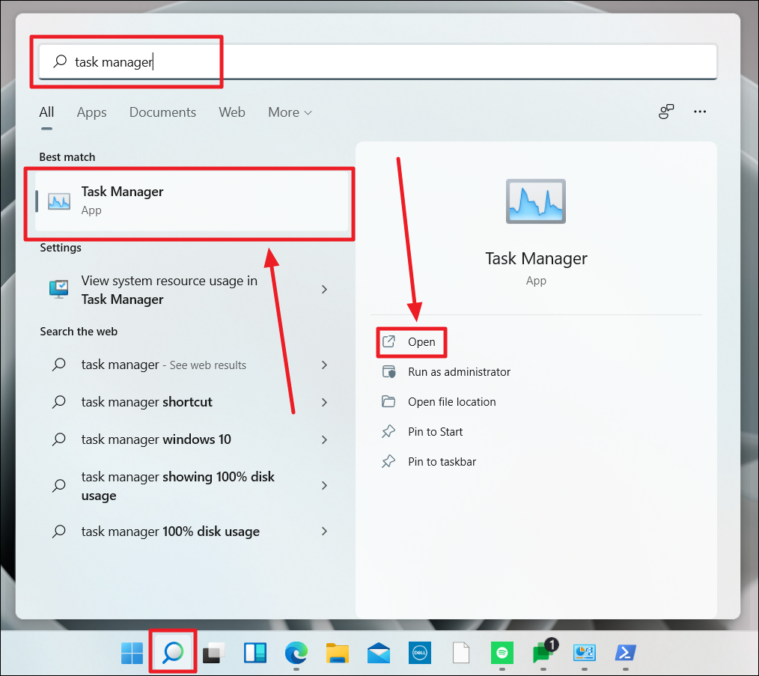
Click the app you want to end immediately from the list of the ‘Task Manager’ application, and hit ‘End Task’.
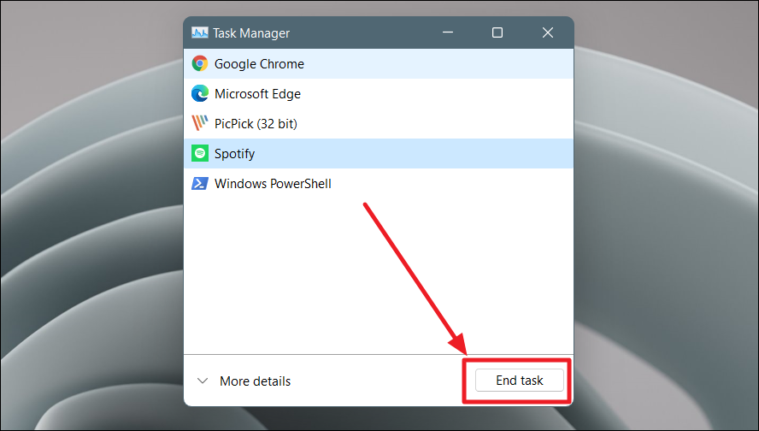
This will force end any application thus, easing the uninstallation process. Now, you should be able to carry on with the uninstallation process.
Another reason why apps may not uninstall is third-party involvement which can be holding certain apps from uninstalling. If this is the case, you will need to open your computer in Safe Mode before uninstalling the required applications.
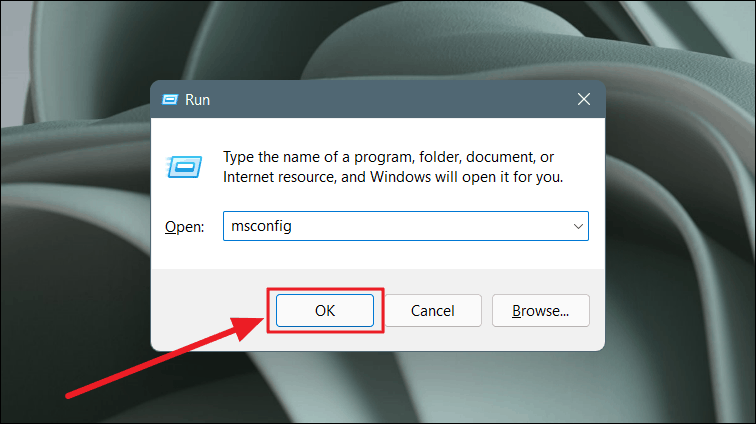
To boot your system into Safe Mode, press down the Windows key + R to open the Run application. Then, enter ‘msconfig‘ in the dialog box and click ‘OK’.
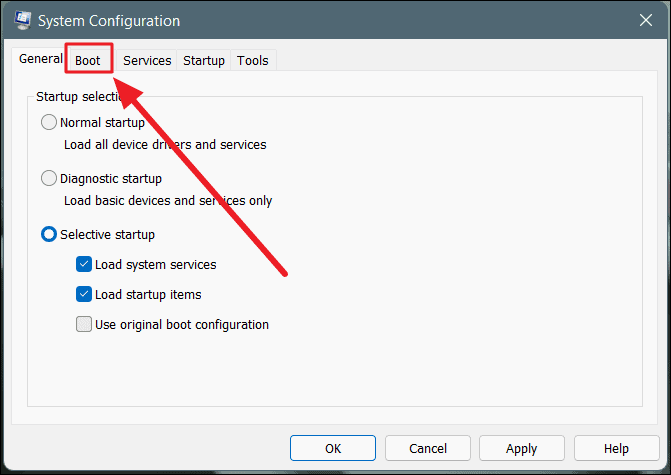
In the ‘System Configuration’ box, click the ‘Boot’ tab to proceed.
On the ‘Boot’ tab, click the box in front of ‘Safe Boot’ under ‘Boot options’ to begin the enabling process of safe mode on your system. Once done, hit ‘Apply’ and then ‘OK’.
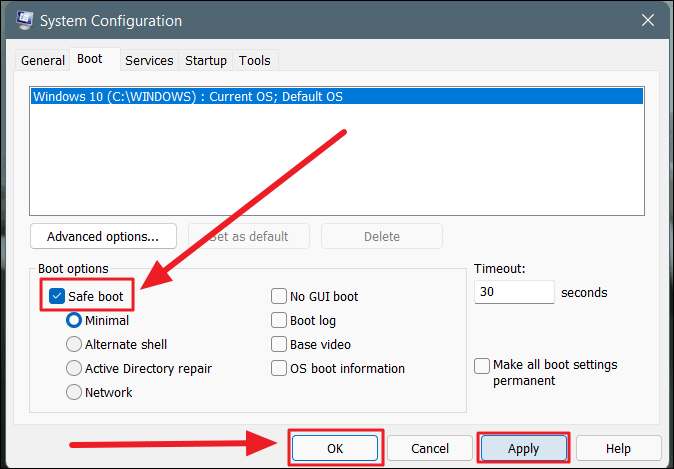
Restart your computer to open it into the Safe Mode. Now, try uninstalling that stubborn application. It should uninstall by now. After the uninstallation, uncheck the ‘Safe Boot’ box through the same procedure to get out of the Safe Mode.








Member discussion