
Nearpod is a formative assessment platform that provides teachers with tools to produce engaging teaching content for the students. It offers countless tools to make learning fun. Especially, right now with remote learning, it can be difficult to engage students’ attention. But with Nearpod, you can make lessons more interactive, and students will absorb them better.
Getting Started on Nearpod for Teachers
Teachers can create an account for free on Nearpod and access all of the free features. Nearpod also offers silver, gold, or platinum plans that unlock more features for you to use.
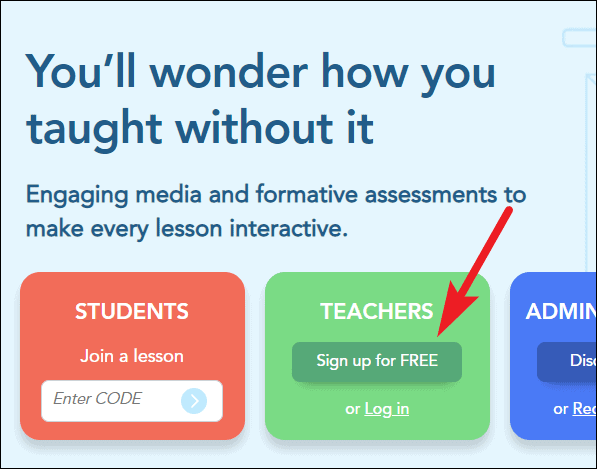
Go to nearpod.com and click on the ‘Sign up for Free’ option.
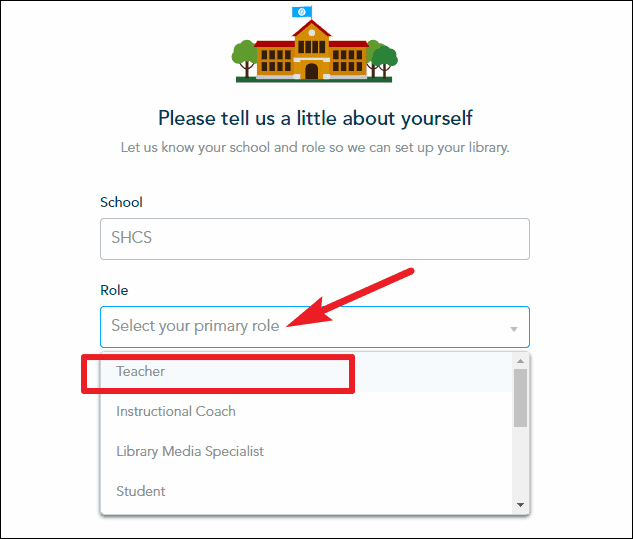
Enter your name and email address to get started. Then, enter the name of your school, and select your role – in this case, teacher. Then, click on ‘Done’.
The account creation is complete, and you will reach the dashboard for your Nearpod account.
Creating a Lesson
Now that you’ve created an account, the next step is to create a lesson. There are several ways to create a lesson for your students – you can create one from scratch, import it from other platforms such as Google Slides, or PowerPoint, and lastly, you can download one of the pre-made lectures available on Nearpod.
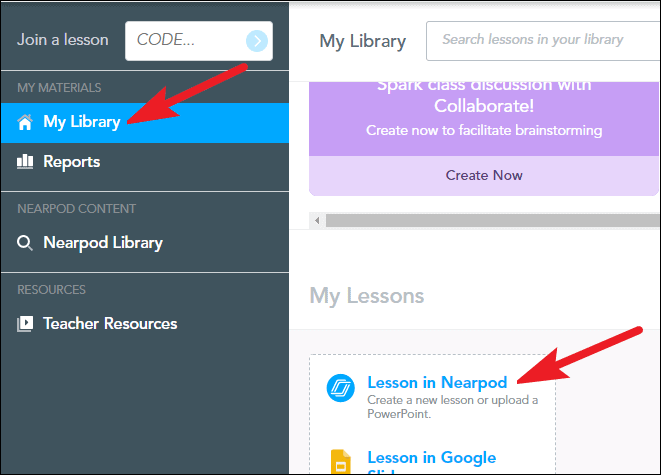
Let’s try creating one from scratch as it’s the most complicated, and yet probably the one you’ll use the most. Go to ‘My Library’ from the dashboard of Nearpod. Then, click on ‘Lesson in Nearpod’ option to create a new lesson.
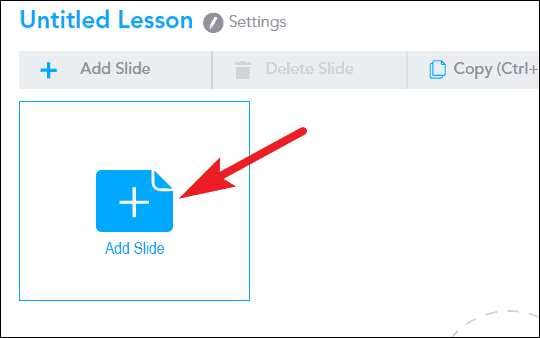
The screen for creating a lesson will open. Click on ‘Add slide’ to create a new slide.
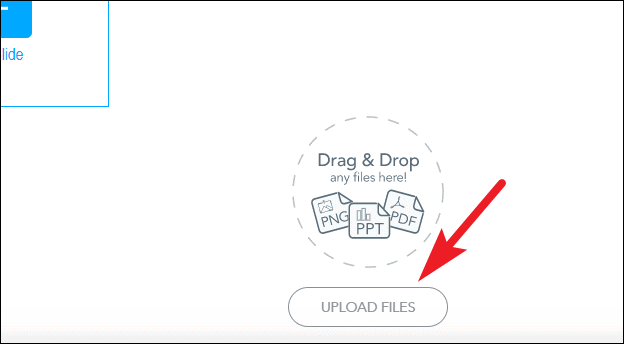
If you want to use material from an existing slide, click on ‘Upload files’ or drag and drop the file there.
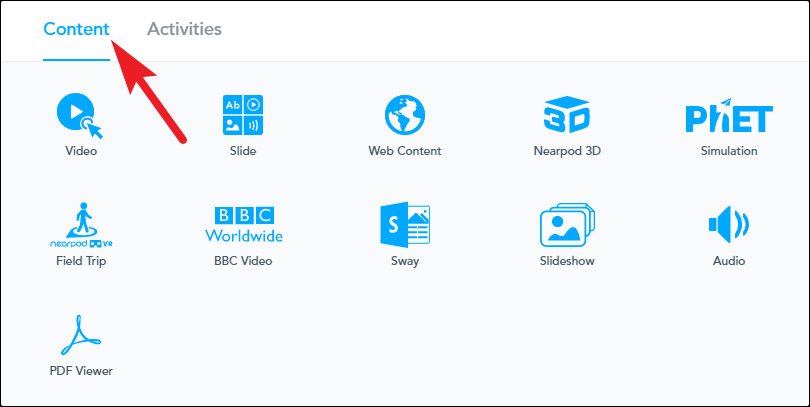
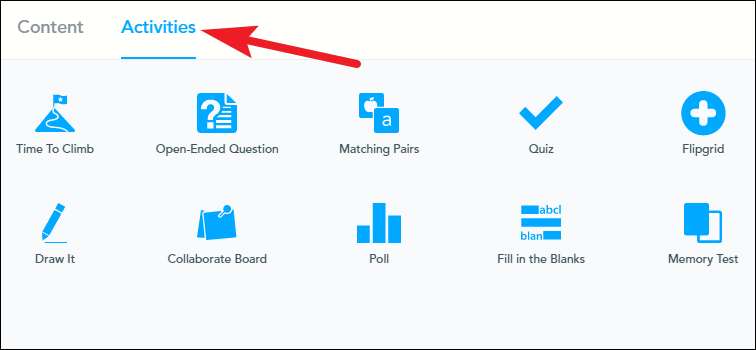
When you click the ‘Add Slide’ button, a window will open where you can select what type of content you want to add to the slide. There are two tabs in the window – Content, and Activity.
If you want to add a non-interactive content type, you can select it from the content tab. Nearpod lets you choose from these content types: Slide, Video, Web content, Nearpod 3D, Simulation, Field Trip (Nearpod VR), BBC video, Microsoft Sway, Slideshow, Audio, PDF viewer, and Live Twitter stream.
For interactive content that lets students participate in the lesson, go to the ‘Activity’ tab and choose one of the following activities: Time to Climb, Open-Ended Question, Matching Pairs, Quiz, Flipgrid, Draw It, Collaborate!, Poll, Fill in the Blanks, Memory Test.
You can add multiple slides to a lesson, each containing any of the content types mentioned above, i.e., your lesson can be an amalgam of all the content types Nearpod offers. So you can use any of the content types in a single lesson to make it more interesting and engaging.
You can have as many slides as you want in a lesson, but there are limitations on the size of the lesson with the free plan. The maximum size of the lesson with the free plan is 40 MB.
Once you have added all the slides, click on the ‘Save & Exit’ button to save the lesson. If you don’t save it, it will still appear as an unsaved lesson on your dashboard. But you need to save it to share it.

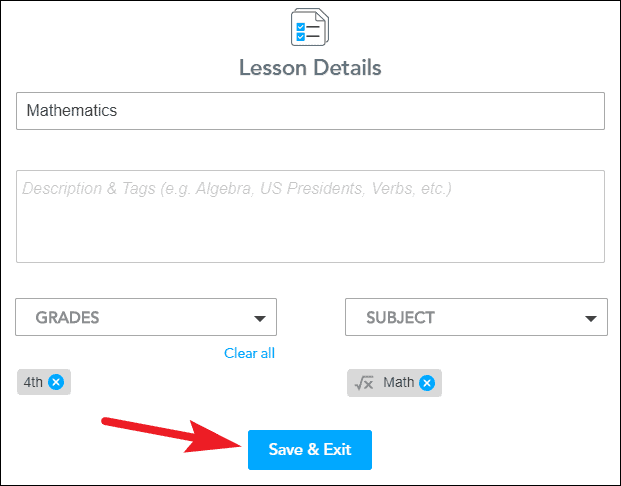
A small window will open. Enter a title, and description (optional), and specify the grade and subject the lesson is for and click on the ‘Save & Exit’ button.
Sharing the Lesson with Students
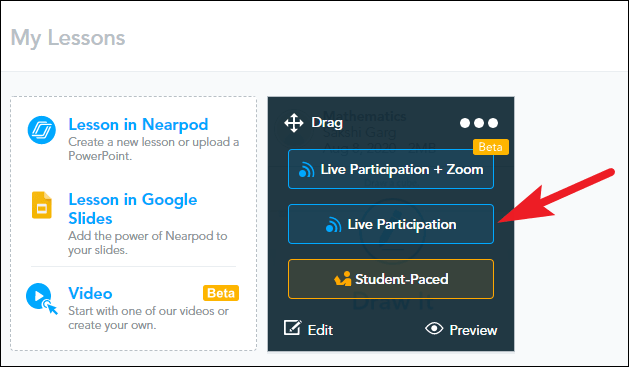
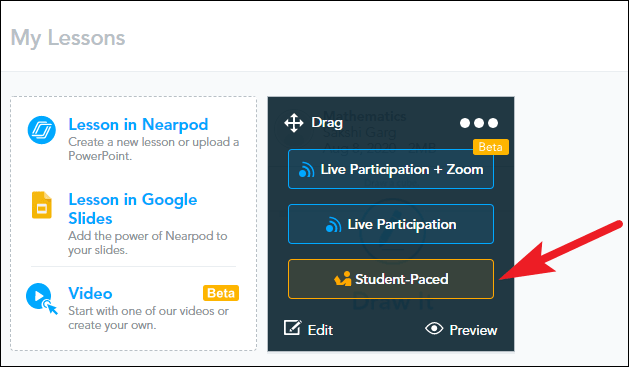
Now, the lesson will appear on your dashboard, and you can share it with your students. Hover on it, and a few options will appear. Now you can choose to share the lesson as a live lesson, student-paced lesson, or a live lesson with Zoom meeting (in beta).
Sharing as a Live Lesson
To share the lesson so students can participate in real-time, click on the ‘Live Participation’ option.
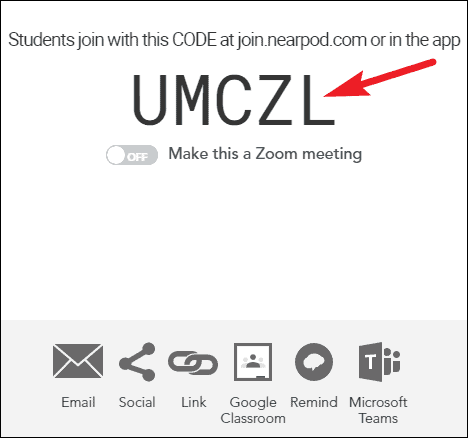
A code will appear on your screen. Share this code with your students, and they will be able to join the live lesson. You can also use one of the other methods given in this window like email, Google Classroom, Microsoft Teams, link, etc. to share the lesson with the students.
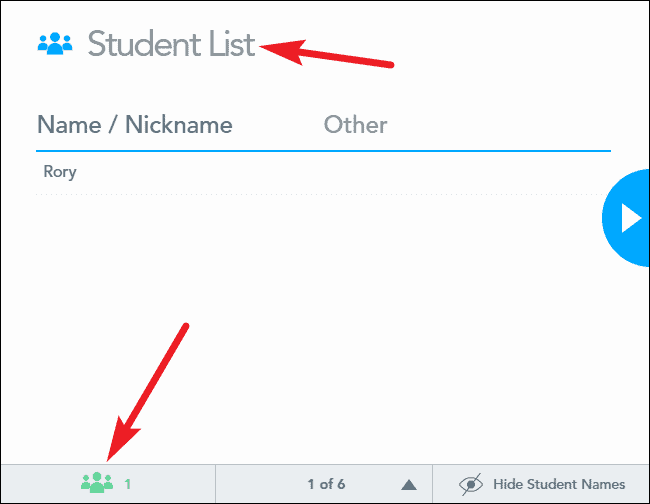
The first slide of the lesson will be an additional slide that will show the list of students who have joined the lesson. When all the students have joined, you can move to the next slide (technically the first slide you created in the lesson), and the lesson will start on the students’ screens.
You can also see the list of all the students during the lesson by clicking on the ‘People’ icon at the bottom-left corner of the screen.
Sharing as a Live Session with Zoom
These days, when the only mode of teaching is through online classes, you’ll most probably be sharing live Nearpod lessons while teaching an online class. If you use Zoom to teach your class, this option in Nearpod will drastically reduce the number of steps involved.
You don’t need to create a meeting room separately and share the link for both the Nearpod lesson and the meeting room with your students. Instead, a single code would work for both.
Note: Before using this feature, you must have a Zoom account and the desktop app for Zoom meetings. This feature is also only available on Nearpod for browsers, and not yet for Android/ iOS apps.
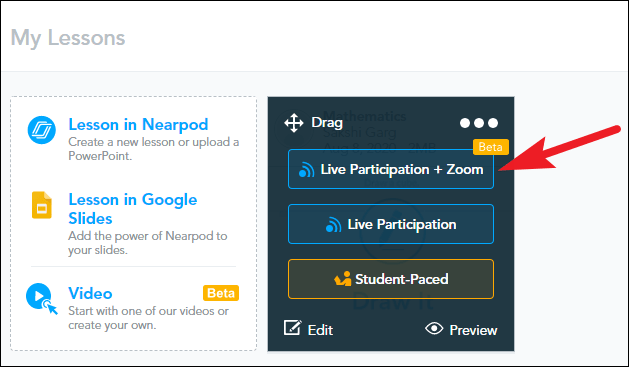
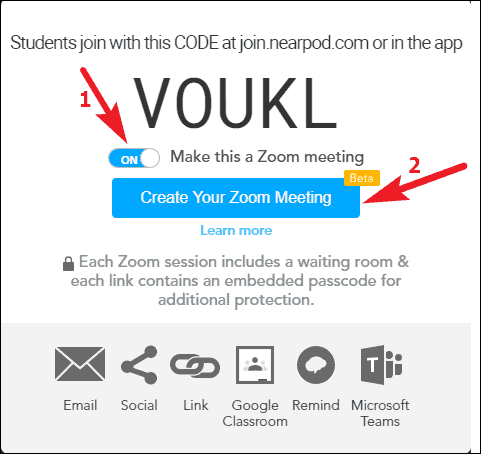
On the dashboard, click the ‘Live Participation + Zoom’ option on the lesson.
A code will be generated. Turn on the toggle for ‘Make this a Zoom meeting’ beneath it. A button for ‘Create Your Zoom meeting’ will appear, click on it.
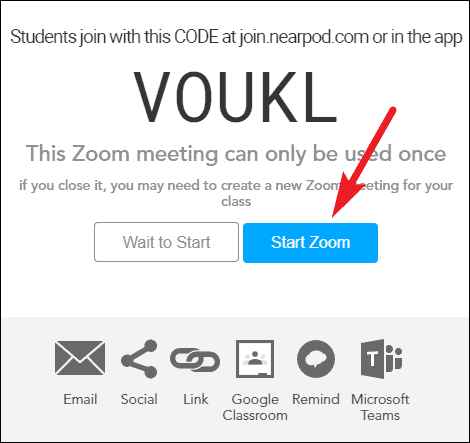
A confirmation message will appear. Click on ‘Start Zoom’.
If this is the first time you’re trying to use Nearpod with Zoom, you will need to sign in to your Zoom account and authorize Nearpod access to your account. But before you can authorize, you need to pre-approve the app. First, click on ‘Pre-approve’, and then click on ‘Authorize’. If you have an organization Zoom account, then your Zoom admin needs to pre-approve access to the app.

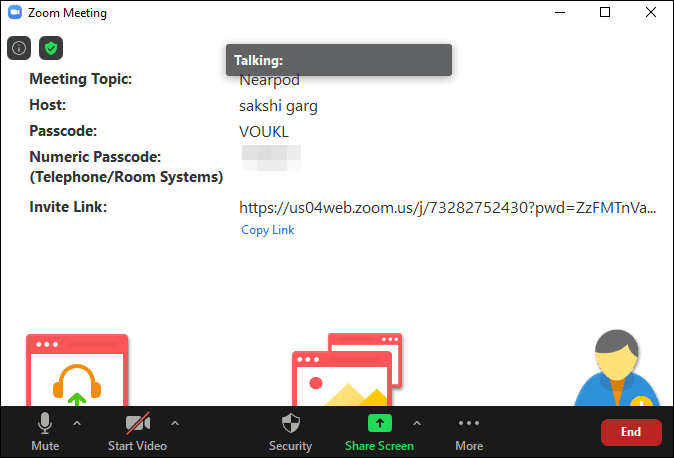
Zoom desktop client will open and the meeting will begin. Share the Nearpod lesson code with your students so they can join the lesson and the Zoom meeting.
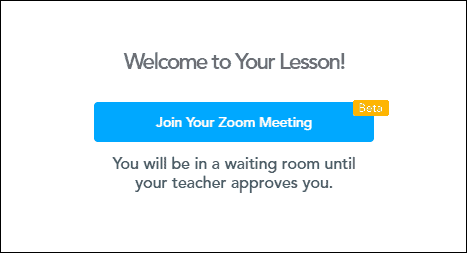
Students only need to go to nearpod.com and enter the join code to enter the lesson as well as the Zoom meeting in one step.
Students will enter the waiting room in Zoom by default, and you need to admit them to the meeting.
Sharing as a Student-Paced Lesson
To share the lesson as a student-paced lesson, hover on the presentation and select ‘Student-paced’ from the options.
Similar to the live lesson, a code will appear on your screen which you can share with the students or use one of the other methods like email, Google Classroom, Microsoft Teams, link, etc. to share it with them.
A student-paced lesson will show something like ’29 days remaining’ on the window. This is the expiration date for the lesson code, or in other words, the number of days students have to complete the lesson. You can extend the number of days up to a year. Click on the ’29 days remaining’ option to open the calendar and increase/ decrease the number of days the lesson will remain accessible with that code.
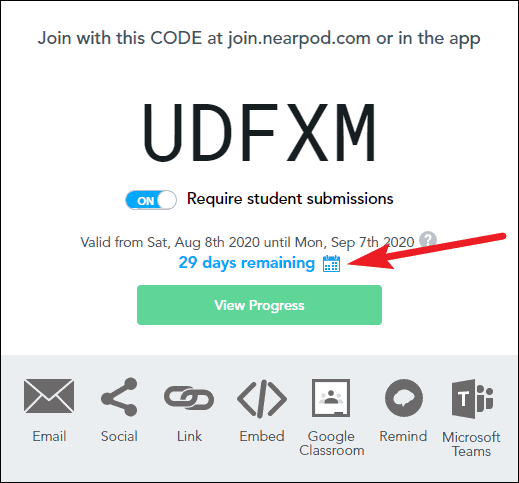
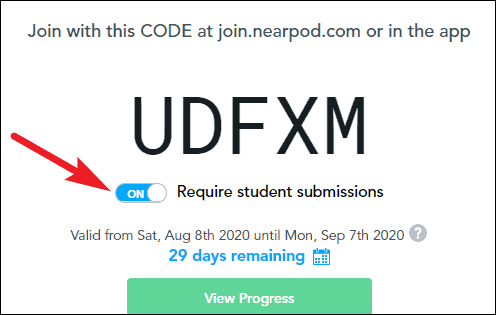
If the lesson has an activity that requires students’ responses, you can also turn on the toggle for ‘Require student submissions’. The students won’t be able to skip to the next slide until they have submitted the answers to the current slide with this mode on.
Students can join a student-paced lesson similar to a live participation lesson, and don’t need an account for it. The only difference is that students control the presentation themselves in this lesson mode.
Joining a Nearpod Lesson as a Student
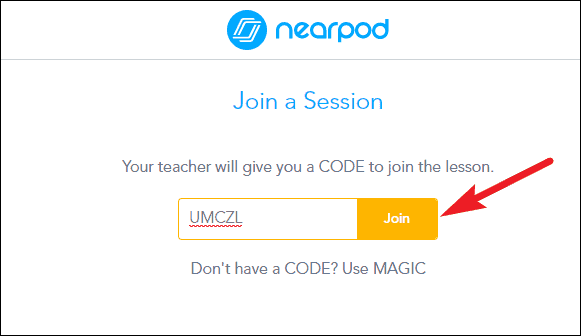
Whether the lesson is a live participation lesson, a live lesson with a Zoom room, or a student-paced lesson, the method of joining stays the same for students. Go to join.nearpod.com to join the lesson if the teacher has provided them with a code. If the teacher has instead shared a link, simply click on it to join.
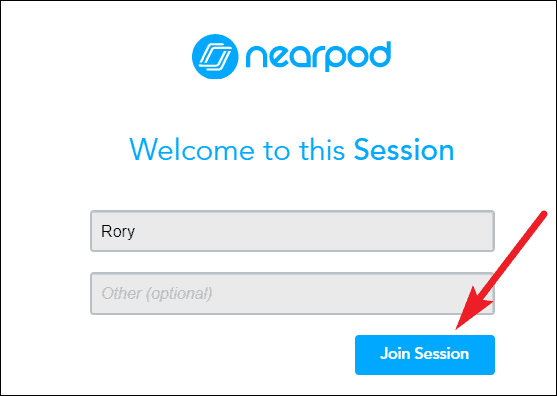
The code will be a 5-letter code, and it is not case sensitive. Enter the code and click on the ‘Join’ button.
Then enter your name and additional information like a roll number if the teacher requires you to (this is optional). Click the ‘Join session’ option, and you will enter the lesson.
If it is a live participation lesson, you can only see the content of the presentation, and participate in the ‘activity-based’ slides but not control the actual presentation.
For a student-paced lesson, you will be the one in control. Click on the left and right arrows to move through the slide. If the teacher requires your submissions for activity-based questions, you won’t be able to go to the next slide until you submit an answer.
Viewing Student Reports
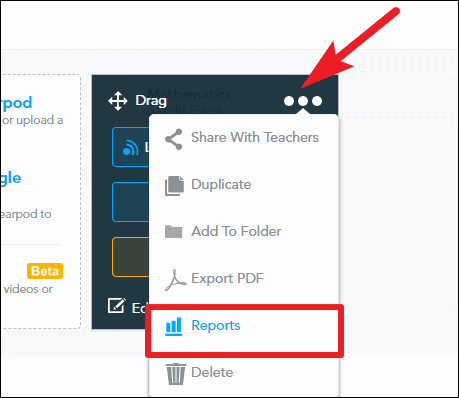
Teachers can view the reports for the lesson, whether it was a live participation session or a student-paced one. Hover over the lesson and then click on the ‘More’ icon (three dots). A menu will open; select ‘Reports’ from it.
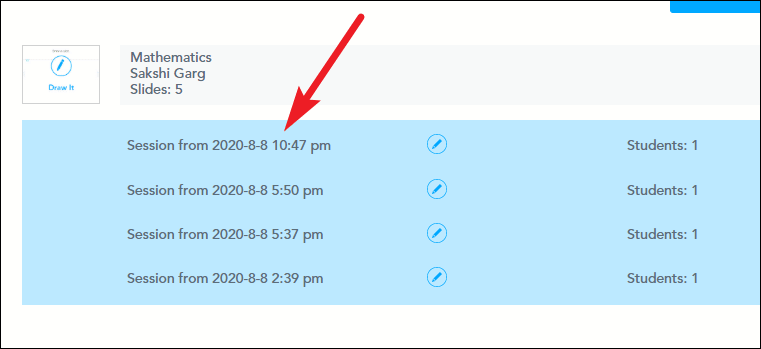
The window for reports will open. It will list the reports for all sessions, live and student-paced, of the lesson. Click on the one you want to view.
Nearpod is the tool you need to bring that charm back to your classes and make them so engaging that your students will be always excited to learn. Nearpod even has plans for entire schools or whole districts if your school wants to use this tool to improve the level of education.


